www.altronics.com.au
Redback® Proudly Made In Australia 11
Redback® A 4480B
8 In to 8 Out Audio Switcher
Setup Guide
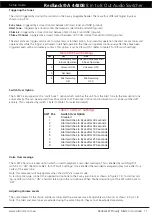
Triggering the tones
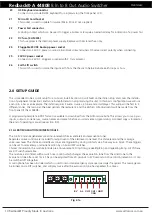
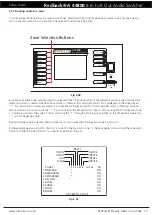
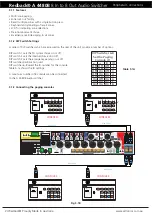
The unit is triggered by closing the contacts on the 5 way pluggable header. There are four different trigger inputs as
shown in Fig 2.1a.
Evac tone
- triggered by a closed contact between EV (alert tone) and GND (ground).
Alert tone
- triggered by a closed contact between AL (alert tone) and GND (ground).
Chime 2
- triggered by a closed contact between CH2 (chime 2) and GND (ground).
Chime 1/Cancel
- triggered by a closed contact between CH1/CAN (chime 1/cancel) and GND (ground).
The alert and evac triggers can be set to momentary or latched action. In momentary operation the alert or evac tones will
operate only while the trigger is activated. In latched operation the tones will operate continuously after they have been
triggered, even with a momentary contact. This option is set by DIP switch 1 (Refer to table 2 for DIP switch settings).
Switch Over Option
The A 4573 is equipped with a “switch over” option which switches the unit from the Alert tone to the Evacuation tone
automatically. This can be adjusted from 30 seconds to 270 seconds in 30 second increments or it can be switched off
entirely. This is adjusted by switch 1 (refer to table 1 for selection details).
Voice Over message
The A 4573 has a voice over option which is used to playback a recorded messsage. This is enabled by switching DIP
switch 2 to “ON” (Refer to table 2 for DIP Switch settings). Once enabled the recorded message will play twice after four
cycles of the evac tone.
Note: this voice over will only operate when the A 4573 is in evac mode.
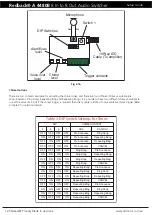
To record a message, connect the supplied microphone to the 2 way euro block as shown in figure 2.1B. To start record-
ing, set DIP switch 8 to “ON” and start talking into the microphone. When finished recording, set the DIP switch back to
‘OFF”
.
Adjusting Volume Levels
The output levels for the chime, alert/evac tones and the voice over are all adjustable via trimpots as shown in Fig 2.1B.
Note: The Alert and Evac tones are adjusted using the same trimpot. They cannot be adjusted separately.
Table 2: DIP Switch Settings
SW
ON
OFF
1
Momentary Alert Latched/Continuous Alert
& Evac Operation.
& Evac Operation.
2
Voiceover ON.
Voiceover OFF.
3
8
Mic Recording
Mic Recording
ON.
OFF.
Not Used
Table 1: Switch 1 Settings
SW1 Pos
Switch Over Option
0
Disabled
1
Alert swtiches to Evac after 30 seconds
2
Alert swtiches to Evac after 60 seconds
3
Alert swtiches to Evac after 90 seconds
4
Alert swtiches to Evac after 120 seconds
5
Alert swtiches to Evac after 150 seconds
6
Alert swtiches to Evac after 180 seconds
7
Alert swtiches to Evac after 210 seconds
8
Alert swtiches to Evac after 240 seconds
9
Alert swtiches to Evac after 270 seconds

