5
Powering off the WC50:
1.Press the power button on the remote control. The RED light will blink 3 times to confirm that the
WC50 has powered down.
NOTE:
The steps to powering off the WC50 are the same for both methods of powering on the WC50.
The WC50 can record while plugged into a power source or using the internal rechargeable battery.
D. Adjust Camera View Angle:
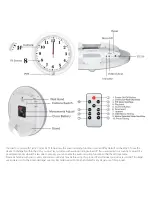
You can adjust the view angle of your camera by using the camera adjustment wheel located on the
back of your WC50. (see diagram; labeled as “camera switch”) Scroll the wheel up to tilt the camera
angle down and vice versa.
E. Loop Recording:
If Loop Recording is turned on, your WC50 will record over the oldest files when the memory
capacity is reached so that you never have to change the memory card. If Loop Recording is turned
off, your WC50 will stop recording when the memory capacity is reached. (see section 5-B-3)
F. Video format and Recording Time:
There are 4 video resolution options: 480p, 720P30, 720P60 or 1080P and 3 options for the video
time which include 1 min, 3 min, and 5 min.
(see section 5-B-4 for more detail)
G. Remote Control
You will use the remote control for many functions on the WC50 such as start/stop recording,
switching modes, taking photos, and navigating the menu system (using the included video output
cable). We recommend pointing the remote directly towards the front of the clock at a 2ft-10ft
range. Please refer to the remote control diagram.


