62
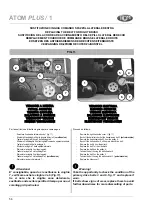
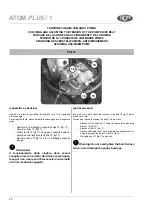
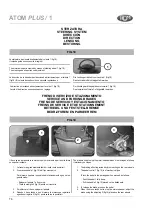
FIG.14
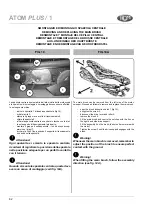
FIG.14A
5
1
4
3
6-7
SMONTAGGIO E RIMONTAGGIO SPAZZOLA CENTRALE
La spazzola centrale è smontabile dal lato sinistro della motoscopa
e le operazioni di smontaggio e rimontaggio devono essere effettua-
te nel seguente ordine:
-
aprire lo sportello 1 di ispezione spazzola (fig.14);
-
svitare la vite 3;
-
staccare il gruppo leva e rullo di trascinamento 4;
-
sfilare la spazzola 5;
-
infilare la spazzola centrale e centrare le tacche con le alet-
te sul supporto di trascinamento lato destro;
- montare il gruppo 4 sulla spazzola; i fori 6 devono accop-
piarsi con i grani 7;
-
avvitare la vite 3 fino a quando il supporto di trascinamento
non entra nella spazzola.
Attenzione!
Ogni qualvolta si smonta la spazzola centrale,
ricordarsi di registrare la posizione della spazzola
nella posizione adeguata per un perfetto contatto
con il terreno.
Attenzione!
Quando si monta la spazzola centrale, questa deve
avere un senso di montaggio (vedi fi g. 14A).
REMOVING AND REPLACING THE MAIN BRUSH
The main brush can be removed from the left side of the motor-
sweeper. Proceed as follows to remove and replace the main brush:
-
open the brush inspection hatch 1 (fig.14);
-
untighten the screw 3;
-
disconnect the drive lever and roller 4;
-
remove the brush 5.
- Fit the main brush and centre the notches with the fins on
the right-hand side drive support.
-
Fit the assembly 4 on the brush; the holes 6 must mate with
the studs 7.
-
Tighten the screw 3 until the drive support engages with the
brush.
Warning!
Whenever the main brush is removed, remember to
adjust the position of the brush to ensure perfect
contact with the ground.
Warning!
When fi tting the main brush, follow the assembly
direction (see fi g. 14A).
DESMONTAJE Y MONTAJE DEL CEPILLO CENTRAL
DÉMONTAGE ET REMONTAGE DE LA BROSSE CENTRALE
AUS- UND EINBAU DER HAUPTBÜRSTE
DEMONTAGE EN HERMONTAGE VAN DE HOOFDBORSTEL
ATOM
PLUS /
1
Summary of Contents for 37.00.205
Page 2: ...WWW RCM IT RCM ...

