56
13 - LPG INSTRUCTIONS
LPG INSTRUCTIONS
PROPANE GAS:
CAUTION:
The gas supply shall be shut off prior to
disconnecting the electrical power, before proceding with the
conversion.
Installation Codes
Installations must follow these codes:
• Local, state, provincial, and national codes, laws, regulations
and ordinances
• National Fuel Gas Code, ANSI Z223.1/NFPA 54 – latest edition
(NFGC)
• For Canada only: CAN/CSA B149 Natural Gas and Propane
Installation Code and CSA C22.1 C.E.C. Part 1 (C22.1)
WARNING:
XPak boilers are shipped ready to fire natural gas
ONLY. You must install the propane orifice and regulate the
gas valve if the boiler will be connected to propane. Failure to
comply could result in severe personal injury, death or
substantial property damage.
Pipe sizing for natural gas
Contact gas supplier to size pipes, tanks and 100% lockup gas
pressure regulator.
Propane supply pressure requirements
1. Adjust propane supply regulator provided by gas supplier for
13" w.c. maximum pressure.
2. Pressure required at gas valve inlet pressure port: Maximum:
13" w.c. with no flow (lockup) or 8" w.c. minimum with boiler
operating
WARNING:
This conversion kit shall
be installed by a qualified service
agency in accordance with the
manufacturer’s instructions and all
applicable codes and requirements
of the authority having jurisdiction.
If the information in this instructions
is not followed exactly, a fire, an
explosion or production of carbon
monoxide may result causing
property damage, personal injury
or loss of life. The qualified service
agency is responsible for the proper
installation of this kit. The installation
is not proper and complete until the
operation of the converted appliance
is checked as specified in the
manufacturer’s instructions
supplied with the kit.
This instruction must be retained adjacent
to the boiler as they contain important
details about the conversion made.
The XPak boiler is factory supplied to use natural gas. The boiler can
use also LPG gas by installing a kit (supplied with every unit). The
conversion to LPG is possible by:
1. Install the new gas injector
2. Modify the fan speed according the data in the table.
The kit is composed by:
1. Injector black coating (to be recognized from the natural gas
that is not black coated)
2. Relative gas sticker (red color) to be attached under the boiler
instead of the natural gas sticker (yellow color factory installed)
3. Instruction of the kit
4. LPG label to be affixed on the boiler casing and completed in
by the organization making this conversion.
Operations for conversion
1. Switch off the boiler
2. Change the gas injector
3. Apply the red sticker
4. Switch on the boiler
5. Set the new fan speed
6. Fill the final part of this instruction
GAS SUPPLY
The gas supply must be connected to the boiler by a competent LPG
installer and must be of sufficient size to supply the boiler at its
maximum output. An existing supply must be checked to ensure that
it is of adequate size to deal with the maximum rated input of this and
any other appliances that it serves.
GAS SUPPLY INSTALLATION
The entire installation including the meter must be purged and
checked for gas tightness.
CONVERTING THE BOILER GAS TYPE
To convert the boiler to another gas type it is necessary to change
the gas injector, adjust the fan speed and the gas valve.
NOTICE:
The gas valve sticker “WARNING: VALVE IS NOT FIELD
SERVICEABLE” means the valve can be adjusted but not disassembled.
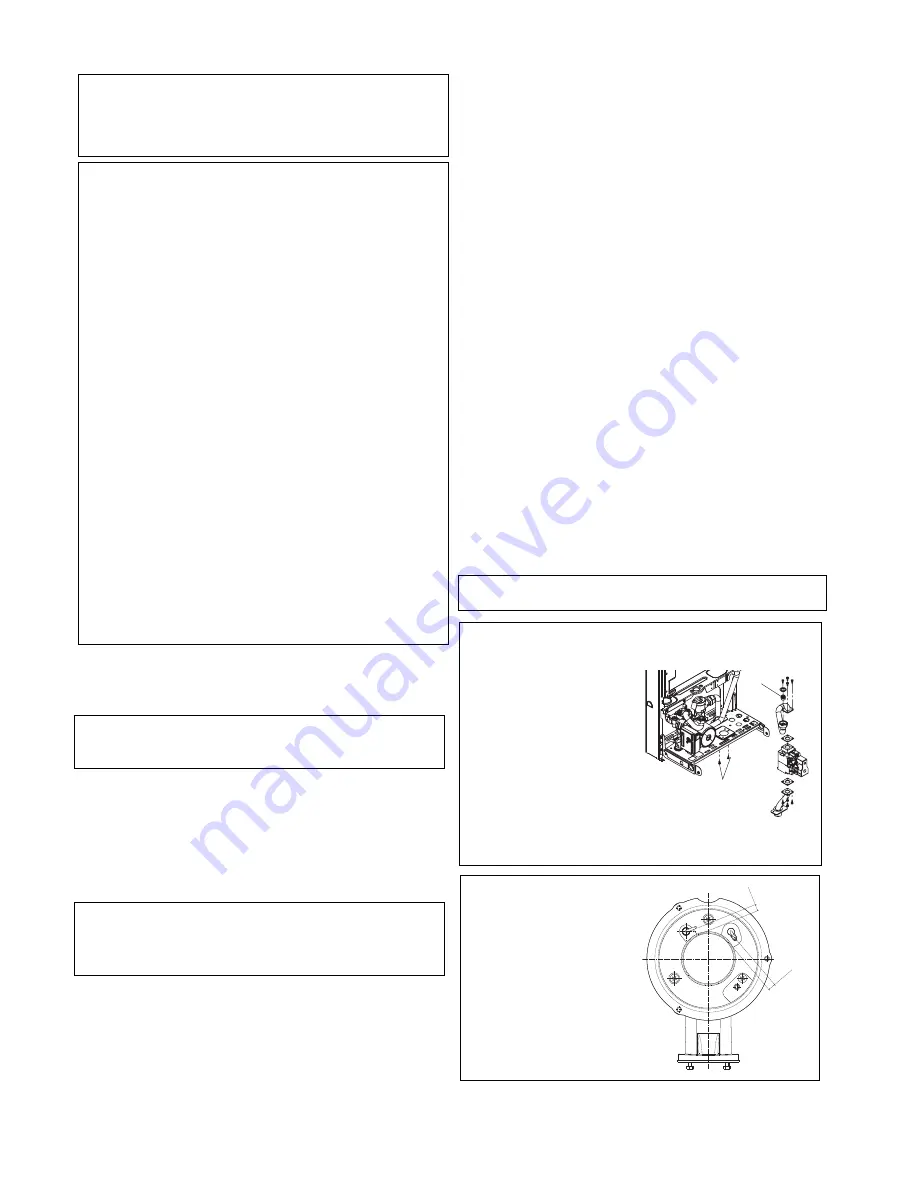
Fig. 1
CHANGE THE GAS INJECTOR
Slacken and unscrew upper gas
valve pipe; locate and remove the
two screws shown as (
A
). Locate
and remove the natural gas injector
(B)
inside the pipe, insert the LPG
injector (black coating). Replace in
the reverse order. Check and
adjust burner pressure settings.
WARNING:
A gas tightness check must be
carried out if any gas carryng
components have been removed,
replaced or disturbed.
B
A
CHECKING THE
RELATIONSHIP OF THE
IGNITER TO MAIN BURNER
Remove the burner assembly as
indicated in the boiler manual
“Servicing instructions”.
Check the distance between the
burner and the two electrodes
according the distances
indicated in Fig. 1A. Replace in
the reverse order.
Fig. 1A
0.35”±
0.039”
(8.9 mm ±
1)
0.41”±
0.039”
(10.3 mm ±
1)
Summary of Contents for XPAK 120
Page 1: ......
Page 20: ...20 Fig 10 Fig 9...
Page 21: ...21 Fig 11 Fig 12...
Page 38: ...38 WIRING FUNCTIONAL DIAGRAM Fig 40...
Page 59: ...59 14 EXPLODED DIAGRAMS Drawing 1 5 7 9 3 12a 4 6 8 12a 1 10 2 11...
Page 60: ...60 Drawing 2 17 18 56a 56a 14 15 56b 13 16 12b 19...


