22
ST5000 Plus SailPilot Owner’s Handbook
• To cancel the alarm and retain the existing wind angle and new
heading, press
standby
and
auto
together.
• Alternatively, to cancel the alarm and return to the previous heading,
either: adjust the locked wind angle using the -
1
,
+1, -10
and
+10
keys; or press
standby
to return to hand steering, steer onto the
required heading, and press
standby
and
auto
together to return to
Vane mode with the new apparent wind angle.
Using AutoTack in Vane mode
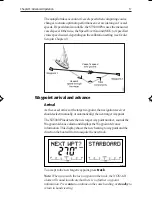
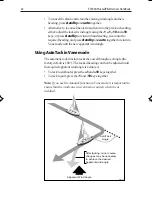
The automatic tack function tacks the vessel through a set angle (the
factory default is 100°). The locked heading can then be adjusted until
the required apparent wind angle is achieved.
• To tack to starboard, press the
+1
and
+10
keys together.
• To tack to port, press the
-1
and
-10
keys together.
Note: If you use the Autotack function in Vane mode, it is important to
ensure that the wind vane was centred accurately when it was
installed.
Apparent Wind Angle
AutoTack
Angle
After tacking, minor course
changes may be necessary
to achieve the desired
apparent wind angle
D4373_1
136_3c03.p65
14/06/99, 10:16
22
Summary of Contents for ST5000 Plus
Page 2: ...ST5000 Plus SailPilot Owner s Handbook Document number 81136 4 Date May2001...
Page 3: ......
Page 11: ...viii ST5000PlusSailPilotOwner sHandbook...
Page 41: ...28 ST5000PlusSailPilotOwner sHandbook...
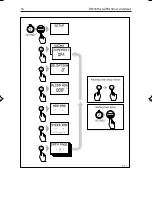
Page 43: ...30 ST5000PlusSailPilotOwner sHandbook 1 1 OR Adjusting User Setup Values...
Page 48: ...Chapter4 CustomisingtheST5000Plus 35 1 1 OR D3583 1a...
Page 83: ...70 ST5000PlusSailPilotOwner sHandbook...
Page 85: ...72 ST5000PlusSailPilotOwner sHandbook...
Page 93: ......
Page 94: ...Shaded area to be removed TOP 109 mm Flush Mount Template 114 mm 4 holes 6 mm diameter D4437 2...
Page 95: ......
Page 96: ...RUDDER POSITIONED AMIDSHIPS CABLE POSITION DRILL THREE 3MM 1 8IN HOLES D3440 1...
Page 97: ......


