Rangemaster Elite SE User Manual Download Page 32

32

SERVICING - WARNING

Disconnect from electricity and gas before servicing. Check appliance is safe when you have finished. 

Servicing

When servicing or replacing gas carrying 
components disconnect from gas before 
commencing operation and check appliance is gas 
sound after completion. When checking for gas leaks 
use a liquid leak detector at all joints and connections 
to check for leaks in the system. Use a product 
specifically manufactured for leak detection. In GB 
refer to BS 6891.
Leak testing of the appliance shall be conducted in 
accordance to the manufacturer’s instructions.

CAUTION: DO NOT USE A FLAME TO CHECK FOR GAS 

LEAKS.

Do not use re-conditioned or unauthorised gas 
controls.
Disconnect from the electricity supply before 
commencing servicing, particularly before removing 
any of the following: - control panel, side panels, 
hotplate tray or any electrical components or covers.
Before electrical re-connection, check that the 
appliance is electrically safe.
Note - References to LH and RH oven apply as viewed 
from the front.
BEFORE SERVICING ANY GAS CARRYING 
COMPONENTS. TURN OFF THE GAS SUPPLY

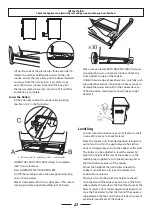
1  To Remove the Control Panel

Disconnect from the electricity supply.

Remove the pan supports and control knobs. Remove 
the 3 screws at the rear of the top edge of the control 
panel and 1 centre top.
Open the oven doors and remove the 3 fixing screws, 
one at each end and one centre, underneath the 
control panel. Lift the control panel, pull forward and 
disconnect the wiring from the rear.
Replace in reverse order.

A - Control panel top fixing screws,    B - Hotplate front fixing screws, 

C - Hotplate back fixing screws

2  To Remove the Hotplate top

Disconnect from the electricity supply.

Pull cooker forward to gain access.
Remove the control panel see 1. Remove the hotplate 
burner caps and tops. If there are screws holding 
the hotplate burners to the hotplate, remove them 
(not the spark electrode fixing screws). Remove the 6 
hexagon headed rear hotplate fixing screws and the 3 
front hotplate fixing screws. Lift the hotplate clear of 
the appliance. Replace in reverse order.

3  To Remove an Outer Side Panel

Disconnect from the electricity supply.

Remove the control panel – see 1. Remove the 
retaining screw on the upper front edge and the two 
fixings on the rear or the side panel. Undo the lower 
retaining screw situated below the edge at the panel 
front corner. Remove the panel by pulling it away 
from the unit.

4  To Remove an Oven Neon

Remove the control panel – see 1. Hold the lens in 
position at front of the panel and from the rear pull 
the body of the neon out of the front lens. Hold the 
front lens in position and from the rear of the control 
panel fit the new light to the lens. Replace parts in 
reverse order. Ensure the replacement neon functions 
correctly.

5  To Remove the Clock

Remove the control panel - see 1.
Pull off the timer control button(s). Remove the 
timer/mounting bracket assembly from the fascia by 
removing the fixing screws. Remove the timer from 
its mounting bracket by depressing the plastic lugs 
on the timer case, at the same time pulling the unit 
forward. Reassemble in reverse order. When replacing 
leads refer to the wiring diagram. Check operation of 
timer.

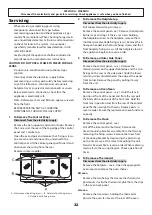
6  To Remove a Thermostat

Disconnect from the electricity supply.

Remove the hotplate – see 2. Open the appropriate 
oven door and remove the oven shelves.

RH oven

Remove the two fixings that secure the thermostat 
phial cover. Unclip the thermostat phial from the clips 
in the oven back panel.

LH oven

Remove the two screws holding the thermostat 
phial to the oven fan cover at the rear of the oven. 

Summary of Contents for Elite SE

Page 1: ...Elite SE 110 Dual Fuel FSD Users Guide Installation Service Instructions U103980 07A...

Page 2: ...2...

Page 3: ...e 15 Storage Page 15 Multi function Oven cooking guide Page 16 Cooking chart Conventional and full Fan oven functions Page 17 Cleaning your cooker Page 18 Troubleshooting Page 21 General Safety Instru...

Page 4: ...odour This should stop after a little use Before using for the first time make sure that all packing materials have been removed and then to dispel manufacturing odours turn the ovens to 200 C and ru...

Page 5: ...ses or down turned base rims should not be used Simmering aids such as asbestos or mesh mats are NOT recommended They will reduce burner performance and could damage the pan supports Avoid using unsta...

Page 6: ...or a maximum of 5 minutes before adding food Leaving it longer may cause damage The controls can be turned to a lower position simply by turning the control knobs towards the lower position marked wit...

Page 7: ...itional methods of oriental cooking Stir Frying Shallow Frying Deep Frying Steaming Braising Stir frying has become the most familiar and popular method of oriental cooking The continual manual proces...

Page 8: ...he oven base Take care to avoid touching the top element and element deflector when placing or removing items from the oven For more detail on this oven see the section Multi function oven The fan in...

Page 9: ...lick into position Use the Adjusting knob to set the time you need You can turn the knob back to the manual setting to keep an eye on the time of day or leave it in the minute minder position as the t...

Page 10: ...ecial Features Key Lock When the key lock is activated the clock can be operated as usual but the ovens are locked and will not come on This means that your child could select a cook program but the p...

Page 11: ...mixtures on top of uncooked pastry are only satisfactory if there is a short delay period Dishes containing leftover cooked meat or poultry should not be cooked automatically if there is a delay peri...

Page 12: ...gone out before inserting the food Fanned grilling This function operates the fan whilst the top element is on It produces a more even less fierce heat than a conventional grill The supplied pan can...

Page 13: ...d The racking on the inside of the Multifunction Oven door left hand oven allows you to position the Handygrill at any of four different levels Using the Handygrill for fan grilling gives you the abil...

Page 14: ...shelves can be easily removed and refitted Pull the shelf forward until the back of the shelf is stopped by the shelf stop bumps in the oven sides Lift up the front of the shelf so the back of the she...

Page 15: ...putting pans etc on top of it The mat can be removed for cleaning The drawer can get very warm don t store anything in it that may melt or catch fire The drawer can be removed completely for cleaning...

Page 16: ...em Place baking trays individual cake tins or baking dishes centrally on the oven shelf For best results pre heat the oven until the oven indicator light goes out Cooking chart Fan assisted oven funct...

Page 17: ...2 3 150 C 20 25mins per 500g 20 25mins 200 C 2 3 190 C 15 20mins per 500g 15 20mins Turkey 160 C 2 150 C 20 25mins per 500g 20 25mins 200 C 2 190 C 15 20mins per 500g 15 20mins Stuffed Poultry Cook at...

Page 18: ...The burner heads and caps can be removed for cleaning Make sure they are absolutely dry before replacing The central hotplate A cap B head C notch D electrode E base When refitting the burner head mak...

Page 19: ...lean hot soapy water Wipe with a clean dampened cloth then polish with a dry cloth The oven doors should only be cleaned with a soft cloth wrung out in clean hot soapy water Ovens The ovens have remov...

Page 20: ...es Plastic Chrome Warm soapy water soft cloth Oven Door Glass Glass Lid Toughened glass Hotsoapywater creamcleaner scourerifnecessary Oven and Grill Part Finish Recommended Cleaning Method Sides floor...

Page 21: ...ting The oven is not cooking evenly If you are cooking a large item be prepared to turn it round during cooking If two shelves are used check that space has been left for the heat to circulate When a...

Page 22: ...ulations and also the local gas and electricity supply companies requirements If you smell gas Don t turn electric switches on or off Don t smoke Don t use naked flames Do turn off the gas at the mete...

Page 23: ...over the hotplate Flammable material could be ignited if brought in contact with a hot surface unit and may cause severe burns Take great care when heating fats and oils as they will ignite if they g...

Page 24: ...The relevant Building IEE regulations In the Republic of Ireland The installation must be carried out by a Competent Person and installed in accordance with the current edition of I S 813 Domestic Gas...

Page 25: ...bility bracket or chain must be fitted These are not supplied by with the cooker but are available at most builders merchants GAS PRESSURE TESTER FLEXIBLE GAS HOSE Must be in accordance with the relev...

Page 26: ...urtains must not be fitted immediately behind the cooker We recommend a gap of 1110mm between units to allow for moving the cooker If a flush fit is required fit the cooker up to the unit at one side...

Page 27: ...rs of the cooker Unfold the rear edge of pack base tray Carefully push the cooker backwards into position Take care not to damage the power cable Push the cooker close to its final position leaving ju...

Page 28: ...cordance with the relevant standards A hose is not supplied by with the cooker Hoses may be purchased at most builders merchants The Gas supply needs to terminate with a down facing bayonet The rear c...

Page 29: ...orrect terminals for your electrical supply type see fig Check that the links are correctly fitted and that the terminal screws are tight Secure the mains cable using the cable clamp These appliances...

Page 30: ...hat the cooker is convertible to the gas you want to use This conversion must be performed by a competent person After conversion the installation must comply with the relevant regulations and also th...

Page 31: ...a burner head Fit the pressure gauge to the injector Turn on and light one of the other hotplate burners Press in the control knob for the burner with the pressure gauge fitted to let gas through Reas...

Page 32: ...l cooker forward to gain access Remove the control panel see 1 Remove the hotplate burner caps and tops If there are screws holding the hotplate burners to the hotplate remove them not the spark elect...

Page 33: ...rectly from the burner body Fit the appropriate injector Re assemble in reverse order Check the appliance is gas sound 11 To Remove a Hotplate Burner Spark Electrode Remove the pan supports burner hea...

Page 34: ...are fully tightened For the LH oven unscrew the 2 thermostat phial fixing screws Remove the screws that secure the inner back to the oven rear Lift the removable panel away Re assemble in reverse ord...

Page 35: ...at shield Remove the top element bracket fixings and withdraw element Replace the element and re assemble parts in reverse order Check that the oven operates satisfactorily 23 To Replace the Cooling F...

Page 36: ...air A6 Left hand MF oven fan element A7 Left hand MF oven fan A8 Left hand MF oven light B Clock Colour Code b Blue br Brown bk Black or Orange r Red v Violet w White y Yellow g y Green yellow gr Grey...

Page 37: ...ee Positioning of Cooker Minimum space above hotplate 650mm Ratings Natural Gas L P Gas Hotplate Injector Injector Right hand Wok burner 3 65kW internal 80 3 5kW 246g h internal 54 external 129 extern...

Page 38: ...38...

Page 39: ...39...

Page 40: ...Clarence Street Royal Leamington Spa Warwickshire CV31 2AD England Tel 44 0 1926 457000 Fax 44 0 1926 450526 E mail consumers rangemaster co uk www rangemaster co uk...

Reviews: