background image

Stand-alone use of the device

17

© 2023 Radiacode Ltd.

Dose

Accumulated dose - display mode;

Search

Count rate search graph - display mode

Power off

Turning off the appliance is an action;

About device

Serial number and software version information.

Use a short press on the up/down swing buttons to select the desired item. The selected item will be
highlighted with a negative icon. To confirm the selection, use a short press on the round button.
Only three selections are available on the instrument screen at a time, the others will become available
when the up/down swing buttons are pressed again.

Of the seven items, four  [


Spectrum


Monitor


Dose


Search

] give access to the

selection

 of the radiation situation display mode.

Item [


Power off

] – is an action point, if it is confirmed with the round button, the instrument will be

switched off

.

Item [


Settings

] is used to go to the submenu of the 

instrument settings

.

Item [


About device

] is used to obtain information about the instrument number and firmware and

bootloader versions.

At all levels, the menu is arranged in a cyclical fashion. For example, on the main level, pressing the

down swing button moves the focus from item to item in the following order: 

 --> 

 --> 

--> 

 -->

 --> 

 --> 

 --> 

 ... 

3.10

Device settings

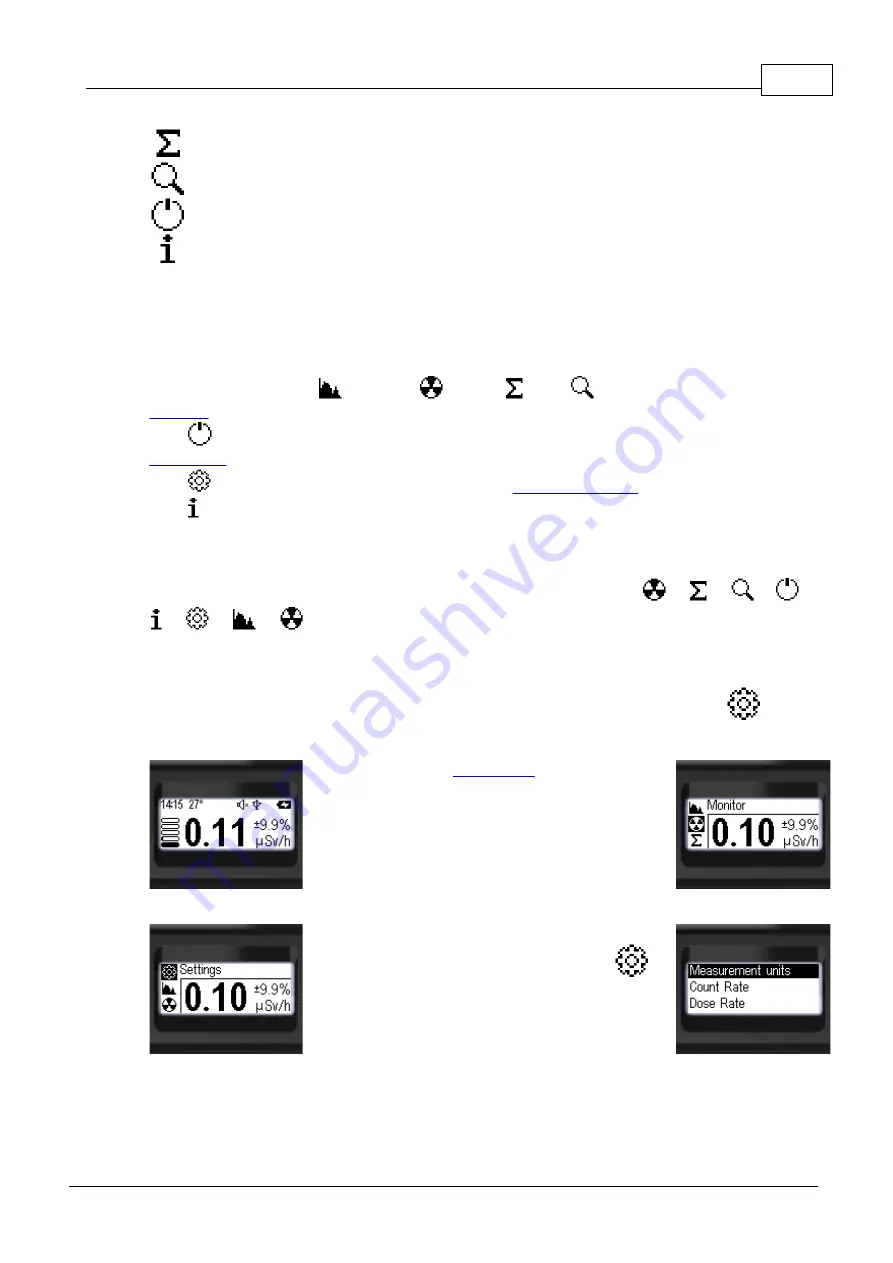
The instrument settings can be accessed from the corresponding instrument submenu – 
"Settings".

·

Press and hold the 

round button

 until you reach the

menu;

·

The name of the current menu item will appear at the
top. (In this case it is "Monitor");

o

The icons of the main menu items will be placed
vertically;

o

The active item will be highlighted with a negative
icon.

·

Short presses on the upper swing button (or the lower

one, the menu is circular) focus on the item 
"Settings";

·

Press the round button briefly to confirm access to
the "Settings" submenu.

Next, short presses on the up/down buttons of the swings can be used to move the focus to the desired
item and make the required settings.

This and deeper menu levels can be exited via

 [< Back]

 and

 [<< Menu quit]

.

Summary of Contents for 10 Series

Page 1: ......

Page 2: ...2 4 Display 13 5 Icons 14 6 Indication sound vibration light 15 7 Battery charging 15 8 Firmware update 16 9 Menu usage 17 10 Device settings 18 Selecting units of measurement 19 Count rate alarm leve...

Page 3: ...Chapter I...

Page 4: ...tion automatic data storage in the instrument s memory accumulated dose monitoring quick search for radiation sources two channel alarm signaling of radiation danger and changes in the radiation situa...

Page 5: ...strument Please read the instructions to obtain reliable results 1 2 Device design Design elements controls and indications controls and indications personal radiation detector Radiacode 10X series 1...

Page 6: ...update period time for a level of random error 15 with natural radiation background 0 08 Sv h 0 1 1000 uSv h 15 0 5 s 34 s Accumulated dose assessment range 0 10 Sv Non volatile memory registration vo...

Page 7: ...echnical requirements to the mobile device The device works with tablets or smartphones with minimum system requirements Android operating system version 6 0 and higher The device works with iPhone an...

Page 8: ...Chapter II...

Page 9: ...load process may lead to a malfunction of the device which can only be fixed by a certified service center FCC warning Federal Communications Commission FCC Statement This device complies with part 15...

Page 10: ...Ltd Safety precautions and warnings RF exposure statement This device complies with FCC RF radiation exposure limits set forth for an uncontrolled environment The device is installed and operated wit...

Page 11: ...Chapter III...

Page 12: ...nection to an Android smartphone is also possible via USB OTG When connected to a computer or smartphone the accumulated data are transferred to an external device and the newly received data are tran...

Page 13: ...ess of the round button is used to to lock the swing buttons return from the main menu to the display mode confirm selection of the highlighted menu item toggle the selection options to turn off the a...

Page 14: ...round button and hold it down for three seconds The device can be switched off via the menu To turn on the instrument press and hold the round button until the instrument turns on at least 3 seconds...

Page 15: ...on conditions backlight time backlight brightness and image orientation are set via the menu section Settings The display is used to show instrument status graphical dose rate level control menu setti...

Page 16: ...u enter by long pressing the round button the sections are indicated by icons and text Settings Instrument settings menu Spectrum Display of the energy spectrum of radiation Monitor Display the curren...

Page 17: ...he glowing of the blue indicator 18 in the general view If the device is turned on then the screen displays the icon 3 in the general view At the end of the charging procedure the blue indicator will...

Page 18: ...ce and confirm by pressing the OK button confirm the firmware update of the instrument wait for the update process to complete Attention Do not turn off the instrument and do not disconnect the USB ca...

Page 19: ...f the instrument settings Item About device is used to obtain information about the instrument number and firmware and bootloader versions At all levels the menu is arranged in a cyclical fashion For...

Page 20: ...the focus to Measurement units Short press the round button to move to Measurement units Short presses on the round button to select dose rate measurement units Sv Sievert or R Roentgen Short presses...

Page 21: ...ct Enter or Esc Long press the round button to confirm your selection This and deeper menu levels can be exited via Back and Menu quit or go to Alarm 2 Short press the round button to move to Alarm 2...

Page 22: ...ge the value of the selected digit Set all digits Short presses on the round button to select Enter or Esc Long press the round button to confirm your selection This and deeper menu levels can be exit...

Page 23: ...to Alarm 1 Short press the round button to select the desired digit of the threshold value Short presses on the up down swing buttons to change the value of the selected digit Set all digits Short pre...

Page 24: ...minutes The screen backlight can be disabled completely allowed to be unconditionally turned on by pressing the buttons or by pressing the button in case of insufficient light level By default the dev...

Page 25: ...us to Rotate Short press the round button to select the screen orientation Auto Right or Left To return to the previous level briefly press the up down swing buttons to move the focus to Back Briefly...

Page 26: ...arm 1 screen backlight Alarm 1 screen backlight Out of scale screen backlight In the menu you can select the operation mode of sound light and vibration alarms Separate permissions to play alarm sound...

Page 27: ...the up down swing buttons to move the focus to the Buttons Short press the up down swing buttons to move the focus to Buttons or Vibro Short press the round button to select the desired response type...

Page 28: ...1 or Alarm 2 Press the round button briefly to confirm your selection Short press the up down swing buttons to move the focus to Sound or Vibration Short press the round button to select On or Off To...

Page 29: ...o the previous level or exit the menu briefly press the up down swing buttons to move the focus to Back or Menu quit Briefly press the round button to confirm your selection 3 10 9 Time settings When...

Page 30: ...provides an item for resetting the instrument to its original factory settings Briefly press the up down swing buttons to move the focus to the item Factory settings Press the round button briefly to...

Page 31: ...ew of the photon gamma and X ray radiation energy spectrum In the Spectrum display mode the screen shows state panel from top energy spectrum of photon gamma and X ray radiation The upper part of the...

Page 32: ...n the radiation situation the averaging continues in order to increase the reliability of the estimation Statistical error in the Monitor mode is maintained at the level not more than 15 for the confi...

Page 33: ...registered quanta clicks Setting alarm thresholds Two alarm thresholds for the dose rate level can be set using the menu When the dose rate alarm threshold level is exceeded a pulsating sign will be d...

Page 34: ...de is available via the buttons o long pressing the lower button resets the value of the accumulated dose o long pressing on the upper button of the swing turns on and off the sound indication Setting...

Page 35: ...rol in this mode is available via buttons o a short press on the upper swing button increases the averaging time o a short press on the lower swing button decreases the averaging time o long press on...

Page 36: ...ale Exceeding the upper threshold by count rate leads to unreliability of dose rate estimation In this case the upper threshold for dose rate is also considered to be exceeded If any of the alarm thre...

Page 37: ...splays the message Alarms and icons of maximum alarm levels reached from the moment the buttons are locked to the current moment of time one icon for each source By long pressing the round button the...

Page 38: ...Chapter IV...

Page 39: ...e To pair with your smartphone install the app on your smartphone Radiacode available at link https space radiacode com and GooglePlay or use the QR code A detailed description of the application inte...

Page 40: ...Chapter V...

Page 41: ...Radiacode The program is available for downloading at https space radiacode com With the help of the program Radiacode you can transfer the data to a computer view it and manage personal radiation de...

Page 42: ...se rate alarm 20 Firmware 15 Firmware update 15 icons 13 info 33 Language 27 Language selection 27 light 14 long press 11 16 menu 16 menu usage 16 menu use 16 off 12 on 12 PC 39 pressing 11 16 Reset 2...

Reviews: