background image

Mod. 05008 


Rev. 00 

16 

16 

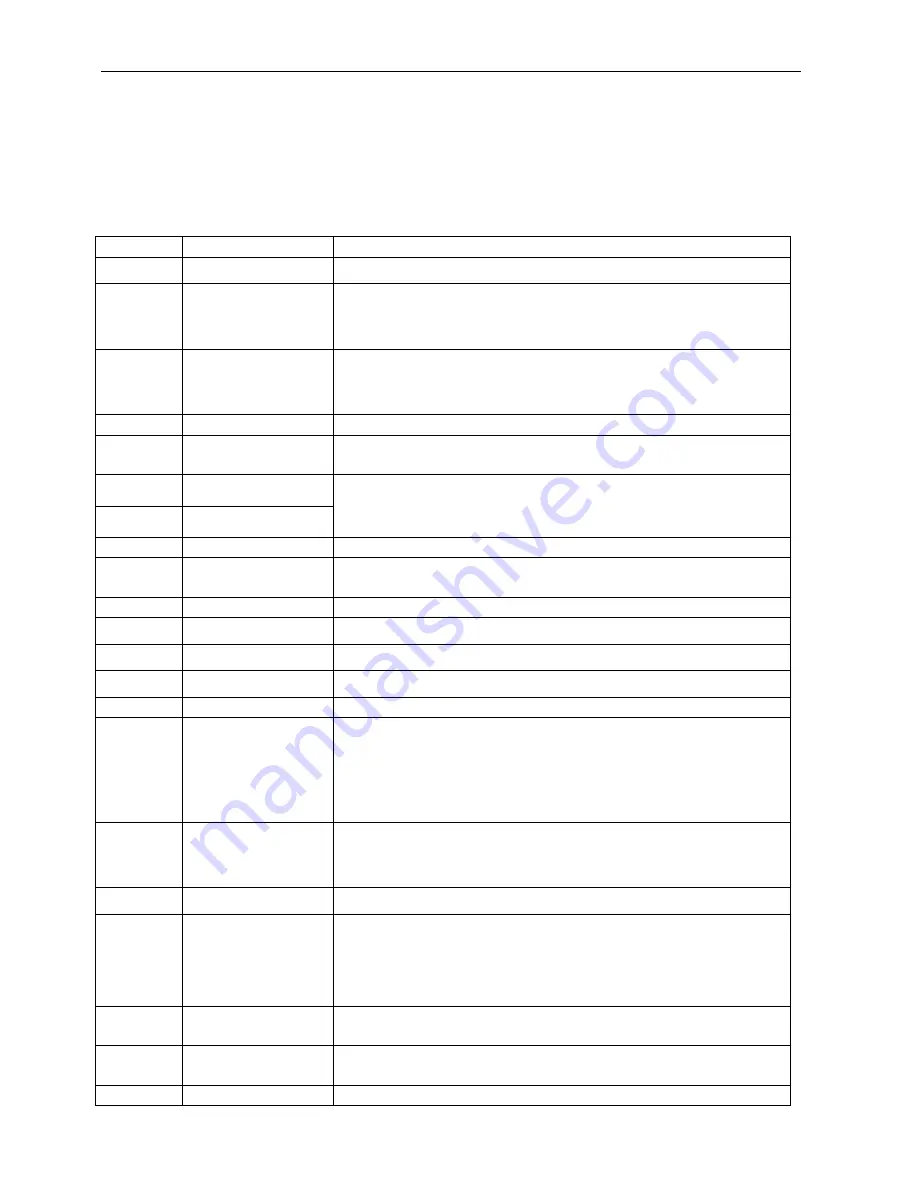
13.  MENU SPECIFICATION 

 
This section contains all the items in the menu with a description of the relative functions. 

To access the menu press 

key 1 “Enter”

. To navigate the menu press 

keys 2 “-” or 3 “+“

. To access a sub-menu press 

key 1 “Enter”

. To change a value press

 keys 2 “-” or 3 “+“

 then press 

key 1 “Enter”

 to confirm the change, then 

key 6


“esc”

 to go back to higher menu level.  


GRINDER 

Enter to access sub-menu then scroll items with + and - 

1.2 

Quant. Coffee 

Enables adjustment of quantity of ground coffee allocated to one of the two coffee 
dispenser keys. A different grinding time can be allocated to each coffee dispenser key. 

1.2.1 

Espresso 

A number appears on the display corresponding to the running time for the coffee 
grinder. This time is expressed in seconds; increasing the time increases the quantity of 
coffee ground for this brew. 

1.2.2 

Coffee 

A number appears on the display corresponding to the running time for the coffee 
grinder. This time is expressed in seconds; increasing the time increases the quantity of 
coffee ground for this brew. 

ADJUSTMENTS 

Enter to access sub-menus 

2.1 

Pre-infusion 

Enables adjustment of the pre-infusion time allocated to one of the two coffee 
dispenser buttons.  A different pre-infusion time can be allocated to each coffee 
dispenser button. 

2.1.1 

Espresso 

Asterisks corresponding to the pre-infusion time appear on the display.  This time 
can be varied from 0 to 4 seconds; no asterisks on the display means no pre-
infusion has been selected. 

2.1.2 

Coffee


2.2 

Temperature 

Enter to access sub-menu 

2.2.4 

Coffee group 

Small squares corresponding to the temperature set for the coffee brew


appear on the 

display. This temperature can be varied from 80°C to 100°C. Each square corresponds 
to about 1°C. 

2.3 

Date/time 

Enter to access sub-menu then scroll items with + and - 

2.3.1 

Date 

+ or 

– to reset the date enter a number and confirm with key 1 then go to next number; 

once all numbers have been set press esc. to exit. 

2.3.2 

Time 

+ or 

– to reset time, enter a number and confirm with key 1 then go to next number; 

once all numbers have been set press esc. to exit. 

2.3.3 

Format 

+ or 

– to select date format (dd/mm/yy or mm/dd/yy) confirm  with key 1 and press esc 

to exit. 

2.4 

Timer 

Enter to access sub-menu and scroll items with + and - 

2.4.1 

Progr. On/off 

Enables the machine to switch on and off automatically at programmed times. To 
programme proceed as follows: Go to menu 2.4.1 Progr. On-Off and press enter. Use 
the + key to scroll and view settings for each day of the week. To change the switch on 
and switch off settings go to the day to be programmed and press enter, then use the + 
and 

– keys to change the hour and minutes for switching on and press enter to confirm. 

Set the time for switching off, press enter to confirm the changes and go on to the next 
day. 

If automatic switching on or off of the machine is not required enter “weekly rest 

day

”. 

2.4.2 

Auto off 

Enables the machine to switch to switch off when idle; when this function is activated it 
turns the machine off when the set time expires. Countdown to the time starts every 
time a brew is dispensed. Press enter to access the menu and use the + and 

– keys to 

set the automatic switch off time, press enter to confirm and esc to exit. When the 
machine switches off just press the on switch to restart it. 

2.5 

Water hardness 

Enables the descaling alarm to be set. The water being used should be analysed before 
a value is set.


□ 

Off/average/ 
hard/soft 

Enables the degree of hardness of the water supply to be set to activate the descaling 
alarm. To set the water hardness select the relative type of water used, press enter to 
confirm and esc to exit.  


Off

: if demineralized water is used. In this case no descaling alarm is shown. 


Soft

: with a hardness of less than 7°d (12°f; 9°e) 


Average

: with hardness between 7-14°d (12-24°f; 9-18°e) 


Hard

: with hardness greater than 14°d (24°f; 18°e) 

2.7 

Water filter 

Enables limescale filter replacement alarm to be set on the basis of the type of filter 
used. The instructions for the filter used should be read carefully before setting the 
alarm.  


0000/0050/0100/0150 

A number corresponding to the liters to be dispensed before the alarm is is shown 
appears on the display. The number displayed is in increments of 50 litres; once set 
press enter to confirm and esc to exit 

2.8 

Password 

Activates the password for access to the menu (protection to prevent access by 

Summary of Contents for 05008

Page 1: ...la perfezione QUICK MILL S R L Via Stati Uniti D America 6 8 20030 Senago MI Tel 02 9986106 Fax 02 99010947 Reg delle Imprese di Milano MI 1999 193954 Cap Soc 52 000 00i v R E A Milano 1593567 C F P I...

Page 2: ...ILL dankt Ihnen f r die Wahl eines unserer Produkte Vor Inbetriebnahme der Maschine empfehlen wir dieses Handbuch aufmerksam zu lesen um so alle n tigen Gebrauchs und Wartungsinformationen des Produkt...

Page 3: ...a 5 8 Installazione pagina 5 8 1 Installazione pagina 5 8 2 Descrizione comandi pagina 5 9 Funzionamento pagina 5 9 1 Messa in funzione pagina 5 9 2 Regolazione grado di macinatura pagina 6 9 3 Erogaz...

Page 4: ...li della rete di distribuzione elettrica Il cavo di alimentazione deve essere ben steso evitare arrotolamenti o sovrapposizioni in posizione non esposta ad eventuali urti o manomissioni di minori non...

Page 5: ...igura 3 14 Pulsante accensione e spegnimento men enter tasto 1 15 Pulsante erogazione caff espresso tasto 2 16 Pulsante erogazione caff lungo tasto 3 17 Pulsante erogazione acqua calda tasto 4 18 Puls...

Page 6: ...al pavimento di 80 cm Posizionare la macchina e inserire la spina nella presa di corrente 8 2 Descrizione comandi 1 Interruttore generale Portando il tasto in posizione 1 si da alimentazione alla macc...

Page 7: ...alle istruzioni riportate al punto 13 9 3 Erogazione caff Premere il tasto di erogazione caff che si desidera tasto 2 tasto 3 Premendo il tasto una volta si ottiene una singola erogazione premendolo d...

Page 8: ...In caso di danneggiamento del cavo di ali mentazione fare riferimento ad un centro di assistenza autorizzato per la sostituzione in quanto necessario l uso di un utensile speciale I materiali di scart...

Page 9: ...i dati premere esc per uscire 2 3 2 Ora o per regolare l ora impostare un dato e confermare con tasto 1 per passare al dato successivo una volta regolati tutti i dati premere esc per uscire 2 3 3 Form...

Page 10: ...gere attentamente le istruzioni del prodotto utilizzato Inserire pastiglia Sul display appare la scritta inserire pastiglia aprire la porta ed inserire nella coppa caff una pastiglia di prodotto sgras...

Page 11: ...age 5 8 Installation page 5 8 1 Installation page 5 8 2 Description of controls page 5 9 Operation page 5 9 1 Starting operation page 5 9 2 Grind adjustment page 6 9 3 Coffee dispenser page 6 9 4 Hot...

Page 12: ...wer cord should be fully extended avoid kinking or compressing in a position where it cannot be knocked or tampered with by children it should not be placed near water or other liquids or heat sources...

Page 13: ...long coffee dispenser button key 3 17 Hot water dispenser button key 4 18 Steam dispenser button key 5 19 Cappuccino dispenser exit button key 6 6 INTENDED USE The machine has been designed and built...

Page 14: ...the machine on or off Press the button briefly to access the menu access submenus and confirm changes to a parameter 3 Espresso coffee dispenser button key 2 Press the key once for one espresso brew...

Page 15: ...Always clean the milk frother after use Take a container with some water and insert the milk supply pipe figure 5 A then press the button of cappuccino in order to clean it Once a week remove the Cap...

Page 16: ...e user A The machine does not switch on Check that the plug has been connected Check that there is electric current and that the circuit breaker or main switch is on Check the condition of the plug an...

Page 17: ...ress esc to exit 2 3 3 Format or to select date format dd mm yy or mm dd yy confirm with key 1 and press esc to exit 2 4 Timer Enter to access sub menu and scroll items with and 2 4 1 Progr On off Ena...

Page 18: ...le During the cleaning cycle the display describes the various stages of the process At the end of the wash with detergent a rinse cycle is automatically performed to eliminate any residual product On...

Page 19: ...e 4 7 Transport Seite 5 8 Installierung Seite 5 8 1 Installierung Seite 5 8 2 Beschreibung der Befehle Seite 5 9 Funktion Seite 5 9 1 Inbetriebsetzung Seite 5 9 2 Einstellung des Mahlgrades Seite 6 9...

Page 20: ...erj hriger nicht in der N he von Fl ssigkeiten oder Wasser sowie von W rmequellen befinden es darf nicht besch digt werden eventuell von qualifiziertem Personal ersetzen lassen Die Anwendung von Adapt...

Page 21: ...6 6 ANWENDUNGSZWECK Die Maschine wurde zur Ausgabe von Kaffee sowie f r die Zubereitung von warmen Getr nken Tee Cappuccino usw geplant und hergestellt Jede abweichende Anwendung gilt als widrig und f...

Page 22: ...te in Position 1 wird die Maschine gespeist 2 Ein Ausschalttaste Taste 1 Durch Dr cken der Taste f r 4 Sekunden wird die Maschine ein oder ausgeschaltet Bei kurzem Dr cken der Taste erfolgt der Men zu...

Page 23: ...gur 1 8 Warmwasserausgabetaste Taste 4 dr cken 9 5 Cappuccino Ausgabe Tauchen Sie den Milch Ansaugschlauch in dem Milchbeh lter stellen Sie die Tasse unter dem Milchaufsch umer und dr cken Sie den Sch...

Page 24: ...hierf r ein geeignetes Werkzeug erforderlich ist Die zur Arbeit oder Wartung verwendeten Ausschussmateriale werden in getrennte Beh lter abgelegt und in eigens daf r vorgesehene Zentren abgegeben sofe...

Page 25: ...hbl ttern 2 3 1 Datum oder zum Einstellen des Datums verwenden Daten eingeben und mit Taste 1 best tigen zu n chsten Daten bergehen nach Eingabe aller Daten Esc zum Verlassen dr cken 2 3 2 Uhrzeit ode...

Page 26: ...Produktes aufmerksam durchlesen Tabletteneingabe Auf dem Display erscheint die Angabe Tabletteneingabe T re ffnen und in die Kaffeeschale eine Tablette Entfettungsprodukt f r Kaffeemaschinen geben fol...

Page 27: ...Mod 05008 Rev 00 26 26...

Reviews: