Quantum StorNext M660, Hardware Manual
Get your hands on the user manual for Quantum StorNext M660 for free download on our website. This manual is essential for setting up and maximizing the potential of your storage solution. Download it now from manualshive.com and get started on efficient data management with ease.
Share
Download


Reviews:
No comments
Related manuals for StorNext M660

ShareCenter DNS-343
Brand: D-Link Pages: 12
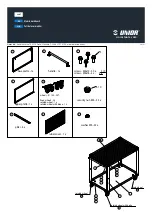
940T
Brand: Unior Pages: 2

Rugged Triple USB 3.0
Brand: LaCie Pages: 2

Rugged Triple USB 3.0
Brand: LaCie Pages: 2

RUGGED MINI
Brand: LaCie Pages: 5

RUGGED BOSS SSD
Brand: LaCie Pages: 60

Minimus
Brand: LaCie Pages: 2

Little Big Disk Quadra
Brand: LaCie Pages: 4

Little Big Disk Quadra
Brand: LaCie Pages: 24

Biggest FW800
Brand: LaCie Pages: 53

Biggest F800
Brand: LaCie Pages: 59

5BIG THUNDERBOLT 2
Brand: LaCie Pages: 54

Starck Desktop Hard Drive
Brand: LaCie Pages: 2

301527
Brand: LaCie Pages: 24

301490
Brand: LaCie Pages: 52

Rugged Hard Disk
Brand: LaCie Pages: 2

Network Space MAX
Brand: LaCie Pages: 2

Rugged Hard Disk
Brand: LaCie Pages: 2


