background image

Quantum DXi6900 Installation Guide

6-68160-03 Rev A, October 2015

*6-68160-03*

Contents

DXi6900 Configuration

2

Determining the DXi6900 Model 4

Choosing a Location

5

Preparing for the Installation

6

DXi6900 Installation Overview

7

Unpacking the DXi6900

10

Installing Components in the 
DXi6900 Node

16

Installing the DXi6900 System 
in the Rack

32

Initializing the Storage Arrays 
and Software

47

Performing Initial Configuration59

Troubleshooting

80

Contacting Quantum

82

This guide provides hardware installation and initial system 
configuration instructions for the Quantum DXi6900 disk backup 
system. For more information, see the 

Quantum DXi6900 User's 

Guide

  (6-68159).

Make sure to take the online training for the DXi6900 in order to make 
the best use of your product. The online training is available at:


www.quantum.com/ServiceandSupport/StorageCareLearning/Index.aspx
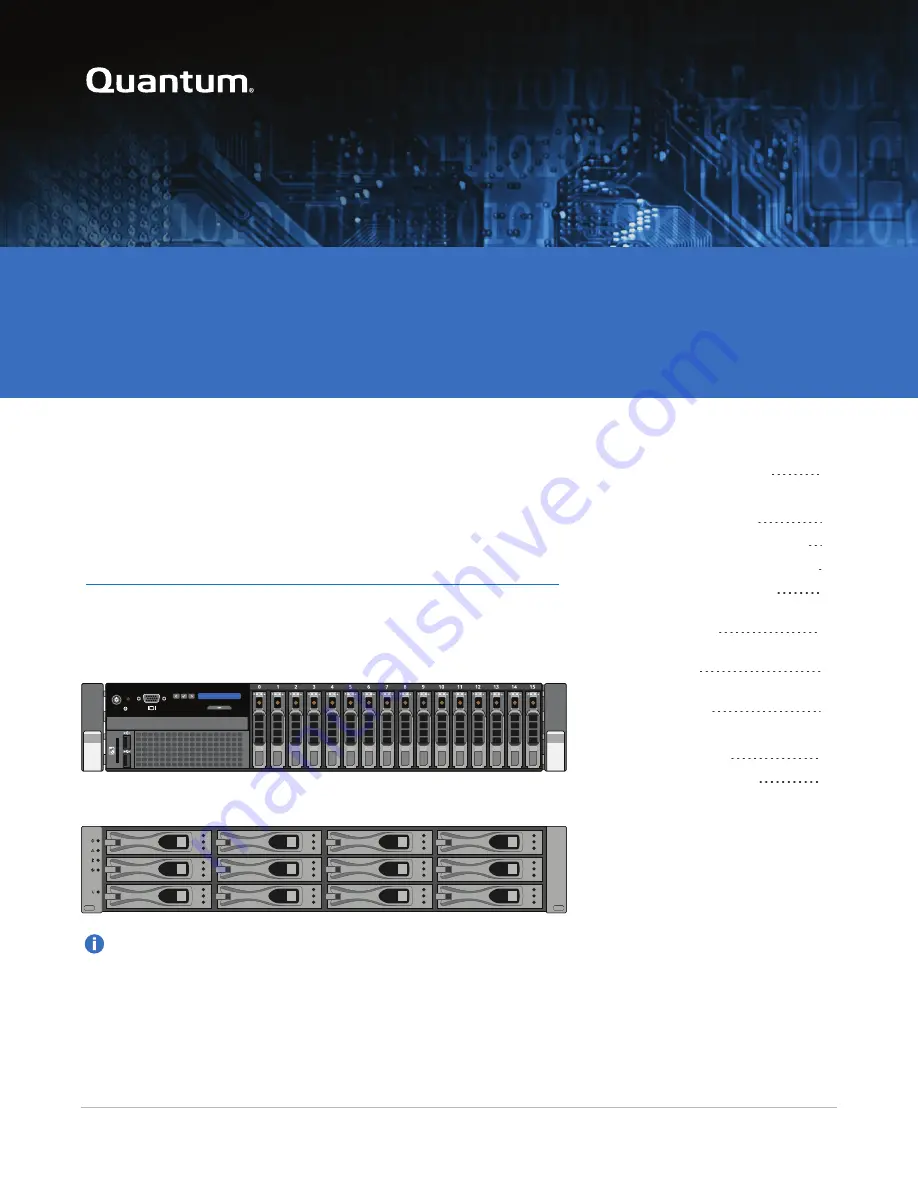


DXi6900 Node

DXi6900 Array Module (RBOD) and Expansion Module (EBOD)

Note: 

This 

Installation and Configuration Guide

 is for DXi6900 with DXi 

3.2.x Software.

Summary of Contents for DXi6900

Page 1: ...al Configuration59 Troubleshooting 80 Contacting Quantum 82 This guide provides hardware installation and initial system configuration instructions for the Quantum DXi6900 disk backup system For more information see the Quantum DXi6900 User s Guide 6 68159 Make sure to take the online training for the DXi6900 in order to make the best use of your product The online training is available at www qua...

Page 2: ...TB 128 GB 1 2 8U 119 TB 136 TB 192 TB 256 GB 1 3 10U 153 TB 170 TB 240 TB 256 GB 1 4 12U 187 TB 204 TB 288 TB 256 GB 1 5 14U 221 TB 238 TB 336 TB 256 GB 1 6 16U 221 TB 238 TB 336 TB 256 GB 1 7 18U 255 TB 272 TB 384 TB 256 GB 2 7 20U 323 TB 340 TB 432 TB 256 GB 2 8 22U 357 TB 374 TB 528 TB 256 GB 2 9 24U 391 TB 408 TB 576 TB 256 GB 2 10 26U 425 TB 442 TB 624 TB 256 GB 2 11 28U 459 TB 476 TB 672 TB ...

Page 3: ...256 GB 1 5 14U 221 TB 238 TB 336 TB 256 GB 1 6 16U 221 TB 238 TB 336 TB 256 GB 1 7 18U 255 TB 272 TB 384 TB 256 GB 2 7 20U 323 TB 340 TB 432 TB 256 GB 2 8 22U 357 TB 374 TB 528 TB 256 GB 2 9 24U 391 TB 408 TB 576 TB 256 GB 2 10 26U 425 TB 442 TB 624 TB 256 GB 2 11 28U 459 TB 476 TB 672 TB 256 GB 2 12 30U 493 TB 510 TB 720 TB 256 GB 2 13 32U 1 TB 1 000 000 000 000 bytes Usable storage capacity for ...

Page 4: ...6900 model information is located on the pull out information tag on the front of the Node see Figure 1 below l The DXi6900 G2 information tag includes G2 in the part number see Figure 2 below l The DXi6900 G1 information tag does not include G1 in the part number see Figure 3 below Figure 1 DXi6900 Information Tag 1 1 Information Tag Figure 2 DXi6900 G2 Information Tag Figure 3 DXi6900 G1 Informa...

Page 5: ...161 to ensure that your site meets the installation requirements for the DXi6900 Rack Space Requirements Table 1 below and contains the rack requirements for the DXi6900 components Table 1 DXi6900 Rack Requirements DXi6900 Node Array Module RBOD Expansion Module JBOD Height 2U 3 4 inches 8 7 cm 2U 3 4 inches 8 7 cm 2U 3 4 inches 8 7 cm Width side to side 17 5 inches 44 4 cm 17 8 inches 45 1 cm 17 ...

Page 6: ...ools are required for unpacking and installing the DXi6900 system l 2 Phillips screwdriver l Small flat head screwdriver l Notebook computer and Ethernet cable for initial system configuration Taking ESD Precautions Some components within the DXi6900 system contain static sensitive parts To avoid damaging these parts while performing installation procedures always observe the following precautions...

Page 7: ...nt for example box 1 of 3 MAKE SURE THAT YOU HAVE ALL BOXES IN THE SHIPMENT BEFORE YOU BEGIN THE INSTALLATION Table 1 on the next page provides an overview of the installation process for each DXi6900 configuration Locate your configuration in the table to see the components you need to install and the procedures to follow YOU MUST INSTALL ALL NODE COMPONENTS INSTALL THE NODE ARRAY MODULES AND EXP...

Page 8: ... Opening the Node Cover on page 16 b Installing the Optional Network Cards on page 25 c Closing the Node Cover on page 31 3 Installing the DXi6900 System in the Rack on page 32 51 102 TB 1 DXi6900 Node 1 Array Module RBOD 1 or 2 Expansion Modules EBODs l DXi6900 G1 Options o Dual Port X520 10 GbE Card or Quad Port i350 1 GbE Card l DXi6900 G2 Options o Up to three Dual Port X520 10 GbE Cards o Up ...

Page 9: ...ng the Memory Modules on page 21 c Installing the Optional Network Cards on page 25 d Closing the Node Cover on page 31 3 Installing the DXi6900 System in the Rack on page 32 Table 2 DXi6900 G2 PCI Slot Configuration Options Caution The PCI slot location for each card must be followed in each configuration option Option PCI Slot 4 PCI Slot 5 PCI Slot 7 101 102 2 x 16 Gb Fibre Channel 103 2 x 16 Gb...

Page 10: ...Node including hard drives weights 49 3 pounds 22 4 kg A minimum of two people are required to lift the chassis Unpacking the DXi6900 Node The box containing the DXi6900 Node contains the following items Item Descriiption Rack mount rails Includes cable management straps Accessory kit Includes the following l DXi6900 User Essentials l Product Installation Instructions card l Quantum Products Regul...

Page 11: ...DXi6900 Installation Guide 11 Carefully unpack and remove the components from the packing materials see Figure 4 below Figure 4 Unpacking the DXi6900 Node Item Description 1 Bezel key taped to back 2 Accessory Kit 3 Rack mount rails ...

Page 12: ...figuration o Cable kit quad 1GbE NIC Cable CAT6 RJ45 non plenum blue solid 25 feet 4 o Cable kit dual 10 GbE NIC Optical Cable 10 GbE 10 meter with SFP 2 o Cable kit dual 10 GbE NIC Twinax Cable 10 GbE 5 meter 2 DXi6900 G2 l X520 10 GbE network card up to 3 l X540 10 GBase T network card up to 3 l 16 GB Fibre Channel card up to 3 The following network cables ship with the optional network cards de...

Page 13: ...X540 10 GBase T Card 16 GB Fibre Channel Card Unpacking the DXi6900Array Module or Expansion Module Depending on the configuration 1 2 Array Modules RBODs and 0 13 Expansion Modules EBODs ship in separate boxes along with the rest of the system see DXi6900 Installation Overview on page 7 Caution Make sure to retain all packing materials as well as the documentation and other items included in the ...

Page 14: ...ning the DXi6900 Array module RBOD or Expansion module EBOD contains the following items l Rack mount rails o Screws and spacers l Accessory kit which includes the following o C13 to C14 power cord 2 o North American power cord 2 o DXi6900 G1 Array Module 2m mini SAS to mini SAS HD interconnect cable 4 o DXi6900 G2 Array Module 2m mini SAS HD to mini SAS HD interconnect cable 4 Note NetApp Co Bran...

Page 15: ...0 Quantum DXi6900 Installation Guide 15 Figure 7 Unpacking the DXi6900 Array Module or Expansion Module 1 2 3 4 5 6 Item Description 1 Rack mount rails 2 Foam 3 Array Expansion module 4 End cap 5 Box 6 SAS AC power cables ...

Page 16: ...he Node Cover on page 31 Opening the Node Cover To open the DXi6900 Node cover WARNING The DXi6900 G1 Node including hard drives weighs 53 0 pounds 24 0 kg The DXi6900 G2 Node including hard drives weights 49 3 pounds 22 4 kg A minimum of two people are required to lift the chassis 1 Set the Node on a flat stable surface 2 Make sure that no cables power Ethernet Fibre Channel or SAS are connected ...

Page 17: ...2 3 1 Latch release lock 2 Latch 3 Node cover 5 Lift the latch on top of the Node and slide the cover back 6 Grasp the cover on both sides and carefully lift the cover away from the Node 7 a Remove the cooling shroud by holding the touch points and lifting the shroud away from the Node see Figure 10 on the next page ...

Page 18: ...ts in the DXi6900 Node Quantum DXi6900 Installation Guide 18 Figure 10 Removing the Cooling Shroud 1 1 Cooling shroud 8 Remove the cooling fan assembly by lifting the release levers upwards see Figure 11 on the next page ...

Page 19: ... Fan Assembly 1 2 3 4 5 6 1 Cooling fan assembly 2 Cooling fan 3 Release lever 2 4 Guide pin on the system board 2 5 Cooling fan connector 6 6 Guide pin on the chassis 6 9 Lift the cooling fan assembly out of the Node Figure 12 on the next page illustrates the interior of the DXi6900 Node with the cover removed ...

Page 20: ...Installing Components in the DXi6900 Node Quantum DXi6900 Installation Guide 20 Figure 12 Inside the DXi6900 Node 1 0 2 3 1 0 2 3 1 2 3 4 5 Item Description 1 Cooling shroud 2 Memory modules ...

Page 21: ...de ships from the factory with 16 GB memory modules DIMMs pre installed in 8 memory sockets for a total of 128 GB of memory For 119 TB and larger configurations install the 8 provided 16 GB memory modules in the Node see Table 1 below Memory modules must be installed in the correct sockets in order for the system to function properly see Figure 13 on the next page Note Memory socket numbers are di...

Page 22: ...Installing Components in the DXi6900 Node Quantum DXi6900 Installation Guide 22 Figure 13 Node Memory Module Locations ...

Page 23: ...e appropriate ESD precautions including the use of a grounding strap when performing this procedure Caution Handle the memory modules by the card edges and avoid touching the components on the memory module 1 Remove the plastic memory blank from the socket by pressing down and out on the ejectors on each end of the socket until the memory blank pops out of the socket see Figure 14 below The plasti...

Page 24: ...the memory module in the socket in only one way 3 Press down on the memory module with your thumbs until the ejector latches snap into a locked position 4 Repeat steps 1 3 for each memory module 5 Replace the cooling fan assembly a Align the cooling fan assembly slots with the guide pins on the chassis see Figure 15 below b Slide the cooling fan assembly into the chassis c Lock the cooling fan ass...

Page 25: ...ng the chassis Installing the Optional Network Cards The following network card options are available for all DXi6900 configurations see Table 2 below The additional Ethernet ports can be used for management replication or data traffic If ordered with the configuration install the provided optional network cards see Figure 17 on the next page Table 2 DXi6900 Network Card Options DXi6900 Configurat...

Page 26: ...1 Item Card Option s 1 Install optional i350 or X520 network card in slot 2 Figure 18 DXi6900 G2 Optional Network Card Location 1 2 3 Item Card Option s 1 Install optional X520 X540 or Fibre Channel card in slot 4 See Table 3 below for configuration options 2 Install optional X520 X540 or Fibre Channel card in slot 5 See Table 3 below for configuration options 3 Install optional X520 X540 or Fibre...

Page 27: ...Ethernet 2 x 16 Gb Fibre Channel 109 2 x 10 Gb Ethernet 2 x 16 Gb Fibre Channel 2 x 16 Gb Fibre Channel 110 2 x 10 Gb Ethernet 2 x 16 Gb Fibre Channel 2 x 10 Gb Ethernet 2 x 10 Gb Ethernet 2 x 10 GbE SFP or 2 x 10 GBase T Ethernet ports DXi6900 G1 Installing Optional Network Cards in Expansion Card Riser 1 To install the optional i350 or X520 network card in the DXi6900 Node Caution Use appropriat...

Page 28: ... and Installing the Expansion Card Riser 1 1 2 3 4 5 1 Touch points 2 Expansion card riser 1 3 Front riser guide 4 Expansion card riser 1 connector 5 Back riser 2 Press the tab to release the expansion card latch and rotate the latch away from the expansion card riser see Figure 20 on the next page ...

Page 29: ...ion card connector 5 Insert the card edge connector firmly into the expansion card connector until the card is fully seated 6 Close the expansion card latch 7 Holding the touch points insert the expansion card riser 1 into the riser connector on the system board see Figure 19 on the previous page 8 Optical 10 GbE option only Insert an SFP unit into each 10 GbE port on the X520 card The SFP units a...

Page 30: ... the slot see Figure 21 below The expansion card latch is located to the right of PCIe slots as you face the rear of the Node The latch will remain attached to the system Figure 21 Installing an Optional Card in Riser 2 or 3 1 2 3 4 5 1 Expansion card latch blue 2 Network card 3 Metal slot cover 4 Expansion card connector 5 Expansion card riser 2 or 3 2 Remove the metal slot covers from the slots ...

Page 31: ...GbE option only Insert an SFP unit into each 10 GbE port on the X520 card The SFP units are included with the optional 10 GbE network card Closing the Node Cover To close the DXi6900 Node cover 1 Lift the latch on the cover see Figure 22 below Figure 22 Replacing the Node Cover 1 2 3 1 Latch release lock 2 Latch 3 Node cover 2 Place the cover onto the Node chassis and offset the cover slightly bac...

Page 32: ...e Order of the Components in the Rack To make it easier to correctly cable the system and for safety reasons follow these recommendations when installing the DXi6900 system in the rack l A rack is not included with the DXi6900 A standard 40U rack can be ordered from Quantum as an optional purchase l Figure 23 below shows the recommended rack configuration for a maximum capacity DXi6900 configurati...

Page 33: ...Installing the DXi6900 System in the Rack Quantum DXi6900 Installation Guide 33 ...

Page 34: ... of installation do NOT install the DXi6900 chassis too high in the rack The weight of the chassis may cause the rack to become top heavy and unstable if installed in the top of an empty rack To mark the rack place a mark or tape on the rack s front vertical rails where you want to locate the bottom of the unit you are installing in the rack The bottom of each 1U space is at the middle of the narr...

Page 35: ...iption 1 Latches click into place in rack flange round or square holes 2 Rail front end 3 Latch release button 4 Rail back end Installing the DXi6900 Array or Expansion Module WARNING The DXi6900 Array module and Expansion module including hard drives weigh 59 0 pounds 26 8 kg and 57 0 pounds 25 9 kg respectively A minimum of two people are required to lift the chassis ...

Page 36: ...odule with the rails and then slide the module into the rack see Figure 26 on the next page 2 Use a 10 32 x 3 4 in SEM screw with washer at the bottom hole on each side of the Array or Expansion module s front panel to secure the module to the rack 3 Install the end caps on either side of the module by inserting the top of the end cap first and then snapping the bottom into place Install the end c...

Page 37: ...Mounting Rails 1 Position the left and right rail end pieces labeled FRONT facing inward and orient each end piece to seat in the holes on the front side of the vertical rack flanges see Figure 27 on the next page 2 Align each back end piece in the bottom and top holes of the desired U spaces 3 Engage the back end of the rail until it fully seats on the vertical rack flange and the latch clicks in...

Page 38: ...ed to remove the rails use a flat head screwdriver to lift the latch release button on the end piece midpoint and unseat each rail Figure 27 Node Rails Installation 1 2 3 4 Item Description 1 Latches click into place in rack flange round or square holes 2 Rail front end 3 Latch release button 4 Rail back end ...

Page 39: ...ch they were removed 1 Pull the inner slide rails out of the rack until they lock into place see Figure 28 on the next page 2 Locate the rear rail standoff on each side of the system and lower them into the rear J slots on the slide assemblies 3 Rotate the system downward until all the rail standoffs are seated in the J slots 4 Push the system inward until the lock levers click into place 5 Press ...

Page 40: ...tion 1 Rear rail standoffs 2 Rear rail J slots 3 Slide release lock button 4 Lock lever 5 Inner slide rails Cabling the DXi6900 Follow these steps to cable the DXi6900 1 Connect each Array module RBOD to the DXi6900 Node For DXi6900 G1 configurations use the provided 2m mini SAS HD to mini SAS cables see Figure 29 on the next page ...

Page 41: ... SAS HD plugs may cause an installation failure DXi6900 G1 Cable Connection Instructions a Connect port RBOD1 slot 5 on the Node to SAS port Ch 1 Controller A on RBOD 1 b Connect port RBOD1 slot 6 on the Node to SAS port Ch 1 Controller B on RBOD 1 c Connect port RBOD2 slot 5 on the Node to SAS port Ch 1 Controller A on RBOD 2 d Connect port RBOD2 slot 6 on the Node to SAS port Ch 1 Controller B o...

Page 42: ...iag O O Port 1 Port 2 ID Diag O O Port 1 Port 2 ID Diag O O Port 1 Port 2 ID Diag O O System Node RBOD 1 RBOD 2 1A 1B 2A 2B 1A 2A 1B 2B 2 Connect each Array module RBOD to its corresponding Expansion module EBOD using the provided 2m mini SAS HD to mini SAS cables see Figure 31 on the next page a Connect SAS expansion port 1 Controller A on RBOD 1 to SAS port 1 Controller A on EBOD 1 1 b Connect S...

Page 43: ...t 2 ID Diag O O Port 1 Port 2 ID Diag O O RBOD 1 EBOD 1 1 1A 1B 1A 1B 3 Connect each Expansion module EBOD using the provided 1m mini SAS cable see Figure 32 below and Figure 33 on page 45 a Connect the SAS expansion port Controller A on the EBOD to SAS port 1 Controller A on the next EBOD in the sequence b Connect the SAS expansion port Controller B on the EBOD to SAS port 1 Controller B on the n...

Page 44: ...BOD 1 7 EBOD 1 6 ID Diag Port 1 ID Diag Port 1 EBOD 1 4 EBOD 1 3 ID Diag Port 1 ID Diag Port 1 ID Diag Port 1 ID Diag Port 1 ID Diag Port 1 ID Diag Port 1 EBOD 1 5 EBOD 1 2 EBOD 1 1 ID Diag Port 1 ID Diag Port 1 ID Diag Port 1 ID Diag Port 1 1A 1B 1A 1B 1A 1B 1A 1B 1A 1B 1A 1B 1A 1B 1A 1B 1A 1B 1A 1B 1A 1B 1A 1B ...

Page 45: ...EBOD 2 5 ID Diag Port 1 ID Diag Port 1 EBOD 2 3 EBOD 2 2 ID Diag Port 1 ID Diag Port 1 ID Diag Port 1 ID Diag Port 1 EBOD 2 4 EBOD 2 1 ID Diag Port 1 ID Diag Port 1 ID Diag Port 1 ID Diag Port 1 1A 1B 1A 1B 1A 1B 1A 1B 1A 1B 1A 1B 1A 1B 1A 1B 1A 1B 1A 1B 1A 1B 4 Connect each power supply to an AC power source using the provided power cable see Figure 34 on the next page ...

Page 46: ...ched straps to secure the power cords to the chassis Figure 34 DXi6900 Power Cabling System Node Rear RBOD 1 or 2 ID Diag Port 1 ID Diag Port 1 EBOD 0 to 13 Port 1 Port 2 ID Diag O O Port 1 Port 2 ID Diag O O Primary AC Source Secondary AC Source Primary AC Source Secondary AC Source Primary AC Source Secondary AC Source Ethernet Cables l Do not connect any Ethernet cables at this time You will co...

Page 47: ... See Table 2 on page 9 for DXi6900 G2 Fibre Channel configuration options Figure 36 DXi6900 G2 Fibre Channel Cabling 1 2 3 Item Description 1 To PTT or VTL optional 2 To PTT or VTL optional 3 To PTT or VTL optional Initializing the Storage Arrays and Software The DXi6900 is not operational until you add the storage arrays to the system and initialize them and initialize the software using the Pick...

Page 48: ... with multiple Expansion modules EBODs b Turn on both power switches on the back of each Array module RBOD see Figure 38 on the next page Wait until the seven segment display on the rear of the module displays 99 approximately 5 minutes c Press the power button on the front of the Node see Figure 39 on the next page Wait for the system to boot before continuing with the procedure This can take up ...

Page 49: ...connect the Ethernet port on the service laptop to the service port on the Node see Figure 40 below Figure 40 Connecting to the Service Port System Node Rear Service Port 3 Configure the network settings on the laptop Note This procedure assumes you are running Windows 7 on the laptop The steps might be different if you are using another operating system a Access the Network Connections control pa...

Page 50: ...d Select Use the following IP address and then enter the following information Caution Before changing the IP address information write down the original settings This will be used later to reset the network configuration l IP address 10 17 21 200 l Subnet mask 255 255 255 0 e Click OK and then click Close f Wait at least two minutes for the computer to set the IP addresses on the local computer 4...

Page 51: ...nfiguration Tools for Configuring Hardware 1 Serial Numbers Tools for Node System and OUI Serial Numbers 2 Install Application Software Install Application Software 3 More Tools Miscellaneous Tools 4 Pick to Order PTO Initial DXi assembly and configuration 8 Type the option number for Pick to Order PTO and press Enter The Pick To Order Menu displays see Figure 43 below Figure 43 Pick to Order Menu...

Page 52: ...on 1 On the Pick to Order Menu type the number option for Discover Hardware and press Enter The system detects installed hardware and discovers the attached storage see Figure 44 below This can take several minutes Check the output for any errors or warnings If errors occur resolve them before continuing see Troubleshooting on page 80 Figure 44 PTO Discover Hardware First locate and prepare any ex...

Page 53: ...15 37 21 PDT 2014 The ESM version 0396 is already running on all EBODs for Qarray1 Finished autoleveling NetApp arrays Firmware Tuning controllers for Qarray1 Populating Encryption Info cache Next locate and record all hardware found Detecting begin Detecting date Detecting localnode Detecting name Detecting serial number Detecting motherboard Detecting ethernet Detecting bios Detecting cpu Detect...

Page 54: ...k to Order Hardware Check Menu 0 Check Memory check memory size to number of trays 1 Check NetApp Trays check for valid tray combinations 2 Check HBAs check for valid PCI slots and cards 3 On the Hardware Check Menu type the option for Check Memory and press Enter The system displays information about the installed memory see Figure 46 below Make sure the memory configuration is valid before conti...

Page 55: ...stalled in the Node see Figure 48 below Note The expansion card display below is an example The actual cards assigned to each PCI slot will depend on the configuration option selected for the DXi see Table 2 on page 9 Make sure all of the installed expansion cards are detected If one or more expansion cards are not detected or are detected in the wrong slots resolve the issue before continuing see...

Page 56: ...nue y n 8 Type y and press Enter The system displays the following message n Array s found Is this correct y n 9 Verify that the number of Array Modules detected is correct then type y and press Enter The system begins background RAID initialization of the storage arrays see Figure 49 below Starting background RAID initialization can take several minutes Figure 49 PTO RAID Initialize Verifing stor...

Page 57: ...size 15 756 TiB Creating TRAY_99_VOL_1 Setting additional attributes for Volume TRAY_99_VOL_1 create TRAY_99_VOL_2 of size 15 756 TiB Creating TRAY_99_VOL_2 Setting additional attributes for Volume TRAY_99_VOL_2 Created Disk_Pool_0 Reserved space for 1 hotspares in Disk_Pool_0 create TRAY_0_VOL_1 of size 15 756 TiB Creating TRAY_0_VOL_1 Setting additional attributes for Volume TRAY_0_VOL_1 create ...

Page 58: ... service password Qa SmX7 c At the command prompt type the following command and press Enter sudo i sh d At the command prompt type the following command and press Enter sh opt DXi scripts service sh e Type the option for Pick to Order PTO and press Enter 12 On the Pick to Order Menu type the option for Software initialize and press Enter The system displays the following message This will start t...

Page 59: ... on page 72 l Installing the Front Bezel on page 74 l Installing the Capacity License on page 75 l Taking Next Steps on page 78 Completing the Getting Started Wizard To complete the DXi6900 Getting Started wizard 1 On the service laptop open a supported Web browser type 10 17 21 1 in the Address box and press Enter The Login window displays see Figure 50 on the next page Additional Information l F...

Page 60: ...e password and click Login The Welcome page displays see Figure 51 below Note If a message on the page indicates the DXi is in Limited Mode wait ten minutes and then log on again Figure 51 Getting Started Wizard Welcome 3 Read the information about the wizard and then click Next to continue The License Agreement page displays see Figure 52 on the next page ...

Page 61: ... License Agreement check box and then click Next to continue Note If you do not accept the license agreement the DXi6900 will not function The Access Control page displays see Figure 54 on page 64 Figure 53 Getting Started Wizard Access Control 5 Create a new password for the GUI Administrator user account a Enter the Old Password password b Enter a New Password ...

Page 62: ... Network page displays see Figure 54 on page 64 IMPORTANT READ BEFORE CONTINUING Steps 8 12 below provide an example of configuring network settings on the DXi6900 In this example the DXi6900 is configured as follows l All Ethernet ports are configured as individual devices Not Bonded l A single network interface with one IP address is configured for eth1 l All traffic types management data and re...

Page 63: ... A network switch is not supplied with the DXi6900 The DXi6900 bonding settings must match the switch settings If the switch settings and the DXi6900 settings do not match your system may become inaccessible through the switch Note The figure below is for illustrative purpose only The Network page will reflect the actual number of physical ports in the system ...

Page 64: ...g Started Wizard Network 8 Under General enter the following network information as provided by your network administrator a Enter the Hostname used to identify the DXi6900 system The Hostname cannot be blank and must contain only letters A Z a z numbers 0 9 hyphens underscores _ and dots ...

Page 65: ... replication sources and targets and other information 9 Under IP Address Configuration Bonding Details configure each Ethernet port as a separate network device a If necessary click the Show link to show the bonding details table b In the Not Bonded row make sure each Ethernet port is selected eth1 eth2 and so on c If necessary click Update to save the changes you made to the Bonding Details tabl...

Page 66: ...e using the default gateway a route must be added under the Routing Details section For more information about interface routing see the Network section in the Quantum DXi6900 User s Guide 6 68159 13 Click Next to continue The Date Time page displays see Figure 55 below Figure 55 Getting Started Wizard Date Time 14 If necessary select Manual Date Time Settings to manually set the system date and t...

Page 67: ...he Timezone drop down box select the time zone where the DXi6900 is located 16 Next to Time Format select the format to use when displaying times 24 hours or 12 hours 17 Click Next to continue The Confirm page displays see Figure 56 below Figure 56 Getting Started Wizard Confirm ...

Page 68: ...test available software version To complete the software upgrade 1 On the service laptop open a supported Web browser type 10 17 21 1 in the Address box and press Enter The Login window displays see Figure 57 below Additional Information l For Web browsers the DXi6900 supports Firefox 17 or higher Chrome 21 or higher or Internet Explorer 9 10 or 11 l If the Login window does not display verify tha...

Page 69: ...ile This is the recommended method for upgrading but it requires that the DXi be able to access the Internet If the DXi cannot access the Internet a link back to the Getting Started Wizard Network page appears see Figure 59 below Note Resetting network settings in the Getting Started Wizard Network page requires a DXi system reboot Figure 59 Upload New DXi Software Upgrade File No Internet Connect...

Page 70: ... upgrade file on the DXi6900 Use this upgrade method if the DXi cannot access the Internet 1 Download the latest software upgrade file from the Quantum Service and Support Site http www quantum com serviceandsupport index aspx 2 Click Browse and select the software upgrade file on your computer downloaded in step 1 3 Click Upload 4 Click Start to begin the upload process Do not close the window un...

Page 71: ...available software upgrades 8 Click Install to begin the software installation Wait for the system to fully restart This can take up to 30 minutes Clear Your Web Browser Cache It is important to clear your Web browser cache before logging on to the remote management console for the first time following the software upgrade This will ensure the remote management console displays correctly Continue ...

Page 72: ...les Note Quantum DXi6900 systems support 10 GbE optical cable lengths of up to 300 meters with OM3 cables and up to 100 meters with OM2 cables Quantum recommends using the DXi6900 10 meter LC to LC optical cable type that are shipped with the DXi6900 system Consult your 10GbE Optical switch SFP documentation for additional information on optical cable requirements Twinax Connect up to two 10 GbE T...

Page 73: ...DXi6900 G1 Ethernet Cabling Optional 4 x 1 GbE Ports System Node Rear To 1 GbE Network Figure 65 DXi6900 G1 Ethernet Cabling Optional 2 x 10 GbE Ports System Node Rear To 10 GbE Network DXi6900 G2 Ethernet Cables 1 Connect up to three CAT6 Ethernet cables to the 1 GbE ports see Figure 66 on the next page 2 Depending on configuration there are three 10 GbE SFP options Optical Twinax CAT6 available ...

Page 74: ...se configuration process and if the Twinax cables supplied by Quantum are not compatible with your switch then you will need to provide your own compatible Twinax cables from your switch vendor Be sure to have these available before the system installation takes place CAT6 Connect up to six CAT6 Ethernet cables to the 10 GbE ports Figure 66 DXi6900 G2 Ethernet Cabling 1 2 3 4 Item Description 1 to...

Page 75: ...ng the Front Bezel Installing the Capacity License A 17 TB storage capacity license is pre installed on the DXi6900 at the factory For 34 TB and larger configurations you must install a license to enable the additional purchased capacity Locate the Storage Capacity License Certificate that was included with the system and then complete the following procedure ...

Page 76: ... navigate to the Utilities License Keys page in the DXi remote management console see Figure 68 below Note that the system serial number displays directly above the New Key box For information about accessing the remote management console see the DXi6900 User s Guide 6 68159 Figure 68 License Keys Page b In the other browser enter the address for the License Key Management Web site see Figure 69 o...

Page 77: ...Licensed Feature page returns a storage capacity key 3 Switch to the Utilities License Keys page in the DXi remote management console see Figure 68 on the previous page 4 Enter the license key in the New Key box and click Add The file system is automatically expanded This can take up to 10 minutes 5 Click the Storage Capacity license link on the License Keys page The maximum allowed storage capaci...

Page 78: ...ng Email Reports Quantum recommends enabling Email Reports after you install your DXi When enabled Email Reports periodically sends system configuration and status information to Quantum including any software upgrades you have installed using the Software Upgrade Utility Quantum Support can use this information to provide a better support experience in the future To configure Email Reports 1 Make...

Page 79: ...ge as one or more OST OpenStorage storage servers for use with a backup application Replication Wizard Helps you configure the DXi to send replicated data to or receive replicated data from another DXi system Email Alerts Wizard Helps you configure the DXi to automatically send notifications and reports to selected recipients Support Wizard Helps you enable licensed features on the DXi register yo...

Page 80: ...see Installing the Optional Network Cards on page 25 6 Make sure all SAS and power cables are securely connected to the correct ports see Cabling the DXi6900 on page 40 7 Turn on the system see Accessing the Service Menu on page 48 8 Return to the Pick to Order Menu see Performing Pick to Order Configuration on page 52 9 Select the Reset PTO option and perform PTO configuration again starting with...

Page 81: ...tum DXi6900 Installation Guide 81 Problem Corrective Action The Home page does not display the expected total Disk Capacity Make sure the storage capacity license is installed see Installing the Capacity License on page 75 ...

Page 82: ...ents To provide comments or feedback about this document or about other Quantum technical publications send e mail to doc comments quantum com Contacting Quantum Quantum DXi6900 Installation Guide 82 2015 Quantum Corporation All rights reserved Be Certain DLT DXi DXi Accent DXi V1000 GoVault Lattus NDX the Q logo the Q Quantum logo Q Cloud Quantum the Quantum logo Quantum Be Certain Quantum Vision...

Reviews: