background image

Summary of Contents for 1657 RLC Digibridge

Page 1: ...adTech assumes no responsibility for any error or for consequential damages that may result from the misinterpretation of any procedures in this publication Contents Instruction Manual Changes Specifi...

Page 2: ...ove fuse drawer by pressing up on release tab Ref No 3R Line voltage switch has been deleted power input is from 90 250V AC Page 1 4 Table 1 3 Accessories A quantity of two spare fuses are supplied 6...

Page 3: ...ons Monthly more or less depending on usage the built in test fixture should be cleaned with a soft brush and isopropyl alcohol Avoid getting excess alcohol on instrument paint surfaces otherwise dama...

Page 4: ...table Measurement Mode Measures R series or parallel L and Q series or parallel C and D series or parallel All measurement modes are pushbutton selectable Displays LED type numerical display with auto...

Page 5: ...VICE POLICY QuadTech policy is to maintain product repair capability for a period of five 5 years after original shipment and to make this capability available at the then prevailing schedule of charg...

Page 6: ...Table of Contents...

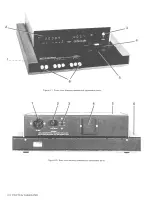
Page 7: ...ptors Figure 1 shows the front panel conrols and indicators receives any common component part axial lead or radial Table 1 1 identifies them with descriptions and functions lead so easily that insert...

Page 8: ...1 2 INTRODUCTION...

Page 9: ...INTRODUCTION 1 3...

Page 10: ...1 4 INTRODUCTION...

Page 11: ...with a power connector that is in conformance with the International Electrotechnical Commission publication 320 The 3 flat contacts are surrounded by a cylindrical plastic shroud that reduces the pos...

Page 12: ...ies See Table 1 3 BNC Adaptor 1689 9601 BNC Cable Assembly 1689 9602 or equivalent Remote Test Fixture 1689 9600 or equivalent handler or special fixture This remote test fixture functions like the on...

Page 13: ...arly Connect the outer shield contacts to the shield or case of the DUT only if it is isolated from both ends of the DUT EXTENDER CABLE COLOR CODE RED AND RED 1 current drive to high end of DUT RED AN...

Page 14: ...s a regulated power supply with the usual characteristic that it functions properly only as a source not a sink then the following test setup is recommended Connect across the power supply a bleeder r...

Page 15: ...OPERATION 3 1...

Page 16: ...is connected to one of its 2 main terminals 3 2 OPERATION Notice that the 2 red tips must connect to the same end of the DUT The terminals with white bands are potential connections with no bands cur...

Page 17: ...s given in paragraph 3 1 To correct for cable capacitance refer to paragraph 3 7 3 3 FUNCTION AND RANGE SELECTIONS 3 3 1 Function Pushbuttons The selection of the principal parameter to be measured is...

Page 18: ...e is a factor of 5 with 2 exceptions going from 19999 up to 99999 and finally to blank without any change in decimal point but with reduced accuracy Any measurement in the high extension of either the...

Page 19: ...se a capacitor measured at 1 kHz has C 400 uF and D 0 5 The R LC basic accuracy is 0 4 and the R LC accuracy factor is 1 5 Therefore the accuracy of the C measurement is 0 6 Notice that the D or Q of...

Page 20: ...o the applicable specifications If there are none known be sure to 3 6 OPERATION specify with your results whether they are parallel or series and what the measurement frequency was Resistors below ab...

Page 21: ...er than the ohmic resistance of the wire leads and foils that are physically in series with the heart of a capacitor ESR includes also the effect of dielectric loss and is therefore dependent on frequ...

Page 22: ...tall an adaptor GR 874 Q2 on each of the two coaxial connectors Land H of the capacitor b Connect cable branch G to the ground post of the low terminal adaptor With a clip lead or plain wire connect t...

Page 23: ...ue The only precision Patent applied for 4 1 4 2 components in this instrument are three standard resistors and a quartz crystal stabilized oscillator There is no reactance standard For example C and...

Page 24: ...4 2 THEORY...

Page 25: ...driving the sine wave generator described below 4 2 3 Sine Wave Generation Figure 4 4 Starting with a digital signal at 256 times the selected test frequency the sinewave generator provides the test...

Page 26: ...esistance be sure that grounded equipment has rubber feet or other means of insulation from the work surface The instrument or system component being serviced should be similarly insulated while groun...

Page 27: ...placed along all surfaces of the instrument Insert fillers between pads and container to ensure a snug fit Mark the box Delicate Instrument and seal with strong tape or metal bands Excelsior Cover pa...

Page 28: ...rrectly set for your power Iine voltage Verify performance as follows a Set the line voltage switch connect the power cord and depress the POWE R button b Press the PARALLEL SERIES button if necessary...

Page 29: ...w Calibration of Standard The acceptable RLC readout min to max range may have to be modified if your actual Zx or Zx accuracy is different from the value tabulated For example if your 1 k standard is...

Page 30: ...5 4 SERVICE...

Page 31: ...fer to para 3 7 for details of connection to 3 terminal capacitors with coaxial connectors and for the determ ination of cable capacitance The corrected readout of capacitance is the actual display mi...

Page 32: ...etails of setup and performance b For check CA the GR 1482 B inductor must be measured twice i e once with a shorting link from center to left reference terminals once with the link from center to rig...

Page 33: ...front corners are unhooked Lift it directly upward Figure 5 1 Reassembly note 2 screws 13 mm long The next step removal of display board is recommended though not absolutely necessary before removal o...

Page 34: ...es Be sure to enfold the pliable dirt seals at left and right sides of main chassis as you start to slide bottom shell onto main chassis use 4 screws 8 mm long h Remove 8 screws shown in Figure 5 5 as...

Page 35: ...own to make a 1657 9700 function as a 1657 9800 or vice versa See para 3 1 for line frequency consideration Conversion involves relocating 2 jumpers and substitution of precision oscillator U7 refer t...

Page 36: ...e 5 5 screws KL 5 10 SERVICE b Clean and check the 4 contact strips Use a card wet with isopropyl alcohol for cleaning Hold the board at an angle so that any drip falls away from the circuits c If nec...

Page 37: ...oint may be caused by a fault in the directly associated circuit on the display board Refer to comments above Pushbutton Malfunction of any pushbutton may be caused by a fault in the switch or in buff...

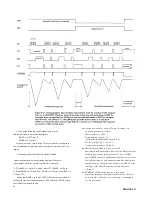
Page 38: ...nal changes amplitude as you switch ranges thus RANGE 1 0 68 V pk pk RANGE 3 20 mV pk pk d If no fault appears in steps a b c skip to para 5 8 4 e Verify that 0 25 V RMS TEST SIGNAL found at S03 pin 1...

Page 39: ...ins 12 9 5 for similar pulses as shown with frequencies as follows Pin 12 276 or261 12 kHz Pin 9 61 440 or 78 3 kHz Pin 5 30 720 or 26 112 kHz Otherwise U10 is faulty NOTE At pin 12 for the 1657 9700...

Page 40: ...ate signal SSW1 U39 pin 5 as a trigger for your scope Pin 3 should be a 1 kHz switched sine wave 500 to 620 mV pk pk for a few cycles while SSW1 is logic high e Similarly check at switch U39 pin 10 us...

Page 41: ...sses all the preceding checks i e no fault can be found in the analog circuitry the fault is liable to be in digital circuitry See below 5 8 5 Control Signal Checks Figures 5 10 5 11 If there is no st...

Page 42: ...5 16 SERVICE...

Page 43: ...the reset pulse provided in step aa Provide reset pulses in either of 2 ways Preferably set up a pulse generator as follows Source resistance 50 Repetition rate period 1 s Pulse polarity and duration...

Page 44: ...associated circuits 5 8 6 Digital Circuitry Display Board A faulty integrated circuit package can usually be identified by interchanging plug in component parts of the same type between display chann...

Page 45: ...or signal flow Reference designation usage is described below 6 2 REFERENCE DESIGNATIONS Each electrical component part on an assembly is identi fied on equipment and drawings by means of a reference...

Page 46: ......

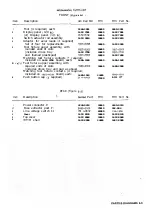
Page 47: ...657 7800 Matching test fixture contacts 4 required included on 1657 4700 board each 5 alt Test fixture upper assembly with squared ends of slots 1689 2000 24655 1689 2000 includes dross tray and pad...

Page 48: ...reintm MAO2 6 6 3 7 ion Cerbidr Nw Yo L NY 001 6 6 6 4 United Csrr Fat Sorton MA 63060 inoreen C ew a d OH 44104 83743 Wed Le erd Mt ernon NY 10550 66083 Westinglvme 6loo e d N 0 003 66062 We n Newerk...

Page 49: ......

Page 50: ......

Page 51: ......

Page 52: ......

Page 53: ......

Page 54: ......

Page 55: ......

Page 56: ......

Page 57: ......

Reviews: