background image


QSA Global, Inc.


 40 North Avenue Burlington, MA 01803 

 888.272.2242


 781.272.2000


 qsa-global.com 

Software Manual 

 MAN-066 

 March 2023 

 Page 12 of 43 


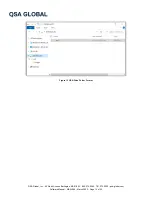
Figure 15 USB Drive Folder Format


Summary of Contents for OPENVISION HD OVHD-NDT-70

Page 1: ...SOFTWARE MANUAL MAN 066 REVISION B OPENVISION HD OVHD NDT 70 SOFTWARE MANUAL...

Page 2: ...40 North Avenue Burlington MA 01803 888 272 2242 781 272 2000 qsa global com Software Manual MAN 066 March 2023 Page 2 of 43 Revision Record Date Description A 03 2023 Production Release B 03 2023 Co...

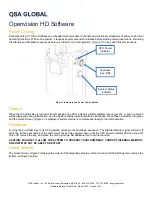
Page 3: ...he System Status Indicators will also illuminate When these indicators turn green and the Home Screen Figure 2 is displayed system startup is complete and ready for normal operation Shutdown Turning t...

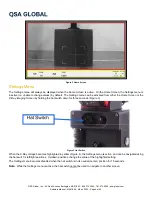
Page 4: ...ctivated from either the Home Screen or the X Ray Imaging Screen by holding the hat switch down for three seconds Figure 3 Figure 3 Hat Switch When the X Ray voltage becomes highlighted in yellow Figu...

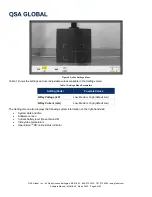
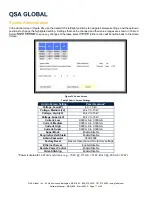
Page 5: ...values available in the Settings menu Table 1 Settings Menu Parameters Setting Units Possible Values X Ray Voltage kV Low Medium High default Low X Ray Current mA Low Medium High default Low The Sett...

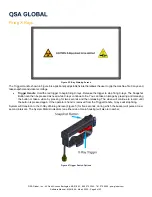
Page 6: ...gger to stop firing X rays The Snapshot Button can then be pressed as need while X rays continue to fire You can take an image by pressing and releasing the button or take a video by pressing for two...

Page 7: ...n by default System Status Indicators remain amber colored and the buzzer pulse rate changes to two second intervals Figure 7 X Ray Live Image Screen To change settings while emitting X Rays hold down...

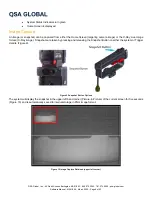
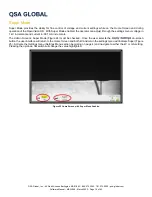
Page 8: ...Screen targeting camera image or the X Ray Live Image Screen X Ray image Snapshots are taken by pressing and releasing the Snapshot Button on either the system or Trigger Handle Figure 9 Figure 9 Snap...

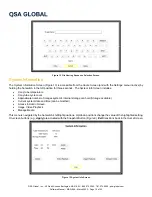
Page 9: ...igure 11 X Ray Video Recording in Progress Custom Naming Media Files Media Files video and snapshots can be given a name of choice to act as an identifier that will display within the image A filename...

Page 10: ...osition for three seconds The System Info Screen includes X ray tube temperature X ray tube cycle count Approximate number of images system s internal storage can hold Storage Available Current system...

Page 11: ...ries that are named with a date stamp of the format YYYYMMDD If the directory does not exist at the point the first snapshot for the day is taken the directory will be automatically created Images wit...

Page 12: ...QSA Global Inc 40 North Avenue Burlington MA 01803 888 272 2242 781 272 2000 qsa global com Software Manual MAN 066 March 2023 Page 12 of 43 Figure 15 USB Drive Folder Format...

Page 13: ...penVision HD transitions to the Media Transfer Screen Figure 17 Navigate to desired folder to copy then press and release the Snapshot Button Figure 9 to initiate file transfer Figure 16 USB Port Figu...

Page 14: ...directory of images will be transferred to the USB drive per insertion Following the last step of a transfer the screen will transition to the home screen To initiate another transfer remove the USB...

Page 15: ...he OpenVision HD Selecting Yes will cause the images in that specified folder to be deleted from the OpenVision HD and then the system will transition to the Home Screen Figure 21 Image Deletion Confi...

Page 16: ...ssword Screen Selecting the Admin in the System Info Screen Figure 13 transitions to the Admin Password Screen Figure 23 The hat switch s left right positions navigate between Enter Exit and the passw...

Page 17: ...e Home Screen Figure 24 Admin Screen Table 2 Admin Screen Settings Admin Screen Setting Possible values Voltage Low kV 40 70 kV Voltage Medium kV 40 kV to 70 kV Voltage High kV 40 kV to 70 kV Voltage...

Page 18: ...n adjust through the settings menu voltage in 1 kV increments and current in 001 mA increments The Admin Screen s Super Mode Figure 24 must be checked Once the user selects the on screen button the us...

Page 19: ...ision HD Wi Fi Table Startup and Power Down of Tablet The OpenVisionTM HD tablet is a touch screen tablet To power up press the power button on the tablet s upper left corner The OpenVision HD APP wil...

Page 20: ...om outlined in yellow and Control Panel which can be user selected to appear on the left or right side shown on right outlined in red Figure 28 OpenVision HD APP Home Screen Establishing Wi Fi Connect...

Page 21: ...OpenVision HD by pressing the link icon Once the link is established the settings from the OpenVision HD will update along bottom of screen as shown in Figure 30 Figure 30 Wi Fi LINK to OpenVision HD...

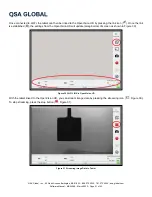
Page 22: ...essed a picture in picture will appear in the upper left corner Figure 32 Snapshots work for both targeting and X ray images Figure 32 Image Snapshot Picture in Picture Pressing the video record icon...

Page 23: ...rmation screens The status bar Figure 34 includes kV and mA adjustments the on line connection status of the OpenVision HD and tablet the current date and time the software revision installed on the s...

Page 24: ...QSA Global Inc 40 North Avenue Burlington MA 01803 888 272 2242 781 272 2000 qsa global com Software Manual MAN 066 March 2023 Page 24 of 43 Figure 36 Error Screen Example...

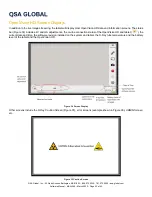
Page 25: ...ing the Local settings screen and de selecting the Screensaver checkbox as shown in Figure 37 Be aware that disabling the screensaver will drain the tablet battery more rapid than with the screensaver...

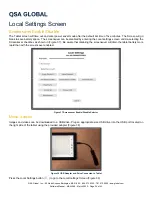
Page 26: ...g the button Figure 40 will transition to the Tablet Media Transfer Screen from where files stored on the tablet can be transferred Figure 40 Local Settings Screen Select desired folder to transfer an...

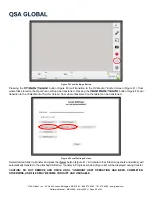
Page 27: ...7 of 43 Figure 41 Media Transfer Screen Figure 42 Transfer in Progress Once the media transfer is complete tablet will transition back to the Local Settings Screen Press the button Figure 43 prior to...

Page 28: ...Manual MAN 066 March 2023 Page 28 of 43 Figure 43 Unmount USB Image Playback In the Local Settings Screen select the button Figure 44 Images stored on the OpenVision HD will only appear if an Image Sy...

Page 29: ...2023 Page 29 of 43 Figure 45 Image Playback Device Selection Select a folder from the list Figure 46 If only one folder is available you can directly scroll through ALL images Folders can also be dele...

Page 30: ...7 Image Scroll Video Playback For Video Playback transition to Local Settings Screen and press button Figure 48 Videos stored on the OpenVision HD will only appear if an Image Sync has been performed...

Page 31: ...e 31 of 43 Figure 49 Video Playback Device Selection Select a folder from the list Figure 50 If only one folder is available you can directly scroll through ALL videos Folders can also be deleted from...

Page 32: ...QSA Global Inc 40 North Avenue Burlington MA 01803 888 272 2242 781 272 2000 qsa global com Software Manual MAN 066 March 2023 Page 32 of 43 Figure 51 Video Playback...

Page 33: ...ing is started on the OpenVision HD it will record the target camera video and a separate X Ray image video When the files are transferred to the tablet via the Image Sync command they will be stitche...

Page 34: ...qsa global com Software Manual MAN 066 March 2023 Page 34 of 43 Figure 53 Image Sync Selection Image sync progress screen appears Figure 54 Figure 54 Image Sync in Progress If stitching is required a...

Page 35: ...e 35 of 43 Figure 55 Stitching Progress A COMPLETED message will appear when the image sync is complete Figure 56 If the battery dies during this process it will need to be repeated All data transferr...

Page 36: ...d by sliding the Brightness bar left or right Figure 57 Figure 57 Brightness Control Control Panel Configuration Button Bar The Control Panel on the Home Screen Figure 28 can be positioned on the left...

Page 37: ...e Remote Power Control option must be selected Figure 59 in the OpenVision HD Software Administration Screen Figure 59 Remote Power Control Selection Once the Remote Power Control option is enabled th...

Page 38: ...traffic areas that would normally inhibit the effective use of a WiFi connection Tethering the Tablet can also aid in the transfer of media files from the system to the Tablet for processing To enabl...

Page 39: ...39 of 43 Plug the secondary ethernet dongle into the opposite end of the ethernet cable Plug the ethernet dongle into the Tablet USB Port In a moment the Signal Strength meter on the tablet should go...

Page 40: ...rface as shown below To see your wireless tablet s current software revision refer to the bottom of the tablet s user interface as shown in Figure 64 Figure 64 System Software Revision NOTE It is mand...

Page 41: ...with the exception of the main power LED will go blank during the update The update may take several minutes to complete Do NOT turn the machine off or remove the battery until the update has complet...

Page 42: ...ning properly If restart does not clear error contact your QSA Global Inc representative for repair options 003 X ray Tube Failure X ray tube is not communicating or has malfunctioned If restart does...

Page 43: ...hunghae Building 12 Sunrung ro 103 Gil Kangnam Ku Seoul 06145 South Korea 82 2 558 3335 All goods and services are sold subject to the terms and conditions of QSA Global Inc A copy of these terms and...

Reviews: