background image


Chapter  3  Software Configuration 


PS8852 USER

S MANUAL


Page:3-19 


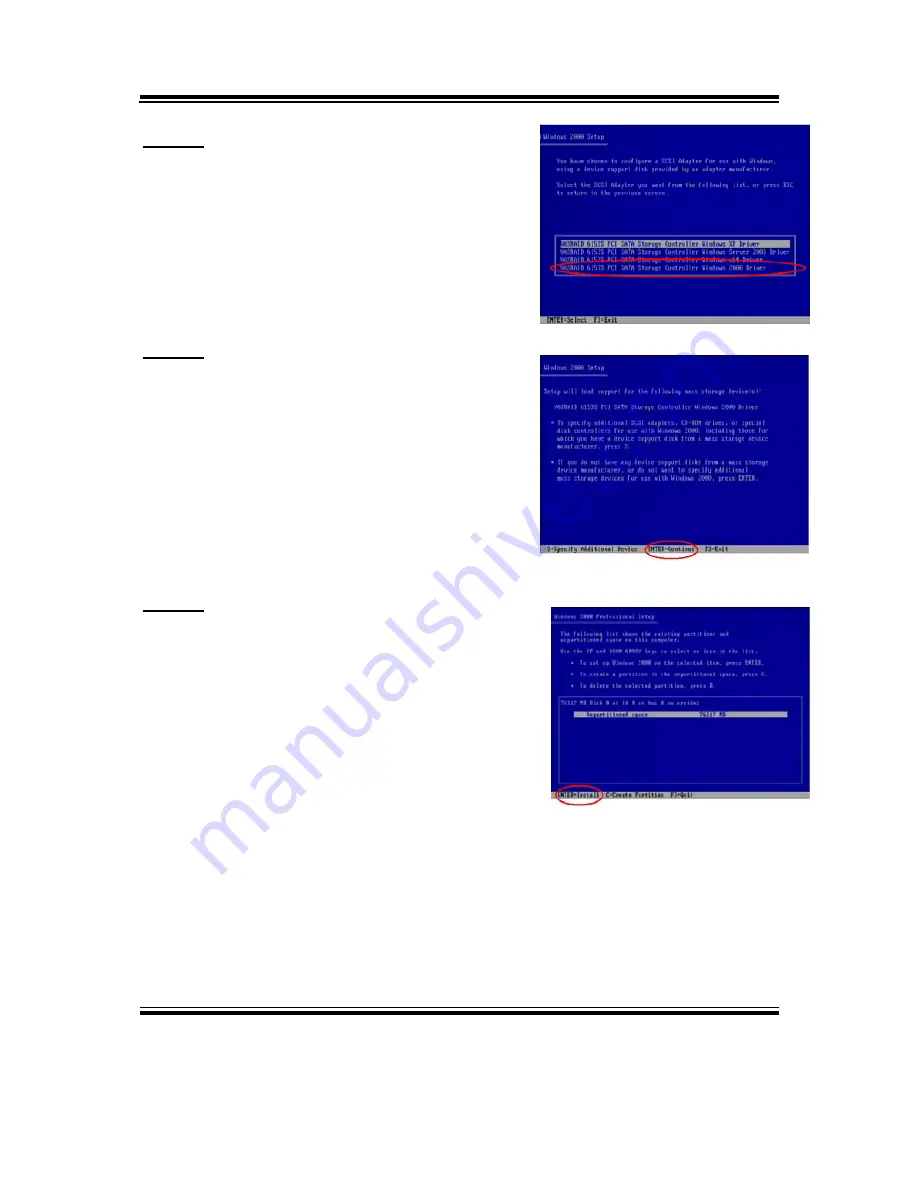
Step 4: 

Choose “VASRAID 6153S PCI SATA Storage 
Controller Windows 2000 Driver” item. 


Step 5: 

As “Windows 2000 Setup” screen appears,   
press “Enter” to continue. 


Step 6: 

As the right screen appears, press “Enter” to   
create all HDD capacity for RAIDm1 use. 


Summary of Contents for PS8852

Page 1: ...USER S MANUAL PS8852 Intel ULV Celeron M 15 Point of Sale Terminal PS8852 M0...

Page 2: ...notice This manual is copyrighted January 2007 You may not reproduce or transmit in any form or by any means electronic or mechanical including photocopying and recording ACKNOWLEDGEMENTS All trademar...

Page 3: ...to cause harmful interference in which case the user will be required to correct the interference at his own expense You are cautioned that any change or modifications to the equipment not expressly...

Page 4: ...OM2 RI and Voltage Selection 2 9 2 7 COM3 RI and Voltage Selection 2 10 2 8 COM4 RI and Voltage Selection 2 11 2 9 Cash Drawer Connector 2 12 2 10 Cash Drawer Power Selection 2 12 2 11 DC Jack 2 13 2...

Page 5: ...ity 3 7 3 6 Intel Chipset Software Installation Utility 3 8 3 7 USB2 0 Software Installation Utility 3 9 3 8 Touch Screen Driver Utility 3 10 3 9 Wireless Driver Utility 3 10 3 10 Watchdog Timer Confi...

Page 6: ...ng 4 27 APPENDIX A SYSTEM ASSEMBLY Exploded Diagram for VFD Installation A 2 Exploded Diagram for MSR and HDD Installation A 4 Exploded Diagram for System Rear View and I O Port View A 5 APPENDIX B TE...

Page 7: ...es you the information for PS8852 It also outlines the System specifications Section includes z About This Manual z System Specifications z Safety precautions Experienced users can skip to chapter 2 o...

Page 8: ...he whole system The final page of this chapter indicates some safety reminders on how to take care of your system Chapter 2 Hardware Configuration This chapter outlines the Prox 8852 component s locat...

Page 9: ...Chapter 1 Introduction PS8852 USER S MANUAL Page 1 3 1 2 POS SYSTEM ILLUSTRATION...

Page 10: ...pin SO DIMM socket on board z CACHE Depended on CPU z REAL TIME CLOCK CALENDAR CMOS data back up from BIOS set or BIOS default z BIOS Award Flash BIOS for plug play function Easy update 256KB flash EE...

Page 11: ...rt z UNIVERSAL SERIAL BUS PORT Two USB 2 0 ports on rear chassis Two USB 2 0 ports on side base plastic One internal pin header reserved on board for touch screen z LED INDICATOR 4 LED indicators Powe...

Page 12: ...Signal Interface bit TTL 24 bit LCD MTBF 30 000 Back Light MTBF Hrs 30 000 Voltage 3 3V TOUCHSCREEN TYPE RESISTIVE 5 wire Resolution 1024 x 768 Controller USB Interface Durability Lifetime 10 million...

Page 13: ...ou lengthen the life cycle of the system 1 Check the Line Voltage a The operating voltage for the power supply should cover the range of 100VAC 240VAC otherwise the system may be damaged 2 Environment...

Page 14: ...o not turn the system upside down This may cause the floppy drive and hard drive to mal function c Do not remove the diskette from the Floppy drive while the light is still on If you remove the disket...

Page 15: ...l information that describes the jumper connector settings and component locations Section includes z Component Locations z Configuration and Jumper settings z Jumper Connector Quick Reference Table z...

Page 16: ...Chapter 2 Hardware Configuration Page 2 2 PS8852 USER S MANUAL 2 1 COMPONENT LOCATIONS PS8852 Connector Jumper and Component locations...

Page 17: ...guration by opening or closing pins The jumper can be combined into sets that called jumper blocks When the jumpers are all in the block you have to put them together to set up the hardware configurat...

Page 18: ...Chapter 2 Hardware Configuration Page 2 4 PS8852 USER S MANUAL JUMPER DIAGRAMS JUMPER SETTINGS...

Page 19: ...VGA Connector VGA1 2 15 Keyboard PS 2 Mouse Connector KB MS1 2 15 LAN USB Connector LAN JUSB1 JUSB2 2 16 Audio Connector JAUDIO1 2 17 Power Switch Connector JPWR_SW1 2 17 Reset Switch Connector JRST_S...

Page 20: ...1 COM2 COM3 and COM4 COM1 COM1 Connector The COM1 Connector assignments are as follows PIN ASSIGNMENT 1 DCD1 2 RXD1 3 TXD1 4 DTR1 5 GND 6 DSR1 7 RTS1 8 CTS1 9 RI 5V 12V selectable COM2 COM2 Connector...

Page 21: ...4 DTR3 5 GND 6 DSR3 7 RTS3 8 CTS3 9 RI 5V 12V selectable 10 NC COM4 COM4 and COM4 1 Connector The pin assignments are as follows PIN ASSIGNMENT 1 DCD4 2 RXD4 3 TXD4 4 DTR4 5 GND 6 DSR4 7 RTS4 8 CTS4...

Page 22: ...uration Page 2 8 PS8852 USER S MANUAL 2 5 COM1 RI VOLTAGE SELECTION JP_COM1 COM1 RI Voltage Selection The selections are as follows SELECTION JUMPER SETTINGS JUMPER ILLUSTRATION RI 1 2 12V 3 4 5V 5 6...

Page 23: ...uration PS8852 USER S MANUAL Page 2 9 2 6 COM2 RI VOLTAGE SELECTION JP_COM2 COM2 RI Voltage Selection The selections are as follows SELECTION JUMPER SETTINGS JUMPER ILLUSTRATION RI 1 2 12V 3 4 5V 5 6...

Page 24: ...uration Page 2 10 PS8852 USER S MANUAL 2 7 COM3 RI VOLTAGE SELECTION JP_COM3 COM3 RI Voltage Selection The selections are as follows SELECTION JUMPER SETTINGS JUMPER ILLUSTRATION RI 1 2 12V 3 4 5V 5 6...

Page 25: ...on PS8852 USER S MANUAL Page 2 11 2 8 COM4 RI VOLTAGE SELECTION JP_COM4 COM4 RI Voltage Selection The selections are as follows SELECTION JUMPER SETTINGS JUMPER ILLUSTRATION RI 1 2 12V 3 4 5V 5 6 Orig...

Page 26: ...4V 6 GND Cash Drawer Control in GPIO Port To Open Drawer Step 0 Write 08h to I O Port 0x40B5 h Write 04h to I O Port 0x40B9 h Step 1 Write 00h to I O PORT address 0x40B9h Step 2 Wait 1 2 seconds Write...

Page 27: ...PS8852 USER S MANUAL Page 2 13 2 10 CASH DRAWER POWER SELECTION JCASH1 Cash Drawer Power Selection The jumper settings are as follows SELECTION JUMPER SETTINGS JUMPER ILLUSTRATION 12V default 2 3 24V...

Page 28: ...2 GND 3 24VIN 24V 4 24VIN 24V 2 12 PRINTER CONNECTOR JPRNT1 Printer Connector The Printer Connector assignments are as follows PIN ASSIGNMENT PIN ASSIGNMENT 1 STBJ 14 ALFJ 2 PDR0 15 ERRJ 3 PDR1 16 PAR...

Page 29: ...2 GREEN 3 BLUE 4 NC 5 GND 6 GND 7 GND 8 GND 9 VCC 5V 10 GND 11 NC 12 DDCA DATA 13 HSYNC 14 VSYNC 15 DDCA CLK 16 NC 2 14 KEYBOARD AND PS 2 MOUSE CONNECTOR KB MS1 PC AT Keyboard and PS 2 Mouse Connector...

Page 30: ...s LAN PIN ASSIGNMENT 1 TX 2 TX 3 RX 4 ISOLATED GND 5 ISOLATED GND 6 RX 7 ISOLATED GND 8 ISOLATED GND LAN LED Indicator Left side LED Green Color On LAN switch hub connected Off No LAN switch hub conne...

Page 31: ...t Light Green color PIN ASSIGNMENT 21 LINE_OUT_L 24 LINE_OUT_R 5 GND MIC In Pink color PIN ASSIGNMENT 1 MIC_IN 3 GND 4 MIC_VL 2 17 POWER SWITCH CONNECTOR JPWR_SW1 Power Switch Connector The pin assign...

Page 32: ...3 LVDS_VCC 4 GND 5 LVDS_CLKBN 6 LVDS_CLKBP 7 LVDS_YBP2 8 LVDS_YBN2 9 LVDS_YBN1 10 LVDS_YBP1 11 LVDS_YBP0 12 LVDS_YBN0 13 LVDS_YBP3 14 LVDS_YBN3 15 GND 16 GND 17 LVDS_CLKAN 18 LVDS_CLKAP 19 LVDS_YAP2...

Page 33: ...t Connector The pin assignments are as follows PIN ASSIGNMENT PIN ASSIGNMENT 1 USBV5 2 USBV5 3 USB_R5N 4 USB_R5P 5 GND 6 GND 7 DCD3 8 RXD3 9 TXD3 10 DTR3 11 GND 12 DSR3 13 RTS3 14 CTS3 15 RI_SEL 16 GN...

Page 34: ...N ASSIGNMENT 1 GND 2 Fan Detect 3 5V VCC 4 PWM Fan Control JSYS_FAN1 System Fan Connector The pin assignments are as follows PIN ASSIGNMENT 1 GND 2 12V VCC12 3 Fan Detect Fan2 2 22 SERIAL ATA CONNECTO...

Page 35: ...3 SATA POWER CONNECTOR JPWR_4P1 SATA Power Connector The pin assignment is as follows PIN ASSIGNMENT 1 5V VCC 2 GND 3 GND 4 12V VCC12 2 24 24V OUT POWER CONNECTOR J24VOUT1 24V Power Connector The sele...

Page 36: ...SIGNMENT 1 IDERSTJ 2 GND 3 PDD7 4 PDD8 5 PDD6 6 PDD9 7 PDD5 8 PDD10 9 PDD4 10 PDD11 11 PDD3 12 PDD12 13 PDD2 14 PDD13 15 PDD1 16 PDD14 17 PDD0 18 PDD15 19 GND 20 NC 21 PDREQ 22 GND 23 PDIOWJ 24 GND 25...

Page 37: ...P_AD6 22 NC 45 P_CBEJ3 68 P_TRDYJ 91 P_AD5 23 GND 46 P_AD24 69 GND 92 P_AD4 24 NC 47 P_AD23 70 VCC3_3 93 NC 25 CLK_PCI0 48 IDSEL 71 P_PERRJ 94 P_AD2 26 PCI_RSTJ3 49 GND 72 P_DEVSELJ 95 P_AD3 27 GND 5...

Page 38: ...The selections are as follows FUNCTION JUMPER SETTING pin closed JUMPER ILLUSTRATION CLEAR CMOS 2 3 NORMAL 1 2 Manufacturing Default Normal To clear CMOS data user must power off the computer and set...

Page 39: ...MPER SETTING pin closed JUMPER ILLUSTRATION Support FSB 400 MHZ default 1 2 Reserved 2 3 Manufacturing Default is set as Support FSB 400MHz 2 29 CPU HOST CLOCK SELECTION JP2 CPU Host Clock Selection T...

Page 40: ...52 USER S MANUAL 2 30 LVDS PANEL 3 3V 5V VOLTAGE SELECTION JP4 LVDS Panel 3 3V 5V Voltage Selection The selections are as follows SELECTION JUMPER SETTING pin closed JUMPER ILLUSTRATION 5V 1 2 3 3V de...

Page 41: ...h BIOS update It also describes how to install the watchdog timer configuration Section includes z VGA Driver Utility z Flash BIOS Update z LAN Driver Utility z Sound Driver Utility z Intel Chipset So...

Page 42: ...lation D Driver FLASH For BIOS update utility D Driver LAN For LAN Driver installation D Driver Sound Realtek ALC202A AC97 For Sound driver installation D Driver UTILITY Intel Chipset Software Install...

Page 43: ...S8852 USER S MANUAL Page 3 3 3 2 VGA DRIVER UTILITY The VGA interface embedded with our PS8852 can support a wide range of display mode such as SVGA STN TFT etc You can display CRT LVDS and PanelLink...

Page 44: ...ded by the vendor or manufacturer When you get these two files ready follow the following steps for updating your VGA BIOS 1 Install Awdflash exe from Utility Disk to Drive C 2 Insert the VGA BIOS fil...

Page 45: ...ewed When you are refreshing the BIOS do not turn off or reset the system or you will damage the BIOS After you have completed all the programming the screen displays the table below FLASH MEMORY WRIT...

Page 46: ...l auto detect your system configuration and find the adapter hardware 1 Ask you to select which driver you want to install select Driver from disk provided by hardware manufacturer 2 Insert the driver...

Page 47: ...roduction The sound function enhanced in this system is fully compatible with Windows 98SEE Windows 2000 Windows XP and WEPOS Below you will find the content of the Sound driver 3 5 2 Installation Pro...

Page 48: ...tel Chipset Components in Device Manager 3 6 2 Installation of Utility for Windows 98SE 2000 XP WEPOS The Utility Pack is to be installed only for Windows 98SE Windows 2000 Windows 2003 Windows XP and...

Page 49: ...llation kindly follow the following steps 1 Please insert the Utility Disk into Floppy Disk Drive A B or CD ROM drive 2 Under Windows 98SE 2000 XP and WEPOS system go to the directory where Utility Di...

Page 50: ...ions on the screen to complete the installation 5 Once installation is completed shut down the system and restart it in order to complete the changes 3 9 WIRELESS DRIVER UTILITY The Wireless driver ut...

Page 51: ...via bit 7 of the WDT_TIMEOUT register which is located on I O Port address 0x865h The WDT time out value is set through the WDT_VAL Runtime register which is located on I O Port address 0x866h Settin...

Page 52: ...and all partitions in real time 1 2 What is Vadi Vadi means VASSTEK Advanced Disk Indicator Vadi Utility is an immediate indicator to inform users when bad sectors occur as users access the file which...

Page 53: ...tting No matter you would like to set RAIDm1 mode or ATA mode the procedure you must follow is 1 Set BIOS 2 Install the driver All procedures are described in Chapter 2 Set the Environment and Chapter...

Page 54: ...3 Install Drivers for installing the driver 2 2 Set ATA environment As you follow the following procedure the SATA hard disk is set for general use The procedure is as below Procedure 1 2 2 A Set BIOS...

Page 55: ...then it will continue automatically Step 3 The system enters the operation system automatically Please turn to 3 Install Drivers and select the driver you would like to install 2 2 A 2 Changing origi...

Page 56: ...to ATA mode Step 6 BIOS shows the hard disk is ATA mode it means changing to ATA mode is successful The number shows the full capacity of the hard disk Pressing ESC key to continue Step 7 It is unnece...

Page 57: ...em and you will install Windows operation system into the SATA hard disk please refer to 3 1 Installing the driver in a new Windows environment and follow the steps 3 1 Installing the driver in a new...

Page 58: ...S8852 USER S MANUAL 3 1 1 Installing in Windows 2000 Step 1 Press F6 key when Windows setup appears Step 2 Press S key to continue in Windows setup Screen Step 3 Insert VASRAID 6153S driver diskette i...

Page 59: ...AL Page 3 19 Step 4 Choose VASRAID 6153S PCI SATA Storage Controller Windows 2000 Driver item Step 5 As Windows 2000 Setup screen appears press Enter to continue Step 6 As the right screen appears pre...

Page 60: ...to My Computer then the click right button of the mouse and click Properties b Choose the Hardware tab then click the Device Manager tab c Double click SCSI and RAID Controllers then VASSTEK VASRAID 6...

Page 61: ...driver diskette into the drive A and press Enter to continue Step 4 Choose VASRAID 6153S PCI SATA Storage Controller Windows XP Driver item Step 5 As Windows Setup screen appears press Enter to contin...

Page 62: ...screen to continue installation Step 9 To confirm the driver has been properly installed please perform the following steps a Click Start then move to My Computer then click the right button of the mo...

Page 63: ...S MANUAL Page 3 23 3 1 3 Installing in Windows XP x64 Step 1 Press F6 key when Windows setup appears Step 2 Press S key to continue in Windows setup screen Step 3 Insert VASRAID 6153S driver diskette...

Page 64: ...53S PCI SATA Storage Controller Windows x64 Driver item Step 5 As Windows Setup screen appears press Enter to continue Step 6 As the right screen appears press Enter to create all HDD capacity for RAI...

Page 65: ...confirm the driver has been properly installed please perform the following steps a Click Start then move to My Computer then click the right button of the mouse and click Properties b Choose the Har...

Page 66: ...the driver you could follow below steps for installing Vadi utility continuously Installing Steps Step 1 Insert PS8852 driver utilities CD in the CD ROM drive Step 2 If your system is Windows 2000or...

Page 67: ...nk continuously as below As clicking the blinking red icon the screen will show as below From the above information you can get some message As you would like to close the window just clicking OK butt...

Page 68: ...can click the item to get the information of the feature The features are described as below About Vadi For showing the Vadi version To click OK to close the window Hard Disk Information It shows the...

Page 69: ...dows 2000 or Windows XP please enter D Driver SATA Vadi UTILITY Vadi x32 directory and double click VadiRun exe file If your system is Windows XP x64 please enter D Driver SATA Vadi UTILITY Vadi x64 d...

Page 70: ...The Standard CMOS Features z The Advanced BIOS Features z The Advanced Chipset Features z Integrated Peripherals z Power Management Setup z PNP PCI Configuration z PC Health Status z Frequency Control...

Page 71: ...programs such as word processing spreadsheets and games rely on an operating system such as DOS or OS 2 to manage such things as keyboard monitor disk drives and memory The operating system relies on...

Page 72: ...e Award SETUP program will appear on the screen Phoenix AwardBIOS CMOS Setup Utility Standard CMOS Features Advanced BIOS Features Advanced Chipset Features Integrated Peripherals Power Management Set...

Page 73: ...ne None 1 44M 3 5 in EGA VGA All But Keyboard 640K 1013760K 1014784K Menu Level Change the day month year and century Move Enter Select PU PD Value F10 Save ESC Exit F1 General Help F5 Previous Values...

Page 74: ...Setup Here is a brief explanation of drive specifications Type The BIOS contains a table of pre defined drive types Each defined drive type has a specified number of cylinders number of heads write p...

Page 75: ...supported you do not have to select the type in Setup Available Options are as follows EGA VGA Enhanced Graphics Adapter Video Graphics Array For EGA VGA SEGA SVGA or PGA monitor adapters CGA 40 Color...

Page 76: ...19 1024 7 512 1023 17 59 20 733 5 300 732 17 30 21 733 7 300 732 17 42 22 733 5 300 733 17 30 23 306 4 0000 336 17 10 24 977 5 65535 976 17 40 25 1024 9 65535 1023 17 76 26 1224 7 65535 1223 17 71 27...

Page 77: ...d On Disabled 6 250 Setup Menu Level Move Enter Select PU PD Value F10 Save ESC Exit F1 General Help F5 Previous Values F6 Fail Safe Defaults F7 Optimized Defaults BIOS Features Setup Screen The BIOS...

Page 78: ...he hard disk drive BOOT UP NUMLOCK STATUS Select power on state for NumLock TYPEMATIC RATE SETTING Enable this item if you wish to be able to configure the characteristics of your keyboard Typematic r...

Page 79: ...d if the correct password is not entered at the prompt Setup The system will boot but access to Setup will be denied if the correct password is not entered at the prompt To disable security select PAS...

Page 80: ...d Enabled Enabled 64 Enabled 32MB CRT Disabled Menu Level Move Enter Select PU PD Value F10 Save ESC Exit F1 General Help F5 Previous Values F6 Fail Safe Defaults F7 Optimized Defaults Chipset Feature...

Page 81: ...The choices are 2 and 3 DRAM RAS PRECHARGE TIME If an insufficient number of cycles is allowed for the RAS to accumulate its charge before DRAM refresh the refresh may be incomplete and the DRAM may...

Page 82: ...Enter Press Enter 3E8 IRQ10 2E8 IRQ11 Disabled Menu Level Move Enter Select PU PD Value F10 Save ESC Exit F1 General Help F5 Previous Values F6 Fail Safe Defaults F7 Optimized Defaults Integrated Peri...

Page 83: ...xit F1 General Help F5 Previous Values F6 Fail Safe Defaults F7 Optimized Defaults Descriptions on each item above are as follows 1 OnChip Primary PCI IDE The integrated peripheral controller contains...

Page 84: ...r USB Keyboard Support USB Mouse Support AC97 Audio Onboard LAN PCI Option ROM Support Init Display First Enabled Enabled Disabled Disabled Auto Enabled Disabled Onboard AGP Menu Level Move Enter Sele...

Page 85: ...Move Enter Select PU PD Value F10 Save ESC Exit F1 General Help F5 Previous Values F6 Fail Safe Defaults F7 Optimized Defaults Descriptions on each item above are as follows 1 Onboard FDC Controller...

Page 86: ...vailable modes 6 ECP Mode Use DMA Select a DMA channel for the parallel port for use during ECP mode ONBOARD SERIAL PORT 3 ONBOARD SERIAL PORT 4 Select a logical COM port name and matching address for...

Page 87: ...h Alarm x Time hh mm ss Alarm Reload Global Timer Events FDD COM LPT Port PCI PIRQ A D Instant Off Off Enabled Disabled 0 0 0 0 Disabled Disabled Menu Level Move Enter Select PU PD Value F10 Save ESC...

Page 88: ...hoices are Delay 4 Sec and Instant Off PWRON After PWR Fail This item allows you to select if you want to power on the system after power failure The choice Off On Former Sts WAKE ON LAN An input sign...

Page 89: ...CI Configuration Setup Screen The PNP PCI Configuration Setup describes how to configure PCI bus system PCI also known as Personal Computer Interconnect is a system which allows I O devices to operate...

Page 90: ...s Item Help IRQ 7 assigned to IRQ 9 assigned to IRQ 12 assigned to IRQ 14 assigned to IRQ 15 assigned to PCI Device PCI Device PCI Device PCI Device PCI Device Menu Level Legacy ISA for devices compli...

Page 91: ...enu Level Move Enter Select PU PD Value F10 Save ESC Exit F1 General Help F5 Previous Values F6 Fail Safe Defaults F7 Optimized Defaults PC Health Status Setup Screen The PC Health Status Setup allows...

Page 92: ...Spectrum Enabled Enabled Menu Level Move Enter Select PU PD Value F10 Save ESC Exit F1 General Help F5 Previous Values F6 Fail Safe Defaults F7 Optimized Defaults Frequency Control Setup Screen This s...

Page 93: ...lts Y N N To use the BIOS default values change the prompt to Y and press the Enter key CMOS is loaded automatically when you power up the system 4 12 LOAD OPTIMIZED DEFAULTS When you press Enter on t...

Page 94: ...n length and press Enter The password typed now will clear any previously entered password from CMOS memory You will be asked to confirm the password Type the password again and press the Enter key Yo...

Page 95: ...res Advanced Chipset Features Integrated Peripherals Power Management PnP PCI Configura PC Health Status Frequency Control Load Fail Safe Defaults Load Optimized Defaults Set Supervisor Password word...

Page 96: ...e retained The screen will be shown as below Phoenix AwardBIOS CMOS Setup Utility Standard CMOS Features Advanced BIOS Features Advanced Chipset Features Integrated Peripherals Power Management PnP PC...

Page 97: ...isk Drive Installation z Exploded Diagram for LCD Panel Installation z Exploded Diagram for RJ11 Installation z Exploded Diagram for Stand and Front Panel Installation z Exploded Diagram for Front Pan...

Page 98: ...Appendix A System Assembly Page A 2 PS8852 USER S MANUAL EXPLODED DIAGRAM FOR VFD INSTALLATION Diagram 1...

Page 99: ...Appendix A System Assembly PS8852 USER S MANUAL Page A 3 Diagram 2...

Page 100: ...Appendix A System Assembly Page A 4 PS8852 USER S MANUAL Diagram 3...

Page 101: ...Appendix A System Assembly PS8852 USER S MANUAL Page A 5 Diagram 4...

Page 102: ...Appendix A System Assembly Page A 6 PS8852 USER S MANUAL Diagram 5...

Page 103: ...Appendix A System Assembly PS8852 USER S MANUAL Page A 7 EXPLODED DIAGRAM FOR MSR AND HDD INSTALLATION...

Page 104: ...Appendix A System Assembly Page A 8 PS8852 USER S MANUAL EXPLODED DIAGRAM FOR HARD DISK DRIVE INSTALLATION...

Page 105: ...Appendix A System Assembly PS8852 USER S MANUAL Page A 9 EXPLODED DIAGRAM FOR LCD PANEL INSTALLATION...

Page 106: ...Appendix A System Assembly Page A 10 PS8852 USER S MANUAL EXPLODED DIAGRAM FOR RJ11 INSTALLATION...

Page 107: ...Appendix A System Assembly PS8852 USER S MANUAL Page A 11 EXPLODED DIAGRAM FOR STAND AND FRONT PANEL INSTALLATION...

Page 108: ...Appendix A System Assembly Page A 12 PS8852 USER S MANUAL...

Page 109: ...Appendix A System Assembly PS8852 USER S MANUAL Page A 13 EXPLODED DIAGRAM FOR FRONT PANEL INSTALLATION...

Page 110: ...Appendix A System Assembly Page A 14 PS8852 USER S MANUAL EXPLODED DIAGRAM FOR USB LED INSTALLATION...

Page 111: ...Appendix A System Assembly PS8852 USER S MANUAL Page A 15 EXPLODED DIAGRAM FOR BOTTOM COVER INSTALLATION...

Page 112: ...Appendix A System Assembly Page A 16 PS8852 USER S MANUAL EXPLODED DIAGRAM FOR STAND INSTALLATION...

Page 113: ...Appendix A System Assembly PS8852 USER S MANUAL Page A 17...

Page 114: ...Appendix A System Assembly Page A 18 PS8852 USER S MANUAL EXPLODED DIAGRAM FOR SYSTEM BOTTOM INSTALLATION...

Page 115: ...Appendix A System Assembly PS8852 USER S MANUAL Page A 19...

Page 116: ...Page B 1 TECHNICAL SUMMARY This section introduce you the maps concisely Section includes z Block Diagram z Interrupt Map z RTC Standard RAM Bank z Timer DMA Channels Map z I O Memory Map APPENDIX B...

Page 117: ...Appendix B Technical Summary Page B 2 PS8852 USER S MANUAL BLOCK DIAGRAM...

Page 118: ...T MAP IRQ ASSIGNMENT 0 System TIMER interrupt from TIMER 0 1 Keyboard 2 Cascade for IRQ 8 15 3 Serial port 2 4 Serial port 1 5 Parallel port 2 6 Floppy disk 7 Parallel port 1 8 RTC Alarm clock 9 IRQ2...

Page 119: ...Status register C 0D Status register D 0E Diagnostic status byte 0F Shutdown byte 10 Floppy Disk drive type byte 11 Reserve 12 Hard Disk type byte 13 Reserve 14 Equipment byte 15 Base memory low byte...

Page 120: ...ELS MAP Timer Channel Map Timer Channel Assignment 0 System timer interrupt 1 DRAM Refresh request 2 Speaker tone generator DMA Channel Map DMA Channel Assignment 0 Available 1 Available 2 Floppy 3 Av...

Page 121: ...AP ASSIGNMENT 000 01F DMA controller Master 020 021 Interrupt controller Master 022 023 Chipset controller registers I O ports 040 05F Timer control regsiters 060 06F Keyboard interface controller 804...

Reviews: