


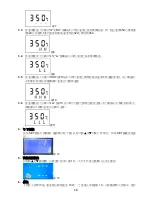


19
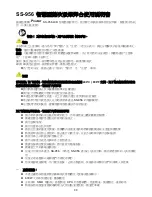
注意事項:
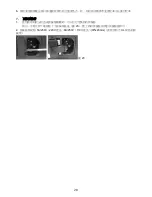
使用吹焊搶及吸筆時注意皮管不可彎折、受壓變形
,
以免影響風量和吸力
.
裝噴咀時勿用力過大,或用鉗子拉動邊緣,勿過度擰緊螺絲
.
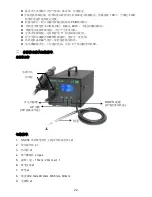
小心高溫操作
,
切勿在易燃氣體、紙質、或其他易燃物品附近,使用本拆焊台,噴咀十分灸熱,為
免灼傷身體,切勿觸摸發熱管,或以熱氣直噴身體部位
.
對於新機,因手柄內有隔熱材料
—
雲母管,開機後短時間內冒白煙,這屬正常現象
.
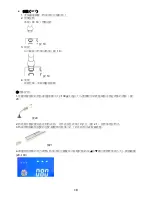
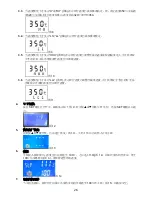
熱氣焊接是有效的
,
但也可能導致焊劑球、焊劑搭連等問題。我們建議您仔細檢查焊接元件
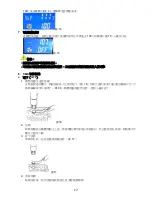
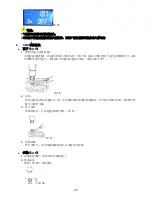
確保被吸物表面需要光潔
,
以利被吸取
.
注意防靜電措施
,
以免損壞器件
.
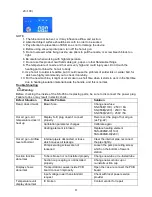
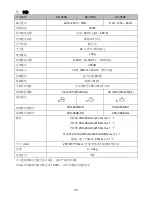
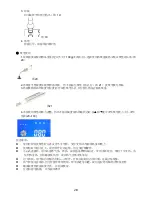
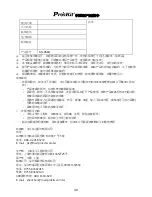
六、
故障排除說明
警告:檢查前請先移除插頭
故障現象
可能原因
解決方法
打開電源不工作
保險絲燒毀
更換相同型號保險絲
SS-956E(110V) : 250V / 8A
SS-956B(220V) : 250V / 5A
SS-956H(220V) : 250V / 5A
熱風溫度不正常
顯示
S-E
,感測器接觸不良
內部連接頭重新拔插
(
如圖
22)
校準參數被更改
重新校準
發熱芯燒毀
更換發熱芯
5SS-989NE-H(110V)
5SS-989NB-H(220V)
熱風風量不正常
內部器件異物阻礙或管通路開裂漏氣
清除雜物,接好開裂處
氣泵底部螺絲未松脫
拆解底部緊泵螺絲
吸物異常
管路開裂漏氣或吸盤老化裝配不當
接好開裂處
,
更換吸盤
顯示不正常
因為運輸振動造成接觸不良
重新插接
PCB
板插頭
使用電源電壓偏低
檢查插座電壓是否正常
死機
器件損毀
請退回廠商維修
上述故障現象以外之問題
,
請聯絡經銷商
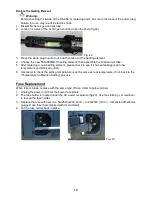
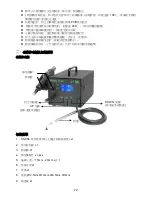
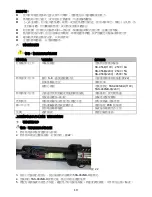
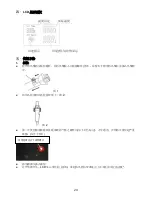
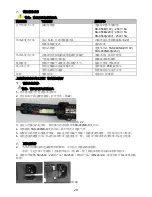
七、
替換發熱元件
警告:替換前請先移除插頭
1.
將手柄尾部與氣管連接部分拆開
2.
將手柄
3
個固定螺絲拆除,打開外殼(圖
22
)
圖
22
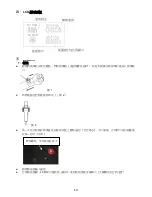
3.
按住白色插頭凸起部分,拔出插頭內的損壞的
5SS-989NB-H
發熱芯
4.
更換新的
5SS-989NB-H
發熱芯後,裝回外殼並連接氣管
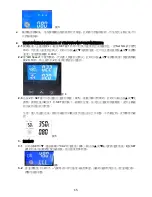
5.
裝配好後請檢查功能是否恢復,確認是否存在漏氣現象(將溫度調至最低,用手堵住出風口檢查)
Summary of Contents for SS-956
Page 12: ...11 SS 956 SS 956 LCD 480 C 896 F SS 956 SS 956 SS 956 600W SMD CPU...
Page 15: ...14 LCD 1 1 3 1 2 2 LCD 3...
Page 18: ...17 100 3 14 7 100 15 15 1 2 8 SMD QFP 1 16 PLCC 16 2 3 17 17 4...
Page 19: ...18 QFP 1 2 18 18 3 19 19 4 1 100g 20 20 2 21 3 21 4 20 100...
Page 21: ...20 6 1 23 2 5A 250V 220V 8A 250V 110V 5x20mm UL 23...
Page 22: ...21 SS 956 SS 956 LCD 480 C 896 F SS 956 SS 956 SS 956 600W SMD CPU...
Page 25: ...24 LCD 1 1 3 1 2 2 LCD 3...
Page 28: ...27 15 1 2 8 SMD QFP 1 16 PLCC 16 2 3 17 17 4 QFP 1 2 18 18...


