background image

Chapter 4: Installing Software Drivers 


49 

Existing Windows 98 Installation 

The following section details the installation of FastTrak TX2plus drivers on a 
system that has Windows 98 already installed and running. 

1.  After installing the FastTrak S150 TX2plus controller card and configuring 

the hard drives, power up the system and boot Windows. 

2.  The “Add New Hardware Wizard” will appear, informing you that it has 

found a “PCI Mass Storage Controller.” 

3.  Click Next. From the generated list box, choose 

Search for best driver for 

your device (Recommended)

.  

4.  Click Next. From PCI Mass Storage Controller choose 

Finish. 

5.  Insert the FastTrak TX2plus driver diskette in drive A:. 

6.  Click Next. From the generated choices, choose 

Specify a location

7. Type 

A:\WIN98-ME

 in the text box that appears. 

8.  Click Next. A message informing you that Windows has found “Win98-ME 

Promise FastTrak TX4000/S150 TX Series Controller” should appear. 

9.  Click Next, then click Finish. 

10.  Click Yes when asked if you want to restart your computer. Be sure to eject 

the diskette from drive A:. 

Confirming Windows 98 Driver Installation 

To confirm that the driver has been properly loaded in Windows 98, perform the 
following steps: 

1. Choose 

Settings

 from the Start menu.  

2. Choose 

Control Panel

, then double-click the System icon.  

3. Choose 

the 

Device Manager

 tab, then click the “+” in front of SCSI 

controllers. “Win98-ME Promise FastTrak TX4000/S150 TX Series 
Controller” should appear. 


Summary of Contents for 150TX2

Page 1: ...FASTTRAK S150TX2PLUS USER MANUAL Version 1 3 ...

Page 2: ...or any other Promise Technology product Notice Although Promise Technology has attempted to ensure the accuracy of the content of this manual it is possible that this document may contain technical inaccuracies typographical or other errors Promise Technology assumes no liability for any error in this publication and for damages whether direct indirect incidental consequential or otherwise that ma...

Page 3: ...timize Array for 21 Using a Hot Spare Drive 23 Creating Multiple Disk Arrays 24 Viewing Drive Assignments 24 Manually Creating an Array 25 Selecting Array Type 26 Selecting Stripe Block 26 Gigabyte Boundary 27 Assigning Drive s to Array 28 Creating a Striped Array 28 Creating a Mirrored Array Using New Drives 29 Adding Fault Tolerance to an Existing Drive 30 Creating a Hot Spare Drive for Mirrored...

Page 4: ...ector 51 Disk Array Terms 52 Disk Array Description 52 Disk Array Member 52 Disk Array Types 52 About RAID Levels 53 Striping RAID 0 53 Mirroring RAID 1 54 Striping Mirroring RAID 0 1 56 About Dual Data Redundancy 56 Chapter 6 Troubleshooting Tips 57 Motherboard Issues 57 System CMOS Issues 58 Drive Related Errors 59 Operating System Related Issues 62 Performance Tips 64 Appendix A Frequently Aske...

Page 5: ...eliability to PC desktops and or servers using Serial ATA drives FastTrak S150 TX2plus has three independent data channels to support a maximum of two Serial ATA drives and two Ultra ATA 133 drives FastTrak S150 TX2plus supports Striping RAID 0 Identical drives can read and write data in parallel to increase performance Mirroring RAID 1 Mirroring increases read performance through load balancing a...

Page 6: ...e Parallel ATA port You can create a RAID 1 Mirroring array by combining hard drives on Channels 1 and 2 Serial ATA only Channels 1 and 3 one Serial one Parallel Channels 2 and 3 one Serial one Parallel Promise Array Management Utility PAM The Promise Array Management PAM utility offers local and remote management and monitoring of all FastTrak arrays that exist anywhere on a network Windows based...

Page 7: ...A Specification Burst data transfer rates up to 150MB sec from Serial ATA drives to boost overall system performance FastTrak S150 TX2 supports Ultra DMA 6 5 4 3 2 1 0 DMA 2 1 0 Burst data transfer rates up to 133MB sec from Ultra ATA 133 drives to boost overall system performance Independent data channels for Serial ATA drives Drives can multiply their data transfer performance when striped toget...

Page 8: ...hest level of hardware compatibility Complies with SATA Specification 1 0 Provides full compatibility with first generation Serial ATA hard drives Compliant with PCI Bus Master standard PCI Bus Master support Provides 32 bit I O Bus Master and Ultra ATA performance for optimal system performance Tested compatibility to coexist with motherboards that have integrated IDE controllers Improves system ...

Page 9: ...ta cables One internal 40 pin Parallel ATA data cable One Y power splitter cable CD with Drivers Promise Array Management PAM utility PAM User Manual and FastTrak S150 TX2plus User Manual If ANY of the contents are missing or appear to be damaged please contact your dealer or distributor immediately Warning Before installing the adapter into an existing system backup any important or useful data F...

Page 10: ...e inside slot cover of an available 32 bit PCI slot on the motherboard 3 Install the FastTrak Serial ATA RAID card into the open slot see Figure 1 below Secure the bracket to the system s frame 4 Attach your system case s 2 or 4 pin LED cable to the LED connector on the FastTrak S150 TX2plus RAID card see Figure 2 on page 8 Make sure that pin 1 on the connector is aligned with pin 1 of the cable 5...

Page 11: ...array to function better as a single drive If you are striping RAID 0 for performance use up to four new drives If mirroring RAID 1 for protection you can use two new drives OR use an existing drive and a new drive the new drive must be the same size or larger than the existing drive 1 Install the hard drives into the hard drive bays of your system including the power cables Caution Use of removab...

Page 12: ...erial ATA hard drives 6 Use existing power cables for the Parallel ATA hard drives Note The FastTrak S150 TX2plus RAID controller is a PCI Plug n Play PnP device No changes are necessary in the Motherboard CMOS Setup for resources or drive types in most applications Port 1 Serial Port 2 Serial Port 3 Parallel Pin 1 LED Pins for future use ...

Page 13: ...es After that follow the steps for the array you want to create 1 Boot your system If this is the first time you have booted with the FastTrak S150 TX2plus card and drives installed the Promise onboard BIOS will display the following screen FastTrak S150 TXx tm BIOS Version 1 aa Build xxxx c 2002 2005 Promise Technology Inc All Rights Reserved No array defined Press Ctrl F to ender FastBuild tm Ut...

Page 14: ...ID 0 array FastTrak S150 TX2plus enables you to create striped arrays with 1 2 3 or 4 drives These arrays have no fault tolerance To create an array for best performance follow these steps 1 Press the Spacebar to choose Performance under the Optimize Array for section 2 Press Ctrl Y to Save and create the array 3 Reboot your system 4 Once the array has been created you will need to FDISK and forma...

Page 15: ...Channels 2 and 3 one Serial one Parallel Use this setting to create a Mirrored RAID 1 array with two new hard drives If one of the drives has data on it follow the Creating a Security Array with an Existing Data Drive procedure on the next page Note When creating a Security array with new drives a feature called Gigabyte Boundary will automatically be set to ON For a description of this feature se...

Page 16: ... created Press any key to reboot the system Array has been created Press Any Key to Reboot 6 Proceed with normal FDISK and format procedures as if you had just installed a new hard drive 7 Once the arrayed drives have been formatted proceed to Chapter 4 of this Manual to install your operating system and or FastTrak driver ...

Page 17: ...ID 1 array with a new hard drive and an existing drive with data and or the bootable system drive in your system Use a new drive of identical or larger storage capacity as the existing drive Warning If you are creating a Security array using an existing hard drive backup any important data Failure to do so could result in data loss Important If you wish to include your current bootable drive using...

Page 18: ...k Channel ID Drive Model Capacity MB Please Select A Source Disk Channel ID Drive Model Capacity MB 1 SEAGATE S380023AS 80024 2 SEAGATE S380023AS 80024 Up Down ESC Exit Ctrl Y Save 4 Use the arrow keys to choose which drive contains the existing data to be copied 5 Press Ctrl Y to Save selection and start duplication The following progress screen will appear Start to duplicate the image Do you wan...

Page 19: ...ter 2 Installation 15 Array has been created Press Any Key to Reboot 8 Once the arrayed drives have been formatted proceed to Chapter 4 of this Manual to install your operating system and or FastTrak driver ...

Page 20: ... drives on Channels 1 and 2 Serial ATA only Channels 1 and 3 one Serial one Parallel Channels 2 and 3 one Serial one Parallel Use this setting to create a Mirrored RAID 1 array with one or two existing hard drives containing data that you do not want to keep This method creates a mirrored array and erases the first data block from your existing drives Warning Using the Quick Initialization option ...

Page 21: ...reate and Quick Initialize 5 A window will appear almost immediately confirming that your Security array has been created Press any key to reboot the system Array has been created Press Any Key to Reboot 6 Proceed with normal FDISK and format procedures as if you had just installed a new hard drive 7 Once the arrayed drives have been formatted proceed to Chapter 4 of this Manual to install your op...

Page 22: ...FastTrak S150 TX2plus User Manual 18 ...

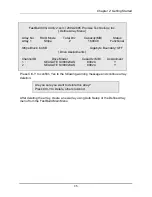
Page 23: ...ild xxxx c 2002 2005 Promise Technology Inc All Rights Reserved Scanning IDE drives If an array exists already the BIOS will display the following screen showing the card s BIOS version and status of the array FastTrak S150 TXx tm BIOS Version 1 xx Build xxxx c 2002 2005 Promise Technology Inc All Rights Reserved ID MODE SIZE TRACK MAPPING STATUS 1 2 0 Stripe 160048M 611 128 32 Functional Press Ct...

Page 24: ...es the Space bar allows to cycle through options Enter selects an option Esc aborts or exits the current menu Using the Main Menu This is the first option screen when entering the FastBuild Setup FastBuild tm Utility 2 xx c 2002 2005 Promise Technology Inc Main Menu Auto Setup 1 View Drive Assignments 2 Define Array 3 Delete Array 4 Rebuild Array 5 Keys Available Press 1 5 to Select Option ESC Exi...

Page 25: ... the selections FastBuild will automatically build the array FastBuild tm Utility 2 xx c 2002 2005 Promise Technology Inc Auto Setup Options Menu Optimize Array for Performance Auto Setup Configuration Mode Stripe Spare Drive Count 1 Drives used in Array 2 Array Disk Capacity size in MB 160048 Keys Available Up Down Space Change Option ESC Exit Ctrl Y Save Optimize Array for Select whether you wan...

Page 26: ...ay for data security The storage capacity equals one half the number of drives times the capacity of the smallest drive in the disk array Note Under the Security setting FastTrak S150 TX2plus permits two drives to be used for a single Mirrored array or four drives to be used for a Mirrored Striped array in Auto Setup Security and Performance RAID 0 1 Striping Mirroring creates an array with stripi...

Page 27: ...el Channels 2 and 3 one Serial one Parallel If a third drive is attached and is not assigned to a mirrored two drive disk array one optimized for Security it will be recognized as a spare drive Such a drive is immediately used as a standby replacement It is automatically added to an array once a disk member of the array has been detected as failed To restore fault tolerance as quickly as possible ...

Page 28: ...nt column drives are labeled with their assigned disk array or shown as Free if unassigned Such Free drives can be used for a future array or used as a spare drive when a drive fails in a mirrored array provided the free drive s capacity is equal to or larger than the smallest array member Unassigned drives are not accessible by the OS The menu also displays the data transfer mode that relates to ...

Page 29: ...nal controller performance depending on the drive type At a later time you can add a second drive to the array and recreate the array to support RAID 1 mirroring Note For most installations Promise recommends the 1 Auto Setup for easy disk array creation FastBuild tm Utility 2 xx c 2002 2005 Promise Technology Inc Define Array Menu Array No RAID Mode Total Drv Capacity MB Status Array 1 Stripe 2 1...

Page 30: ...ssignment 1 SEAGATE S380023AS Y 2 SEAGATE S380023AS Y 3 Slave WDC WD400BB 53DEA0 N 3 Master WDC WD400BB 53DEA0 N Keys Available Up Down ESC Exit Space Select Ctrl Y Save Selecting Stripe Block For RAID 0 and RAID 0 1 arrays you may manually select the stripe block size Press the Spacebar to scroll through choices progressing as follows 16 32 64 128 KB The size selected affects how FastTrak S150 TX...

Page 31: ...maller than the remaining working drive For the Gigabyte Boundary feature to work the Gigabyte Boundary feature must be set to ON when the original mirrored array is created When enabled the Gigabyte Boundary feature rounds the drive capacity of both drives to the common whole GB drive size For example with the Gigabyte Boundary feature enabled the remaining working drive can be 80 5 GB and the re...

Page 32: ...f FastBuild If you selected a Mirroring array for two drives there is an additional window that appears as described in order to create the array To do this you will use either two brand new drives or one drive that contains existing data that you wish to mirror Creating a Striped Array As described in the Drive Assignments Option section above if you selected a performance array follow the direct...

Page 33: ... Channels 1 and 2 Serial ATA only Channels 1 and 3 one Serial one Parallel Channels 2 and 3 one Serial one Parallel As described in the Drive Assignments Option section above if you selected a mirroring array and wish to use two new assigned drives follow the directions here 1 Assign new drives to a Mirroring array 2 Save the information by pressing Ctrl Y the window below will appear Do you want ...

Page 34: ... 1 and 3 one Serial one Parallel Channels 2 and 3 one Serial one Parallel FastTrak S150 TX2plus will create a mirrored array using an existing system drive with data You must assign the existing drive and another drive of same or larger capacity to the Mirroring array The BIOS will send the existing data to the new blank drive Warning Backup any necessary data before proceeding Failure to follow t...

Page 35: ...tion table in order to maintain data integrity 3 Press Y for the Create and Duplicate option The window below will appear asking you to select the Source drive to use FastBuild will copy all data from the Source drive to the Target drive Source Disk Channel ID Drive Model Capacity MB Target Disk Channel ID Drive Model Capacity MB Please Select A Source Disk Channel ID Drive Model Capacity MB 1 SEA...

Page 36: ... 6 Select Y to continue If you choose N you will be returned to step 1 7 Once you select Y the following progress screen will appear The process will take a few minutes Please Wait While Duplicating The Image 10 Complete Once mirroring is complete the following screen will appear confirming that your Security array has been created Array has been created Press Any Key to Reboot 8 Press any key to ...

Page 37: ...he automatic rebuild This is performed in the background under all supported operating systems except DOS At a later time the system can be turned off and the failed drive can be physically removed How FastTrak S150 TX2plus Orders Arrays During startup the disk arrays on the FastTrak S150 TX2plus are recognized in this order 1 The array set to bootable in the FastBuild Setup 2 The Array number i e...

Page 38: ...ult in its data loss Make sure to record all array information including the array type the disk members and stripe block size in case you wish to undo a deletion FastBuild tm Utility 2 xx c 2002 2005 Promise Technology Inc Delete Array Menu Array No RAID Mode Total Drv Capacity MB Status Array 1 Stripe 2 160048 Functional Array 2 Mirror 2 80024 Functional Array 3 Array 4 Keys Available Up Down ES...

Page 39: ... Boundary OFF Drive Assignments Channel ID Drive Model Capacity MB Assignment 1 SEAGATE S380023AS 80024 Y 2 SEAGATE S380023AS 80024 Y Press Ctrl Y to confirm Yes to the following warning message and continue array deletion Are you sure you want to delete this array Press Ctrl Y to Delete others to Abort After deleting the array create a new array using Auto Setup or the Define Array menu from the ...

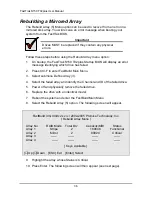
Page 40: ...astBuild Main Menu 3 Select submenu Define Array 3 4 Select the failed array and identify the Channel and ID of the failed drive 5 Power off and physically remove the failed drive 6 Replace the drive with an identical model 7 Reboot the system and enter the FastBuild Main Menu 8 Select the Rebuild Array 5 option The following screen will appear FastBuild tm Utility 2 xx c 2002 2005 Promise Technol...

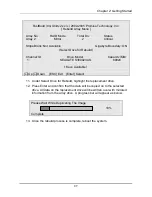
Page 41: ...city MB 1 SEAGATE S380023AS 80024 Keys Available Up Down ESC Exit Enter Select 11 Under Select Drive for Rebuild highlight the replacement drive 12 Press Enter and confirm that the data will be copied on to the selected drive All data on the replacement drive will be written over with mirrored information from the array drive A progress bar will appear as below Please Wait While Duplicating The Im...

Page 42: ...FastTrak S150 TX2plus User Manual 38 ...

Page 43: ...2plus Controller card you MUST install the Windows driver software first onto this drive while it is still attached to your existing hard drive controller Procedure Page Number New Windows XP Installation 34 Existing Windows XP Installation 35 Confirming Windows XP Driver Installation 35 New Windows 2000 Installation 36 Existing Windows 2000 Installation 37 Confirming Windows 2000 Driver Installat...

Page 44: ... driver diskette into drive A and press Enter 4 Choose WinXP Promise FastTrak TX2plus Controller from the list that appears on screen and then press the Enter 5 Press S to use the driver on the floppy disk and then press Enter to continue with installation 6 The Windows XP Setup screen will appear again saying Setup will load support for the following mass storage devices The list will include Win...

Page 45: ...tTrak TX4000 S150 TX Series Controller from the list that appears on screen and then press the Enter key 4 If using a driver that has not been digitally signed by Microsoft you will be asked if you want to continue the installation Click Continue anyway 5 When the New Hardware Wizard has finished installing the FastTrak TX2plus software click Finish Confirming Windows XP Driver Installation 1 Righ...

Page 46: ...Additional Device s 3 Insert the FastTrak TX2plus driver diskette into drive A and press Enter 4 Choose Win2000 Promise FastTrak TX4000 S150 TX Series Controller from the list that appears on screen then press Enter 5 The Windows 2000 Setup screen will appear again saying Setup will load support for the following mass storage devices The list will include Win2000 Promise FastTrak TX4000 S150 TX Se...

Page 47: ...driver then click Next 5 When the Windows 2000 supported SCSI adapter drivers list appears click Have disk 6 Insert the FastTrak TX2plus driver diskette in drive A 7 Type A Win2000 in the text box Click OK 8 Choose Win2000 Promise FastTrak TX4000 S150 TX Series Controller from the list that appears on screen then click Next 9 Click Yes to confirm continue the installation and copy the driver to sy...

Page 48: ...cal display under Other Devices is a listing for PCI RAID Controller Click it then click the Properties button 8 In the Properties window choose the Driver tab then choose Update Driver and click Next 9 Choose Search for a better driver than the one your device is using now recommended then click Next 10 Choose Specify Location then type A WIN98 ME in the text box 11 Insert the FastTrak TX2plus dr...

Page 49: ...s choose Specify a location 5 Insert the FastTrak TX2plus driver diskette in drive A 6 Type A WIN98 ME in the text box that appears 7 Click Next A message informing you that Windows Me has found Win98 ME Promise FastTrak TX4000 S150 TX Series Controller should appear 8 Click Next then click Finish When asked if you want to restart your computer click Yes Immediately remove the diskette from drive ...

Page 50: ...sert the FastTrak TX2plus driver diskette into drive A and press Enter 5 Choose WinNT Promise FastTrak TX4000 S150 TX Series Controller from the list that appears on screen then press Enter 6 The Windows NT Setup screen will appear again saying Setup will load support for the following mass storage devices The list will include WinNT Promise FastTrak TX2plus Controller NOTE If there are any additi...

Page 51: ...ver diskette in drive A 7 Type A NT4 in the text box window then click OK 8 When the Install Driver dialog box appears select WinNT Promise FastTrak TX4000 S150 TX Series Controller then click OK 9 When the Select SCSI Adapter Option dialog box appears click Install 10 After a successful installation the SCSI Adapter Setup box will show that the WinNT Promise FastTrak TX4000 S150 TX Series Control...

Page 52: ...ice Manager tab 7 In the hierarchical display under Other Device is a listing for PCI RAID Controller Select it then click the Properties button 8 Choose the Driver tab in the Properties window choose Update Driver then click Next 9 Choose Search for a better driver than the one your device is using now recommended then click Next 10 Choose Specify Location then type A WIN98 ME in the text box 11 ...

Page 53: ...rt the FastTrak TX2plus driver diskette in drive A 6 Click Next From the generated choices choose Specify a location 7 Type A WIN98 ME in the text box that appears 8 Click Next A message informing you that Windows has found Win98 ME Promise FastTrak TX4000 S150 TX Series Controller should appear 9 Click Next then click Finish 10 Click Yes when asked if you want to restart your computer Be sure to ...

Page 54: ...FastTrak S150 TX2plus User Manual 50 ...

Page 55: ...d setup to select from menu settings FastBuild Auto Menu Setup This setup utility is used to build and manage FastTrak S150 TX2plus disk arrays The utility is menu driven and features the Auto Setup 1 option that uses a simple interactive setup process Once the array is built all the array members store the configuration information in the drive s reserved area See Chapter 3 which provides descrip...

Page 56: ...re called members Each member of a specific disk array has coded in its reserved sector configuration information that identifies the drive as a member All disk members in a formed disk array are recognized as a single physical drive to the system Disk Array Types For most installations the FastBuild setup Auto Setup 1 option will configure your system There are three disk array types RAID 0 1 and...

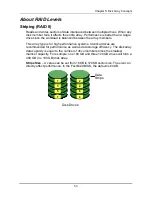
Page 57: ...ay type is for high performance systems Identical drives are recommended for performance as well as data storage efficiency The disk array data capacity is equal to the number of drive members times the smallest member capacity For example one 100 GB and three 120 GB drives will form a 400 GB 4 x 100 GB disk array Stripe Size A value can be set from 16KB to 128KB sector size The size can directly ...

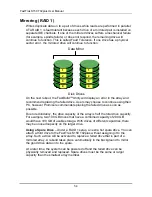
Page 58: ...e using their PC however Promise recommends replacing the failed drive as soon as possible Due to redundancy the drive capacity of the array is half the total drive capacity For example two 100 GB drives that have a combined capacity of 200 GB would have 100 GB of usable storage With drives of different capacities there may be unused capacity on the larger drive Using a Spare Drive Under a RAID 1 ...

Page 59: ...array exists on the Master Slave pair this condition may cause the operating system to freeze Do NOT create a RAID 1 Mirroring array with two Parallel ATA hard drives using the Master Slave arrangement on Channel 3 the Parallel ATA port You can create a RAID 1 Mirroring array by combining hard drives on Channels 1 and 2 Serial ATA only Channels 1 and 3 one Serial one Parallel Channels 2 and 3 one ...

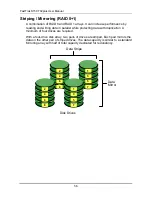
Page 60: ...ile protecting data with duplication A minimum of four drives are required With a four drive disk array two pairs of drives are striped Each pair mirrors the data on the other pair of striped drives The data capacity is similar to a standard Mirroring array with half of total capacity dedicated for redundancy 2 4 6 8 1 3 5 7 2 4 6 8 1 3 5 7 Disk Drives Data Mirror Data Stripe ...

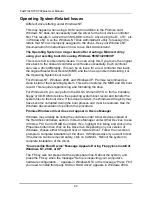
Page 61: ...s Setting the IRQ for a particular PCI slot will be different depending on the motherboard BIOS This setting is usually made in the PCI Configuration and or Plug and Play PnP section of the motherboard BIOS setup There are three common methods that motherboard BIOS s handle assignment of IRQs to PCI slots Specifically assigning an IRQ to a particular slot You can tell the motherboard to use IRQ 10...

Page 62: ...therboard CMOS displays C or D drive failure during startup See the Drive Related Errors section Using an Onboard IDE Card with FastTrak S150 TX2plus If an onboard IDE controller is installed with hard disks enable support in the Motherboard Standard CMOS Setup for the drives Note that the onboard IDE hard drives will then be the bootable hard disk unless the system BIOS has a boot sequence settin...

Page 63: ...anagement PAM utility as detailed in the PAM User Manual Drive cannot be formed into an array Drives must support Ultra DMA or Serial ATA and be free of media defects to be added into an array Promise recommends using new identical drives for each array Re secure data and power cabling while checking for proper alignment Typically Pin 1 of the drive is closest to the power connector System CMOS di...

Page 64: ...es that are striped will destroy the arrayed data To remove the Reserve Sector follow these steps 1 During boot up press Ctrl F to enter the FastBuild BIOS utility 2 Choose option 2 View Drive Assignments 3 Press arrow keys to highlight the drive where you wish to remove the reserve sector 4 Press Alt F1 The highlighted drive will start blinking on the screen 5 Press Ctrl Tab A message will appear...

Page 65: ...e During Reboot See Unable to Partition or Format array above Cannot Rebuild Mirrored RAID 1 Array See Unable to Partition or Format array above Fatal Errors or Data Corruption Are Constantly Reported When Reading or Writing to Drive Array See Unable to Partition or Format array above ...

Page 66: ...itioning and formatting the drive For Windows 98 you can perform the DOS Command SYS C from a bootable floppy or CD ROM to restore the operating system boot record and transfer the system files to the boot drive If this does not work the Windows 98 registry may have become corrupted during the boot process and must be restored See the Windows documentation to perform this procedure Promise Windows...

Page 67: ...2000 or XP The F6 key was not pressed at the appropriate time Reboot the system and press the F6 key when the message Setup is inspecting your computer s hardware configuration appears in Windows NT4 or the message Press F6 if you need to install third party SCSI or RAID driver appears in Windows 2000 and XP ...

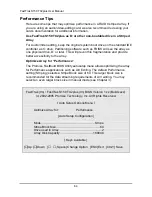
Page 68: ... better accessibility to the array Optimize Array for Performance The Promise FastBuild BIOS Utility autosetup menu allows optimizing the array for Performance applications such as A V Editing The default Performance setting Striping selects a Stripe Block size of 64 This larger block size is recommended for the data streaming requirements of A V editing You may select an even larger block size in...

Page 69: ...he PCI bus and frees that time for use by other PCI devices and will eliminate the glitch dropout effect on playback 1 In PAM click on the Controller icon in Tree View to display its Options in Information View 2 At the bottom of the window is the PCI bus utilization slider 3 Move the slider to the left to reduce the time FastTrak S150 TX2plus occupies the PCI bus Then click the Commit button Once...

Page 70: ...FastTrak S150 TX2plus User Manual 66 ...

Page 71: ...ntroller does not support ATAPI devices Q Will the FastTrak S150 TX2plus work with 66MHz PCI bus speed A Yes the FastTrak S150 TX2plus is designed to accommodate the newer PCI bus speed and is backward compatible with 33MHz speeds Q How can I change the resources that the FastTrak uses A The FastTrak S150 TX2plus is fully PnP This means all the resources that it uses are given to it by the PnP BIO...

Page 72: ...e times the speed of the slowest HDD in the array RAID 1 Mirror For capacity The FastTrak S150 TX2plus array will be as big as the smallest HDD in the array The larger HDD will simply be truncated The truncated space on the bigger HDD will then be unusable For sustained data transfers The FastTrak S150 TX2plus array will write data at the rate of the slowest HDD in the array The FastTrak S150 TX2p...

Page 73: ... a different controller such as the one integrated on the motherboard A Only Single drive striped RAID 0 and Mirrored RAID 1 array configurations allow the drive s to be accessed individually on another controller Multiple drive striped RAID 0 will not work Q If I have a problem with one of the drives on the FastTrak S150 TX2plus how can I low level format it to correct the problem A Do NOT do thi...

Page 74: ...ivers not by your system BIOS Q How do I partition format my FastTrak S150 TX2plus RAID array A The FastTrak S150 TX2plus represents the array as a single HDD to your system Therefore anything that you can do to a single HDD you can do to a FastTrak S150 TX2plus array For example you should use the FDISK and FORMAT utilities to partition format the array You can partition the array as you see fit ...

Page 75: ... add in controllers in the system then the boot sequence among them will be determined exclusively by their PCI slot priority PCI slot 1 will be first slot 2 second etc Put the FastTrak S150 TX2plus controller in the PCI slot where it will be accessed ahead of other SCSI controllers if you want to boot from the array Q How can I change the boot sequence between a PCI SCSI card and the FastTrak S15...

Page 76: ...FastTrak S150 TX2plus User Manual 72 ...

Page 77: ...ontrollers Technical Support Services Promise Online TM Web Site http www promise com tech documents drivers utilities etc USA Tech Support Center E mail Support support promise com Fax Technical Support 408 228 6401 Attention Technical Support Phone Technical Support 408 228 6402 7 30 5 00pm M F Pacific Standard Time If you wish to write us for support Promise Technology Inc Attn Technical Suppor...

Page 78: ...mise Technology Inc Attn Technical Support 2F No 30 Industry E Rd IX Science based Industrial Park Hsinchu Taiwan R O C China Office E mail Support support china promise com Fax Technical Support 86 0 10 687 23940 Attention Technical Support Phone Technical Support 86 0 10 687 23941 9 00 6 00pm China Time If you wish to write us for support Promise Technology China Attn Technical Support Room 3217...

Page 79: ...isaster or maintenance by anyone other than a Promise or a Promise authorized service center Disclaimer of other warranties This warranty covers only parts and labor and excludes coverage on software items as expressly set above Except as expressly set forth above Promise disclaims any warranties expressed or implied by statute or otherwise regarding the product including without limitation any wa...

Page 80: ...ure of the essential purpose of the foregoing remedy and regardless of whether Promise has been advised of the possibility of such damages Promise is not an insurer If you desire insurance against such damage you must obtain insurance from another party Some states do not allow the exclusion or limitation of incidental or consequential damages for consumer products so the above limitation may not ...

Page 81: ...her Countries Return the product to your dealer or retailer Contact them for instructions before shipping the product You must follow the packaging guidelines for returning products Use the original shipping carton and packaging or similar packaging if the original is not available Include a summary of the product s problem s Write an attention line on the box with the RMA number Include a copy of...

Page 82: ...FastTrak S150 TX2plus User Manual 78 ...

Reviews: