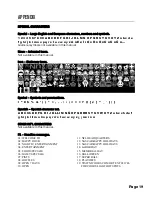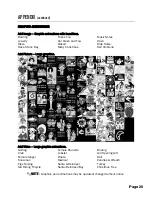
CONTENT MODIFICATION
MODIFY, INSERT, AND INDEX CONTENT
By now you should have a good feel for creating new content. Now let’s try to make some
changes.
Modify Contents – Revise an existing custom message.
1)
Press the [MENU] button.
2)
Press the arrow button. The Modify Contents option appears.
3)
Press [OK].
4)
Use the and arrow buttons to scroll through your existing messages.
5)
Select any custom message to revise by pressing [OK].
6)
You are now free to delete, add or modify your message.
7)
When your revisions are complete, exit the edit mode and run your message.
Insert Contents – Inserts new content before an existing message.
1)
Press the [MENU] button.
2)
Press the arrow button until the Insert Contents option appears.
3)
Press [OK].
4)
Use the and arrow buttons to scroll through your existing messages.
5)
When you have selected the location of the new content to be inserted, press [OK].
6)
Use the and arrow buttons to select an insertion option type.
NOTE
:
Insertion options: (1) Sentence Insertion (2) Dual Message Insertion
(3) Image Insertion (4) Picture Insertion (5) Video Insertion
(6) Display Date (7) Display Time (8) Dday Insertion (9) Dtime Insertion.
7)
Select your option by pressing [OK].
8)
Enter your content accordingly and, exit the edit mode and run your message.
NOTE
:
All insertion options can be reviewed again by returning to Page 10 in this
manual.
Index Content – Organize your message playlist.
1)
Press the [MENU] button.
2)
Press the arrow button until the Index Contents option appears.
3)
Press [OK].
4)
Use the and arrow buttons to scroll through your existing messages.
5)
Press [OK] to change enable/disable a message. Selecting “X” will disable the
message from running in your message playlist. Selecting “O” will enable the
message to run in your playlist.
NOTE
:
By default, all messages are enabled to run in the playlist.
6)
When you are satisfied with your changes press [ESC].
7)
Now press [ESC] again to run your message.
[ ]
[ ]
[ ]
[ ]
[ ]
[ ]
[ ]
[ ]
[ ]
[ ]
[ ]
Page 14
Summary of Contents for Marquee-Lite Plus
Page 1: ...Remote Keyboard USER GUIDE...


