


141
141
Owner’s Manual
Quick S
tar
t:
Lev
el
Setting
Ov
er
view
Hook
up
Con
trols
Connec
ting
to
a
Comput
er
Tut
orials
Technic
al
Inf
orma
tion
Trouble
-
shooting
and W
arr
an
ty
Sc
enes
, P
resets
, S
yst
em Menu
,
and MIDI C
on
trol
Sof
tw
ar
e: Univ
ersal C
on
trol
,
SL Remot
e, C
aptur
e,
and S
tudio O
ne A
rtist
Tutorials 8
141
Quick S
tar
t:
Lev
el
Setting
Ov
er
view
Hook
up
Con
trols
Connec
ting
to
a
Comput
er
Tut
orials
Technic
al
Inf
orma
tion
Trouble
-
shooting
and W
arr
an
ty
Sc
enes
, P
resets
, S
yst
em Menu
,
and MIDI C
on
trol
Sof
tw
ar
e Univ
ersal C
on
trol
,
SL Remot
e, C
aptur
e,
and S
tudio O
ne A
rtist
Microphone Types and Placement 8.1
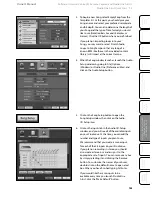
Electric Guitar
Place a dynamic microphone an inch or two away
from the speaker of the guitar amplifier. Experiment
with exact location. If you are recording an amp with
multiple speakers, experiment with each one to see if
one sounds better than the others. Place a condenser
microphone approximately six feet away, pointed at
the amp. Experiment with distance. Also experiment
with inverting the phase of the room microphone to
check for phase cancellation and reinforcement.
(Select the “fuller”-sounding position.) To use this
technique in a live application, omit the condenser
microphone.
Acoustic Guitar
Point a small-diaphragm condenser microphone at
the 12th fret, approximately 8 inches away. Point a
large-diaphragm condenser microphone at the bridge
of the guitar, approximately 12 inches from the guitar.
Experiment with distances and microphone
placement. Another popular method is using an XY
microphone placement with two small-diaphragm
condenser microphones. (See drum-overheads photo
on the next page.)