background image


LC3251 / LC4751 Product Manual 

44 

Summary of Contents for WeatherBright LC3251

Page 1: ...Planar WeatherBright LC3251 LC4751 OUTDOOR DIGITAL SIGNAGE DISPLAYS PRODUCT MANUAL www planar com...

Page 2: ...t is subject to change without notice This document contains proprietary information that is protected by copyright All rights are reserved No part of this document may be reproduced translated to ano...

Page 3: ...NSTALLING THE DISPLAY IN AN ENCLOSURE 15 CONNECTION AND DISPLAY POWER UP 15 TROUBLESHOOTING TIPS AND FUNDAMENTALS 16 PREVENTATIVE MAINTENANCE 17 ITEMS REQUIRED FOR FIELD SERVICE AND PREVENTATIVE MAINT...

Page 4: ...ing type plug has two blades and a third grounding prong The grounding prong is provided for your safety Consult an electrician for a fixed installation or if the outlet does not accommodate all conne...

Page 5: ...y access for field cleaning or servicing Field replaceable components include LEDs fans and power supplies The fans and power supplies are redundant allowing the displays to continue operating if thes...

Page 6: ...box o Tempered cover glass is durable and vandal resistant o No front surface coatings which can degrade over time o Air gaps in competing solutions result in more reflections reduced brightness lowe...

Page 7: ...ce to the user The Junction Board accepts the power and serial inputs and manages the system with smart monitoring and control The system also incorporates a 12V power supply fans a diffuser temperatu...

Page 8: ...checking It checks the status or looks for faults at a maximum interval of every 10 seconds The display continues operating even with a failure unless directed otherwise Fault tests are independent fr...

Page 9: ...and LC4751 displays The LC3251 and LC4751 displays are designed for 24 7 mission critical usage in extreme outdoor conditions Use the display in portrait orientation The displays are intended for use...

Page 10: ...15 44in x 27 47in 5640mm x 1096mm 23 02in x 40 93in Surface treatment Anti Glare 4 7mm optically bonded tempered Vandal Glass Anti Glare 4 7mm optically bonded tempered Vandal Glass Connectivity Video...

Page 11: ...Compatibility The LCD monitor has been tested to synchronize to and scale the following DVI digital signal graphics inputs and generate a stable display that has a similar geometry Item Resolution Ver...

Page 12: ...Hz No Standard 19 1600 x 1200 60Hz VESA 20 1920 x 1080 60Hz No Standard Reliability Specification System is designed for 50 000 hours of continuous 24 7 use with field replaceable LED backlights and r...

Page 13: ...LC3251 LC4751 Product Manual 13 LC3251 and LC4751 Display Drawings Figure 2 Front and Side Rendering of the LC3251 display Figure 3 Back and Side Rendering of the LC3251 display...

Page 14: ...LC3251 LC4751 Product Manual 14 Figure 4 Front and Side Rendering of the LC4751 display Figure 5 Back View of the LC4751 display...

Page 15: ...splay in a Typical Enclosure Connection and Display Power Up Follow these steps to hook up and power on a LC3251 or LC4751 display 1 Attach a DVI D or VGA cable to the corresponding video input of the...

Page 16: ...designed into the product to enable this In the event of an issue the unit will raise a fault flag that can be accessed through the RS 232 serial interface The best first step for troubleshooting is t...

Page 17: ...re removed the door of the display hinges open for access to the back of the display and optical diffuser glass Close the door of the display and turn it on for a visual inspection It is possible that...

Page 18: ...2 3 fans 3 3 fans 80mm electronics cooling PM 1 2 fans 4 6 fans 92mm LC3251 front cooling PM 2 3 fans 5 Standard glass cleaner and cloths for wiping glass PM 6 2 3 filters PM 1 filter 7 Remote PC with...

Page 19: ...s shipped separate if ordered with the open frame displays Package dimensions and weights Product Unit Weight Shipping Weight Package Dimensions LC3251 67 lb 85 lb 17 in x 28 in x 42 in LC3251 MP 72 l...

Page 20: ...902 0711 01 Power Supply LC4751 650W 48V CC 170 0292 03 Fan Assembly 48V 127mm PWM IP55 LC3251 LC4751 170 0299 03 Fan Assembly 48V 92mm PWM IP55 LC3251 170 0300 03 Fan Assembly 48V 80mm Low IP55 LC32...

Page 21: ...rom post sale technical support to a full suite of depot services our services are performed by trained Planar employees When you purchase a Planar product you get more than a display you get the serv...

Page 22: ...al interface between the Junction Board and the Video Interface Board No handshaking is used Baud Rate 19200 1 Stop Bit No Parity RS 232 Serial Communication Formats This section provides general RS 2...

Page 23: ...the unit take that value Get asks what the value is Increment adds 1 to the current value Decrement subtracts 1 from the current value none Execute performs an action such as a reset Value is only ap...

Page 24: ...f Response Errors There are several situations where an error message will be returned Below is a list of possible error messages and the likely cause of the error Commands must start with op or st CR...

Page 25: ..._OVP16 0xB8 LED_OVP17 0xC1 LED_OVP18 0xC2 LED_OVP19 0xC3 LED_OVP20 0xC4 LED_OVP21 0xC5 LED_OVP22 0xC6 LED_OVP23 0xC7 LED_OVP24 0xC8 FanSpeed1 0x21 FanSpeed2 0x22 FanSpeed3 0x23 FanSpeed4 0x24 FanSpeed...

Page 26: ...Adjusts the brightness of the backlight Backlight can either be set to full on or 50 OP backlight brightness 1 10 Set Responses Backlight brightness set to XX CR Backlight brightness XX CR Backlight b...

Page 27: ...CR Hours 0 CR Minutes 0 CR Reset Execute Hardware reset all adjustable parameters remain unchanged OP hardware reset System resetting CR Factory Reset Execute Display restores all adjustable paramete...

Page 28: ...uto Dimming OFF CR Auto Dimming ON CR Auto dimming is OFF CR Auto dimming is ON CR Minimum Dimming Level Set Get Increment Decrement 5 Sets the lowest brightness level the display will go when placed...

Page 29: ...Set Auto Set or get the state of the louver OP louver control Open Close Auto Louver Opening CR Louver Closing CR Louver Control set to Auto CR Louver is Opening CR Louver is Closing CR Louver Control...

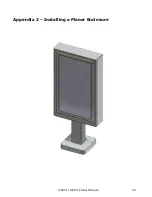
Page 30: ...LC3251 LC4751 Product Manual 30 Appendix 2 Installing a Planar Enclosure...

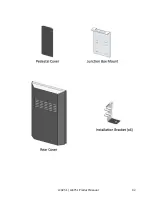
Page 31: ...LC3251 LC4751 Product Manual 31...

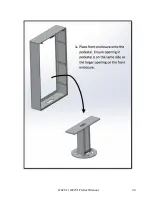
Page 32: ...LC3251 LC4751 Product Manual 32...

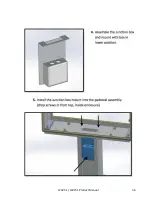
Page 33: ...LC3251 LC4751 Product Manual 33...

Page 34: ...LC3251 LC4751 Product Manual 34...

Page 35: ...LC3251 LC4751 Product Manual 35...

Page 36: ...LC3251 LC4751 Product Manual 36...

Page 37: ...LC3251 LC4751 Product Manual 37...

Page 38: ...LC3251 LC4751 Product Manual 38...

Page 39: ...LC3251 LC4751 Product Manual 39...

Page 40: ...LC3251 LC4751 Product Manual 40...

Page 41: ...LC3251 LC4751 Product Manual 41...

Page 42: ...LC3251 LC4751 Product Manual 42...

Page 43: ...LC3251 LC4751 Product Manual 43...

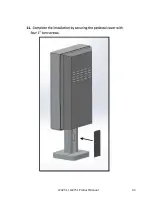
Page 44: ...LC3251 LC4751 Product Manual 44...

Reviews: