background image

QUICK LINKS

Contents

Index

Regulatory Compliance

Product Information

Warranty

GETTING STARTED

About the Display

Package Contents

Identify Components

Position Display

Desk Stand Features

INSTALLING THE DISPLAY

Set  DIP Switch

Install Display Controller

Connect Video and Power

Install Display Driver

Change Display Properties

Dome CXtra Software

APPENDIXES

Troubleshooting

Specifications

LED Status Lights

Single Desktop

USB Connection

Component Removal

Power Management

Palette Options

9

Dome C3i Display

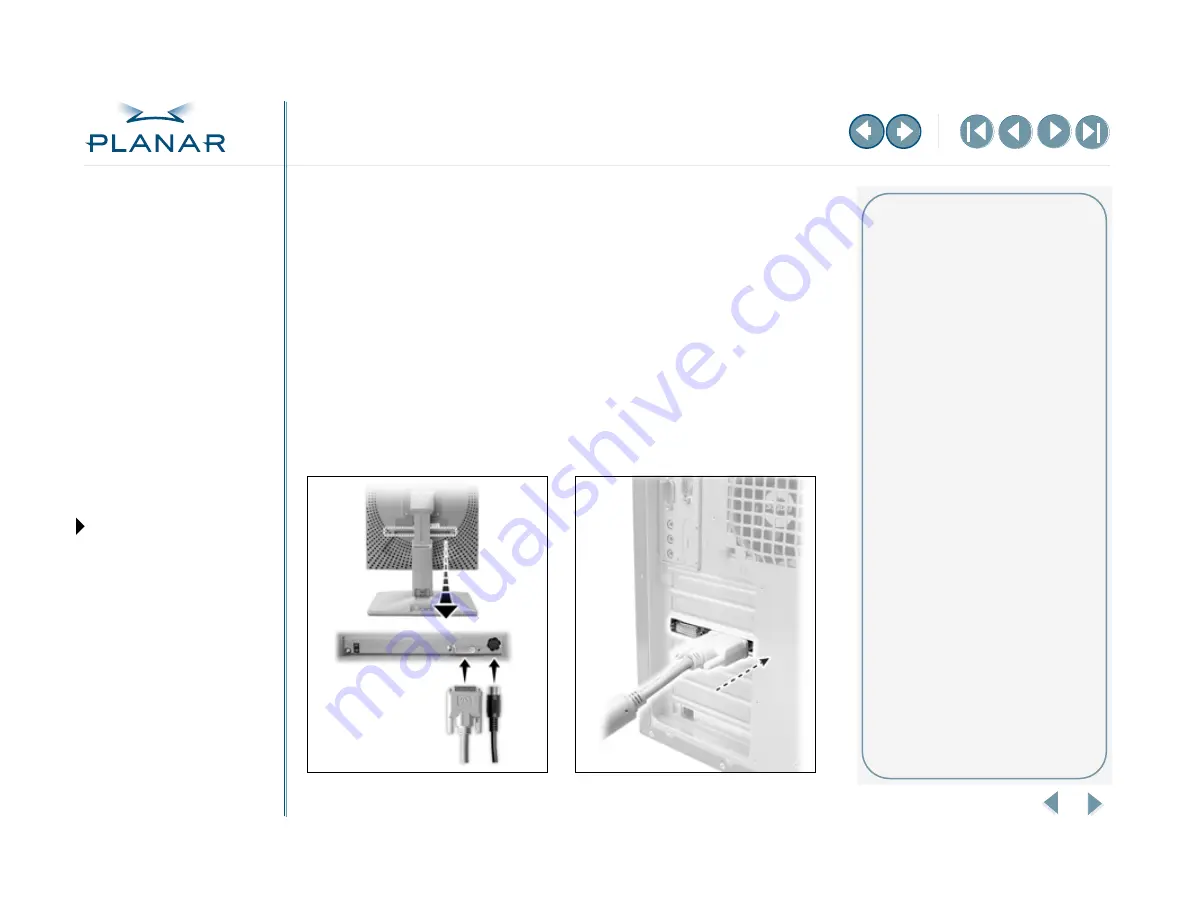
Connect Video Cable and Power Supply

Turn your computer off. Leave the power cord plugged into the grounded outlet. 
Use the Dome C3i display with the power supply and video cable shipped. The 
universal external 12V DC power supply is the Ault MW122RA1223F02.

To connect the display

1

Plug one end of the DVI cable into the DVI port on the interface plate. 

Secure the connection.

2

Plug the power cord into the power input port on the interface plate.

3

Plug the other end of the DVI cable into the Video 1 port on the installed 
DX2 display controller. Secure the connection.

4

Plug the other end of the power cord into the power supply.

5

Plug the power supply cord into a grounded AC outlet.

Installation tips

Easy access to ports

For displays mounted on a desk 
stand, rotate the LCD panel from 
portrait to landscape for easy 
access to the ports. 

Threading cables

Thread the DVI cable and power 
cord through the back of the stand. 
Make sure the cable and cord run 
through the notches. To reattach the 
stand cover, align the hooks with the 
slots on the stand. Press the cover 
into place. A click sound signals 
a secure connection.

Restarting

Turn on your display before you turn 
on your computer. Failing to do so 
could damage the display.

Multiple displays

Connect the first display of a two-
headed system, or the only display 
of a one-headed system, to the 
Video 1 port. Connect all displays 
to the DX2 display controller before 
you turn on the computer system to 
install the driver. The driver can then 
detect all displays.

Using two displays allows you to 
view two images simultaneously or 
one image across both displays.

Summary of Contents for Dome C3i

Page 1: ...tures INSTALLING THE DISPLAY Set DIP Switch Install Display Controller Connect Video and Power Install Display Driver Change Display Properties Dome CXtra Software APPENDIXES Troubleshooting Specifica...

Page 2: ...as reference only Reference to other vendors product does not imply any recommendation or endorsement This document contains proprietary information protected by copyright No part of this manual may...

Page 3: ...nection Component Removal Power Management Palette Options Contents Regulatory Compliance iv Product Information vi About the Dome C3i Display 1 Package Contents 2 Identify the Components 3 Position t...

Page 4: ...cy energy and if not installed and used in accordance with the instruction may cause harmful interference to radio communications However there is no guarantee that interference will not occur in a pa...

Page 5: ...and other normative documents EU EMC Directive 89 336 EEC EU Electromagnetic Compatibility Directive EN 60601 1 2 2001 Medical Electrical Equipment Section 1 2 Collateral standard electromagnetic comp...

Page 6: ...sponsible for the system to comply with the requirements of IEC 60601 1 1 If in doubt speak with a qualified technician To prevent fire or injury Replace the power supply or cables if damaged Use only...

Page 7: ...o a grounded outlet Secure the display properly onto a standard VESA 100 mm mounting unit if you elect not to use the desk stand Do not step on or place anything on top of the power cord Do not set up...

Page 8: ...do the following Swivel the display panel in portrait mode Push the panel down to the lowest position Use the stand lock to anchor the panel Always transport the Dome C3i display in its original cont...

Page 9: ...ical to softcopy medical viewing Unwanted analog display image artifacts such as noise jitter ghosting and image smearing are eliminated The Dome C3i display offers the following key features See the...

Page 10: ...Dome CXtra software DC power adapter Quick references for Dome C3i display and Dome CXtra software Dome C3i LCD panel mounted on desk stand Unpacking and handling tips The Dome C3i display is a precis...

Page 11: ...ing Specifications LED Status Lights Single Desktop USB Connection Component Removal Power Management Palette Options 3 Dome C3i Display Identify the Components Review this illustration of the back pa...

Page 12: ...ons 4 Dome C3i Display Position the Display You can adjust the tilt height viewing angle and orientation of the display to maintain an ergonomic and comfortable viewing position Before you unpack the...

Page 13: ...ideo and Power Install Display Driver Change Display Properties Dome CXtra Software APPENDIXES Troubleshooting Specifications LED Status Lights Single Desktop USB Connection Component Removal Power Ma...

Page 14: ...n the stand lock to adjust display height Remove the stand cover to thread the power cord and DVI cable connections to the display To activate the USB hub function the display must be connected to a U...

Page 15: ...itch 1 on the DIP switch into the ON position Enable VGA on only one board when you install multiple DX2 display controllers Disable VGA on all DX2 display controller if you are using a separate VGA c...

Page 16: ...Options 8 Dome C3i Display Install the Display Controller Before you begin choose a well ventilated location with an adequate amount of space Excessive heat cannot dissipate when display vents are blo...

Page 17: ...lug the other end of the DVI cable into the Video 1 port on the installed DX2 display controller Secure the connection 4 Plug the other end of the power cord into the power supply 5 Plug the power sup...

Page 18: ...ancel You must run Setup exe to install the driver 3 Insert the W2KDXPCI CD and open the CD folder 4 Double click Setup exe 5 Click Next to proceed through the installation and start copying files 6 C...

Page 19: ...es the same resolution 1 Log on with administrator privileges 2 Right click the desktop Select Properties Settings 3 Select Default Monitor and Dome DX2 PCI Properties from the Display list 4 Check th...

Page 20: ...et driver options Beware that the Disable DirectDraw driver option has specific conditions which may affect your display In the Driver Options field of the Dome tab select Disable DirectDraw Click App...

Page 21: ...rds This sensor works with the digital interface board that is built into the back of the Dome C3i display Dome CXtra base services allow you to monitor and stabilize display backlights schedule the b...

Page 22: ...sure the first display of a dual headed system or the only display of a single headed system is connected to the Video 1 port on the DX2 display controller See page 9 Power LED is amber Display is in...

Page 23: ...ger section 3 Select either Ignore or Warn to allow installation of the Dome driver and other unsigned drivers If you select Ignore the installation program ignores the lack of a valid Catalog file wi...

Page 24: ...61 shades of gray programmable gamma Refresh rate 60 Hz Contrast ratio 600 1 typical Brightness 233 fL or 800 cd m2 typical Pixel rise fall time 50 ms Viewing angle 170 85 horizontal vertical Interfac...

Page 25: ...Supply Category Characteristic Item Specification Power input requirements Voltage selection Auto ranging Voltage 100 240V AC Current 2 0 A Frequency 50 to 60 Hz Power output requirements Voltage 12...

Page 26: ...ement Palette Options 18 Dome C3i Display Video Modes Resolutions expressed in pixels W x H Single desktop requires dual displays DVI 1 0 Interface The Dome C3i display connects to the DX2 display con...

Page 27: ...s between the DX2 display controller and the interface LED B describes the display panel status it shows any faults currently in the panel Power up sequence information from LED LED A Action Sequence...

Page 28: ...ubleshooting Specifications LED Status Lights Single Desktop USB Connection Component Removal Power Management Palette Options 20 Dome C3i Display LED A status information after initial power on LED B...

Page 29: ...ual headed display to single desktop On the DX2 display controller switch 3 on DIP switch must be in the ON position for each procedure See page 7 To set the display resolution After you install the d...

Page 30: ...ou are working on a dual headed display you can use the following procedure to change your hardware and software configuration to single desktop 1 Use the InstallShield Wizard to uninstall the existin...

Page 31: ...ts Single Desktop USB Connection Component Removal Power Management Palette Options 23 Dome C3i Display To get information Open the Dome tab to retrieve information on the two displays you are using t...

Page 32: ...B hub that allows you to attach USB devices such as a keyboard or mouse to the Dome C3i display rather than to a computer To use the USB ports 1 Use a Type A B USB cable to connect the USB B port on t...

Page 33: ...e the InstallShield Wizard to uninstall the driver first Then use the Device Manager to remove the controller To uninstall the driver 1 Insert the WINDX CD and browse to find the Win2k DXpcidirectory...

Page 34: ...o ways to lower energy usage when the Dome C3i display is idle Dome CXtra Backlight Saver service preferred DPMS Display Power Management Signaling Activate the power saver when you anticipate periods...

Page 35: ...ome C3i Display Palette Options The Dome DX2 display controller supports different palette options on Windows systems In the Palette Options field of the Dome tab use the pull down menu to select a pa...

Page 36: ...tatus Lights Single Desktop USB Connection Component Removal Power Management Palette Options 28 Dome C3i Display Palette options with multiple displays The SelectPalette and RealizePalette functions...

Page 37: ...or screen if the primary display is set to a gray palette The following table lists the palette options available on primary and secondary displays A check mark indicates the palette combination that...

Page 38: ...onlinear static gray palette provides correct colors for applications using the Windows palette colors display incorrectly if the application assumes that a static palette is always ramped Static gray...

Page 39: ...1 13 DIN power connector 3 18 DirectDraw disabling 12 display back panel 3 connecting 9 installing 9 display controller installation 8 Display Power Management Signaling vi 26 display properties chan...

Page 40: ...equence LED 19 precautions cleaning viii installing vii safety vi preventing fire or injury vi product information vi R Reset button 3 resolution 18 19 setting display 11 setting single desktop 21 ret...

Page 41: ...l attempt to correct any minor issues that may be causing the problem Once Planar has determined that you have a non functioning product Planar will arrange for return and repair of the non functionin...

Page 42: ...nty is void on any product with damage deterioration or malfunction resulting from the following a Accident misuse neglect fire water lightning or other acts of nature unauthorized product modificatio...

Page 43: ...ESS OPPORTUNITY LOSS OF GOODWILL INTERFERENCE WITH BUSINESS RELATIONSHIPS OR OTHER COMMERCIAL LOSS EVEN IF ADVISED OF THEIR POSSIBILITY OF SUCH DAMAGES 2 ANY OTHER DAMAGES WHETHER INCIDENTAL INDIRECT...

Reviews: