TECHNOLOGIE FÜR DEN HAUSHALT
TECHNOLOGY FOR DOMESTIC USE
04.04.2022
Bedienungsanleitung
Instruction Manual
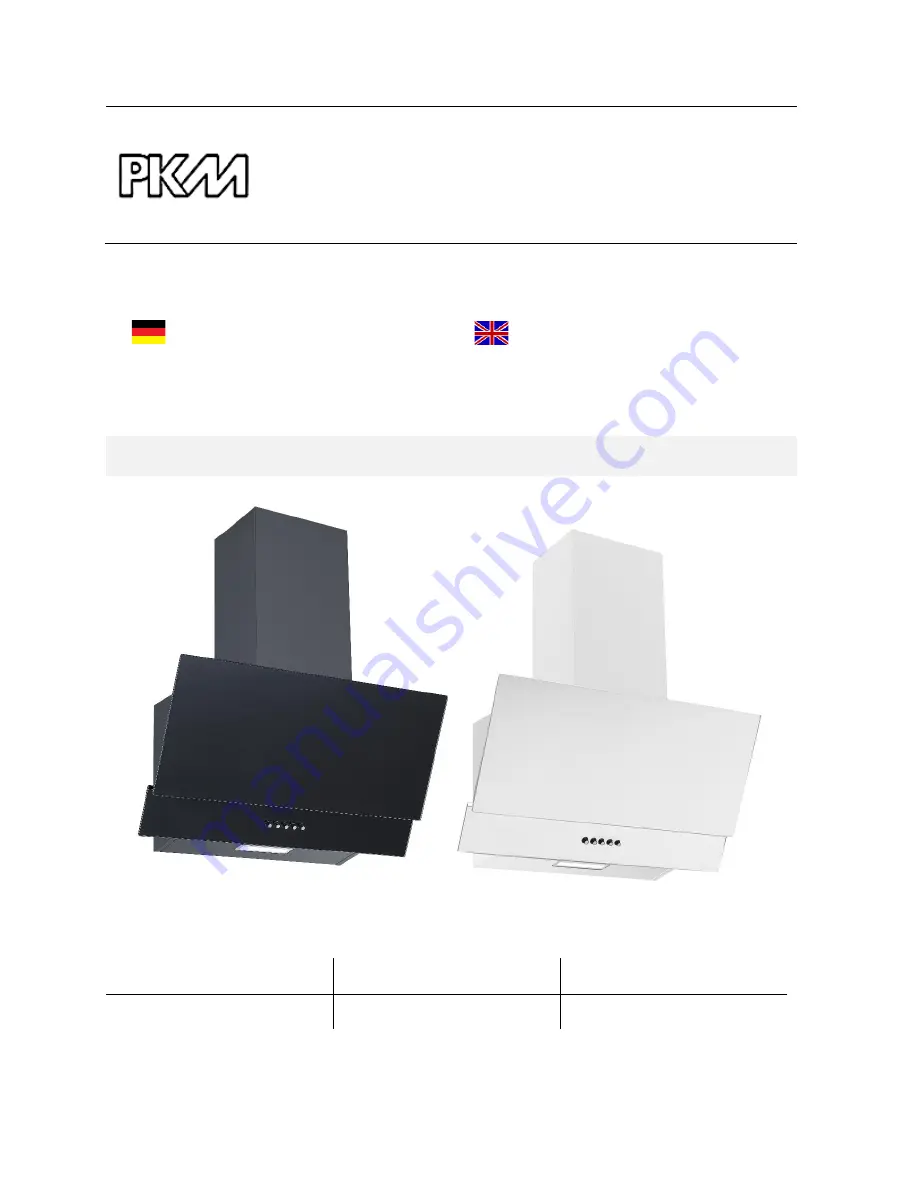
Dunstabzugshaube
Extractor Hood
BS38-60ABPH
/
BS38-60AWPH
Deutsch
Seite
2
English
Page
45
www.pkm-online.de
Page 1: ...LOGIE F R DEN HAUSHALT TECHNOLOGY FOR DOMESTIC USE 04 04 2022 Bedienungsanleitung Instruction Manual Dunstabzugshaube Extractor Hood BS38 60ABPH BS38 60AWPH Deutsch Seite 2 English Page 45 www pkm onl...
Page 2: ...lt Inhalt 2 1 Sicherheitshinweise 4 1 1 Signalw rter 5 1 2 Sicherheitsanweisungen 5 2 Installation 10 2 1 Wichtige Installationshinweise f r den Abluftbetrieb 11 2 2 Mindestabst nde 12 2 3 Ger teansic...
Page 3: ...uss auf die Funktionsweise des Ger tes haben Entsorgen Sie das Verpackungsmaterial entsprechend den rtlichen Vorschriften Ihres Wohnorts Das von Ihnen gekaufte Ger t wurde m glicherweise inzwischen ve...
Page 4: ...r tes an die Stromversorgung notwendig sind d rfen nur von einer qualifizierten Fachkraft Elektrotechniker in durchgef hrt werden Das Ger t ist ausschlie lich zur privaten Nutzung bestimmt Das Ger t i...
Page 5: ...u mittelschweren oder kleineren Verletzungen f hren kann HINWEIS verweist auf eine Gefahrensituation die wenn sie nicht abgewendet wird eine m gliche Besch digung des Ger tes zur Folge hat 1 2 Sicherh...
Page 6: ...ung abschalten Kontaktieren Sie den Kundendienst oder das Gesch ft in dem Sie das Ger t erworben haben 2 STROMSCHLAGGEFAHR 8 Achten Sie vor dem Einschalten des Ger tes darauf dass kein offenes Kaminfe...
Page 7: ...ten 2 Betreiben Sie das Ger t nur mit 220 240 V AC 50 Hz Verwenden Sie bei 220 240 V AC 50 Hz Netzbetrieb keine Steckdosenleisten Mehrfachsteckdosen oder Verl ngerungskabel Alle Netzanschlussleitungen...
Page 8: ...n der Dunstabzugshaube von qualifiziertem Fachpersonal durchf hren zu lassen Jegliche Sch den die durch unsachgem e Installation des Ger tes entstehen unterliegen weder der Garantie noch der Gew hrlei...
Page 9: ...d rfen nicht mit dem Ger t spielen 23 Erlauben Sie Kindern nur dann das Ger t unbeaufsichtigt zu benutzen wenn sie vorher in einer solchen Art und Weise im Gebrauch des Ger tes unterwiesen wurden das...
Page 10: ...fen Sie vor dem Anschluss des Ger tes ob das Netzkabel oder das Ger t selbst keine Besch digungen aufweisen 8 Das Typenschild darf niemals unleserlich gemacht oder gar entfernt werden Falls das Typens...
Page 11: ...Leistung des Ger tes vermindert wird Die maximal zul ssige Biegung nach au en betr gt 120 6 Verwenden Sie nur glatte Rohre oder flexible Abluftschl uche aus nicht brennbarem Material 7 Halten Sie bei...
Page 12: ...llationsh he sondern nur einen minimalen Wert der durch die Addition der H he des Kochfelds Fu boden Kochfeld und des ben tigten Mindestabstands der entsprechenden Art des Kochfelds zur Dunstabzugshau...
Page 13: ...shaube nicht den Kopf zu sto en ansonsten kann es zu PRELLUNGEN SOWIE ZU VERLETZUNGEN IM AUGENBEREICH kommen 2 3 Ger teansicht 1 GEH USE DER DUNSTABZUGSHAUBE 2 BEDIENFELD 3 R CKSCHLAGKLAPPE 4 ABLUFTAU...
Page 14: ...s HINWEIS Jegliche Sch den die durch ein unsachgem installiertes und oder unsachgem an die Stromversorgung angeschlossenes Ger t entstehen unterliegen weder der Garantie noch der Gew hr leistung Wir e...
Page 15: ...PPE Klappenteil a b R CKSCHLAGKLAPPE Klappenteil b c GEH USE DES ABLUFTAUSLASSES INSTALLATIONSSCHRITTE 1 Die beiden einzelnen Klappenteile a b bestehen jeweils aus einem Halbkreis inkl einer Achse d M...
Page 16: ...16 a R CKSCHLAGKLAPPE Klappenteil a b R CKSCHLAGKLAPPE Klappenteil b c GEH USE DES ABLUFTAUSLASSES d ACHSEN e ACHSSTIFTE f FFNUNGEN IM GEH USE DES ABLUFTAUSLASSES beidseitig...
Page 17: ...gesamten Kamins darstellt 3 Bohren Sie zur Befestigung der Innenkaminhalterung A und des Geh uses 4 L cher 8 mm in die Wand Bringen Sie die Spreizd bel B in die vier Bohrl cher C ein 4 Bringen Sie zw...
Page 18: ...shaube J s Abb unten links Befestigen Sie den Abluft schlauch G am Abluftauslass H mit einem Kabelbinder K s Abb unten rechts UMLUFTBETRIEB Schritt 7 ABLUFTBETRIEB und Schritt 13 brauchen Sie nicht zu...
Page 19: ...chmesser von jeweils 6 mm befinden sich auf der hinteren Seite des Geh uses der Dunstabzugshaube A INNENKAMINHALTERUNG D SCHRAUBEN 4 30 mm 2 St insgesamt G ABLUFTSCHLAUCH nur bei Abluftbetrieb J GEH U...
Page 20: ...11 Setzen Sie den kompletten Kamin O N auf die Dunstabzugshaube und f hren Sie den Abluftschlauch G nur bei Abluftbetrieb nach au en s Abb unten links und s Schritt 13 12 Befestigen Sie den u eren Kam...
Page 21: ...des Kamins am Ger t 13 Sie k nnen die Abluftf hrung wie folgt verlegen s unten NUR bei ABLUFT BETRIEB Vertikal Der Abluftschlauch wird zu einer Auslasskappe im Dach gef hrt Abb hnlich Horizontal Der...
Page 22: ...insgesamt zur Befestigung des inneren Kamins 15 Installieren Sie die Fettfilter s Kapitel 6 1 REINIGUNG DER FETTFILTER und schlie en Sie das Netzkabel5 am Stromnetz an berpr fen Sie ob Ihr Ger t aus...
Page 23: ...bluftbetrieb Umluftbetrieb 3 1 Abluftbetrieb WARNUNG Die Abluft darf nicht in einen Schornstein geleitet werden der f r Abgase von Ger ten die mit Gas oder anderen Brennstoffen betrieben werden genutz...
Page 24: ...luftbetrieb verwenden m chten k nnen Sie Kohlefilter installieren s Kapitel 3 2 1 KOHLEFILTER Neben den Fettfiltern m ssen immer installiert sein neutralisieren Kohlefilter zus tzlich Ger che und abso...
Page 25: ...WARNUNG Schalten Sie das Ger t vor der Montage von Kohlefiltern unbedingt aus und trennen Sie es von der Stromversorgung entsprechende Sicherung im Haussicherungskasten INSTALLATION DER KOHLEFILTER 1...
Page 26: ...en des Motors befestigt 4 Setzen Sie den KOHLEFILTER 2 auf den Motor 1 und drehen Sie ihn im Uhrzeigersinn nach rechts 3 bis er ordnungsgem und fest auf dem Motor sitzt s Abb unten Abb hnlich Modifika...
Page 27: ...em in Position befindet lassen Sie die Arretier Taste B los um den Fettfilter zu arretieren s Abb unten 8 Klappen Sie die Glasabdeckung A der Dunstabzugshaube vorsichtig nach unten um das Ger t zu sch...
Page 28: ...lich mit eingesetzten Fettfiltern betrieben werden da sich ansonsten durch den Dunst transportiertes Fett in der Haube ablagert BRANDGEFAHR 4 Bedienfeld und Bedienung 4 1 Bedienfeld WARNUNG Decken Sie...
Page 29: ...dieser Taste stellen Sie die niedrigste Leistungsstufe Motorgeschwindigkeit der Dunstabzugshaube ein Diese Leistungsstufe ist f r langsames K cheln und Braten bei geschlossenem Deckel geeignet Nutzen...
Page 30: ...r cken Benutzen Sie die Beleuchtungseinheiten nur wenn das Ger t in Betrieb ist Benutzen Sie die Beleuchtungseinheiten nicht zur Raumbeleuchtung 5 Umweltschutz 5 1 Umweltschutz Entsorgung Ger te mit d...
Page 31: ...unstabzugshaube effizient und mit geringen Betriebsger uschen arbeitet W hlen Sie bei intensiven Kochd nsten fr hzeitig eine h here Leistungsstufe Bereits in der K che verteilte Kochd nste k nnen eine...
Page 32: ...auf die Leistung der Filter und sind kein Reklamationsgrund 7 Benutzen Sie keine Scheuermittel oder Essigreiniger 8 Benutzen Sie niemals einen Dampfreiniger STROMSCHLAGGEFAHR BESONDERE HINWEISE F R G...
Page 33: ...Gebrauchsh ufigkeit der Dunstabzugshaube DEINSTALLATION INSTALLATION DER ALUMINIUM FETTFILTER 1 Klappen Sie die Glasabdeckung der Dunstabzugshaube nach oben um das Ger t zu ffnen A s Abb unten Pfeilri...
Page 34: ...ine ordnungsgem e Position dr cken Sobald der Fettfilter sich ordnungsgem in Position befindet lassen Sie die Arretier Taste B los um den Fettfilter zu arretieren s Abb unten 4 Klappen Sie die Glasabd...
Page 35: ...ne gereinigt werden Normalprogramm bis 30 C Stellen Sie die Filter nicht zusammen mit verschmutztem Geschirr in die Sp lmaschine Lassen Sie die Filter gr ndlich trocknen bevor Sie sie wieder vorsichti...
Page 36: ...ung entsprechende Sicherung im Haussicherungskasten STROMSCHLAG GEFAHR HINWEIS Ber hren Sie das neue Leuchtmittel nicht mit blo en H nden Der Fingerschwei reduziert dir Haltbarkeit des Leuchtmittels V...
Page 37: ...SSKABELS E LEUCHTMITTELANSCHLUSSKABEL 5 Verwenden Sie die H nde um die Federb gel F auf beiden Seiten des LED Leuchtmittels G vorsichtig nach innen zu dr cken s Abb unten links w hrend Sie das LED Leu...
Page 38: ...t insgesamt G LED LEUCHTMITTEL H LEUCHTMITTELFASSUNG 7 Ersetzen Sie das verbrauchte LED Leuchtmittel durch ein LED Leuchtmittel von gleicher Bauart und Leistung a ILCOS D Code f r dieses Leuchtmittel...
Page 39: ...gsgem en Austausch des LED Leuchtmittels entstehen unter liegen nicht der Garantie 7 Problembehandlung FEHLER M GLICHE URSACHE MA NAHMEN GER T ARBEITET NICHT 1 Das Ger t ist mit dem Netzstecker nicht...
Page 40: ...dnungsgem befestigen UNGEN GENDE ABZUGSLEISTUNG 1 Abstand Haube Kochfeld zu gro 1 Haube tiefer h ngen 2 Zu viel Zugluft aufgrund ge ffneter T ren und oder Fenster 2 T ren und oder Fenster schlie en GE...
Page 41: ...hr g stehende Lamellen sind kann dadurch der Luftstrom beeintr chtigt werden Entfernen Sie zum berpr fen die Abdeckplatte Bringen Sie eine Abdeckplatte mit beweglichen Lamellen an die den Luftstrom am...
Page 42: ...63 dB A bewertete Luftschallemission im Betrieb auf der Intensivstufe oder Schnelllaufstufe Anschlusswert 62 00 W Beleuchtungssystem LED Leistungsaufnahme des Lichtsystems WL 2 0 W Leistungsaufnahme...
Page 43: ...3 Bevor Sie ein beliebiges Altger t entsorgen machen Sie dieses vorher unbedingt funktionsunt chtig Das bedeutet immer den Netzstecker ziehen und danach das Stromanschlusskabel am Ger t abschneiden u...
Page 44: ...chswert des Produkts keinen Einfluss haben 3 Sch den infolge Betriebs und Bedienungsfehler 4 Sch den durch aggressive Umgebungseinfl sse Chemikalien Reinigungsmittel 5 Sch den am Produkt die durch nic...
Page 45: ...tant installation instructions extraction mode 52 2 2 Minimum distances 53 2 3 View of the appliance 54 2 4 Installation one way valve extractor hood 55 2 4 1 Installation of the one way valve 56 2 4...
Page 46: ...the appliance shall remain reserved by the manufacturer Please dispose of the packing with respect to your current local and municipal regulations The appliance you have purchased may be an enhanced...
Page 47: ...l connections and energy leading components incl wires inside a wall must be checked by a qualified professional All modifications to the electrical mains to enable the installation of the appliance m...
Page 48: ...ged 3 When the power cord is damaged it must be replaced by the manufacturer or an authorised aftersales service or a qualified professional electrical engineer only 4 All electrical work that may be...
Page 49: ...generated which will ignite the gas 10 Never pull the power supply cable to unplug the appliance Always use the power plug itself to unplug the appliance RISK OF ELECTRIC SHOCK 11 Never touch the powe...
Page 50: ...e installed at a suitable position only 10 Before you install the appliance check that there are not any electrical or other cables in the installation area this prevents these cables from being drill...
Page 51: ...o that the child is able to use the appliance in a safe way and understands the risks of improper use CAUTION 1 Accessible parts of the hood may become hot while cooking 2 Any potential user must be c...
Page 52: ...pliance that is improperly installed and improperly connected to the mains is not covered by the warranty or guarantee We recommend carrying out the installation of the extractor hood by qualified per...
Page 53: ...e generated Proper insulation of the corresponding parts of the exhaust duct will then be needed Equip such an exhaust duct with a condensate trap if need be 10 Depending on the model the hood is equi...
Page 54: ...tance to the hob WARNING Never install the appliance below the required minimum distance If you ignore the required minimum distance the accumulated fat in the filters can catch fire due to the heat e...
Page 55: ...tion instructions for screws or mounting devices may result in electrical hazards RISK OF ELECTRIC SHOCK WARNING Do not damage the wiring in the wall while drilling RISK OF ELECTRIC SHOCK NOTICE Two a...
Page 56: ...ur appliance does not have the one way valve installed at the factory you still need to install it The following figures only show an example of how to install the one way valve as the exhaust air out...
Page 57: ...n axle pin e s fig below 2 Insert the axle d of a flap part carefully into the corresponding openings f on both sides in the housing of the exhaust air outlet c the axle pin e must point upwards s fig...
Page 58: ...istances are observed Note that the position of the screw holes for the fixing of the inner chimney bracket also represents the highest point of the entire chimney 3 For the fixing of the inner chimne...
Page 59: ...alled install it now s chapter 2 4 1 INSTALLATION OF THE ONE WAY VALVE 7 EXTRACTION MODE connect the exhaust hose G to the exhaust air outlet H of the extractor hood J s fig below on the left Fix the...
Page 60: ...r hood on the wall by placing the installation openings L of the extractor hood on the screws D Align the extractor hood properly 9 When the extractor hood is aligned properly tighten the two screws D...
Page 61: ...XTRACTOR HOOD L INSTALLATION OPENINGS 2 on the back side of the housing 10 Insert the inner chimney O into the outer chimney N Fix the fixing bracket M on the outer chimney using the corresponding scr...
Page 62: ...P SCREWS 11 Place the whole chimney O N on the extractor hood and guide the exhaust hose G for extraction mode only to the outside s fig below on the left and s step 13 12 Fix the outer chimney N on t...
Page 63: ...for EXTRACTION MODE ONLY VERTICALLY lay the exhaust hose to a roof cap Fig similar HORIZONTALLY lay the exhaust hose to an exhaust outlet equipped with an air grille Fig similar Article not included i...
Page 64: ...s chapter 6 1 CLEANING OF THE GREASE FILTERS and connect the appliance to the mains14 Check the correct position of the extractor hood from front and side perspective Otherwise the appliance will not...
Page 65: ...r extracting exhaust air of appliances operated by gas or other combustibles The extractor hood is usually ready for the use in extraction mode modifications are possible In extraction mode the intake...
Page 66: ...odours and absorb fine dust particles etc In this way carbon filters additionally improve the exhaust air that is returned to the kitchen We always recommend the use of carbon filters in recirculatio...
Page 67: ...mains before you install any carbon filters use the relevant fuse in your household fuse box HOW TO INSTALL THE CARBON FILTERS 1 Lift the glass cover A of the extractor hood to open the appliance s f...
Page 68: ...ILTERS are intended to be installed on both sides of the motor 4 Place the CARBON FILTER on the motor and turn it clockwise until it is firmly tightened s fig below Fig similar modifications are possi...
Page 69: ...he locking button B to lock the grease filter in place s fig below 8 Lower the glass cover A of the extractor hood carefully to close the appliance s fig below A GLASS COVER OF THE EXTRACTOR HOOD B LO...
Page 70: ...the appliance with inserted grease filters only Otherwise recirculating transported fat will deposit in the appliance and the exhaust system RISK OF FIRE 4 Control panel and operation 4 1 Control pane...
Page 71: ...hood This power level is suitable for slow cooking simmering and roasting with the lid of the cookware closed Use this power level when low steam generation occurs low concentration of cooking fumes P...
Page 72: ...rotection disposal Appliances bearing this symbol must not be disposed of together with household waste throughout the EU To prevent potential damage to the environment or human health from uncontroll...
Page 73: ...regularly as clean filters will increase the efficiency of the appliance Replace the carbon filters for recirculation mode only regularly Observe the information given on the packaging of the carbon...
Page 74: ...irect environment of the control panel or the control panel itself NOTICE Aggressive detergents such as abrasive detergents vinegar cleaners etc damage the surface of the extractor hood 6 1 Cleaning o...
Page 75: ...e C of the grease filter D to release the grease filter from its lock s fig below Then remove the grease filter D and clean it as described in this chapter A GLASS COVER OF THE EXTRACTOR HOOD B LOCKIN...
Page 76: ...system RISK OF FIRE HOW TO CLEAN THE ALUMINIUM GREASE FILTERS MANUALLY 1 Soak the aluminium grease filters in warm rinse water up to 30 C 2 Then clean the grease filters with a soft brush Be careful...
Page 77: ...e in your household fuse box CARBON FILTERS for your extractor hood are optional available Conventional carbon filters cannot be cleaned The capacity of these filters is limited You can use such filte...
Page 78: ...uch the illuminant with your hands The sweat on your fingers will reduce the operating time of your new illuminant Use a thin cloth or a thin glove INSTRUCTIONS FOR THE QUALIFIED PROFESSIONAL ELECTRIC...
Page 79: ...CTION CABLE 5 Carefully press the spring clips F on both sides of the LED illuminant G inwards using your hand s fig below on the left Simultaneously push the LED illuminant G downwards out of its hol...
Page 80: ...place the used LED illuminant by a new one of the same type and power a ILCOS D Code for this illuminant DBS 2 65 H 120 33 b LED module rectangular lamp c Max Wattage 1 2 0 W d Rectangular lamp dimens...
Page 81: ...AT ALL 1 The plug of the appliance is not connected to the socket 1 Connect the appliance to the mains properly 2 The plug has become loose 2 Check the plug 3 The socket is not supplied with energy 3...
Page 82: ...Tighten the screws 2 The mounting bracket mounting plate is not fixed firmly 2 Fix the mounting bracket mounting plate properly If the appliance has a malfunction not noted on the schedule or if you h...
Page 83: ...ery 3 6 months If the appliance has a malfunction not noted on the schedule or if you have checked all items on the schedule but the problem still exists please contact the shop you purchased the appl...
Page 84: ...ied accessories instruction manual yes Recirculation kit recirculating air turnout optionally available Telescopic chimney extractable from to 40 00 78 00 cm Total height incl telescopic chimney 107 5...
Page 85: ...t off the entire power cord Dispose of the power cord and the plug immediately 4 Dispose of any paper and cardboard into the corresponding containers 5 Dispose of any plastics into the corresponding c...
Page 86: ...not influence the utility value of the product 3 damage caused by handling errors or false operation 4 damage caused by aggressive environmental conditions chemicals detergents 5 damage caused by non...
Page 87: ...DOMESTIC USE Wenden Sie sich bitte an das Gesch ft in dem Sie das Ger t erworben haben Please contact the shop you purchased the appliance at nderungen vorbehalten Subject to alterations STAND UPDATED...