background image

Black plate (152,1)

4

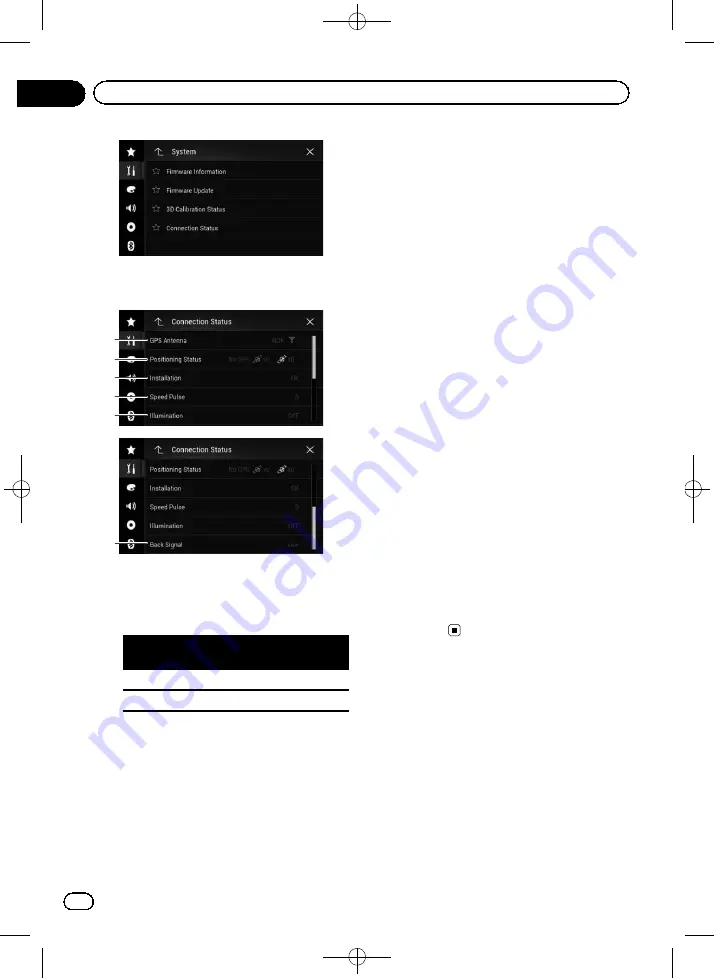
Touch [Connection Status].

The

Connection Status

screen appears.

2

3

5

4

1

6

1

GPS Antenna

Indicates the connection status of the GPS
aerial, the reception sensitivity, and from
how many satellites the signal is received.

Colour

Signal com-
munication

Used in posi-
tioning

Orange

Yes

Yes

Yellow

Yes

No

p

When the GPS aerial is connected to
this product,

OK

is displayed. When

the GPS aerial is not connected to this
product,

NOK

is displayed.

p

If reception is poor, please change the
installation position of the GPS aerial.

2

Positioning Status

Displays the positioning status (3D posi-
tioning, 2D positioning, or no positioning),

the number of satellites used for position-
ing (orange), and the number of satellites
whose signal has been received (yellow). If
signals from more than three satellites are
received, the current location can be mea-
sured.

=

For details, refer to

Positioning technol-

ogy

on page 191.

3

Installation

Indicates whether the installation position
of this product is correct or not. If installed
correctly,

OK

appears. When this product

is installed at an extreme angle exceeding
the limitation of the installing angle,

NOK

(Inst. Angle)

will be displayed. When the

angle of this product has been changed,

NOK(Vibration)

will be displayed.

4

Speed Pulse

The Speed Pulse value detected by this pro-
duct is shown.

0

is shown while the vehi-

cle is stationary.

5

Illumination

When the headlights or small lamps of the
vehicle are on,

ON

is displayed. When the

small lamps of the vehicle are off,

OFF

is

displayed. (If the orange/white lead is not
connected,

OFF

appears.)

6

Back Signal

When the gearstick is shifted to

R

, the

signal switches to

High

or

Low

. (One of

these is displayed depending on the
vehicle.)

<CRB4523-A>152

Engb

152

Chapter

25

System settings

Summary of Contents for AVIC-F70BT

Page 1: ...IGATION AV PLAYER AVIC F70BT AVIC F970BT Be sure to read Important Information for the User first Important Information for the User includes the important information that you must understand before using this product English CRB4523 A 1 ...

Page 2: ...ejecting an SD memory card 16 Connecting and disconnecting an iPod 17 Plugging and unplugging a USB storage device 17 Startup and termination 17 On first time startup 17 Regular startup 18 A message about the map database 18 Turning off the display 18 When the Application screen is available 18 When the Application screen is not available 18 How to use the screens 20 Switching screens using the to...

Page 3: ...ng waypoints 45 Checking route alternatives 45 Checking detour routes 46 Checking route information and preferences 46 Cancelling the current route guidance 47 Watching the simulation of the route 48 Registering and editing locations and routes Storing a location in Saved Location 49 Storing your home and your workplace location 49 Storing your favourite locations 49 Editing stored locations 49 St...

Page 4: ...tooth software 73 Displaying the Bluetooth software version 74 Using hands free phoning Displaying the phone menu 75 Touch panel keys 75 Reading the screen 75 Making a phone call 76 Direct dialling 76 Calling a number in the phone book 76 Dialling from the history 77 Using the preset dial lists 78 Receiving a phone call 78 Answering an incoming call 79 Minimising the dial confirmation screen 79 Ch...

Page 5: ...n 104 Starting procedure for Disc 105 Starting procedure for USB SD 105 Switching the browse mode 105 Selecting files from the file name list 106 Selecting a file from the list related to the song currently playing link search 106 Playing files in random order 106 Setting a repeat play range 107 Switching the media file type 107 Operating with the hardware buttons 107 Playing compressed video file...

Page 6: ...n 130 Starting procedure 130 Setting the video signal 131 Switching the operation screen 131 Using AV input Using the touch panel keys 132 Reading the screen 132 Starting procedure 132 Setting the video signal 133 Using MIXTRAX Touch panel keys 134 Selecting an item to play songs 134 Selecting songs not to be played 134 Specifying the playback portion 135 Setting the flash pattern 135 System setti...

Page 7: ...uto adjusted equaliser 161 Adjusting the equaliser curve automatically Auto EQ 161 Before operating the Auto EQ function 162 Performing Auto EQ 162 Theme menu Selecting the background display 165 Changing to the background display image stored on the external storage device USB SD 165 Setting the illumination colour 166 Selecting the colour from the preset colours 166 Creating a user defined colou...

Page 8: ...nt conditions for playing a disc 196 Playable discs 196 DVD Video and CD 196 AVCHD recorded discs 197 Playing DualDisc 197 Dolby Digital 197 Detailed information for playable media 197 Compatibility 197 Media compatibility chart 200 Bluetooth 204 SDHC 204 WMA WMV 204 DivX 204 AAC 205 Google Google Play Android and Android Auto 205 MirrorLink 205 MIXTRAX 205 Detailed information regarding connected...

Page 9: ...tation marks e g System screen or Audio screen Touch panel keys that are available on the screen are described in bold in brackets e g Disc AV Source Settings Extra information alternatives and other notes are presented in the following for mat e g p If the home location has not been stored yet set the location first Functions of other keys on the same screen are indicated with at the beginning of...

Page 10: ...om the battery or removing the battery itself p Some of the settings and recorded con tents will not be reset Resetting the microprocessor CAUTION Pressing the RESET button resets settings and re corded contents to the factory settings p Do not perform this operation when a device is connected to this product p Some of the settings and recorded contents will not be reset The microprocessor must be...

Page 11: ...details refer to Using the voice re cognition function on page 81 6 MODE button Press to switch between the Application screen and the AV operation screen p If the display cannot switch from the AV operation screen to the Applica tion screen when the MODE button is pressed the display will turn off For details of the operations refer to How to use the screens on page 20 Press and hold to turn the ...

Page 12: ...RN Returns to the specified point and starts playback from there 7 f Press to pause or resume playback m For audio Press and hold to perform fast reverse For video Press to perform fast reverse Press to change the fast reverse speed n For audio Press and hold to perform fast forward For video Press to perform fast forward Press to change the fast forward speed o Press to return to the previous tra...

Page 13: ...or the like CAUTION Remove the battery if the remote control is not used for a month or longer There is a danger of explosion if the battery is incorrectly replaced Replace only with the same or equivalent type Do not handle the battery with metallic tools Do not store the battery with metallic objects If the battery leaks wipe the remote control completely clean and install a new battery When dis...

Page 14: ... Gently grip the bottom of the detach able faceplate and slowly pull it outward 1 1 Detachable faceplate Attaching the detachable faceplate 1 Slide the detachable faceplate all the way into this product Make sure the detachable faceplate is se curely connected to the mounting hooks of this product 2 Push the lower part of the detachable faceplate until you hear a click If you fail to successfully ...

Page 15: ...losed Inserting ejecting connecting media CAUTION Do not insert anything other than a disc into the disc loading slot Do not insert anything other than SD memory cards into the SD card slot Ejecting an SD memory card during data transfer can damage the SD memory card Be sure to eject the SD memory card by the pro cedure described in this manual Do not press the h button when an SD mem ory card is ...

Page 16: ...ith some SD memory cards Inserting an SD memory card F70BT 1 Press the h button The following screen appears 2 Touch the following key Opens the LCD panel 3 Insert an SD memory card into the SD card slot Insert it with the label surface face up and press the card until it clicks and completely locks 4 Press the h button The LCD panel closes Ejecting an SD memory card F70BT 1 Press the h button The...

Page 17: ...termination 1 Start the engine to boot up the system After a short pause the splash screen comes on for a few seconds 2 Turn off the vehicle engine to termi nate the system This product is also turned off On first time startup When you use this product for the first time select the language that you want to use 1 Start the engine to boot up the system After a short pause the splash screen comes on...

Page 18: ...off the ignition switch ACC OFF is displayed A message about the map database After you start using this product a message related to map data may be displayed p This message is displayed the first time you turn on this product each month Turning off the display You can turn off the display at night or when the screen is too bright When the Application screen is available Press and hold the MODE b...

Page 19: ...Black plate 19 1 CRB4523 A 19 Engb 19 Chapter 02 Basic operation Basic operation ...

Page 20: ...Black plate 20 1 How to use the screens Switching screens using the touch panel keys 1 2 3 4 7 8 a b 5 6 9 CRB4523 A 20 Engb 20 Chapter 02 Basic operation ...

Page 21: ...ect the AV source 6 Favourite source icons You can display the icons of frequently used sources by dragging the icons to the display area For details of the operation refer to Changing the display order of source icons on page 23 7 AV operation screen You can operate each source 8 Navigation menu screen You can specify way points and a destina tion 9 Map screen You can use this screen to check the...

Page 22: ...e list For details refer to Selecting a front source on the source list on page 23 2 Displays the Time and date setting screen For details refer to Setting the time and date on page 179 3 Displays the Setting menu screen 4 Recalls equaliser curves For details refer to Using the equaliser on page 160 5 Displays the Phone menu screen For details refer to Displaying the phone menu on page 75 6 Shows ...

Page 23: ... source You can select a source output to the rear dis play For details of the operations refer to Select ing the video for the rear display on page 181 Turning off the AV source Turn off the AV source to stop playing or re ceiving the AV source 1 Press the HOME button to display the Top menu screen 2 Touch the following key Displays the AV source selection screen 3 Touch OFF The AV source is turn...

Page 24: ...pears 3 Touch the following key Displays the source list 4 Touch the following key The source keys can be moved 5 Drag the source key to the desired posi tion 6 Touch the following key Returns to the previous screen p If the source key is moved the source icons displayed on the Top menu screen and the AV source screen are also moved Using the touch panel You can operate this product by touching th...

Page 25: ...lays the characters that are entered If there is no text in the box an informative guide with text appears 2 Moves the cursor to the right or left for a num ber of characters equivalent to the number of touches 3 Enters the characters in the text box 4 Deletes the input text to the left of the cursor one letter at a time Continuing to touch the key deletes all of the text 5 Confirms the entry and ...

Page 26: ...ouch Next The Voice Language screen appears 7 Select the language that you want to use for voice guidance messages then touch Next 8 If needed modify the unit settings then touch Next The Route Preferences screen appears 9 If needed modify the default route planning options then touch Next 10 Touch Activate then Next A message saying that the connected online features are activated appears if you ...

Page 27: ...r tant information 7 Displays the location that you saved as a fa vourite For details refer to Selecting a destina tion from stored locations on page 39 8 Switches among 2D 3D and 2D North up view modes 9 Displays the User Profile screen where you can create new profiles or edit the exist ing profiles If multiple drivers are using this product they can create their own profiles with their own sett...

Page 28: ... cific roads in your planned route to avoid Displays the route in its full length on the map and displays route parameters and route alternatives Deletes your route or removes a waypoint Suspends and re sumes the route gui dance CRB4523 A 28 Engb 28 Chapter 03 How to use the Navigation menu screen ...

Page 29: ...idance point manoeuvre 4 Shows the second manoeuvre arrow 5 Indicates the current location of your vehicle The apex of the triangular mark indicates your orientation and the display moves automati cally as you drive 6 Displays the data field Touching this field displays the Trip Compu ter screen Touch and hold down this key and then select the values that you wish to have displayed to customise th...

Page 30: ...tance it will zoom out and lower the view angle to be flat so you can see the road in front of you When the route is not set Smart Zoom will zoom in if you drive slowly and zoom out when you drive at high speed Switching between 2D 3D and 2D North up views You can switch how the map is displayed For 2D map view mode you can select between Heading up and North up Heading up The map display always s...

Page 31: ... p If you press the MAP button the map re turns to the current position Control keys on the scrolled map 1 Press the MAP button The Map screen appears 2 Touch anywhere on the map The cursor and control keys appear 3 Touch the following key Zooms in Zooms out Changes the map view mode the map mode currently selected is shown Tilts up Tilts down Rotates left Rotates right Cancels map rotation p You ...

Page 32: ...When navigating on multilane roads you will need to make sure to take the proper lane for the recommended route If there is lane information available in the map data the navigation system will display the lanes and corresponding directions of tra vel at the bottom of the map using small ar rows Highlighted arrows represent the lane and direction that you need to take for the re commended route La...

Page 33: ...the data field The data fields are different when you are navi gating a route and when you have no specified destination For example the data field pro vides the following information When the route is set Distance to final destination time needed to reach the final destination and estimated arrival time are shown When the route is not set Direction or altitude is shown p Touching and holding the ...

Page 34: ... GPS position is available the triangu lar mark is displayed in full colour When there is no GPS position the triangular mark is transparent It shows your last known position CRB4523 A 34 Engb 34 Chapter 04 How to use the map ...

Page 35: ...ollowing key Displays the navigation menu on the Map screen 3 Touch New Route The New Route to screen appears 4 Touch Address The Find Address screen appears 5 Input the destination information State or UT Union Territories name City town village locality name or PIN code Locality or street name House number or intersection After you touch the selected address to finish the address search the sear...

Page 36: ...own position p When a route is set Petrol Station and Restaurant are searched for along the route and Accommodation and Park ing are searched for around the destina tion 5 Touch the category you want The results appear in a list 6 Touch the POI you want The searched location appears on the Map screen If you touch you can sort the results or show the locations of all facilities on the map 7 Touch S...

Page 37: ...ed city town Around Destination Searches for a place around the destination of the current route The results will be listed in order of the distance from the des tination p This key is active only when the route is set Along Route Searches along the current route and not around a point already set This is useful when searching for a stopover that results in a minimal detour such as searching for p...

Page 38: ...tion Utilise the information for your reference 1 Press the MAP button The Map screen appears 2 Touch the following key Displays the navigation menu on the Map screen 3 Touch Useful Information The Useful Information screen appears 4 Touch Help Nearby The Help Nearby screen appears The preset search categories are as follows Car Repair Health Police Petrol Station 5 Touch the category you want The...

Page 39: ... Summary screen appears and count down begins When the countdown ends the guidance automatically starts If the screen is touched anywhere during the countdown the countdown stops and the screen will stay as it is For details on the operations in the Route Summary screen refer to Checking route information and preferences on page 46 7 Touch Start Navigation Your navigation system starts the route g...

Page 40: ...stinations appears 5 Touch the entry you want The searched location appears on the Map screen 6 Touch Select as Destination on the Map Location screen For details on the operations in the Map Location screen refer to Using the Map Location screen on page 43 After touching Select as Destination the Route Summary screen appears and count down begins When the countdown ends the guidance automatically...

Page 41: ...ws the conditions that are currently se lected 2 Touch this key to show the other conditions If you touch a map data provider logo you can narrow down the list of results by showing the re sults from the provider 9 Touch Select as Destination on the Map Location screen For details on the operations in the Map Location screen refer to Using the Map Location screen on page 43 After touching Select a...

Page 42: ...the Route Summary screen appears and count down begins When the countdown ends the guidance automatically starts If the screen is touched anywhere during the countdown the countdown stops and the screen will stay as it is For details on the operations in the Route Summary screen refer to Checking route information and preferences on page 46 9 Touch Start Navigation Your navigation system starts th...

Page 43: ... Shows the route setting preferences for route calculation Touch the keys to activate or deac tivate the preference Calculates the route prioritising the use of motorways when the key is activated Calculates the route prioritising the use of per use charged toll roads when the key is activated Calculates the route prioritising the use of ferries when the key is activated 5 Returns to the previous ...

Page 44: ...le posi tion is set as default and Current GPS Po sition is displayed For details refer to Changing the starting position on page 45 9 Calculates the route and shows the Route Summary screen a Displays the options for the location Move Up Move Down Edits the order you want to visit the loca tions Delete Deletes the destination or waypoint Save Location Stores the location in Saved Location For det...

Page 45: ... Touch Route Planner or My Route 2 Touch Current GPS Position The pop up menu appears 3 Touch Back to GPS position and then touch Delete Start Point The starting position for route calculation re turns to the current position Adding waypoints 1 Press the MAP button The Map screen appears 2 Touch the following key Displays the navigation menu on the Map screen 3 Touch Add Waypoint 4 Search for a lo...

Page 46: ...5 Avoid Special Sections Shows the route avoiding certain sections Touch the list item to select the section you want to avoid The distance and time differ ence suggested route current route and the section avoided are shown Touch Ac cept to apply the suggested route Avoid Specific Road Shows the route avoiding certain road Touch the list item to select the road you want to avoid Distance and time...

Page 47: ... the map If you touch Avoid on the map screen the route is recalculated avoiding the transit point as much as possible Save Route Saves the displayed route The saved route can be recalled later Places Along Route Searches for POIs along the displayed route Touch the POI to show the Map Location screen and also set the POI as a waypoint Simulation You can run a simulation of the naviga tion for the...

Page 48: ...6 Touch Simulation The simulation starts from the starting point of the route and using a realistic speed it leads you through the whole recommended route p During simulation you can use the follow ing control keys they disappear after a few seconds but you can view them again by touching the map Jumps to the previous gui dance point manoeuvre Pauses the simulation Jumps to the next guidance point...

Page 49: ...Save Location The cursor position has been stored Storing your favourite locations You can store a frequently visited location such as a relative s home to allow easy rout ing 1 Press the MAP button The Map screen appears 2 Touch the following key Displays the navigation menu on the Map screen 3 Touch the following key Displays the Saved Location screen 4 Touch Add Location 5 Search for a location...

Page 50: ...rs 6 Touch the item you want to delete and touch Delete p Home and Work cannot be deleted The location can be set again p If you touch and then touch Delete All all entries including the home and workplace locations can be deleted A message will appear asking you to confirm the deletion 7 Touch OK 8 Touch Done The Saved Location screen appears p You can also delete the stored location with out usi...

Page 51: ...ou want to rename and touch Rename 9 Enter the name and then touch 10 Touch Done Deleting stored routes 1 Press the MAP button The Map screen appears 2 Touch the following key Displays the navigation menu on the Map screen 3 Touch New Route The New Route to screen appears 4 Touch to show the next page 5 Touch Saved Routes The Saved Routes screen appears 6 Touch the following key Displays the short...

Page 52: ...alert point if applicable Direction Sets the direction from which you expect the alert to come from 6 Touch Save The location is saved as a new alert point For details refer to Warnings settings on page 61 Editing the stored alert points Stored alert points can be edited later 1 Press the MAP button The Map screen appears 2 Scroll the map to the stored alert point 3 Touch the following key Display...

Page 53: ...ial screen with information about the current position and a key to search for nearby emergency or roadside assistance services The screen provides the following informa tion Latitude and longitude coordinates of the current position in WGS84 format Address details of the current position when available The nearest city Next crossing road street Previous crossing road street p If the current stree...

Page 54: ... the oldest trip log will be overwrit ten by the new one p If you want the system to always activate the trip logger whenever the GPS signal is available turn on Enable Auto Saving For details refer to Enable Auto Saving on page 55 Browsing the trip log 1 Record the trip log 2 Press the MAP button The Map screen appears 3 Touch the following key Displays the navigation menu on the Map screen 4 Tou...

Page 55: ...The Trip Monitor screen appears 5 Touch and then touch Edit The Select Trip to Edit screen appears 6 Touch any of the items to edit Delete Deletes the trip log Rename Renames the trip log Change Colour Changes the colour by selecting another colour from the colour table p If you touch and then touch Delete All all entries can be deleted 7 Touch Done Using the Trip Computer mode In the trip compute...

Page 56: ...sumption The Fuel Consumption screen appears 5 Touch Initial Milometer Value The Set Initial Milometer Value screen ap pears 6 Enter the initial odometer value and then touch The initial odometer value has been set Entering the fuel consumption information To calculate the fuel consumption for the dis tance you have travelled enter the distance driven and the amount of fuel whenever you fill up yo...

Page 57: ...ul Information screen appears 4 Touch Fuel Consumption The Fuel Consumption screen appears 5 Touch 6 Touch Maintenance Schedule 7 Touch Add or the one of entries 8 Enter the name date and mileage for the reminder 9 Touch Done p To delete an entry touch to display the shortcut for deletion CRB4523 A 57 Engb 57 Chapter 08 Checking useful information about your trip Checking useful information about ...

Page 58: ...isplay Sets separate themes for daytime and nighttime use adjusts the display back light and enables or disables menu anima tions For details refer to Display settings on page 64 Weather Enables or disables the online weather fore cast option and the automatic download of weather information For details refer to Weather settings on page 64 Fuel Enables or disables the online fuel price op tion and...

Page 59: ...route accuracy correctly select a vehicle type that is similar to the condition of your vehicle Car Manoeuvre restrictions and directional constraints are taken into account when planning a route Roads are used only if access for cars is allowed Private roads and resident only roads are used only if they are inevitable to reach the destination Walkways are excluded from routes Emergency All manoeu...

Page 60: ...routes for normal vehicles regardless of the speed Economical Calculates a route that is quick and saves fuel Navigation Mode You can enable or disable off road navigation On road The route is planned towards the destina tion along the roads on the map Off road The route is planned towards the destina tion in a straight line not along the roads on the map Motorways When this function is turned off...

Page 61: ...ty Level You can set the verbosity of the voice instruc tions how much information is given and how often the prompts occur Minimal Voice instructions are given once right before the next manoeuvre Medium Voice instructions are given once as the vehicle approaches the next man oeuvre and it is repeated right before the manoeuvre Verbose Voice instructions are given once relatively far from the nex...

Page 62: ...he colour scheme used in the daytime map Night Map Colour You can select the colour scheme used in nighttime map Landmarks This setting shows or hides 3D landmarks which are 3D artistic or block representa tions of prominent or well known objects Buildings This setting shows or hides 3D city models which are 3D artistic or block representa tions of complete city building data con taining actual bu...

Page 63: ...the destination may not be easy to find in city areas As you approach the destina tion this navigation system can offer parking category places near your destination Touch to open a top down map with the destina tion and the offered parking places The route is calculated by selecting one of the parking places Offer Hints Upon Detour If you leave the recommended route and sud denly exit the motorwa...

Page 64: ...ions When animation is turned on the keys on the menus and keyboard screens appear in an animated way Screen transitions are also ani mated Day Skin Theme You can select the style and colours of the na vigation menu used in the daytime Night Skin Theme You can select the style and colours of the na vigation menu used in the nighttime Weather settings p For details refer to the manual for AVICSYNC ...

Page 65: ...4 Touch Settings The Settings screen appears 5 Touch Warnings The Warnings screen appears 6 Touch Alert Points The Alert Points screen appears 7 Touch Alert Point Warnings to turn it on 8 Touch Alert Types The Select Alert Types screen appears 9 Touch any of the items to change the setting The warning setting screen of the selected ca tegory is shown 10 Touch Warning Type and then touch one of the...

Page 66: ... could be affected by any of the following compatibility issues with future firmware ver sions of smartphone compatibility issues with future versions of the connected content ap plication s for the smartphone changes to or discontinuation of the connected Content ap plication s or service by its provider Pioneer is not liable for any issues that may arise from incorrect or flawed app based con te...

Page 67: ...y S4 Android 4 2 2 4 4 2 Galaxy Note B Android 4 1 1 Galaxy Tab 2 Android 4 0 3 LG Nexus 5 Android 4 4 2 ASUS Nexus 7 2013 4 3 Preparations before using the AVICSYNC function 1 Download the AVICSYNC App from App Store or Google Play and install the app to your iPhone or smartphone Android To find AVICSYNC App access the App Store or Google Play and enter AVICSYNC in the search box 2 Start the AVIC...

Page 68: ...want to acti vate The menus for the connected service are activated Getting the map update You can update existing content purchase ad ditional maps and activate extra services on your product To update the content download the update on your USB memory storage by using the computer to which the Naviextras Toolbox is installed Then transfer the data from connected USB memory storage to your naviga...

Page 69: ...peration Registering your Bluetooth devices You need to register your devices featuring Bluetooth wireless technology when you con nect it to this product for the first time A total of three devices can be registered Two regis tration methods are available Searching for nearby Bluetooth devices Pairing from your Bluetooth devices p If three devices are already paired Mem ory Full is displayed and ...

Page 70: ...onnection is established the de vice name is displayed Touch the device name to disconnect After the device is successfully registered a Bluetooth connection is established from the system The profile icons displayed on the registered device list screen light up as follows Lights up when your mobile device is successfully connected with the HFP Hands Free Profile Lights up when your audio device i...

Page 71: ...is turned on 1 Press the HOME button to display the Top menu screen 2 Touch the following keys in the follow ing order The Bluetooth screen appears 3 Touch Auto Connect repeatedly until the desired setting appears On default Turns the automatic connection on Off Turns the automatic connection off If your Bluetooth device is ready for a Bluetooth wireless connection a connection to this product wil...

Page 72: ...to display the Top menu screen 3 Touch the following keys in the follow ing order The Bluetooth screen appears 4 Touch Connection The following screen appears 5 Touch the name of the device that you want to connect Switching visibility This function sets whether or not to make this product visible to other devices Initially this function is set to on 1 Press the HOME button to display the Top menu...

Page 73: ...the Bluetooth memory is being cleared 1 Press the HOME button to display the Top menu screen 2 Touch the following keys in the follow ing order The Bluetooth screen appears 3 Touch Bluetooth Memory Clear 4 Touch Clear The confirmation screen appears 5 Touch OK The Bluetooth memory is cleared If you do not want to clear the memory touch Cancel Updating Bluetooth software This function is used to up...

Page 74: ...t fails to operate properly you may need to consult your dealer for repair In such cases you may be asked to specify the software version Perform the following proce dure to check the version on this unit 1 Press the HOME button to display the Top menu screen 2 Touch the following keys in the follow ing order The Bluetooth screen appears 3 Touch Bluetooth Version Information The version of this pr...

Page 75: ...reen On the App control side bar on the MirrorLink mode screen Touch the following key Displays the Phone menu screen p The Phone Book screen appears when using this function for the first time The screen of the last used function appears from the next time Touch panel keys 4 2 3 5 1 6 7 8 1 Displays the preset dial screen 2 Switches to the phone book list 3 Switches to the missed received and dia...

Page 76: ... call p The contacts on your phone will normally be transferred to this product automatically when the phone is connected If the contacts are not transferred automati cally you can transfer the contacts using the phone menu of the mobile phone To transfer the contacts using the phone menu of the mobile phone set this product visible to other devices For details refer to Switching visibility on pag...

Page 77: ...Hebrew the following key ap pears If you want to change the character touch the following key until the desired character repeatedly Changes the character 5 Touch an entry to display the phone number list of the entry The details screen of the phone book appears 6 Touch the phone number you want to dial The dial screen appears 7 Dialling starts p To cancel the call touch 8 Touch the following key ...

Page 78: ...he phone number to the Preset Dial list Dialling from the preset dial list 1 Press the HOME button to display the Top menu screen 2 Touch the following keys in the follow ing order The Preset Dial screen appears 3 Touch the desired entry on the list to make a call The dial screen appears 4 Dialling starts p To cancel the call touch 5 Touch the following key Ends the call The call ends Deleting a p...

Page 79: ...7 2 Touch the following key Ends the call The call ends Minimising the dial confirmation screen p The dial confirmation screen cannot be minimised on the AV operation screen p AV sources cannot be selected even if the dial confirm screen is minimised while talk ing on the phone 1 Touch the following key The dial confirmation screen is minimised 2 Touch the following key Displays the dial confirmat...

Page 80: ...g tone on Off Turns the ring tone off Inverting names in the phone book When your device is connected to this pro duct the first and last names of your contacts may be registered to the phone book in reverse order You can use this function to change the order back Inverting the names in the phone book 1 Press the HOME button to display the Top menu screen 2 Touch the following keys in the follow i...

Page 81: ...ilable with this product p For AVIC F70BT users For using this function with a smartphone the device must be compatible with Android Auto and Mode in Smart phone Setup must be set to Android Auto beforehand For details refer to Information on the connections and functions for each de vice on page 85 1 Press the HOME button to display the Top menu screen 2 Touch the following keys to start voice co...

Page 82: ...you press the accept button on the mobile phone when a call comes in hands free phoning may not be performed The registered name appears if the phone number of the received call is already regis tered in the phone book When one phone number is registered under different names only the phone number is dis played If the phone number of the received call is not registered in the phone book the phone ...

Page 83: ...e following settings Device Select the device to be connected Connection Select the connection meth od p Configure the settings correctly according to the device to be connected and the con nection method to be used For details refer to Information on the connections and functions for each de vice on page 85 p If you change the setting the confirmation screen appears Touch OK The setting will chan...

Page 84: ... classic 160GB iPod classic 80GB iPod nano 6th generation iPod nano 5th generation iPod nano 4th generation iPod nano 3rd generation iPod with Lightning connector iPhone 6 Plus iPhone 6 iPhone 5s iPhone 5c iPhone 5 iPod touch 5th generation iPod nano 7th generation Android device compatibility p Operation methods may vary depending on the Android device and the software ver sion of the Android OS ...

Page 85: ...ion requirement Connect to USB port 1 for using AVICSYNC App Connect to USB port 1 for using AVICSYNC App Available source iPod audio 1 1 iPod video 1 1 AVICSYNC App 1 1 1 iPod iPhone with a Lightning connector Required cable sold separately Cable connection is not re quired CD IU52 Smartphone Setup Device iPhone iPod iPhone iPod Connection Bluetooth USB Bluetooth connection Bluetooth connection i...

Page 86: ...Select Android Auto for Mode for using Android Auto Select MirrorLink for Mode for using MirrorLink mode 1 For AVIC F70BT users Available only when an Android Auto compatible device is connected The AVICSYNC App function automatically turns off when an Android Auto compatible device is connected with this product for the first time From the next time a compatible device is connected Android Auto c...

Page 87: ...ails refer to Seek tuning on page 88 9 Displays the preset channels For details refer to Selecting a preset channel from the preset channel list on page 88 a Recalls the preset channel stored to a key from memory with a single touch of the key Stores the current broadcast frequency to a key for later recall by continuing to touch the key For details refer to Storing broadcast fre quencies on page ...

Page 88: ...ek tuning Touch and hold one of the following keys for about one second and then re lease Scans frequencies until it finds a broad cast strong enough for good reception You can cancel seek tuning by touching either key briefly If you keep holding either key you can skip broadcasting frequencies Seek tuning will start when you release the key Selecting a preset channel from the preset channel list ...

Page 89: ... the number of strong broadcast frequencies stored has not reached the limit 1 Touch the preset channel list display key The preset channel list appears 2 Touch BSM to start a search A message appears While the message is dis played the six strongest broadcast frequen cies will be stored under the preset tuning keys 1 to 6 in order of their signal strength When this is complete the message disap p...

Page 90: ...our programme types News Info Popular Classics Others 3 Touch the following key Begins a search The tuner searches for a station broadcasting that programme type If you touch Cancel the search is cancelled p The programmes of some stations may dif fer from that indicated by the transmitted PTY p If no station is broadcasting the type of pro gramme you searched for Not Found is displayed for about ...

Page 91: ...TP stations and other enhanced net works TP stations are tuned in during seek tuning or BSM when the TA function is on Using news programme interruption When a news programme is broadcast from a PTY code news station this product can switch from any station to the news broadcast station When the news programme ends re ception of the previous programme resumes p This function can only be used on th...

Page 92: ...gs The following screen appears 4 Touch Radio Settings The following screen appears 5 Touch Alternative FREQ repeatedly until the desired setting appears Off default Turns the alternative frequencies function off On Turns the alternative frequencies function on p Only RDS stations are tuned in during seek tuning or BSM when AF is on p When you recall a preset station the tuner may update the prese...

Page 93: ...dis appear if the tuner tunes into a regional sta tion that differs from the originally set station p The regional function can be turned on or off independently for each FM band Switching Auto PI seek If this product fails to find a suitable alterna tive frequency or if you are listening to a broadcast and the reception becomes weak this product will automatically search for a dif ferent station ...

Page 94: ...d setting appears Off default Deactivates the Auto PI seek function On Activates the Auto PI seek function Operating with the hardware buttons Press the TRK button You can move up or down the preset chan nels Press and hold the TRK button You can perform seek tuning CRB4523 A 94 Engb 94 Chapter 13 Using the radio ...

Page 95: ... b l m 8 k j8 i g h 7 Playback screen page 2 n o p e q r 1 Displays the source list For details refer to Selecting a front source on the source list on page 23 2 Displays the Time and date setting screen For details refer to Setting the time and date on page 179 3 Displays the Setting menu screen 4 Recalls equaliser curves For details refer to Using the equaliser on page 160 5 Selects a track from...

Page 96: ...tches the subtitle language For details refer to Switching the subtitle language on page 100 j Switches the audio language For details refer to Switching the audio language on page 100 k Stops playback l Changes the wide screen mode For details refer to Changing the wide screen mode on page 179 m Moves ahead one frame frame by frame playback or slows down playback speed slow motion playback For de...

Page 97: ...ust the current title 3 Play time indicator Shows the elapsed playing time within the current file 4 Track number indicator Shows the number of the track currently play ing when available 5 Audio channel indicator Shows the current audio channel type such as Mch Multi channel 6 Digital sound format indicator Shows which digital sound format surround sound format has been selected 7 Sampling freque...

Page 98: ...tracks re corded on the disc 2 Touch a track on the list to play back Playing tracks in random order All tracks on the disc can be played at random by only touching a single key Touch the following key repeatedly until the desired setting appears Turns random play on or off default Does not play tracks in random order Plays all tracks in the current repeat play range in random order p If you turn ...

Page 99: ...track or 10Key numeric keypad 10Key numeric keypad is available for Video CDs featuring PBC playback con trol only p Chapter search and time search are not available when disc playback has been stopped 1 Touch the following key Displays the screen for direct num ber search 2 Touch Title title Chapter chapter 10Key numeric keypad or Track track 3 Touch 0 to 9 to input the desired number p To cancel...

Page 100: ...discs images may be unclear during frame by frame playback Slow motion playback This lets you slow down the playback speed 1 Touch and hold r until an arrow icon is displayed during playback The arrow icon is displayed and forward slow motion playback starts p To return to normal playback touch d e 2 Touch r to adjust playback speed during slow motion playback Each time you touch r the speed chang...

Page 101: ...e on the screen and then touch The touch panel keys are displayed again 2 Touch the following key Confirms the selected item p The way to display the menu differs depend ing on the disc If you touch the touch panel keys disap pear and the icon is displayed Switching the multi angle DVD display With DVDs featuring multi angle recordings scenes shot from multiple angles you can switch among viewing ...

Page 102: ...pped p The appearance of this key changes accord ing to the current setting Operating with the hardware buttons Press the TRK button You can skip tracks or chapters forward or backward Press and hold the TRK button You can perform fast reverse or fast for ward CRB4523 A 102 Engb 102 Chapter 14 Playing a disc ...

Page 103: ...itches the text display between tag in formation and file folder information For details refer to Reading the screen on page 104 For details refer to Switching the browse mode on page 105 8 Displays the Phone menu screen For details refer to Displaying the phone menu on page 75 9 Switches to the next or previous page of touch panel keys a Skips files forward or backward b Changes the playback poin...

Page 104: ...s no corresponding infor mation p Nothing is displayed if the song cur rently playing is in a format which does not support these functions Folder Browse mode File name Shows the name of the file currently playing Folder name Shows the name of the folder contain ing the file currently playing 2 Current time and date 3 Album artwork Album art of the current song is displayed if it is available 4 Pl...

Page 105: ... Dis playing the AV operation screen on page 22 2 Insert the SD memory card into the SD card slot or plug the USB storage device into the USB connector For details refer to Plugging in a USB sto rage device on page 17 For details refer to Inserting and ejecting an SD memory card on page 16 3 Touch USB or SD on the AV source selection screen The source changes and then playback will start 4 Use the...

Page 106: ...ber order p Touching a folder on the list shows its con tents You can play a file on the list by touching it Selecting a file from the list related to the song currently playing link search You can select files to play back using the ca tegory list for the files in an external storage device USB SD p This function is available for the external storage device USB SD only 1 Touch the following key D...

Page 107: ...ats all compressed audio files Repeats just the current file Repeats just the current folder Music Browse mode default Repeats all files Repeats just the current file Folder Browse mode default Repeats all files Repeats the current folder Repeats just the current file Switching the media file type When playing a digital media containing a mixture of various media file types you can switch between ...

Page 108: ...isplay the touch panel keys again 7 Sets a repeat play range For details refer to Setting a repeat play range on page 110 8 Switches the subtitle language With DivX featuring multi subtitle recordings you can switch between subtitle languages during playback 9 Displays the Phone menu screen For details refer to Displaying the phone menu on page 75 a Skips files forward or backward b Switches the a...

Page 109: ...ge 108 Starting procedure for USB SD 1 Display the AV source selection screen For details of the operations refer to Dis playing the AV operation screen on page 22 2 Insert the SD memory card into the SD card slot or plug the USB storage device into the USB connector For details refer to Plugging in a USB sto rage device on page 17 For details refer to Inserting and ejecting an SD memory card on p...

Page 110: ...tion playback This lets you slow down the playback speed Touch r external storage device USB SD or touch and hold r disc during playback The arrow icon is displayed and forward slow motion playback starts p There is no sound during slow motion play back p With some discs and external storage de vices USB SD images may be unclear during slow motion playback p To return to normal playback touch d e ...

Page 111: ... refer to Displaying the phone menu on page 75 9 Skips files forward or backward a Sets a repeat play range For details refer to Setting a repeat play range on page 112 b Rotates the displayed picture 90 clock wise c Selects the previous folder or the next folder d Switches the media file type For details refer to Switching the media file type on page 112 e Switches between playback and pause f Ch...

Page 112: ...les in the external storage device USB SD can be played at random by only touching a single key Touch the following key repeatedly until the desired setting appears Turns random play on or off default Does not play files in random order Plays all files in the current repeat play range in random order Setting a repeat play range The repeat play range can be changed by only touching a single key Tou...

Page 113: ...witch at intervals of 15 sec onds Manual JPEG images can be switched manually Operating with the hardware buttons Press the TRK button You can skip files forward or backward Press and hold the TRK button You can search 10 JPEG files at a time p If the number of files in the folder from the file currently being played to the first or last file is fewer than 10 the first or last file in the folder i...

Page 114: ... be viewed while your vehicle is in motion To view video images you must stop in a safe place and apply the handbrake Using the touch panel keys for audio Playback screen page 1 1 3 2 8 4 5 6 7 b 9 a 9 Playback screen page 2 8 d e f g c h b Using the touch panel keys for video 1 3 2 4 5 6 7 b 9 a 9 j d e f i 1 Displays the source list For details refer to Selecting a front source on the source lis...

Page 115: ...peed For details refer to Changing the speed of audiobook playback on page 118 h Displays the category list including the selected item i Hides the touch panel keys Touching this area hides the touch panel keys p Touch anywhere on the LCD screen to display the touch panel keys again j Changes the wide screen mode For details refer to Changing the wide screen mode on page 179 Reading the screen for...

Page 116: ...ne 5 or iPod touch 5th gen eration is connected the media library song information will be imported from the connected device and saved to this pro duct Wait until the process completes The media library will not be imported if an updated media library of the connected de vice has been imported or the memory of this product is full 3 Touch iPod on the AV source selection screen 4 Use the touch pan...

Page 117: ... category list Switches to the music category list Switches to the video category list p The video category list icon is not available when using iPod function with an iPhone 6 Plus iPhone 6 iPhone 5s iPhone 5c iPhone 5 or iPod touch 5th generation 3 Touch the category you want to search for Category lists for music Playlists Artists Albums Songs Podcasts Genres Composers Audiobooks Category lists...

Page 118: ...generation p While this function is in use the iPod will not turn off even if the ignition key is turned off Operate the iPod to turn off the power 1 Touch the following key Switches the control mode p The control mode switches to App Mode The icon changes to 2 Operate the connected iPod to select a video or song and play p The following functions are still accessible from this product even if the...

Page 119: ... the iPod source The app name and the song information are also displayed Using the touch panel keys 9 8 8 1 3 2 4 5 6 7 1 Displays the source list For details refer to Selecting a front source on the source list on page 23 2 Displays the Time and date setting screen For details refer to Setting the time and date on page 179 3 Displays the Setting menu screen 4 Recalls equaliser curves For details...

Page 120: ...ma tion 3 Artist name Shows the artist name for the song currently being played when available No Name is displayed if there is no corresponding infor mation 4 Album title Shows the title of the album of the current file when available No Title is displayed if there is no corresponding information 5 Pause indicator 6 Album artwork Album art of the current song is displayed if it is available CRB45...

Page 121: ...tches between playback and pause Reading the screen 5 2 4 3 1 1 Current track information Application name Shows the application name when available No Name is displayed if there is no corresponding information Song title Shows the title of the song currently playing when available No Title is displayed if there is no corresponding information Artist name Shows the artist name for the song cur ren...

Page 122: ...p Android Auto For details refer to Using Android Auto on page 123 2 Press the HOME button to display the Top menu screen 3 Touch USB2 on the AV source selec tion screen 4 Use the touch panel keys on the screen to control the playback For details refer to Using the touch panel keys on page 121 p The Android Auto function may not oper ate properly if the Bluetooth connection with the Android Auto c...

Page 123: ...oviders In Android Auto usage is limited while driving with availability of functions and content determined by the App providers Android Auto allows access to applica tions other than those listed subject to lim itations while driving PIONEER IS NOT RESPONSIBLE AND DIS CLAIMS LIABILITY FOR THIRD PARTY NON PIONEER APPS AND CONTENT IN CLUDING WITHOUT LIMITATION ANY IN ACCURACIES OR INCOMPLETE INFOR...

Page 124: ... will be applied the next time an Android Auto compatible device is con nected to this product Adjusting the volume You can adjust the guidance volume alert sound volume separately from the main sound volume when Android Auto is used Touch the VOL button 1 2 3 1 Touch to mute Touch again to unmute 2 Displays the main sound volume 3 Adjusts the guidance volume alert sound volume Each touch of or in...

Page 125: ...g MirrorLink mode 1 Unlock your MirrorLink device 2 Connect your MirrorLink device to this product via the separately sold USB inter face cable for use with MirrorLink devices CD AH200 For details of the connections refer to the Installation Manual 3 Press the HOME button to display the Top menu screen 4 Touch APPS If the launcher application is installed in the MirrorLink device the application l...

Page 126: ...ouch again to unmute 2 Sets whether to switch the sound mix func tion on or off Left tab The audio mix function is en abled mix on The App volume is dis played If you touch the App volume the volume keys will be displayed Right tab The audio mix function is dis abled mix off 3 Adjusts the application audio volume Each touch of or increases or de creases the volume level p The AV operation screen a...

Page 127: ... if you switch to another source while listening to a song on your Bluetooth audio player song playback may continues p Depending on the Bluetooth audio player you connected to this product operations on this product to control the player may differ from those explained in this manual p When you are talking on a mobile phone connected to this product via Bluetooth wireless technology song playback...

Page 128: ...ble Genre Shows the genre of the current file when available p In the following cases file information will only be displayed after a file starts or resumes playing Bluetooth audio player compatible with AVRCP1 3 is connected and the playback is started by the operation on the device Another file is selected while play back is paused Starting procedure 1 Press the HOME button to display the Top me...

Page 129: ...gle key p This function is only available when the connected Bluetooth audio player supports AVRCP 1 3 Touch the following key repeatedly until the desired setting appears Turns random play on or off Setting a repeat play range The repeat play range can be changed by only touching a single key p This function is only available when the connected Bluetooth audio player supports AVRCP 1 3 Touch the ...

Page 130: ...the Setting menu screen 4 Recalls equaliser curves For details refer to Using the equaliser on page 160 5 Hides the touch panel keys Touching this area hides the touch panel keys p Touch anywhere on the LCD screen to display the touch panel keys again 6 Displays the Phone menu screen For details refer to Displaying the phone menu on page 75 7 Switches the operation screen For details refer to Swit...

Page 131: ...AUX input 1 Press the HOME button to display the Top menu screen 2 Touch the following keys in the follow ing order The Video Setup screen appears 3 Touch Video Signal Setting The following screen appears 4 Touch AUX The pop up menu appears 5 Touch the item you want to set Auto default Adjusts the video signal setting automati cally PAL Sets the video signal to PAL NTSC Sets the video signal to NT...

Page 132: ...he touch panel keys Touching this area hides the touch panel keys p Touch anywhere on the LCD screen to display the touch panel keys again 6 Displays the Phone menu screen For details refer to Displaying the phone menu on page 75 7 Changes the wide screen mode For details refer to Changing the wide screen mode on page 179 Reading the screen 1 1 Current time and date Starting procedure You can disp...

Page 133: ...gnal setting p You can operate this function only for the video signal input into the AV input 1 Press the HOME button to display the Top menu screen 2 Touch the following keys in the follow ing order The Video Setup screen appears 3 Touch Video Signal Setting The following screen appears 4 Touch AV The pop up menu appears 5 Touch the item you want to set Auto default Adjusts the video signal sett...

Page 134: ...he operations refer to Se lecting songs not to be played on page 134 6 Sets to the original BPM Beats Per Minute 7 Specifies the playback portion For details of the operations refer to Specifying the playback portion on page 135 8 Touch to select a track Touch and hold to fast forward or rewind 9 Turns on or off the MIXTRAX original visual display a Pauses and starts playback b Displays the item s...

Page 135: ...g the flash pattern The flashing colour changes with the changes in the sound and bass levels 1 Press the HOME button to display the Top menu screen 2 Touch the following keys in the follow ing order The System screen appears 3 Touch AV Source Settings The following screen appears 4 Touch MIXTRAX Settings 5 Touch Flash Pattern The pop up menu appears 6 Touch the item you want to set Sound1 default...

Page 136: ...nu screen 2 Touch the following keys in the follow ing order The System screen appears 3 Touch Navigation Related Settings The following screen appears 4 Touch AV App Guide Mode repeat edly until the desired setting appears On default Switches from the AV operation screen or the Application screen to the map screen Off Does not switch the screen Setting the steering wheel control You can set the s...

Page 137: ...ollowing keys in the follow ing order The System screen appears 3 Touch Steering Wheel Control The Steering Wheel Control screen ap pears 4 Touch W o Adapter 5 Touch the type of your vehicle Japanese car Sets the vehicle type to Japanese car Korean car Sets the vehicle type to Korean car The confirmation message appears 6 Touch Yes 7 Touch the following key Source Press to cycle through all the av...

Page 138: ...0 kHz and 50 kHz p This setting is available when the source is turned off 1 Press the HOME button to display the Top menu screen 2 Touch the following keys in the follow ing order The System screen appears 3 Touch AV Source Settings The following screen appears 4 Touch Radio Settings The following screen appears 5 Touch FM Step repeatedly until the desired setting appears 100kHz default Switches ...

Page 139: ...t Activates the Bluetooth audio source Off Deactivates the Bluetooth audio source Setting the ever scroll When Ever Scroll is set to On recorded text information scrolls continuously in the display Set to Off if you prefer the informa tion to scroll just once 1 Press the HOME button to display the Top menu screen 2 Touch the following keys in the follow ing order The System screen appears 3 Touch ...

Page 140: ...ately after the system of this product is started up only the camera image will be displayed and the parking as sist guidelines will not be displayed The parking assist guidelines will be displayed on the camera image after a little while Be sure to check the conditions around the ve hicle even before the guidelines and the message are displayed Camera for Camera View mode Camera View can be displ...

Page 141: ... VERSE R position When the gearstick is aligned to the REVERSE R position after setting the rear view camera the rear view image appears Setting the reversed image display for the rear view image Rear view camera images are displayed re versed as mirror images on the front screen except when a rear view camera that can out put images in the correct direction is used You can set whether to reverse ...

Page 142: ...ource selec tion screen or in the source list 1 Press the HOME button to display the Top menu screen 2 Touch the following keys in the follow ing order The System screen appears 3 Touch Camera settings The following screen appears 4 Touch Camera View repeatedly until the desired setting appears Off default Turns the camera view setting off On Turns the camera view setting on If no operations are p...

Page 143: ...F The range projected by the rear view camera is limited Also the vehicle width and distance guidelines displayed on the rear view camera image may differ from the actual vehicle width and distance The guidelines are straight lines The image quality may deteriorate depending on the usage environment such as at night or in dark surroundings 1 Park your vehicle in a safe place and apply the handbrak...

Page 144: ... the second camera input You can view images of the second camera a front camera etc on the screen of this pro duct Setting the second camera activation p To view images of the second camera on the screen of this product 2nd Camera Input needs to be set to On 1 Press the HOME button to display the Top menu screen 2 Touch the following keys in the follow ing order The System screen appears 3 Touch ...

Page 145: ... turn off the demo screen 1 Press the HOME button to display the Top menu screen 2 Touch the following keys in the follow ing order The System screen appears 3 Touch Demo Mode repeatedly until the desired setting appears On default Displays the demo screen Off Hides the demo screen Selecting the system language The system language can be selected p The languages used in the programme and voice gui...

Page 146: ... screen p Do not turn off the engine while saving the adjusted position data 1 Press the HOME button to display the Top menu screen 2 Touch the following keys in the follow ing order The System screen appears 3 Touch Touch Panel Calibration The touch panel adjustment screen appears 4 Touch two corners of the screen along the arrows and then touch the centres of two marks at the same time twice 5 P...

Page 147: ...e For details refer to Setting the duration of time for the dimmer function to be ac tive on page 147 Setting whether to activate the dimmer function You can set whether to activate the dimmer function at nighttime p This function is available only when Dim mer Trigger is set to Manual For details refer to Setting the dimmer function on page 146 1 Press the HOME button to display the Top menu scre...

Page 148: ...the right of value at the centre are for the morning p The default values are 18 00 start time and 6 00 end time p The value can be changed in 15 minute steps Adjusting the picture You can adjust the picture for each source the Application screen and rear view camera CAUTION For safety reasons you cannot use some of these functions while your vehicle is in motion To en able these functions you mus...

Page 149: ...ly for the On Off status of the dimmer function These are switched automatically depending on whether the dimmer function is on or off For details on setting the dimmer func tion refer to Setting the dimmer function on page 146 p The picture adjustment may not be avail able with some rear view cameras p The setting contents can be memorised se parately for the following screens and video images DV...

Page 150: ... ing order The System screen appears 6 Touch System Information The following screen appears 7 Touch Firmware Update The Firmware Update screen appears 8 Touch Continue to display the data transfer mode p Follow the on screen instructions to finish updating the firmware p This product will reset automatically after the firmware update is completed if the up date is successful p When the firmware u...

Page 151: ... PG1 is connected the distance calculation value cannot be replaced automatically Clearing the status You can delete the learned results stored in Distance Speed Pulse or Learning 1 Touch Distance or Speed Pulse A message confirming whether to erase the data appears 2 Touch Yes The results stored in Distance or Speed Pulse are cleared 3 Touch Learning The pop up menu appears 4 Touch Reset All All ...

Page 152: ...re than three satellites are received the current location can be mea sured For details refer to Positioning technol ogy on page 191 3 Installation Indicates whether the installation position of this product is correct or not If installed correctly OK appears When this product is installed at an extreme angle exceeding the limitation of the installing angle NOK Inst Angle will be displayed When th...

Page 153: ... The default setting is F R 0 L R 0 p Set Front and Rear to 0 when using a dual speaker system 5 Touch the following keys to adjust the left right speaker balance Moves towards the left Moves towards the right Each time you touch the keys the left right speaker balance moves towards the left or right p Left25 to Right25 is displayed as the left right speaker balance moves from the left to right p ...

Page 154: ...ume does not change Adjusting source levels The SLA source level adjustment function ad justs the volume level of each source to pre vent radical changes in volume when switching between sources p This function is available only when main audio is available p Settings are based on the FM tuner volume level which remains unchanged p This function is not available when the FM tuner is selected as th...

Page 155: ...whether the device is connected to USB port 1 or USB port 2 p When an iPod iPhone with a Lightning connector is connected to USB port 1 or USB port 2 using a USB interface cable for iPod iPhone CD IU52 sold separately the source level adjustment volume is auto matically set to the same level as the USB port to which the iPod iPhone with a Light ning connector is connected The source level adjustme...

Page 156: ... setting is On 4 Touch Crossover The Cutoff screen appears 5 Touch the following keys to select Front or Rear Selects the adjustable previous speak er Selects the adjustable next speaker 6 Touch HPF to turn on 7 Drag the line graph horizontally to ad just the range of cut off frequency from 50 Hz to 200 Hz p The default setting is 100 Hz 8 Drag the tip of the slope to adjust the range of level bet...

Page 157: ...der The Audio screen appears 3 Touch Listening Position The Listening Position screen appears 4 Touch the desired position Off default Changes the listening position setting to off Front Changes the listening position setting to front Front L Changes the listening position setting to front left Front R Changes the listening position setting to front right All Changes the listening position setting...

Page 158: ...r Rear Right Changes the speaker level of the rear right speaker Subwoofer Changes the speaker level of the subwoofer speaker If you touch Apply Auto EQ the result of A EQ TA Measurement will be applied to the speaker level setting p To use this function the vehicle s acoustics must be measured in advance Adjusting the time alignment By adjusting the distance from each speaker to the listening pos...

Page 159: ...ker and the selected listen ing position Increases the distance between the se lected speaker and the selected listen ing position p 0 0 cm to 500 0 cm is displayed as the distance to be corrected is increased or de creased Front Left Changes the distance between the front left speaker and the selected listening position Front Right Changes the distance between the front right speaker and the sele...

Page 160: ...liser curves that you can easily recall at any time Here is a list of the equaliser curves Equaliser curve S Bass is a curve in which only low pitched sound is boosted Powerful is a curve in which low and high pitched sounds are boosted Todoroki is a curve in which low and high pitched sounds are emphatically boosted Vocal is a curve in which the midrange which is the human vocal range is boosted ...

Page 161: ...r Using the auto adjusted equaliser You can set the auto adjusted equaliser to suit the vehicle s acoustics To use this function the vehicle s acoustics must be measured in advance For details of the operations refer to Adjust ing the equaliser curve automatically Auto EQ on page 161 p To manually adjust the equaliser curve set Auto EQ TA to Off 1 Press the HOME button to display the Top menu scre...

Page 162: ...LPF of an active subwoofer to the highest fre quency The distance has been calculated by a computer to provide optimum delay to en sure accurate results Do not change this value The reflected sound within the vehicle is strong and delays occur The LPF on active subwoofers or exter nal amps delay the lower sounds If an error occurs during measurement a message appears and measurement is cancelled C...

Page 163: ...ppears 8 Touch A EQ TA Measurement The A EQ TA Measurement screen ap pears 9 Connect the microphone for acoustical measurement with this product F70BT Plug the microphone into the microphone input jack on this product F970BT Connect the microphone with the mini jack ex tension cable and then plug it into the auxili ary input jack on this product For details of the operations refer to the In stalla...

Page 164: ...tly an error message will be displayed p The measurement time varies depending on the type of vehicle p To stop the measurement touch Stop 14 Store the microphone carefully in the glove compartment or another safe place If the microphone is subjected to direct sun light for an extended period high tempera tures may cause distortion colour change or malfunction CRB4523 A 164 Engb 164 Chapter 26 Aud...

Page 165: ... the desired preset background dis play custom Displays the background display image im ported from the external storage device USB SD For details refer to Changing to the back ground display image stored on the exter nal storage device USB SD on page 165 off Hides the background display Changing to the background display image stored on the external storage device USB SD You can change the backgr...

Page 166: ...urthermore the illumina tion can be switched between these 5 colours in order Selecting the colour from the preset colours You can select an illumination colour from the colour list 1 Press the HOME button to display the Top menu screen 2 Touch the following keys in the follow ing order The Theme screen appears 3 Touch Illumination The following screen appears p You can also change the screen for ...

Page 167: ...en and blue to create a favourite colour p You can also adjust the colour tone by drag ging the colour bar 6 Touch and hold Memo to store the customised colour in the memory The customised colour is stored in the mem ory The set colour will be recalled from the mem ory the next time you touch the same key Selecting the theme colour A theme colour can be selected from 5 differ ent colours 1 Press t...

Page 168: ...screen You can change the splash screen to other images preinstalled in this product 1 Press the HOME button to display the Top menu screen 2 Touch the following keys in the follow ing order The Theme screen appears 3 Touch Splash Screen The following screen appears 4 Touch the item you want to set Preset images Selects the desired preset splash screen image custom Displays the splash screen image...

Page 169: ...ettings can be exported se parately p This setting is available only when you stop your vehicle in a safe place and apply the handbrake p If multiple external storage devices are con nected to this product the order of priority for the targets that the Theme settings are exported to is as follows 1 SD memory card for AVIC F70BT 2 USB storage device that is connected to USB port 1 3 USB storage dev...

Page 170: ...ts that the Theme settings are imported from is as follows 1 SD memory card for AVIC F70BT 2 USB storage device that is connected to USB port 1 3 USB storage device that is connected to USB port 2 CAUTION Do not turn off the engine while importing the settings To prevent data loss and damage to the SD memory card never edit the data exported to the SD memory card 1 Insert the SD memory card into t...

Page 171: ... touch For details refer to Language code chart for DVDs on page 177 The subtitle language is set p If the selected language is not available the language specified on the disc is displayed p You can switch the subtitle language by touching the subtitle language switching key during playback p The setting made here will not be affected even if the subtitle language is switched during playback usin...

Page 172: ...esired language When you select Others a language code input screen is shown Input the four digit code of the desired language then touch For details refer to Language code chart for DVDs on page 177 The menu language is set p If the selected language is not available the language specified on the disc is dis played Setting the angle icon display You can set whether to display the angle icon on th...

Page 173: ...ith black bands on the top and bottom of the screen Pan Scan Cuts the image short on the right and left sides of the screen p When playing discs that do not have a pan scan system the disc is played back with Letter Box even if you select the Pan Scan setting Confirm whether the disc package bears the mark p The TV aspect ratio cannot be changed for some discs For details refer to the disc s instr...

Page 174: ... with discs that do not feature a recorded parental lock level p With some discs parental lock operates to skip certain scenes only after which normal playback resumes For details refer to the disc s instructions Displaying your DivX VOD registration code If you want to play DivX VOD video on de mand content on this product you must first register this product with your DivX VOD con tent provider ...

Page 175: ... VOD provider Automatic playback of DVDs When a DVD disc with a DVD menu is in serted this product will cancel the menu auto matically and start playback from the first chapter of the first title p Some DVDs may not operate properly If this function is not fully operable turn this function off and start playback p This setting is available only when Disc is selected as the source 1 Press the HOME ...

Page 176: ...SECAM Sets the video signal to SECAM Setting the video output format You can switch the video output format of the rear display between NTSC and PAL p The video output format setting has no ef fect on AUX AV and iPod sources when the control mode is set to iPod p This function is available when nothing is output to the front screen and a source other than Disc USB1 USB2 and SD is output to the rea...

Page 177: ...Lingala sv 1922 Swedish da 0401 Danish lo 1215 Lao sw 1923 Swahili de 0405 German lt 1220 Lithuanian ta 2001 Tamil dz 0426 Dzongkha lv 1222 Latvian te 2005 Telugu el 0512 Greek mg 1307 Malagasy tg 2007 Tajik en 0514 English mi 1309 Maori th 2008 Thai eo 0515 Esperanto mk 1311 Macedonian ti 2009 Tigrinya es 0519 Spanish ml 1312 Malayalam tk 2011 Turkmen et 0520 Estonian mn 1314 Mongolian tl 2012 Ta...

Page 178: ...e menu The star icon for the selected menu is filled in To cancel the registration touch the star icon in the menu column again Selecting a shortcut 1 Press the HOME button to display the Top menu screen 2 Touch the following keys in the follow ing order The Favorites screen appears 3 Touch the desired item Removing a shortcut 1 Press the HOME button to display the Top menu screen 2 Touch the foll...

Page 179: ...etriever func tion p Mode2 has a stronger effect than Mode1 Changing the wide screen mode You can set the screen size for the video and JPEG images p This setting is available only when you stop your vehicle in a safe place and apply the handbrake p The default setting is Full for video and Normal for JPEG images 1 Touch the following key Displays the setting screen to select the appropriate scree...

Page 180: ...mage may be displayed partly cut off either at the top bottom or sides p This setting is for JPEG images only p Different settings can be stored for each video source p When a video is viewed in a wide screen mode that does not match its original as pect ratio it may appear different p The video image will appear coarser when viewed in Zoom mode CRB4523 A 180 Engb 180 Chapter 30 Common operations ...

Page 181: ...V MKV and FLV only SD The video and sound of the SD memory cards are output to the rear display Compatible file types are MPEG 4 H 264 WMV MKV and FLV only AV The video and sound of the AV input are output to the rear display The video image and sound are output only when AV has both video and sound The video image and sound are output only when AV Input is set to Source For details refer to Setti...

Page 182: ...en ap pears Entering the password On the password input screen you must enter the current password 1 Enter the password 2 Touch Go When the correct password is entered this product will be unlocked Deleting the password The current password and password hint can be deleted 1 Press the HOME button to display the Top menu screen 2 Touch the following keys in the follow ing order The System screen ap...

Page 183: ...the default settings p This setting is available only when you stop your vehicle in a safe place and apply the handbrake CAUTION Do not turn off the engine while restoring the set tings 1 Press the HOME button to display the Top menu screen 2 Touch the following keys in the follow ing order The System screen appears 3 Touch Restore Settings The following screen appears 4 Touch the item you want to...

Page 184: ...audio or video skips This product is not firmly secured Secure this product firmly No sounds are produced The volume level will not rise Cables are not connected correctly Connect the cables correctly The system is performing still slow motion or frame by frame playback with DVD Video There is no sound during still slow motion or frame by frame playback with DVD Video The system is paused or perfo...

Page 185: ...iPod software version Cables are not connected correctly Connect the cables correctly Sound from the iPod cannot be heard The audio output direction may switch automatically when the Bluetooth and USB connections are used at the same time Use the iPod to change the audio output di rection Problems with the phone screen Symptom Cause Action Dialling is impossible because the touch panel keys for di...

Page 186: ...c tion the System will shut down automatically in 1 min ute Re cycle the ignition to restart the product If this mes sage keeps showing please contact your dealer or local service centre The temperature is too high for this product to operate Follow the instructions displayed on the screen If this does not solve the problem contact your dealer or an authorised Pioneer Station for assistance Positi...

Page 187: ...s loaded correctly There is an electrical or mechanical error Press the RESET button Page 10 Different Region Disc The disc does not have the same re gion number as this product Replace the DVD with one bearing the correct region number Unplayable Disc This type of disc cannot be played on this product Replace the disc with one that can be played on this product Unplayable File This type of file c...

Page 188: ... card It is recom mended that you use SD Formatter for for matting SD memory cards Page 198 Check USB The USB connector or USB cable is short circuited Check that the USB connector or USB cable is not caught in something or damaged The connected USB storage device consumes more than maximum al lowable current Disconnect the USB storage device and do not use it Turn the ignition switch to OFF then ...

Page 189: ...r a few seconds Restart the smartphone Turn the ignition switch to OFF and then to ON If the error message is still displayed after per forming the above action please contact your dealer or an authorised Pioneer Service Sta tion The time set in this product is not correct Check if GPS signals are received and the time is correctly set Bluetooth pairing failed Please pair your Android phone manual...

Page 190: ...ayed after per forming the above action reset the smart phone If the error message is still displayed after per forming the above action please contact your dealer or an authorised Pioneer Service Sta tion Launching the application failed Failed to launch the application Try again Failed to display the screen of your device because of irregu lar resolution The image size is too large The size of t...

Page 191: ...onnect ing the speed pulse the system will become more accurate than no connection of speed pulse So you connect the speed pulse without fail to get the accuracy of positioning p The position of the speed detection circuit vary depending on the vehicle model For details consult your authorised Pioneer dealer or an installation professional p Some types of vehicles may not output a speed signal whi...

Page 192: ...can not be received from more than two GPS satellites In some driving conditions signals from GPS satellites may not reach your vehicle In this case it is impossible for the system to use GPS positioning In tunnels or en closed parking garages Under elevated roads or similar structures When driving among high build ings When driving through a dense forest or tall trees If a car phone or mobile pho...

Page 193: ...d on the map screen If you make a slight turn If there is a parallel road If there is another road very nearby such as in the case of an elevated motorway If you take a recently opened road that is not on the map If you drive in zigzags If the road has a series of hairpin bends If there is a loop or similar road configura tion If you take a ferry If you are driving on a long straight road or a gen...

Page 194: ...in such as on a rough track or in snow If you put on chains or change your tyres for ones with a different size If trees or other obstacles block the GPS signals for a considerable period If you drive very slowly or in a start and stop manner as in a traffic jam If you join the road after driving around a large car park When you drive around a roundabout When starting driving immediately after sta...

Page 195: ...ver if you pass intersections turns and other guidance points in rapid succes sion some may delay or not be announced It is possible that guidance may direct you off a motorway and then back on again In some cases the route may require you to travel in the opposite direction to your current heading In such cases you are in structed to turn around so please turn around safely by following the actua...

Page 196: ...ipment To clean a disc wipe it with a soft cloth moving outward from the centre Condensation may temporarily impair the built in drive s performance Leave it to ad just to the warmer temperature for about one hour Also wipe any damp discs with a soft cloth Playback of discs may not be possible be cause of disc characteristics disc format recorded application playback environ ment storage condition...

Page 197: ... the double D sym bol are trademarks of Dolby Laboratories Detailed information for playable media Compatibility Common notes about disc compatibility Certain functions of this product may not be available for some discs Compatibility with all discs is not guaran teed It is not possible to playback DVD ROM DVD RAM discs Playback of discs may become impossible with direct exposure to sunlight high ...

Page 198: ... be recognised by a computer Formatting the SD memory cards using a dedicated formatter may resolve the pro blem SD memory cards formatted using the standard formatting function on a com puter do not comply with the SD standard Problems such as that those cards cannot be read or written could occur It is recom mended that you use a dedicated formatter to avoid such problems All of the data stored ...

Page 199: ...d Subtitle files that are named with the same character string as the DivX file before the extension are associated with the DivX file The character strings before the extension must be exactly the same However if there is only one DivX file and one subtitle file in a single folder the files are associated even if the file names are not the same The subtitle file must be stored in the same folder ...

Page 200: ...EG Notes Maximum playback time of audio file stored in the disc 60 h Maximum playback time of audio file stored on an external storage device USB SD 7 5 h 450 minutes MP3 compatibility Media CD R RW DVD R R SL R DL DVD RW USB storage de vice SD memory card File extension mp3 mp2 mp3 m2a mka Bit rate 8 kbps to 320 kbps CBR VBR Sampling frequency 16 kHz to 48 kHz 32 kHz 44 1 kHz 48 kHz for emphasis ...

Page 201: ...ice SD memory card File extension WAV files on the CD R RW DVD R RW R SL R DL cannot be played wav Format Linear PCM LPCM Sampling frequency 16 kHz to 48 kHz Quantisation bits 8 bits and 16 bits Note The sampling frequency shown in the display may be rounded AAC compatibility Media CD R RW DVD R R SL R DL DVD RW USB storage de vice SD memory card File extension m4a aac adts mka m4a Bit rate 8 kbps...

Page 202: ...576 pixels Maximum file size 4 GB Notes This product is not compatible with the following DivX Ultra format DivX files without video data DivX files encoded with LPCM Linear PCM audio codec Depending on the file information composition such as the number of audio streams there may be a slight delay in the start of playback on discs If a file contains more than 4 GB playback stops before the end So...

Page 203: ...his product may not operate correctly de pending on the application used to encode WMA files Depending on the version of Windows Media Player used to encode WMA files album names and other text information may not be correctly displayed There may be a slight delay when starting playback of audio files encoded with image data This product is not compatible with packet write data transfer This produ...

Page 204: ...e names are those of their respective owners SDHC SDHC Logo is a trademark of SD 3C LLC WMA WMV Windows Media is either a registered trade mark or trademark of Microsoft Corporation in the United States and or other countries p This product includes technology owned by Microsoft Corporation and cannot be used or distributed without a licence from Microsoft Licensing Inc DivX DivX Certified devices...

Page 205: ...t while using this product Please back up your iPod data regularly Do not leave the iPod in direct sunlight for ex tended amounts of time Extended exposure to direct sunlight can result in iPod malfunc tion due to the resulting high temperature Do not leave the iPod in any location with high temperatures Firmly secure the iPod when driving Do not let the iPod fall onto the floor where it may be co...

Page 206: ...twork coverage for the purpose of al lowing your smartphone to connect to the In ternet Service availability may be geographically lim ited to the region Consult the connected con tent service provider for additional information Ability of this product to access connected content is subject to change without notice and could be affected by any of the following compatibility issues with future firm...

Page 207: ...egarding open source licences For details about the open source licences for the functions that this product is equipped with please visit http www oss pioneer com car multimedia Map coverage For details about the map coverage of this pro duct refer to the information on our website Using the LCD screen correctly Handling the LCD screen When the LCD screen is subjected to direct sunlight for a lon...

Page 208: ...ng the LCD screen When removing dust from or cleaning the LCD screen first turn this product off and then wipe the screen with a soft dry cloth When wiping the LCD screen take care not to scratch the surface Do not use harsh or abrasive chemical cleaners LED light emitting diode backlight A light emitting diode is used inside the dis play to illuminate the LCD screen At low temperatures using the ...

Page 209: ...tings MIXTRAX Settings 135 Radio Settings 89 90 91 92 93 138 Bluetooth Audio 139 Ever Scroll 139 Input Output Settings Smartphone Setup 83 AV Input 139 AUX Input 130 Camera settings Camera View 142 Back Camera Input 140 2nd Camera Input 144 Camera Polarity 141 Parking Assist Guide 142 Back Camera Reverse Video 141 2nd Camera Reverse video 145 Parking Assist Guide Adjust 143 Demo Mode 145 CRB4523 A...

Page 210: ...ch Panel Calibration 146 Dimmer Settings Dimmer Trigger 146 Day Night 147 Dimmer Duration 147 Driving Position 124 Picture Adjustment 148 System Information Firmware Information 149 Firmware Update 150 3D Calibration Status 150 Connection Status 151 Theme menu Page Background 165 Illumination 166 Theme 167 Clock 168 Splash Screen 168 Export 169 CRB4523 A 210 Engb 210 Appendix Appendix ...

Page 211: ...6 Listening Position 157 Time Alignment 158 Auto EQ TA 161 A EQ TA Measurement 162 ASL 160 Video Setup menu Page DVD DivX Setup Subtitle Language 171 Audio Language 171 Menu Language 172 Multi Angle 172 TV Aspect 173 Parental 173 DivX VOD 174 DVD Auto Play 175 Time Per Photo Slide 112 Video Signal Setting AV 133 AUX 131 Camera 175 Video Output Format 176 CRB4523 A 211 Engb 211 Appendix Appendix Ap...

Page 212: ...ection 69 Auto Connect 71 Visibility 72 PIN Code Input 72 Device Information 73 Auto Answer 79 Ring Tone 80 Invert Name 80 Bluetooth Memory Clear 73 BT Software Update 73 Bluetooth Version Information 74 CRB4523 A 212 Engb 212 Appendix Appendix ...

Page 213: ...mpatible Tolerable temperature range Power off 20 C to 80 C Audio Maximum power output 50 W 4 Continuous power output 22 W 4 50 Hz to 15 kHz 5 THD 4 W LOAD Both Channels Driven Load impedance 4 W 4 W to 8 W allowable Preout output level max 4 0 V Equaliser 13 Band Graphic Equaliser Frequency 50 Hz 80 Hz 125 Hz 200 Hz 315 Hz 500 Hz 800 Hz 1 25 kHz 2 kHz 3 15 kHz 5 kHz 8 kHz 12 5 kHz Gain 12 dB HPF ...

Page 214: ... memory card Compatible physical format Version 2 0 File system FAT16 FAT32 NTFS MP3 decoding format MPEG 1 Layer 1 MPEG 1 Layer 2 MPEG 1 Layer 3 MPEG 2 Layer 1 MPEG 2 Layer 2 MPEG 2 Layer 3 MPEG 2 5 Layer 3 WMA decoding format WMA10 Std WMA10 Pro WMA9 Lossless AAC decoding format MPEG 2 AAC LC MPEG 4 AAC LC WAVE signal format Linear PCM H 264 video decoding format BaseLine Profile Main Pro file H...

Page 215: ...Black plate 215 1 CRB4523 A 215 Engb 215 ...

Page 216: ...ia 3202 Australia TEL 03 9586 6300 PIONEER ELECTRONICS OF CANADA INC 340 Ferrier Street Unit 2 Markham Ontario L3R 2Z5 Canada TEL 1 877 283 5901 TEL 905 479 4411 PIONEER ELECTRONICS DE MEXICO S A de C V Blvd Manuel Avila Camacho 138 10 piso Col Lomas de Chapultepec Mexico D F 11000 TEL 52 55 9178 4270 FAX 52 55 5202 3714 先鋒股份有限公司 台北市內湖區瑞光路407號8樓 電話 886 0 2 2657 3588 先鋒電子 香港 有限公司 香港九龍長沙灣道909號5樓 電話 ...

Reviews: