AVH-P3100DVD/XN/UC
95
5
6
7
8
5
6
7
8
C
D
F
A
B
E
1
2
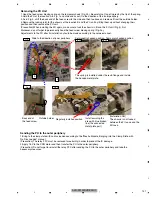
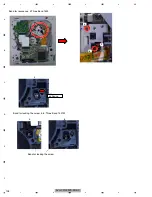
Remove the four screws.
3
Remove the four screws
and then remove Chassis(Upper) while
holding both edges of the gasket. (Fig.8)
*If the gasket was damaged or lost,
replace it with the new one.
Disconnect the cable and then remove
the DVD Mechanism Module.
-
Removing the DVD Mechanism Module (Fig.6)
-
Removing the Chassis(Upper) (Fig.7, 8)
1
Remove the two screws. (Fig.7)
2
Remove the five screws
and then remove the Heat Sink. (Fig.7)
Remove the Holder. (Fig.7)
1
1
1
1
2
1
1
2
2
2
2
2
3
3
3
3
Fig.6
Fig.8
DVD Mechanism Module
Heat Sink
Holder
Fig.7
Chassis(Upper)
Summary of Contents for AVH-P3150DVD
Page 29: ...AVH P3100DVD XN UC 29 5 6 7 8 5 6 7 8 C D F A B E ...
Page 61: ...AVH P3100DVD XN UC 61 5 6 7 8 5 6 7 8 C D F A B E Side A SCLOCK SDATA D CP_ RESET D DGND2 ...
Page 67: ...AVH P3100DVD XN UC 67 5 6 7 8 5 6 7 8 C D F A B E ...
Page 114: ...AVH P3100DVD XN UC 114 1 2 3 4 1 2 3 4 C D F A B E 9 1 PACKING ...
Page 116: ...AVH P3100DVD XN UC 116 1 2 3 4 1 2 3 4 C D F A B E 9 2 EXTERIOR 1 A A A B ...
Page 118: ...AVH P3100DVD XN UC 118 1 2 3 4 1 2 3 4 C D F A B E 9 3 EXTERIOR 2 A A E F 2 1 ...
Page 123: ...AVH P3100DVD XN UC 123 5 6 7 8 5 6 7 8 C D F A B E ...
Page 127: ...AVH P3100DVD XN UC 127 5 6 7 8 5 6 7 8 C D F A B E ...
Page 145: ...AVH P3100DVD XN UC 145 5 6 7 8 5 6 7 8 C D F A B E ...

