AVH-P3100DVD/XN/UC
94
1
2
3
4
1
2
3
4
C
D
F
A
B
E
7. DISASSEMBLY
1
2
1
2
-
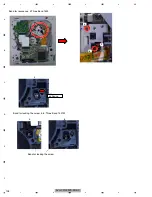
Removing the Case and Monitor Unit (Fig.1, 2, 3)
Remove the four hooks with Tweezers
and then remove the Case.(Fig.3)
Remove the four screws. (Fig.3)
Remove the four screws.
Remove the two screws
and then remove the Holder.
The hook is removed with Tweezers as shown in figure. (Fig.1)
3
Remove the two hooks. (Fig.3)
3
Disconnect the two cables
and then remove the Monitor Unit.(Fig.4)
Disconnect the two cables.
4
5
Remove the screw.
Remove the five hooks
and then remove the LCD Assy.
6
7
Remove the five screws
and then remove the Monitor PCB.
Disconnect the two cables.
Remove the Keybord PCB.
Don’t remove from the hook of sign.(Fig.3)
Because the Holder may be deformed.(Fig.2)
1
1
1
1
2
2
2
2
3
3
4
4
4
1
5
1
1
1
5
1
1
2
3
3
2
4
2
5
5
5
5
2
2
6
6
7
7
7
7
7
Fig.1
Case
-
Removing the Monitor PCB and Keybord PCB (Fig.5)
Fig.3
Fig.5
Monitor Unit
Holder
Monitor PCB
Keybord PCB
LCD Assy
Fig.4
Fig.2
Holder
Summary of Contents for AVH-P3150DVD
Page 29: ...AVH P3100DVD XN UC 29 5 6 7 8 5 6 7 8 C D F A B E ...
Page 61: ...AVH P3100DVD XN UC 61 5 6 7 8 5 6 7 8 C D F A B E Side A SCLOCK SDATA D CP_ RESET D DGND2 ...
Page 67: ...AVH P3100DVD XN UC 67 5 6 7 8 5 6 7 8 C D F A B E ...
Page 114: ...AVH P3100DVD XN UC 114 1 2 3 4 1 2 3 4 C D F A B E 9 1 PACKING ...
Page 116: ...AVH P3100DVD XN UC 116 1 2 3 4 1 2 3 4 C D F A B E 9 2 EXTERIOR 1 A A A B ...
Page 118: ...AVH P3100DVD XN UC 118 1 2 3 4 1 2 3 4 C D F A B E 9 3 EXTERIOR 2 A A E F 2 1 ...
Page 123: ...AVH P3100DVD XN UC 123 5 6 7 8 5 6 7 8 C D F A B E ...
Page 127: ...AVH P3100DVD XN UC 127 5 6 7 8 5 6 7 8 C D F A B E ...
Page 145: ...AVH P3100DVD XN UC 145 5 6 7 8 5 6 7 8 C D F A B E ...

