background image

4

     Copyright notice


  This product incorporates copyright 
protection technology that is protected 
by method claims of certain U.S. patents 
and other intellectual property rights 
owned by Macrovision Corporation and 
other rights owners. Use of this copyright 
protection technology must be authorised 
by Macrovision Corporation, and is intended 
for home and other limited viewing uses only 
unless otherwise authorised by Macrovision 
Corporation. Reverse engineering or 
disassembly is prohibited.

     About Progressive Scan


  Consumers should note that not all high 
de

fi

 nition television sets are fully compatible 

with this product and may cause artifacts to 
be displayed in the picture. In case of 525 
or 625 progressive scan picture problems, 
it is recommended that the user switch the 
connection to the ‘standard de

fi

 nition’ output. 

If there are questions regarding our TV set 
compatibility with this model 525p and 625p 
DVD player, please contact our customer 
service center.

         1 Important

    Safety and important notice

 Warning

 Risk of overheating! Never install the Home 


Theater System in a con

fi

 ned space. Always 

leave a space of at least 4 inches around the 

Home Theater System for ventilation. Ensure 

curtains or other objects never cover the 

ventilation slots on the Home Theater System.

  Never place the Home Theater System, 


remote control or batteries near naked 

fl

 ames 

or other heat sources, including direct sunlight.

  Only use this Home Theater System indoors. 


Keep this Home Theater System away from 

water, moisture and liquid-

fi

 lled objects.

  Never place this Home Theater System on 


other electrical equipment.

  Keep away from this Home Theater System 


during lightning storms.

  Where the mains plug or an appliance 


coupler is used as the disconnect device, 

the disconnect device shall remain readily 

operable.

  Visible and invisible laser radiation when open. 


Avoid exposure to beam.

    Recycle notice


  This electronic equipment contains a large 
number of materials that can be recycled 
or reused if disassembled by a specialized 
company. If you are disposing of an old 
machine, please take it to a recycling center. 
Please observe the local regulations regarding 
disposal of packaging materials, exhausted 
batteries and old equipment.

EN

hts3021_94_eng1.indd   Sec1:4

hts3021_94_eng1.indd   Sec1:4

1/14/2009   5:46:06 PM

1/14/2009   5:46:06 PM

Summary of Contents for HTS3021/94

Page 1: ...Register your product and get support at www philips com welcome HTS3021 EN User manual ...

Page 2: ...12 home theater Home Theater System Home Theater System Home Theater System Visit us on web at www philips com support or Call us on Tel No 1860 180 1111 BSNL MTNL 011 6600 1111 GSM WLL standard call rates apply Electronics ...

Page 3: ...speakers and subwoofer 11 Connect radio antenna 11 Connect audio cables other devices 11 Connect power cord 12 4 Get started 13 Insert the remote control batteries 13 Find the correct viewing channel 14 Select menu display language 14 Turn on Progressive Scan 14 Change speaker settings 15 Select a play source 16 5 Play 17 Play a disc 17 Play video 17 Play music 20 Play photo 21 Play from USB devic...

Page 4: ...arning Risk of overheating Never install the Home Theater System in a confined space Always leave a space of at least 4 inches around the Home Theater System for ventilation Ensure curtains or other objects never cover the ventilation slots on the Home Theater System Never place the Home Theater System remote control or batteries near naked flames or other heat sources including direct sunlight On...

Page 5: ...Certified product Plays all versions of DivX video including DivX 6 with enhanced playback of DivX media files and the DivX Media Format Plays DivX video with menus subtitles and audio tracks Windows Media and the Windows logo are trademarks or registered trademarks of Microsoft Corporation in the United States and or other countries The USB IF Logos are trademarks of Universal Serial Bus Implemen...

Page 6: ...ompressed multi channel surround sound This Home Theater System supports 5 1 channels of uncompressed audio that delivers a real to life sound experience as if you are listening to it live USB direct Simply plug your USB device into the USB jack to play your MP3 WMA JPEG DivX files Sync the audio output with the video play Synchronize audio and video by delaying the audio output if the video signa...

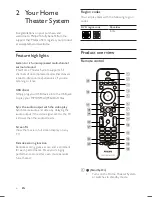
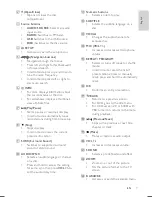
Page 7: ...he karaoke menu b Open Close Opens or closes the disc compartment c Source buttons AUDIO SOURCE Selects an audio input source RADIO Switches to FM band USB Switches to the USB source DISC Switches to the disc source d SETUP Accesses or exits the setup menu e Navigation buttons Navigates through the menus Press left and right for fast backward or forward search In radio mode press up and down to tu...

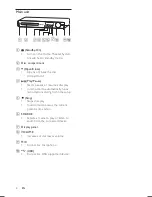
Page 8: ...resumes disc play In radio mode automatically tunes radio stations during first time setup e Stop Stops disc play In radio mode erases the current preset radio station f SOURCE Selects a media to play or listen to audio from the connected device g Display panel h VOLUME Increases or decreases volume i MIC Connects a microphone j USB Connects a USB supported device a b c d e f gh ij EN ...

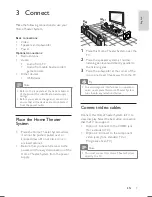
Page 9: ...his Home Theater System directly to a TV FRONT RIGHT FRONT LEFT CENTER REAR RIGHT REAR LEFT SUBWOOFER 3 Connect Make the following connections to use your HomeTheater System Basic connections Video Speakers and subwoofer Power Optional connections Radio antenna Audio Audio from TV Audio from cable box recorder game console Other devices USB device Note Refer to the type plate at the back or bottom...

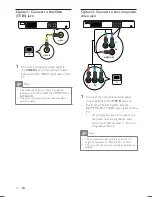
Page 10: ...sive Scan Note The component video input jack on the TV might be labeled as Y Pb Cb Pr Cr or YUV This type of connection provides good picture quality VIDEO OUT Pb Pr Y Pb Pr Y Option 1 Connect to theVideo CVBS jack 1 Connect a composite video cable to the VIDEO jack on this Home Theater System and the VIDEO input jack on the TV Note The video input jack on the TV might be labeled as A V IN VIDEO ...

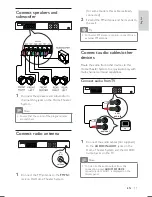
Page 11: ...io cables not supplied to the AUDIO IN AUX1 jacks on the Home Theater System and the AUDIO output jacks on the TV Note To listen to the audio output from this connection press AUDIO SOURCE repeatedly until AUX1 is displayed on the display panel AUDIO OUT AUX 1 AUDIO IN Connect speakers and subwoofer 1 Connect the speakers and subwoofer to the matching jacks on the Home Theater System Note Ensure t...

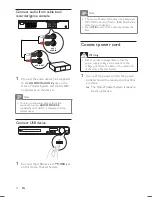
Page 12: ...he power cord to the power outlet when all the required connections are done The HomeTheater System is ready to be set up for use Connect audio from cable box recorder game console 1 Connect the audio cables not supplied to the AUDIO IN AUX2 jacks on the Home Theater System and the AUDIO output jacks on the device Note To listen to the audio output from this connection press AUDIO SOURCE repeatedl...

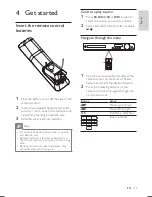
Page 13: ... Move up or down Move left or right OK Confirm a selection Enter numbers 4 Get started Insert the remote control batteries 1 Slide the battery cover off the back of the remote control 2 Insert the 2 supplied batteries AAA Be sure the and ends of the batteries line up with the markings inside the case 3 Slide the cover back into position Note Do not mix batteries old and new or carbon and alkaline ...

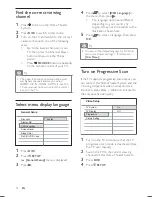
Page 14: ...g channel for this Home Theater System 3 Press DISC 4 Press SETUP Video Setup Picture Setting TV Display TV System Progressive On Off Find the correct viewing channel 1 Press to turn on the Home Theater System 2 Press DISC to switch to disc mode 3 Turn on the TV and switch to the correct video in channel in one of the following ways Go to the lowest channel on your TV then press the Channel Down b...

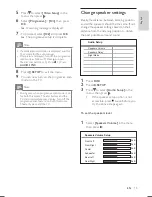
Page 15: ...Front Right Center Subwoofer Rear Left Rear Right 0dB 0dB 0dB 0dB 0dB 0dB 5 Press to select Video Setup in the menu then press 6 Select Progressive On then press OK A warning message is displayed 7 To proceed select Ok and press OK The progressive setup is complete Note If a blank distorted screen is displayed wait for 15 seconds for the auto recover If no picture displayed turn off the progressiv...

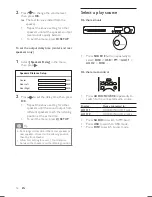
Page 16: ...r other speakers until all the speakers output level sounds equally balance To exit the menu press SETUP To set the output delay time center and rear speakers only 1 Select Speakers Delay in the menu then press 2 Press to set the delay time then press OK Repeat the above setting for other speakers until the sound output from different speakers reach the listening position at the same time To exit ...

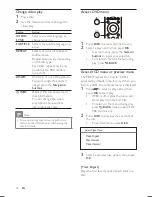
Page 17: ... possible 5 Play Play a disc Caution Never place any objects other than discs into the disc compartment Never touch the disc optical lens inside the disc compartment 1 Press to open the disc compartment 2 Insert a disc with its label facing up For double sided disc load the side to play faces up 3 Press to close the disc compartment and start disc play To view disc play turn on the TV to the corre...

Page 18: ... a preview play option then press OK Track Digest Plays the first few seconds of each track in a disc Select Digest Type Track Digest Disc Interval Track Interval Change video play 1 Play a title 2 Use the remote control to change the video play Button Action AUDIO SYNC Selects an audio language or channel on a disc SUBTITLE Selects the subtitle language on a disc REPEAT Selects or turns off repea...

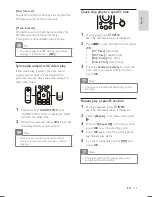
Page 19: ...elect Off and press OK Note The marked section for repeat play is only possible within a track title Disc Interval Divides the total disc time by six and play the first few seconds of these intervals Track Interval Divides the current track by six and play the first few seconds of these intervals This option is not available in stop mode Tip You can change the PBC setting see Adjust settings Prefe...

Page 20: ...ly to change the search speed REPEAT Selects or turns off repeat or shuffle mode View video play from different camera angles 1 During play press INFO The disc status menu is displayed 2 Select Angle then press 3 Press the Numeric buttons to select an angle then press OK Play changes to the selected angle Note Applicable only to discs contain multi angle scenes Play DivX video DivX video is a digi...

Page 21: ...t contains the MP3 WMA music 2 Press DISC or USB A contents menu is displayed 3 Select a folder then press OK 4 Select a track to play then press To return to the main menu press BACK or press until Previous folder is selected then press OK Note For disc recorded in multiple sessions only the first session is played This Home Theater System does not support MP3PRO audio format If any special chara...

Page 22: ...press Play starts Note You may require longer time to display the disc content on the TV due to the large number of songs photos compiled onto one disc If the JPEG photo is not recorded with an exif type file the actual thumbnail picture is not be shown on the display It is replaced by a blue mountain thumbnail picture This Home Theater System can only display digital camera pictures according to ...

Page 23: ... frequency up or down Press and hold this button to erase the current radio station from the preset list The preset number for other radio stations remain unchanged 4 To stop play press or remove the USB device Note If the device does not fit into the USB jack connect it through a USB extension cable If you connect a multiple USB card device reader only one card device can be accessed Digital came...

Page 24: ...eviously stored radio stations are replaced Note Check the radio antenna connection if no stereo signal is detected or less than 5 stations are detected during radio installation Search and store radio stations individually 1 Press RADIO 2 Press It starts searching until a radio station is detected 3 Repeat step 2 until you tune to the radio station you wish to store To finetune the radio frequenc...

Page 25: ...mid range and surround effects for clear vocals and the atmosphere of a live sports venue It is also ideal for video gaming NIGHT Dynamically controlled sound mode suitable for watching movies at night or for nonintrusive background music 6 Adjust sound Control the volume 1 Press VOL to increase or decrease the volume To mute press To restore the volume press again or press VOL Select surround sou...

Page 26: ...hone volume level 1 Connect a microphone not supplied to MIC jack on this Home Theater System 2 Turn on the microphone output see Karaoke settings 3 Press MIC VOL to adjust the microphone volume MIC XX is displayed Sing or speak through the microphone to find the desired volume level Karaoke settings 1 Turn on the TV to the correct viewing channel for this Home Theater System 2 Press KARAOKE Karao...

Page 27: ...k Restricts access to the current disc Once activated a password is needed to unlock and play the disc Unlock Plays all discs Tip You can set or change the password see Adjust settings Preferences Password Screen Saver DivX R VOD Code Sleep Timer Display Dim Disc Lock OSD Language General Setup 7 Adjust settings You can customize various kinds of settings as you prefer Refer to the following instr...

Page 28: ...er System 100 Normal brightness 70 Medium brightness 40 Dimmest display OSD Language Selects the default on screen menu language Screen Saver Turns off or on the screen saver mode Helps to protect the TV screen from being damaged due to over exposure to a static image for too long On Sets the screen saver to appear after 15 minutes of inactivity for example in pause or stop mode Off Disables scree...

Page 29: ...p Picture Setting TV Display TV System Progressive Speakers Delay Sets the delay time for the center and rear speakers if they are placed closer to the listening position so that the sound output from all speakers reach the listening position at the same time 1 To start press OK 2 Select a speaker in the menu then press to set the delay time 3 Press OK to confirm and exit Note Allow 1ms setting fo...

Page 30: ...ull height display with the trimmed sides 4 3 Letter Box For 4 3 screen TV wide screen display with black bars on the top and bottom of the screen 16 9 Wide Screen For wide screen TV display ratio 16 9 Picture Setting Selects a predefined set of picture color settings or customize the personal setting Standard Original color setting Bright Vibrant color setting Soft Warm color setting Personal Cus...

Page 31: ...rd Note If the language you have set is not available on the disc the disc uses its own default language For some discs the subtitle audio language can only be changed from the disc menu To select the languages that are not listed in the menu select Others Then check the Language Code list at the back of this user manual and enter the respective 4 digit language code Parental Restricts access to d...

Page 32: ...vie srt Version Info Displays the software version of this Home Theater System Tip This information is required when you want to find out if a newest software version is available at the Philips website that you may download and install on this Home Theater System Default Resets all the settings of this Home Theater System to factory default except for Disc Lock Password and Parental settings EN ...

Page 33: ...stem with the latest software version if available at the Philips website 1 Press SETUP 2 Select Preferences Version Info then press OK 3 Write down the version number then press SETUP to exit the menu 4 Go to www philips com support to check the latest software version available for this Home Theater System 5 If the latest software version is higher than the software version of this Home Theater ...

Page 34: ...nse 150 Hz 20 kHz Dimensions WxHxD Center 100 x 100 x 75 mm Front Rear 100 x 100 x 75 mm Weight Center 0 38 kg Front Rear 0 38 kg each 9 Specifications Note Specification and design are subject to change without notice Playback media DVD Video DVD R RW DVD R RW DVD R DL CD R CD RW Audio CD Video CD SVCD Picture CD MP3 CD WMA CD DivX CD USB flash drive Amplifier Total output power 200 W RMS 10 THD ...

Page 35: ...er Frequency response 45 Hz 150 Hz Dimensions WxHxD 122 6 x 309 5 x 369 mm Weight 3 54 Kg Laser specification Type Semiconductor laser GaAIAs CD Wave length 645 665 nm DVD 770 800 nm CD Output power 6 mW DVD 7 mW VCD CD Beam divergence 60 degrees E ng l is h EN ...

Page 36: ...audio stream No sound from TV program Connect an audio cable from the AUDIO input on this Home Theater System to the AUDIO output on your TV Then press AUDIO SOURCE repeatedly to select the corresponding audio input source 10 Troubleshooting Warning Risk of electric shock Never remove the casing of the Home Theater System To keep the warranty valid never try to repair the system yourself If you en...

Page 37: ...lete The aspect ratio of the screen is not aligned with the TV display setting The aspect ratio is fixed on the disc DivX subtitle does not display correctly Ensure that the subtitle file name is the same as the movie file name Select the correct character set 1 Press SETUP 2 Select Preferences then press 3 Select DivX Subtitle then press OK 4 Select the character set that supports the subtitle Th...

Page 38: ... Windows XP Files are recognized by their file extension wma 11 Glossary A Aspect ratio Aspect ratio refers to the length to height ratio of TV screens The ratio of a standard TV is 4 3 while the ratio of a high definition or wide TV is 16 9 The letter box allows you to enjoy a picture with a wider perspective on a standard 4 3 screen D DivX The DivX codec is a patent pending MPEG 4 based video co...

Page 39: ... 2009 Koninklijke Philips Electronics N V All rights reserved sgpjp_0903 94_v1 ...

Reviews: