background image

65BDL4052E/75BDL4052E/86BDL4052E

19

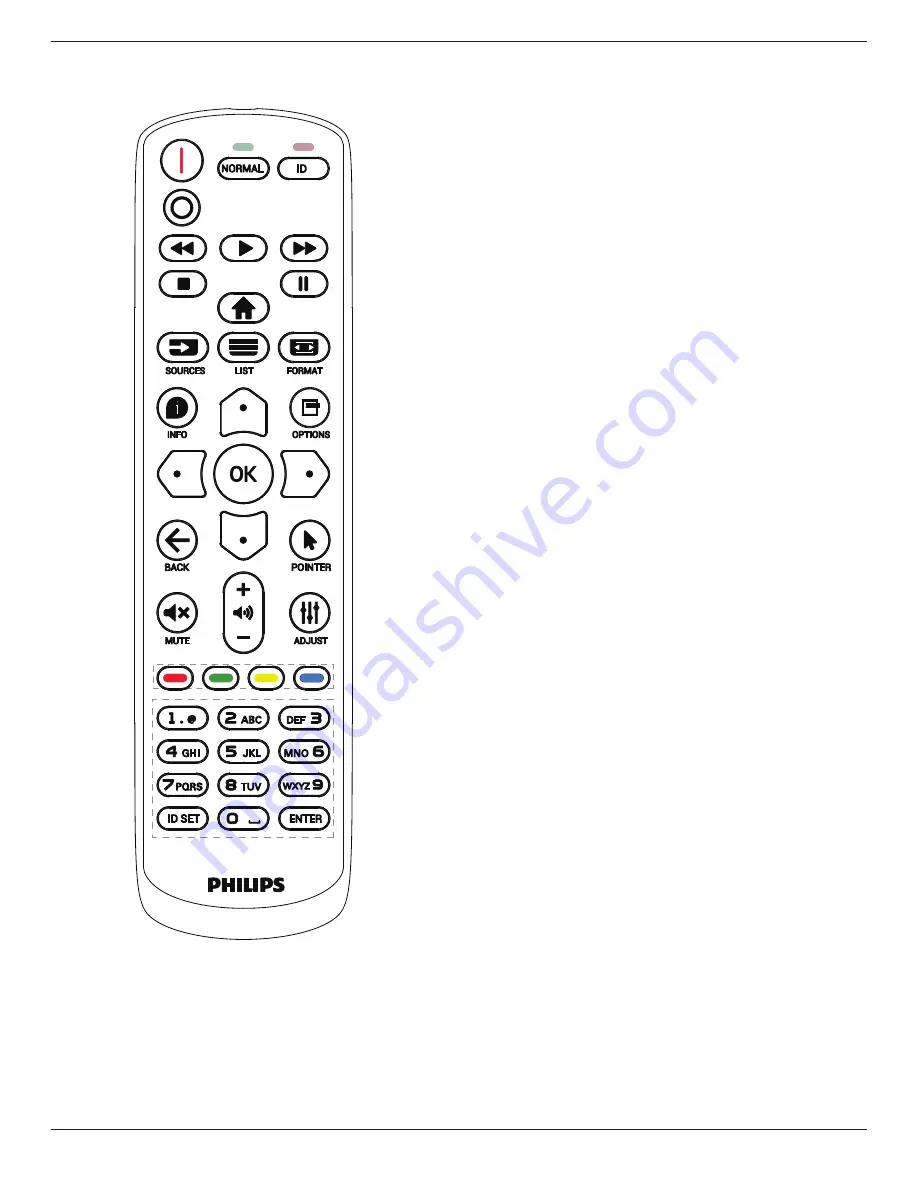
Press the [ID] button and the red LED blinks twice.
1.  Press [ID SET] button for more than 1 second to enter the 

ID Mode. The red LED lights up.  

Press the [ID SET] button again will exit the ID Mode. The 

red LED lights off.

Press the digit numbers [0] ~ [9] to select the display to be 

controlled.  

For example: press [0] and [1] for display No.1, press [1] and [1] 

for display No.11. 

The numbers available are [01] ~ [255].
2.  If no button is pressed within 10 seconds, it will exit from 

the ID mode.

3.  If a wrong button is pressed, wait for 1 second until the 

red LED lights off and then turns on again, then press the 

correct digits.

4. 

Press [ENTER] button to confirm your selection. The red 

LED blinks twice and then lights off.

NOTE:

•  Press [NORMAL] button. The green LED blinks twice, 

indicating that the display is under normal operation.

•  It is necessary to set up the ID number for each display 

before selecting its ID number.

3.6.2.  ID Remote Control

Set remote control ID number when using several displays.

Summary of Contents for E Series

Page 1: ...Professional Display Solutions E Line 65BDL4052E 75BDL4052E 86BDL4052E User Manual English www philips com welcome ...

Page 2: ...mat 29 5 3 Launcher 29 5 4 Media Player 30 5 5 Browser 34 5 6 PDF Player 38 5 7 CMND Play 40 5 8 Custom App 41 5 9 Side Bar 42 6 Whiteboard 43 6 1 Main page 43 6 2 Toolbar 43 6 3 Page switch and preview 44 6 4 Gesture control 44 6 5 Exit 45 6 6 Annotation mode 45 7 File manager 46 7 1 File manager 46 7 2 Display switch 46 8 Setting UI 47 8 1 Network internet 47 8 2 Portable hotspot 48 8 3 Signage ...

Page 3: ...it with a slightly damp cloth The screen may be wiped with a dry cloth when the power is off However never use organic solvent such as alcohol or ammonia based liquids to clean your display To avoid the risk of shock or permanent damage to the set do not expose the display to dust rain water or an excessively moist environment If your display becomes wet wipe it with dry cloth as soon as possible ...

Page 4: ...that is caused by the shortcomings inherent in LCD technology In most cases the afterimage will disappear gradually over a period of time after the power has been switched off Be aware that the after image symptom cannot be repaired and is not covered under warranty If provided with a 3 pin attachment plug on the power cord plug the cord into a grounded earthed 3 pin outlet Do not disable the powe...

Page 5: ...on est autorisée aux deux conditions suivantes 1 le dispositif ne doit pas produire de brouillage préjudiciable et 2 ce dispositif doit accepter tout brouillage reçu y compris un brouillage susceptible de provoquer un fonctionnement indésirable Envision Peripherals Inc 490 N McCarthy Blvd Suite 120 Milpitas CA 95035 USA Europe Statement IMPORTANT NOTE The device is restricted to indoor use only wh...

Page 6: ...se harmful interference and 2 this device must accept any interference received including interference that may cause undesired operation Ce dispositif est conforme à la norme CNR 247 d Industrie Canada applicable aux appareils radio exempts de licence Son fonctionnement est sujet aux deux conditions suivantes 1 le dispositif ne doit pas produire de brouillage préjudiciable et 2 ce dispositif doit...

Page 7: ...rements of standards PN 93 T 42107 and PN 89 E 06251 Electric Magnetic and Electromagnetic Fields EMF 1 We manufacture and sell many products targeted at consumers which like any electronic apparatus in general have the ability to emit and receive electromagnetic signals 2 One of our leading Business Principles is to take all necessary health and safety measures for our products to comply with all...

Page 8: ...ode BLUE NEUTRAL N BROWN LIVE L GREEN YELLOW EARTH E 1 The GREEN YELLOW wire must be connected to the terminal in the plug which is marked with the letter E or by the Earth symbol or coloured GREEN or GREEN YELLOW 2 The BLUE wire must be connected to the terminal which is marked with the letter N or coloured BLACK 3 The BROWN wire must be connected to the terminal which marked with the letter L or...

Page 9: ...阻 电容 集成电路 连接器等 O 表示该有害物质在该部件所有均质材料中的含量均在 GB T 26572规定的限量要求以下 X 表示该有害物质至少在该部件的某一均质材料中的含量超出GB T 26572规定的限量要求 上表中打 X 的部件 应功能需要 部分有害物质含量超出GB T 26572规定的限量要求 但符合欧盟 RoHS法规要求 属于豁免部分 备注 上表仅做为范例 实际标示时应依照各产品的实际部件及所含有害物质进行标示 10 环保使用期限 此标识指期限 十年 电子电气产品中含有的有害物质在正常使用的条件下不会发生外泄或突变 电 子电气产品用户使用该电子电气产品不会对环境造成严重污染或对其人身 财产造成严重损害的期限 废弃电器电子产品回收处理管理条例 提示性说明 为了更好地关爱及保护地球 当用户不再需要此产品或产品寿命终止时 请遵守国家废弃电器电子产品 回收处理相关法律法规 将其交给当地具...

Page 10: ...te and federal regulations For additional information on recycling contact www eia org Consumer Education Initiative Waste Electrical and Electronic Equipment WEEE Attention users in European Union private households This marking on the product or on its packaging illustrates that under European Directive 2012 19 EU governing used electrical and electronic appliances this product may not be dispos...

Page 11: ... other household waste Instead it is your responsibility to dispose of your waste equipment by handing it over to a designated collection point for the recycling of waste electrical and electronic equipment The separate collection and recycling of your waste equipment at the time of disposal will help to conserve natural resources and ensure that it is recycled in a manner that protects human heal...

Page 12: ...127018 Россия Importer and information Наименование организации ООО Профтехника Адрес 3 й Проезд Марьиной рощи 40 1 офис 1 Москва 127018 Россия Контактное лицо Наталья Астафьева 7 495 640 20 20 nat profdisplays ru Information for FAC Подтверждение соответствия Мининформсвязи России Декларация соответствия Д PD 4342 от 01 09 2016 года действительна до 01 09 2024 года зарегистрирована в Федеральном ...

Page 13: ...he carton ensure that the contents are complete and in good condition Before Unpacking Please read and fully understand unpacking notice before installation Please check the packing there should be no any abnormality such as creak dent mark etc Please do necessary inspection before you move the display out of the carton Always install the display by experienced technician to prevent any damage Not...

Page 14: ...65BDL4052E 75BDL4052E 86BDL4052E 12 Place the display vertically and its weight should spread evenly on the surface Please keep vertically no bending and torsion during moving the display ...

Page 15: ... differ in different locations Display design and accessories may differ from the images shown NOTES For all other regions apply a power cord that conforms to the AC voltage of the power socket and has been approved by and complies with the safety regulations of the particular country Type H05W F 2G or 3G 0 75 or 1 mm2 should be used Keep the packaging materials appropriately after unpacking the p...

Page 16: ...screws with a length 15 mm longer than the thickness of the mounting bracket and tighten them securely 2 4 1 VESA Grid 65BDL4052E 400 H x 400 V mm 75BDL4052E 600 H x 400 V mm 86BDL4052E 600 H x 400 V mm Caution To prevent the display from falling For wall or ceiling mounting we recommend that you install the display with metal brackets which are commercially available For detailed instructions abo...

Page 17: ...he OSD menu is On 8 MENU button Return to the previous menu while the OSD menu is On This button can also be used to activate the OSD menu when the OSD menu is Off 9 Light Sensor Receive command signals of the light sensor function 10 Remote control sensor and power status indicator Receive command signals from the remote control Indicate the operating status of the display Light green when the di...

Page 18: ... HDMI cable 16 IR IN 17 IR OUT IR signal input output for the loop through function NOTES The remote control sensor of this display will stop working if the jack IR IN is connected To remotely control your A V device via this display refer to page 26 for IR Pass Through connection 18 MICRO SD Insert a Micro SD card 19 USB SERVICE PORT Connect your USB storage device and service port 20 USB 3 0 Con...

Page 19: ... the leakage of flammable liquid or gas and a battery subjected to extremely low air pressure that may result in an explosion or the leakage of flammable liquid or gas Note Remove the batteries from the battery compartment when not using for an extended period of time 3 4 Handling the remote control Do not drop or apply shock to the remote control Do not allow any liquid to get inside the remote c...

Page 20: ...m bar down to make adjustment IR Daisy Chain Menu Decrease the controlled Group ID number Main Menu Go to the previous level of menu Source Menu Exit from the source menu Volume Menu Decrease the volume Main Menu Go to the next level of menu or set selected option Source Menu Go to the selected source Volume Menu Increase the volume 8 button Root Menu Go to the OSD of IR daisy chain in Primary Sec...

Page 21: ...bers available are 01 255 2 If no button is pressed within 10 seconds it will exit from the ID mode 3 If a wrong button is pressed wait for 1 second until the red LED lights off and then turns on again then press the correct digits 4 Press ENTER button to confirm your selection The red LED blinks twice and then lights off NOTE Press NORMAL button The green LED blinks twice indicating that the disp...

Page 22: ...orage internal USB SD Card All sub folders video photo music are named by media types and shouldn t be changed videos root dir of storage philips video photos root dir of storage philips photo music root dir of storage philips music Note that the root directories of three storages are Internal storage sdcard USB storage mnt usb_storage SD card mnt external_sd 3 HOME button Access the OSD menu The ...

Page 23: ...rolled by Scalar 13 FORMAT button Change picture format The button is only controlled by Scalar 14 OPTIONS button Open the toolbox from Media Player 1 Media Player Compose Edit or add a new playlist press to open a toolbox The toolbox will slide from the left side of the screen 15 POINTER buttons Reserved 16 ADJUST button 1 In the content of the web page move the focus down to the next selectable ...

Page 24: ...2 3 7 USB Cover Use the USB cover and screws to cover the USB stick and Micro SD card Install the USB sticker and micro SD card Use the screw from accessory to fix the USB cover Maximum suitable USB stick size 20 W x10 H x60 L mm L H W ...

Page 25: ...75BDL4052E 86BDL4052E 23 3 8 AC Switch Cover Use AC Switch Cover to cover the AC switch 1 Install the AC Switch Cover 2 Fix the AC Switch Cover with the screw from accessory M3 1PC 65BDL4052E 75BDL4052E 86BDL4052E ...

Page 26: ... 1 Connecting External Equipment Multimedia Player 4 1 1 Using HDMI video input HDMI IN HDMI Out HDMI IN Multimedia Player 4 2 Connecting a PC 4 2 1 Using DVI input DVI IN DVI Out PC PC LINE IN Audio Out AUDIO IN DVI IN 4 2 2 Using HDMI input PC HDMI IN HDMI Out HDMI IN ...

Page 27: ...isplays in a Daisy chain Configuration You can interconnect multiple displays to create a daisy chain configuration for applications such as a menu board 4 4 1 Display control connection Connect the RS232 OUT connector of DISPLAY 1 to the RS232 IN connector of DISPLAY 2 PC DISPLAY 2 DISPLAY 1 RS232 IN RS232 RS232 OUT RS232 IN PC RJ 45 RS232 OUT RS232 IN DISPLAY 1 DISPLAY 2 RJ 45 ...

Page 28: ...DISPLAY 1 DISPLAY 2 NOTE 1 The remote control sensor of this display will stop working if the IR IN is connected 2 IR loop through connection can support up to 9 displays 3 IR in daisy chain via RS232 connection can support up to 9 displays 4 6 IR Pass through Connection Multimedia Player Remote Control Multimedia Player IR OUT IR IN ...

Page 29: ...d move across the target without losing direct contact then release Flick Touch the target on the screen with one fingertip and brush the surface quickly Zoom in Touch the target on the screen with two fingertips held together and move them apart to zoom in magnify the screen image Zoom out Touch the target on the screen with two fingertips stretched apart and move them closer to zoom out shrink t...

Page 30: ... include 10 15 O X Mac OSX after include 10 10 O X Chrome 38 O O Android 4 0 Kernel after include 3 6 O O Linux O O Support multi touch Kernel 3 15 upward Support 10 point touch CentOS Debian Fedora Gentoo Mandrake Mandriva Meego Red Hat Slackware SuSE OpenSuSE Ubuntu Xubuntu and Yellow Dog etc Kernel 3 15 upward 1 We highly recommend that you use the latest Service Pack with all Windows 7 OS 2 Di...

Page 31: ...rmats The available picture formats depend on the video source 1 Press FORMAT button to select a picture format PC mode Full 4 3 Real 21 9 Custom Video mode Full 4 3 Real 21 9 Custom 5 3 Launcher Launcher You can press Source and select Home to start up Multiple Home shortcut items can be added to the Launcher The Launcher consists of the following Apps Whiteboard Present and Apps Whiteboard go to...

Page 32: ...o to media player and playback File1 File7 of the playlist automatically 8 media player autoplay media file of USB storage Clear all 5 4 2 Media Player introduction 1 Main page of Media Player app this App consists of three items Play Compose and Settings Play select a playlist to play Compose edit playlist Settings set play properties 2 Select Play on the main page first you should choose one pla...

Page 33: ...dia file Info show media info Touch file select unselect file Note When long press on one of the directory in Source full path will be displayed 7 1 In the slidebar the following functions are available Select all select all storage files Delete all delete all playlist files Add Remove update playlist from source Sort sort playlist Save abort save or abort playlist Back return 8 If Sort is selecte...

Page 34: ...ion 5 seconds 10 seconds 15 seconds or 20 seconds Software Decode using software decoder during playback enable disable Autoplay Plug in the USB and it will automatically play files from USB root path enable and disable autoplay photo only video only photo and video help 13 Media Player import text file Step 1 Create media player text file File name mpplaylistX txt X means playlist number 1 2 3 4 ...

Page 35: ...ulated legacy philips photo xxx jpg storage emulated legacy philips video yyy mp4 storage emulated legacy philips photo zzz mp3 Step 4 Start media player app it will automatically import media player text file Note Once the playlist file text is imported if user changes playlist via remote control this change will not be written on playlist text file ...

Page 36: ...the on screen keyboard to enter URL and press the OK button the data will be saved in the List 4 How to specify the path of the local webpage 4 1 Setting up a html file path Use file as a prefix 4 2 How to get the html file path of external storage Use the file manager to get the html file path 5 Press Option then a list will pop up on the left side Import Import the file of URL list Export Export...

Page 37: ...ct a browser file Import the browser file and the URL will be listed on the screen The file format supported for import is txt 5 2 Export Select export Select the storage where the file will be exported to A dialog box displays the path of the file to be saved as well as the file name Press the Save button to save the URL ...

Page 38: ...lay a web page of the selected URL appears 8 Press Settings then enter next page 8 1 Incognito a Enable Display webpages using incognito mode b Disable Display webpages using non incognito mode 8 2 Reload Allow user to set webpage reload time a If the Enabled checkbox is unchecked the default reload time is 60 seconds Note In this case the webpage only reloads when network state has changed If net...

Page 39: ...arklist txt to philips folder of your internal storage You may use FTP to do this File path storage emulated legacy philips for DL PL Ex storage emulated legacy philips bookmarklist txt Step 3 Start Browser App it will import the text file of Browser automatically Note Once the playlist file text is imported any changes made through the remote control will not be recorded in the playlist text file...

Page 40: ... week Set Sunday Monday Tuesday Wednesday Thursday Friday Saturday Every week Set a weekly schedule 5 6 2 PDF Player introduction 1 Main page of PDF Player this page has three items Play Compose and Settings Play select playlist to play Compose edit playlist Settings set PDF Player properties 2 Select Play on the main page first you should choose one playlist to play between FILE 1 and FILE 7 The ...

Page 41: ...ct file 6 1 From the side menu bar the following functions are available Select all select all storage files Delete all delete all playlist files Add remove update playlist from source Sort sort playlist Save abort save or abort playlist Back return to the previous page 7 If Sort is selected you can customize the file order severally 8 Select Settings on the main page there are 2 options available...

Page 42: ... of the file it will to back to the last file Stop Return to the first page of file Arrow keys Left go to the previous page Right go to the next page Combination key Number key OK key change to a specific page Press number key to select a specific page Press OK key Page number will display at the bottom of the page If the page number you selected exceeds total page number then that page will not b...

Page 43: ...3 Select app Save Select the App click the Save button to perform save function Forget Press Forget button to remove previously stored information Cancel Press Cancel button to quit without saving changes made If no customer APK is installed the list will be blank and the Save and Forget buttons will be grayed out Select App Select App FORGET CANCEL SAVE Custom App If customer APK is installed use...

Page 44: ... or remove frequently used APK 7 Tool Touch Lock Lock the touch function When touch function is locked input the password to unlock it Default password is 123 To set another password go to Settings Signage Display System tools Touch lock password 8 Quick info It will display the information of Time Network and Monitor Information 9 History Show history app 10 Back Return to the previous page or ex...

Page 45: ...t step Redo a step Toolbar Minimization Fold up the whiteboard toolbar Background color Select and set the background color for each page of the board Marquee Tap the Marquee icon and select an object to perform operations such as copying deleting and moving the level Multi point writing support simultaneous writing of 20 points Save Support saving of three file formats picture PDF whiteboard Fold...

Page 46: ... page next page to switch pages or select any page in the preview Delete page You can delete the current page and cancel the deletion 6 4 Gesture control 6 4 1 Gesture erasing Control the eraser size according to the contact surface and use gesture to erase the brush writing effect that needs to be erased This gesture also works in annotation mode 6 4 2 Pinch to Zoom In single point mode the canva...

Page 47: ...exit 6 6 Annotation mode Entry Tap the arrow to display the sidebar select annotation mode Tap to enter annotation mode you can write with a brush on the current screen you can choose the brush thickness and color 6 6 1 Eraser Erase current annotation content by point erasing circle erasing and one click screen clearing Point erasing Follow the contact to erase part of the content Circle erasing s...

Page 48: ... Entry On the Android homepage click the file manager icon to enter the native file manager 7 1 File manager Select a file and rename copy paste cut or delete it 7 2 Display switch Files are displayed in list mode Files are displayed in thumbnail mode ...

Page 49: ...s to nearby Wi Fi networks that you ve connected to before All available Wi Fi are listed Tap a network to connect A lock icon is shown beside the network that requires password Tap advanced options for more detail options such as Static IP assignment Tap connect to save options and connect to a network Add networks Tap Add network to add the network that is not on the list Enter Wi Fi SSID and se...

Page 50: ...s are assigned by DHCP server they are not modifiable If connection is successful it will show current network settings Static IP User can assign device s IP Address Netmask DNS address and Gateway settings of Ethernet in Static IP connection type Note 1 IP address Netmask DNS server address and gateway address are necessary 2 input limitation Format number 0 9 decimal point 8 2 Portable hotspot E...

Page 51: ...ip file under data local bootanimation folder Click FORGET to remove the bootanimation zip already stored in data local bootanimation folder Navigation bar Set navigation bar behavior Always on Always show navigation bar on the screen Always off Never show navigation bar on the screen Auto hide Navigation bar will be hidden when no user operation for 10 seconds NOTE Navigation bar never shows on K...

Page 52: ...isplay Server Settings FTP Click the checkbox to enable disable FTP server feature When enabled user can setup account password and port number a Account The user name for login FTP server The length of name is limited to 4 20 charters and it only allows a z A Z 0 9 b Password The password for login FTP server Password length is limited to 6 20 charters and it only allows a z A Z 0 9 The password ...

Page 53: ...ity and edit effect settings activity Edit play list opens MediaPlayer playlist compose page Edit effect settings opens MediaPlayer settings page Browser Settings Signage Display Source Settings Browser Open Browser APK s main activity Kiosk Settings Signage Display Source Settings Kiosk Open Kiosk APK s main activity CMND Play Settings Signage Display Source Settings CMND Play CMND Play APK setti...

Page 54: ...resent or crash when Force Restart Custom App is enabled If the custom App is not present and boot on source is set to Custom App system will launch custom App again Default is disabled Source label enable settings User can enable disable external source on source menu In addition user can change external source s name Tap the checkbox to enable disable external source Tap on source s label name t...

Page 55: ... The folders to be cleared will be listed Press RESET to clear all data under listed folder Or press back key to leave and do nothing Reset Settings Signage Display System Tools Reset Factory Reset Factory reset allows you to clear all user data and settings System will auto reboot and jump to OOBE after it is finished Important Note 1 All system data will be erased and cannot be reverted includin...

Page 56: ...m will create it automatically All available storage medium are listed for user to select Import Signage Display Settings Import database data from philips clone BDL4052E clone zip file of selected storage internal Storage SD Card or USB storage System imports the following data in ZIP file 1 Import Database in BDL4052E clone zip 2 Import 3rd party APK in BDL4052E clone zip All available storage m...

Page 57: ...r a new password 3 Enter the new password again Try again if the new password is not correct If the password is changed successfully you will see a Successful toast message Reset password Settings Signage Display System tools Admin Password Reset Password Reset the password to default 1234 If succeed you will see a Successful toast message Touch lock password The default touch unlock password is 1...

Page 58: ... mode Default is enable TeamViewerHost APKs will auto install into system Otherwise system will remove them if user disable TeamViewer Support The following APK will be listed in Settings Apps if TeamViewer support is enabled Hide the close button of whiteboard Show or hide the close button of whiteboard APK Enable hide as default The close button on lower right corner of whiteboard APK Change wal...

Page 59: ...gs Signage Display System updates Remote update Please keep the network connected and available Choose Latest or Download code to download the update zip to root folder from Remote FW server If Download Code is selected you need to input 10 digits code obtained from remote FW server Tap OK and wait for 5 minutes to download update zip according to network speed If the download is successful the sy...

Page 60: ...al keyboards 8 7 2 Current keyboard List all available keyboards to set up default keyboard 8 7 3 Virtual keyboard Control each IME detail settings Manage keyboards to enable or disable IMEs If the system has only one IME installed user cannot disable it At last one IME in system is necessary 8 7 4 Physical keyboard Settings of physical keyboard 8 7 5 Developer options Android system developer opt...

Page 61: ...rn to the previous menu or keep pressing MENU button to exit from the OSD menu 9 2 OSD Menu Overview 9 2 1 Picture menu Picture Screen Audio Con guration Advanced Android Settings Brightness Contrast Sharpness Black Level Tint Color Noise reduction Gamma selection Color temperature Color control Overscan PQ Bypass Picture reset 80 50 10 50 50 55 Off Native Native Action Off Off Action Brightness Adju...

Page 62: ...previous menu 9 2 2 Screen menu Picture Screen Audio Con guration Advanced Android Settings Zoom mode Custom Zoom Screen reset Full Action Action Zoom mode Choose one for video input Full Real 21 9 4 3 Custom Full This mode restores the correct proportions of pictures transmitted in 16 9 using the full screen display Real This mode displays the image pixel by pixel on screen without scaling the or...

Page 63: ...orce on Action RS232 Action On Off Off Off 10 Action xxxxxx Action Switch on state Select the display status when you connect the power cord next time Power off The display will remain off when the power cord is connected Forced on The display will turn on when the power cord is connected Last status The display will return to the previous power status on off standby mode when the power cord is conne...

Page 64: ... detection Language Power Save OPS settings Advanced option reset Unlock Unlock Off Action Action Off Off Off English Model 1 Auto Action IR control Select the operation mode of the remote control when multiple displays are connected via RS232 connection Unlock All displays can be operated normally by the remote control unit Lock All Lock all but Volume Lock all but Power Lock all except PWR VOL Lock ...

Page 65: ... Failover 13 Home default Not all modules have all 13 failover list depends on total source of module Language Select the language used in the OSD menu The options are English Deutsch 简体中文 Français Italiano Español Pyccкий Polski Türkçe 繁體中文 日本語 Português ةيبرعلا Danish Swedish Finnish Norwegian Dutch Czech Lithuanian Latvian Estonian Power Save Mode 1 TCP off WOL on auto off Mode 2 reserved Mode ...

Page 66: ...5 Layer3 8KHz 48KHz 2 8Kbps 320Kbps MPEG1 2 Layer1 16KHz 48KHz 2 32Kbps 448Kbps MPEG1 2 Layer2 16KHz 48KHz 2 8Kbps 384Kbps AAC HEAAC 8KHz 48KHz 5 1 AAC LC 12Kbps 576Kbps V1 6Kbps 288Kbps V2 3Kbps 144Kbps Photo format Image Resolution JPEG 3840 x 2160 PNG 3840 x 2160 BMP 3840 x 2160 WebP 3840 x 2160 NOTES Sound or video may not work if the contents have a standard bit rate frame rate above the comp...

Page 67: ...ruction book for information about connecting your PC to a display If a vertical and horizontal frequency select mode exists select 60Hz vertical and 31 5KHz horizontal In some cases abnormal signals such as stripes might appear on the screen when the PC power is turned off or if the PC is disconnected If so press the INPUT button to enter the video mode Also make sure that the PC is connected Whe...

Page 68: ... pixel A pixel or picture element is composed of three sub pixels in the primary colors of red green and blue Many pixels together form an image When all sub pixels of a pixel are lit the three colored sub pixels together appear as a single white pixel When all are dark the three colored sub pixels together appear as a single black pixel Other combinations of lit and dark sub pixels appear as sing...

Page 69: ...y appear on some liquid crystal display LCD panels This is known within the industry as Mura which is a Japanese term for unevenness It is used to describe an irregular pattern or area in which uneven screen uniformity appears under certain conditions Mura is a result of the deterioration of the liquid crystal alignment layer and is most commonly caused by long term operation under high ambient te...

Page 70: ...a soft lint free cloth in a mild detergent solution Wring the cloth to remove excess liquid Wipe the surface of the display to remove dirt Then use a dry cloth of the same type to dry Do not scratch or hit the surface of the panel with fingers or hard objects of any kind Do not use volatile substances such as insert sprays solvents and thinners Cabinet Cleaning Instructions If the cabinet becomes ...

Page 71: ...n Mode may be set incorrectly to underscan 3 If the image exceeds the screen size Scan Mode may need to be set to Underscan Use the Zoom mode or Custom zoom function in the Screen menu to fine tune display geometry and time frequency parameter Can hear sound but no picture Source signal cable is connected improperly Make sure that both video inputs and sound inputs are correctly connected Can see ...

Page 72: ...lay Toggle MENU will show again if it disappear 3 Default setting ID NO 0 GP NO 0 this setting can control all displays by IR The can change ID NO to control signal display by Monitor ID The UP DOWN can change GP NO to control multi display by Group ID The first display is always controlled by IR How is the RC working Daisy chain no connection of RS232 and IR cable No setting is required Connect w...

Page 73: ...ns Speaker Output Internal Speakers 15W L 15W R RMS 8Ω 82 dB W M 160 Hz 13 KHz Audio Output 3 5mm phone jack x 1 0 5V rms Normal 2 Channel L R Audio Input 3 5mm phone jack x 1 0 5V rms Normal 2 Channel L R RS232 3 5mm phone jack x 2 RS232 in RS232 out RJ 45 RJ 45 Jack x 1 8 pin 10 100 LAN port HDMI Input HDMI Jack x 3 Type A 19 pin Digital RGB TMDS Video Audio MAX Video 720p 1080p 3840 x 2160 60 H...

Page 74: ...W 0 5 W 0 5 W AC Switch Off Mode W 0 W 0 W 0 W Dimensions Without Stand W x H x D 1494 3 x 883 2 x 99 5 mm 1715 5 x 1007 6 x 101 5 mm 1960 8 x 1145 7 x 101 3 mm Weight Without Stand 44 26 Kg 55 85 Kg 74 49 Kg Gross Weight Without Stand 53 9 Kg 67 8 Kg 91 2 Kg Environmental Condition Item Specifications Temperature Operational 0 40 C Storage 20 60 C Humidity Operational 20 80 RH No condensation Sto...

Page 75: ...is not possible or not commercially viable we may replace the product with a new or equivalent refurbished product with similar functionality Replacement will be offered at our discretion and the warranty will continue from the date of original purchase of the first date of purchase of the product Please note that all parts including repaired and replaced parts are covered only for the duration of...

Page 76: ...ting Service Please check your user s manual before requesting service Adjustments of the controls discussed there may save you a service call WARRANTY PERIOD Warranty period for PHILIPS signage display is listed as below for areas not covered in this table please follow their warranty statement Standard warranty period for PHILIPS signage display is listed as below for areas not covered in this t...

Page 77: ...mote control 17 Installation Notes 13 IR connection 26 IR Pass through Connection 26 L Launcher 29 M Media Player 30 Mounting on a Wall 14 N Navigating the OSD Menu 59 O Operating range of the remote control 17 Operation 29 OSD Menu 59 OSD Menu Overview 59 P Package Contents 13 Parts and Functions 15 Pixel Defect Policy 66 R Remote Control 18 S Safety Instructions 1 Setting UI 47 Side Bar 42 Suppo...

Page 78: ...esponsibility of Top Victory Investments Ltd and Top Victory Investments Ltd is the warrantor in relation to this product Philips and the Philips Shield Emblem are registered trademarks of Koninklijke Philips N V and are used under license Specifications are subject to change without notice Version V1 00 2022 09 02 ...

Reviews: