


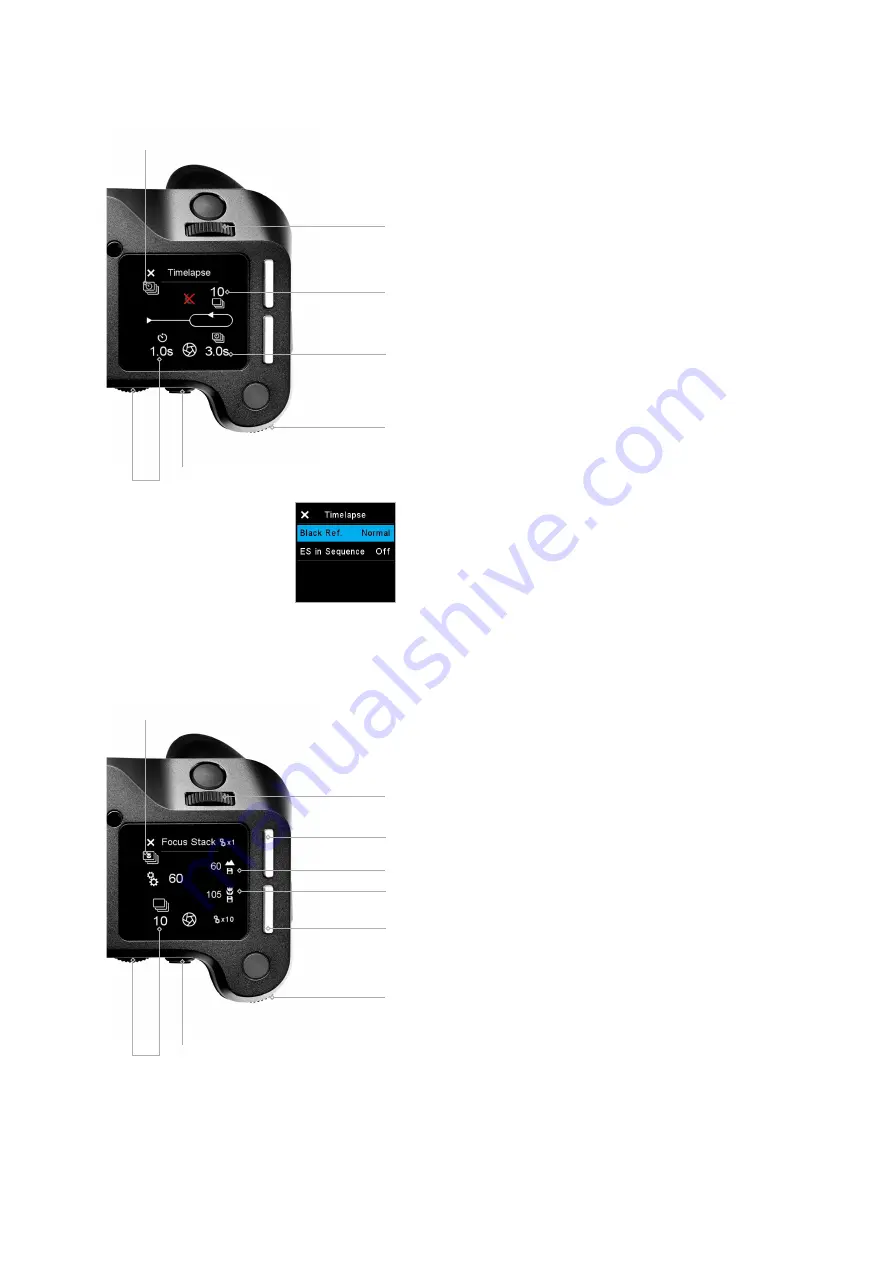
Number of
images in the
sequence
Far-focus
distance value
Adjust the number
of images in the
sequence
Adjust the
distance in small
increments
Amount of
seconds between
captures
Near-focus
distance value
Save the
near-focus
distance value
Save the far-focus
distance value
Adjust seconds
between captures
Adjust the
distance in larger
increments
Advanced settings
Advanced settings
Initiates the
timelapse sequence
Start the Focus
Stack capture
sequence
Add a delay before
the sequence begins
Adjust the number
of captures in the
sequence
Timelapse advanced options
Timelapse Tool
At second position when swiping to the left is the Timelapse tool.
As with the other sequnce tools, metadata is stored in the files to indicate that
the files are part of a timelapse sequence, and also which position they are in
the timelapse.
Set the number of images you want in the Timelapse using the Front Dial, and
the seconds between using the Side Dial.
If you want a delay before the timelapse starts, this is set using the Rear Dial.
Image capture is started from the rear button, and images are captured with
the current camera settings.
Values that are indicated as red, is out of range - for instance if there is not
enough storage for all the images, or the time between each capture too fast
for this specific camera-digital back combination or digital back file format
setting.
As an advanced feature, it is possible to temporarily suppress the black frame
calibration during a timelapse. This is useful when doing long exposures,
because the additional time taken by the black frame calibration could end up
exceeding the desired time between the captures. Beside the
Normal
operation mode there are 3 other black frame options that can be set:
•
Always
. A black frame reference is generated for every capture.
•
Suppress
. The black frame reference will be suppressed.
•
1st
. The black frame reference is done on first capture, which ensures that
reference shot is as close as possible to the capture Temperature and
timing of the images in the Time Lapse. With the black reference option
set to “1st”, the XF Camera will only do a black reference if it is really
needed because of significant temperature drift during the time lapse.
You choose the black reference option by tapping on the advanced tool
option icon and selecting the option required with the Side Dial. Once it is
active, the suppression is indicated with a red cross over a moon. Please note
that the image quality may be degraded as a consequence to selecting
“Suppress”, but since timelapse sequences are typically used to make videos in
a lower resolution, it could often be an acceptable compromise.
Note that the setting will revert back to the Normal black frame calibration
between each capture when the camera is turned o
ff
.
You can also enable the Electronic Shutter for capturing with the ES in
Sequence option. This requires that your IQ Digital Back support the ES
feature.
Focus Stack Tool
Focus stacking is especially usefull to create macro images with a great depth
of field that would not be possible by just stopping down the lens, because
that would cause di
ff
raction. There are many ways to compile a Focus stack
once the images are captured, one of the best software packages for Focus
stacking is Helicon Focus which you can read about at www.heliconsoft.com.
Using the Focus Stack Tool
The Focus Stack Tool is designed to automate the sequence capture involved
in making a focus stack of images. The tool will automatically suggest the
number of images needed based on the optical quality of the lens, the
aperture setting and the area and pixel size of the digital back.
To setup a capture sequence for focus stacking your lens need to be set to
Auto Focus. When using this tool the front and Side Dial will adjust the focus
of the lens in MCUs (Motor Control Units). Front dial is used for small
increments (x 1 MCU), and Side Dial is used for larger increments (x 10 MCU).
1. Setup the near-focus distance using the front and Side Dial. Once you
have set the near-focus, store this value by pressing the Top rear key.
2. Then setup the far-focus with the front and Side Dial. Once you have the
far-focus adjusted, press the Top front key to store this value.
3. The XF Camera will now automatically calculate the optimal number of
images, if your lens support this feature. In this case, the number will
displayed in a blue color.
4. If the number of captures is displayed in white, you will need to adjust the
amount manually. This is done with the Rear dial.
5. When you are ready to capture, press the Rear User button to start the
sequence.
28
XF Tools on the Top Touch Screen
XF IQ4 Camera System Manual |


