background image

PENTAIR FLECK 5000 Control Valve Service Manual 

• 

5

INSTALLATION INSTRUCTIONS

Water Pressure

A minimum of 20 psi (1.4 bar) of water pressure is required for 

regeneration valve to operate effectively.

Electrical Facilities

An uninterrupted alternating current (A/C) supply is required.

NOTE:   

Other voltages are available. Please make sure your 

voltage supply is compatible with your unit  

before installation.

CAUTION

 For dry installation location use only.

Existing Plumbing

Condition of existing plumbing should be free from lime and iron 

buildup. Piping that is built up heavily with lime and/or iron should 

be replaced. If piping is clogged with iron, a separate iron filter 

unit should be installed ahead of the water softener.

Drain Line Connection

Secure the end of the drain line to prevent it from moving.

NOTE:   

Waste connections or drain outlet should be designed 

and constructed to provide for connection to the 

sanitary waste system through an air-gap of 2 pipe 

diameters or 1 inch (22 mm), whichever is larger.

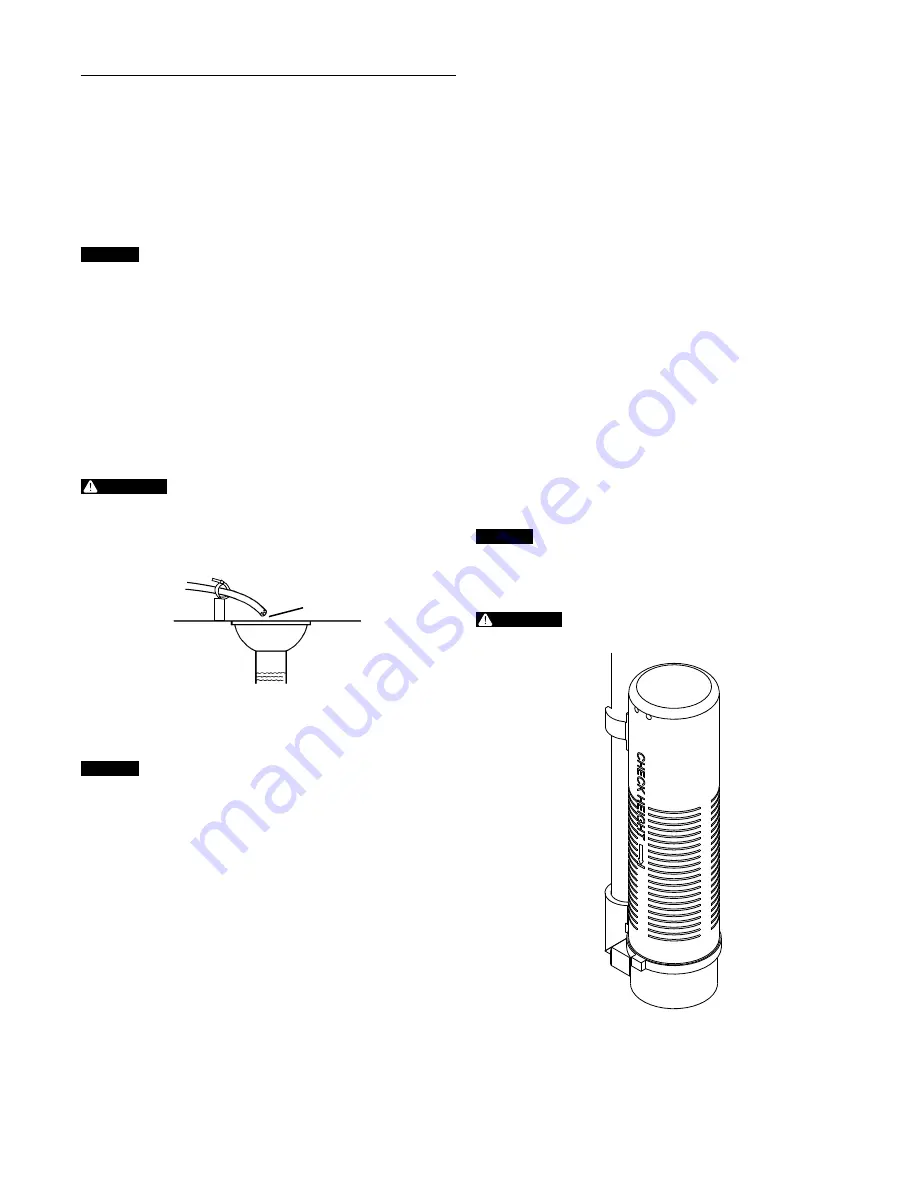
WARNING:

 Never insert drain line directly into a drain, 

sewer line, or trap (Figure 8). Always allow 

an air gap between the drain line and the 

wastewater to prevent the possibility of sewage 

being back-siphoned into the conditioner.

Right Way

Air Gap

Drain

By-Pass Valves

Always provide for the installation of a by-pass valve if unit is not 

equipped with one.

CAUTION

 Water pressure is not to exceed 125 psi (8.6 bar), water 

temperature is not to exceed 110°F (43°C), and the unit 

cannot be subjected to freezing conditions.

Installation Instructions

1. 

Place the softener tank where you want to install the unit 
making sure the unit is level and on a firm base.

2. 

During cold weather, the installer should warm the valve to 

room temperature before operating.

3. 

All plumbing should be done in accordance with local 
plumbing codes. The pipe size for residential drain line 
should be a minimum of 1/2 inch (13 mm). Backwash flow 
rates in excess of 7 gpm (26.5 Lpm) or length in excess of 
20 feet (6 m) require 3/4 inch (19 mm) drain line. Commercial 
drain lines should be the same size as the drain line flow 

control. 

4. 

Refer to the dimensional drawing for cutting height of the 
distributor tube. If there is no dimensional drawing, cut the 
distributor tube flush with the top of the tank.

5. 

Lubricate the distributor o-ring seal and tank o-ring seal. 
Place the main control valve on tank. 

NOTE:   

Only use silicone lubricant.

6. 

Solder joints near the drain must be done prior to connecting 
the Drain Line Flow Control fitting (DLFC). Leave at least 
6 inches (15 cm) between the DLFC and solder joints when 
soldering pipes that are connected on the DLFC. Failure to do 
this could cause interior damage to the DLFC.

7. 

Plumber tape is the only sealant to be used on the drain 
fitting. The drain from twin tank units may be run through a 

common line.

8. 

Make sure that the floor is clean beneath the salt storage 
tank and that it is level.

9. 

Place approximately 1 inch (25 mm) of water above the grid 
plate. If a grid is not utilized, fill to the top of the air check 
(Figure 1) in the salt tank. Do not add salt to the brine tank at 
this time.

10.  On units with a by-pass, place in by-pass position. Turn on 

the main water supply. Open a cold soft water tap nearby and 
let run a few minutes or until the system is free from foreign 
material (usually solder) that may have resulted from the 
installation. Once clean, close the water tap.

11. 

Slowly place the by-pass in service position and let water 
flow into the mineral tank. When water flow stops, slowly 
open a cold water tap nearby and let run until the air is 
purged from the unit.

12.  Plug unit into an electrical outlet. 

NOTE:   

All electrical connections must be connected 

according to local codes. Be certain the outlet  

is uninterrupted.

CAUTION


•  Do not exceed 125 psi water pressure
•  Do not exceed 110°F (43°C) water temperature
•  Do not subject unit to freezing conditions

WARNING:

 The system MUST be depressurized before 

removing any connections for servicing.

Figure 2  

Residential Air Check Valve

Summary of Contents for FLECK 5000

Page 1: ...pentair com FLECK 5000 CONTROL VALVE SERVICE MANUAL...

Page 2: ...0626 18 Paddle Meter Assembly P N 60086 50 18 Bypass Valve Assembly Metal 19 Bypass Valve Assembly Plastic 19 Safety Brine Valve 20 Dimensional Drawings 21 Water Conditioner Flow Diagrams 22 Injector...

Page 3: ...Outside Faucet Bath Tub Lavatory Toilet Kitchen Laundry Tubs Pump or Meter Hot Water Outlet Water Heater Brine Tank Overflow Drain Optional Floor Drain Drain Line Bypass Softener Grounding Strap Figur...

Page 4: ...hypochlorite 70 available chlorine is available in several forms including tablets and granules These solid materials may be used directly without dissolving before use 1 Dosage A Two grains approxima...

Page 5: ...13 mm Backwash flow rates in excess of 7 gpm 26 5 Lpm or length in excess of 20 feet 6 m require 3 4 inch 19 mm drain line Commercial drain lines should be the same size as the drain line flow control...

Page 6: ...Indicator Service Icon Programming Icon Extra Cycle Button Up Button Down Button Error Information Icon Features of the SXT Power backup that continues to keep time and the passage of days for a mini...

Page 7: ...normal operation Pressing the Extra Cycle button during a regeneration cycle immediately advances the valve to the next cycle step position and resumes normal step timing Control Operation During Pro...
Page 8: ...ety Factor Percentage of the system capacity to be used as a reserve RC Fixed Reserve Capacity Fixed volume to be used as a reserve DO Day Override The system s day override setting RT Regen Time The...

Page 9: ...n entering Master Programming Mode The Display Format setting specifies the unit of measure that will be used for volume and how the control will display the Time of Day This option setting is identif...

Page 10: ...MING MODE CONTINUED 9 Safety Factor Display Code SF Press the Extra Cycle button Use this display to set the Safety Factor This setting specifies what percentage of the system capacity will be held as...

Page 11: ...ion for each day Use the Up and Down buttons to adjust the setting as needed Press the Extra Cycle button to accept the setting and move to the next day Note that the control requires at least one day...

Page 12: ...ds while in service and the time of day is NOT set to 12 01 PM 2 Use this display to adjust the Day Override This option setting is identified by DO in the upper left hand corner of the screen 3 Press...

Page 13: ...in service 2 Press the Up button Use this display to view the current Flow Rate This option setting is identified by FR in the upper left hand corner of the screen 3 Press the Up button Use this disp...

Page 14: ...r Downflow Softener U S Power Supply 1 Injector 0 50 GPM BLFC 500006 003 Turbine Meter B W Filter U S Power Supply NOTE NOTE Above part numbers DO NOT include the following parts Bypass Assembly Conne...

Page 15: ...sher Head 10 24 0 81 9 1 13304 O ring 121 10 1 18303 01 O ring 336 560CD 11 1 13030 Retainer Distributor Tube O ring 12 1 18569 Retainer Tank Seal 13 1 18312 DLFC Housing Retainer Clip 14 1 60115 001...

Page 16: ...4 Yoke SS NPT Washers 19153 Washer Flow 0 6 GPM 19152 Washer Flow 0 8 GPM 12085 Washer Flow 1 2 GPM 19150 Washer Flow 1 3 GPM 12086 Washer Flow 1 5 GPM 12087 Washer Flow 2 0 GPM 12088 Washer Flow 2 4...

Page 17: ...REQUIREMENT CHECKED 20 16 13 14 14 15 15 11 10 9 2 5 12 8 4 3 2 1 6 17 18 7 272481 A RELEASE FOR PRE PRODUCTION 44553 00 5000 44553 01 50DP 12 9 12 PWS ITEM NO PART NUMBER DESCRIPTION 44553 00 QTY 445...

Page 18: ...Item No QTY Part No Description 1 1 14716 Meter Cap Assy NT includes items 2 3 and 4 2 1 13874 Cap Meter Electronic 3 1 13847 O ring 137 Std Meter 4 1 17798 Screw Slot Hex Washer Head 5 1 19121 01 Met...

Page 19: ...Yoke 1 BSP Plastic 41027 02 Yoke 3 4 BSP Cast Machined 18706 12 Yoke 3 4 BSP Plastic 19620 01 Yoke Assy 3 4 R Angle 90 Deg 6 1 60049 Bypass Plastic Not Shown 2 19228 01 Adapter Assy Coupling w O ring...

Page 20: ...9647 Elbow Safety Brine Valve 9 2 19625 Nut Assy 3 8 Plastic 10 1 18312 Retainer Drain 11 1 60014 Safety Brine Valve Assy 2310 12 2 10150 Grommet 0 30 Dia 13 1 60068 30 Float Assy 2310 w 30 Rod 14 1 6...

Page 21: ...DIMENSIONAL DRAWINGS PENTAIR FLECK 5000 Control Valve Service Manual 21...

Page 22: ...neral in the mineral tank Conditioned water enters center tube through the bottom distributor then flows up through the center tube and to the outlet of the valve Hard water enters unit at valve inlet...

Page 23: ...ough nozzle and throat down through mineral and enters the center tube through bottom distributor and out through the drain line Hard water flows from inlet around the piston down through the mineral...

Page 24: ...TR18755 Rev B 24 PENTAIR FLECK 5000 Control Valve Service Manual INJECTOR FLOW DATA...

Page 25: ...BLACK ORANGE WT BLK BLACK WHITE GREEN BLUE BLUE WHITE BLUE WHITE BLUE PURPLE ORANGE BLACK WT BLK YELLOW BLACK BROWN METER P1 S N N H S VDO P2 N O H PWR H S CB1 50 60 HZ CB1 SXT Timer T1 24V Transforme...

Page 26: ...upport pentair com PENTAIR COM All indicated Pentair trademarks and logos are property of Pentair Third party registered and unregistered trademarks and logos are the property of their respective owne...

Reviews: