


CHAINSAW SELION M12
51_149238-C
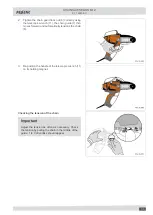
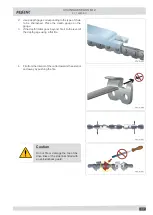
5. After reducing the height of the depth limiters, round
off the angle to maintain the original shape of the
depth limiters.
Note
On chains with drive links equipped with anti-kick-
back guards, it may be necessary to take the chain
out of the guide in order to file the depth limiters
correctly.
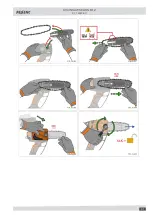
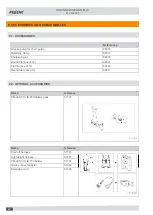
6.9. CHECKING AND REPLACING THE SPROCKET
Replace the sprocket if it is damaged or every 2 chain replacements (ref. 85643).
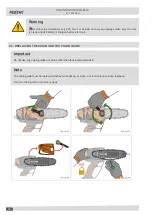
1. Set the battery switch to "0" and disconnect the con-
nector.
2. Remove the chain guide (7) and the chain (6) (see.
Section 6.4, “REPLACING THE CHAIN AND THE
CHAIN GUIDE”.)
3. Remove the circlips and the sprocket
4. Replace the sprocket
5. Reinstall the assembly and pay attention to the di-
rection of installation of the circlip.
Caution
The circlips must be replaced
after each dismantling operation
(ref.:01357).
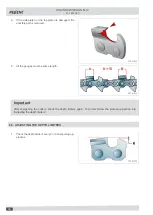
6.10. CLEANING THE CHAIN GUIDE
1. Set the battery switch to "0" and disconnect the con-
nector.
2. Remove the chain guide (7) and the chain (6). (see
Section 6.4, “REPLACING THE CHAIN AND THE
CHAIN GUIDE”.)
3. Clean the groove, grease holes and the oblong hole
of the chain guide
4. Reassemble the chain guide and the chain.
Important
Disassemble the chain guide and clean at the
groove of the chain and grease holes (see dia-
grams opposite). Repeat the operation daily.
Carry out this operation each time you change work
sites in order to disinfect the tool a little.
Clean the lubricating holes as often as necessary.
38
Summary of Contents for SELION M12
Page 2: ......
Page 31: ...CHAINSAW SELION M12 51_149238 C 31...
Page 48: ......
Page 49: ......
Page 50: ......
Page 51: ...PELLENC Quartier Notre Dame 84120 Pertuis France...


