background image

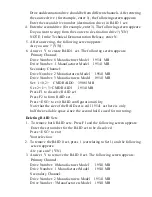
Press Fl to dissolve RAID set
Press F2 to form RAID set
Press F3 to form RAIDO+1 set

Press <ESC> to exit

Your selection?

2. Choose F3 and the following screen appears:

Select the chunk size to be used in RAIDO set:

0=lk l=2k 2=4k 3=8k 4=16k 5=32k 6=64k 7=128k 8=256k 9= ,5M

Your selection?

3. Choose desired chunk size (for example, choose 5). The following screen

appears:
Enter the first source drive number in RAIDO+1 set:

4. Once again, to optimize throughput, have both source drives be from

different channels and then both destinations drives be from different

channels. It also must be remembered hat the total capacity of the source
drives must be less than or equal to the total capacity of the destination

drives (for example, choose 0). The following screen appears:
Enter the second source dive number in RAIDO+1 set:

5. For example, choose 2. The following screen appears:

Enter the first destination drive number in RAIDO+1 set:

6. For example, choose 1. The following screen appears:

Enter the second destination drive number in RAIDO+1 set:

7. For example, choose 3 . The following screen appears:

Are you sure? (Y/N)

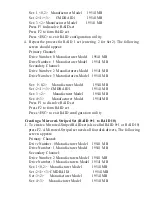
8. Enter Y to create Mirrored=Striped set. The following screen appears:

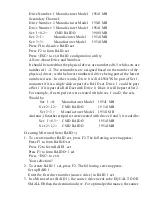
Primary Channel:

Drive Number: 0 Manufacturer Model 19541 MB

Drive Number: 1 Manufacturer Model 19541 MB
Secondary Channel:

Drive Number: 2 Manufacturers Model 19541 MB

Drive Number: 3 Manufacturers Model 19541 MB

Set: 1<0,2><1,3>CMD RAID 1 39081MB

Press Fl to dissolve RAID set

Press F2 to form RAID set
Press <ESC> to exit RAID configuration utility

Summary of Contents for Ultra 133

Page 1: ...PCI Ultra 133 RAID Card User s Manual...

Page 2: ...kage Content P I System Requirement P I Hardware Installation P 2 Software Installation P 2 Appendix P 3 Creating Striped Sets RAID 0 P 3 Creating Mirrored Sets RAID 1 P 5 Deleting RAID Sets P 6 Creat...

Page 3: ...cification revision 1 0 Compliant with Programming Interface for Bus Master IDE Controller revision 1 0 Compliant with ATA ATAPI 6 specifications Compliant with UDMA6 ATA 133 Specification Driver supp...

Page 4: ...RAID Controller should appear in th listing 6 Right click on RAID Controller 7 Select Properties 8 Select Driver tab 9 Select Update Driver 10 Follow directions in Wizard Be sure to select Display a...

Page 5: ...r RAID utility 2 Press F3 3 The following screen will appear Primary Channel Drive Number 0 Manufacturer Model 19541 MB Drive Number 1 Manufacturer Model 19541 MB Secondary Channel Drive Number 2 Manu...

Page 6: ...1 2K 2 4K 3 8K4 16K 5 32K 6 64K 7 128K 8 256K 9 5M Yourselection 6 Choose the chunk size desired for example press 5 for 32K chunk size Once done the following screen appears Enter the total number o...

Page 7: ...a RAID set Drive 1 could be part of Set 1 ifit is part ofa RAID set with Drive 0 Ifnot it will be part ofSet 2 For example if a striped set were created with drives 1 and 2 the sets Would be Set 1 0...

Page 8: ...e Number 3 Manufacturers Model 19541 MB Set 1 0 2 CMD RAIDO 39081MB Set 2 l 3 CMDRAIDl 19541MB Press F1 to dissolve RAID set Press F2 to form RAID set Press ESC to exit RAID configuration utility Note...
Page 9: ...3 CMDRAIDl 19541MB Set 3 2 Manufacturer Model 19541MB Set 4 3 Manufacturer Model 19541MB Press F1 to dissolve RAID set Press F2 to form RAID set Press ESC to exit RAID configuration utility Creating a...

Page 10: ...or equal to the total capacity ofthe destination drives for example choose 0 The following screen appears Enter the second source dive number in RAIDO 1 set 5 For example choose 2 The following scree...

Page 11: ...harmful interference when the equipment is operated in a residential Installation This equipment generates uses and can radiate radio frequency energy and Ifnot installed and used in accordance to th...

Reviews: