3 • Quick Start Installation
Model 3201 G.SHDSL Integrated Access Device User Guide
22
Hardware installation
Hardware installation
If you are already familiar with Model 3201/3241 Router Modem installation and configuration, this chapter
will enable you to finsh the job quickly. Installation consists of the following:
•
Preparing for the installation (see section “What you will need”)
•
Hooking up cables, verifying that the unit will power up, and running a HyperTerminal session (see section
“Identify the connectors and attach the cables”)
•
Changing the IP address from the factory default setting (see section “IP address Quick Start modification”
on page 23)
•
Launching a web browser in preparation for configuring the modem (see “Web Operation and Configura-
tion” on page 24)
What you will need
•
Model 3201 or 3241 G.SHDSL Router Modem
•
External power supply for Model 3201 or 3241
•
Ethernet cable with RJ45 plugs on each end (included with router modem)
•
DB9-RJ45 Adapter (included with router modem)
•
RJ45/RJ45 straight-through cable for connecting to control port (included with router modem)
•
PC computer with HyperTerminal or equivalent VT-100 emulation program, or an ASCII (“dumb”) terminal.
Identify the connectors and attach the cables
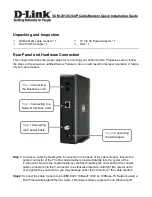
All connectors are on the rear panel of the DiamondLink with the exception of the power connection. The
Console port is Red, the Ethernet port is Green, and the Line is Yellow.
Do the following:
1. Connect the DB9-RJ45 adapter to the DB-9 serial port on the PC or dumb terminal. Use the RJ45-RJ45
straight-through cable between the adapter and the red marked RJ45 port on the modem.
2. Do NOT connect the router modem to the Ethernet LAN now.
3. On the PC, start a HyperTerminal session at 9600 bps, 8 data bits, 1 stop bit, and no parity.
4. Power up the router modem.
5. Type “superuser” for Login:, and press Enter.
6. Then type “superuser” for the password, press Enter.
Summary of Contents for DIAMONDLINK 3201
Page 12: ...About this guide Model 3201 G SHDSL Integrated Access Device User Guide 10...
Page 19: ...17 Chapter 2 Product Overview Chapter contents Product Overview 18 Applications Overview 18...
Page 22: ...2 Product Overview Model 3201 G SHDSL Integrated Access Device User Guide 20 Product Overview...
Page 101: ...99 Chapter 8 Monitoring Status Chapter contents Status LEDs 100...
Page 106: ...9 Diagnostics Model 3201 G SHDSL Integrated Access Device User Guide 104 Software Upgrades...


