PF6000X
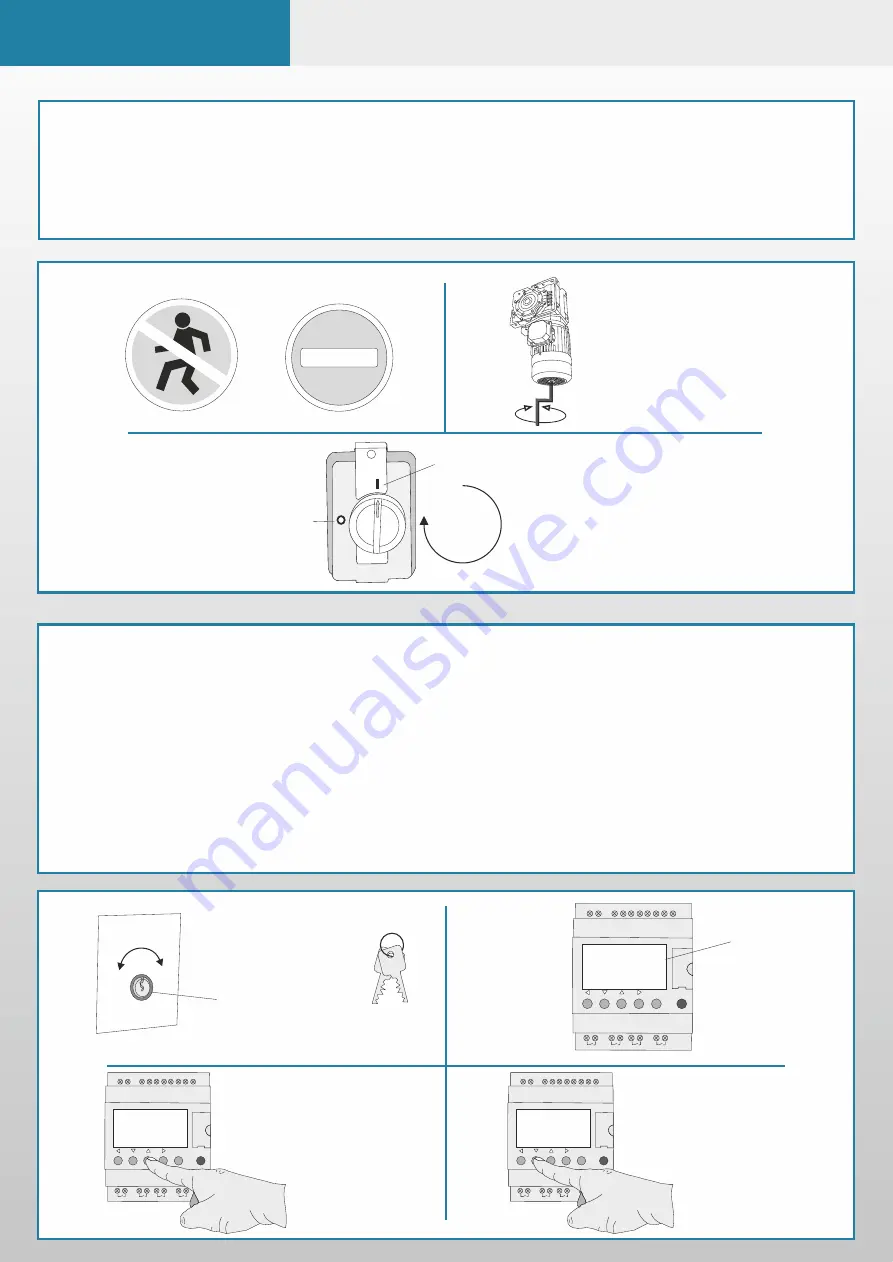
First Operation Manoeuvres
1.Before attempting the steps outlined below, please obey common sense and make sure that you have
closed the passage the barrier will inhibit, provided a diversion and informed site inc pedestrians.
2.Follow the manual release guide in this manual and make sure the barrier moves un-hindered by
inserting the winding handle and turning to make the barrier open and then close.
3.If the above step is ok then proceed to close the barrier using the manual method and then power on
using the isolator switch as shown.
1.
2.
There are many options to operate the barrier as it is dependant upon which type of access control you
have connected. However there is a standard way to operate the barrier by using the key switch (optional
extra) and PLC . Instructions are assisted by pictures below.
1. Picture shown below is the key switch which is located on the outside of the barrier cabinet (it will always be on
the opposite side to the barrier arm, also picture shows the key switch keys.
2. To move the barrier arm using the PLC first make sure the screen says “RUN LD” if it does not follow the
troubleshooting guide on page 11 when the screen says “RUN LD” follow below.
3. To make the barrier move upwards or to “open” press the up arrow.
4. To make the barrier move down or to “close” press the down arrow.
Please note that the above 2 manoeuvres will not work if there is something in the way of photocells or on the loops.
1.
2.
3.
4.
Key switch
keys
This key switch is mounted on
the side of the barrier
Key switch
When the Key is inserted fully
into the centre hole turn
clockwise to open and anti-
clockwise to close. After this
you must remove the manual
release handle.
3.
Off
On
If an isolator is fitted
turn the knob
clockwise to power
on the barrier.
ROAD
CLOSED
Auto
Open
IDEC
IDEC
Menu/Ok
SR2 B121BD
1
2
Q1
1
2
Q2
1
2
Q3
1
2
Q4
+
-
I1
I2 I3 I4 IB
ID
IC
IE
24VDC
24VDC
24VDC
Analog or
IB....IE
Inputs I1...I4
Outputs
Q1...Q4 : Relay 8A
1234
BCDE
RUN LD
SUN 20 JUL
09:36
1234
Display showing
run mode
Menu/Ok
SR2 B121BD
1
2
Q1
1
2
Q2
1
2
Q3
1
2
Q4
+
-
I1
I2 I3 I4 IB
ID
IC
IE
24VDC
24VDC
24VDC
Analog or
IB....IE
Inputs I1...I4
Outputs
Q1...Q4 : Relay 8A
1234
BCDE
RUN LD
SUN 20 JUL
09:36
1234
Menu/Ok
SR2 B121BD
1
2
Q1
1
2
Q2
1
2
Q3
1
2
Q4
+
-
I1
I2 I3 I4 IB
ID
IC
IE
24VDC
24VDC
24VDC
Analog or
IB....IE
Inputs I1...I4
Outputs
Q1...Q4 : Relay 8A
1234
BCDE
RUN LD
SUN 20 JUL
09:36
1234
Drawing showing the “UP”
arrow being pressed
Drawing showing the “DOWN”
arrow being pressed
Summary of Contents for PF6000X
Page 1: ...PF6000X Automatic Barrier Rev 1 0 Installation Operation Maintenance Manual ...
Page 11: ...PF6000X Handing Change Procedure ...
Page 12: ...PF6000X Handing Change Procedure ...
Page 13: ...PF6000X Handing Change Procedure ...
Page 14: ...PF6000X Barrier Manual Release Procedure ...
Page 15: ...PF6000X Straining Wire Assembly ...
Page 23: ...PF6000X Loop Detector Guide Relay Functionality Diagnostics ...
Page 28: ...PF6000X Safety Edge Setup ...
Page 29: ...PF6000X Safety Edge Setup ...


