background image

PF6000X

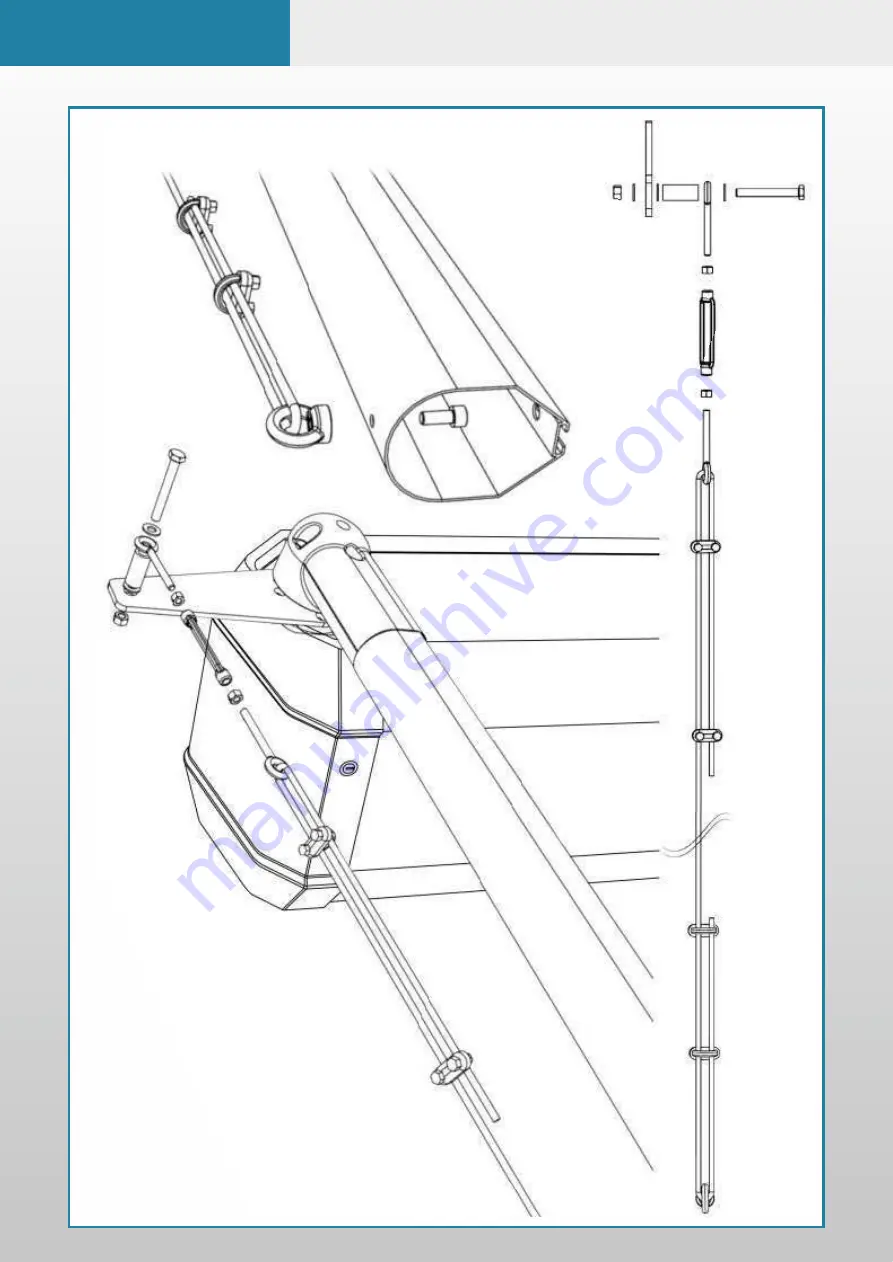
Straining Wire Assembly

Summary of Contents for PF6000X

Page 1: ...PF6000X Automatic Barrier Rev 1 0 Installation Operation Maintenance Manual ...

Page 2: ...G 11 13 MANUAL RELEASE GUIDE 14 STRAINING WIRE ASSEMBLY 15 FIRST OPERATION MANOEUVRES 16 LIMIT SWITCH ADJUSTMENT 17 PLC USAGE EXPLAINED 18 UPLOADING A PROGRAM 19 PLC LOGIC 20 ALTERING BARRIER SPEED 21 EXAMPLE LOOP INSTALLATION 22 LOOP DETECTOR GUIDE 23 24 WIRING DIAGRAM 25 26 MASTER SLAVE WIRING 27 TROUBLESHOOTING 28 29 BARRIER MAINTENANCE 30 POTENTIAL SYSTEM HAZARDS 31 INSTALLATION CHECK LIST 32 ...

Page 3: ...y other details that have been documented in this manual so you should always refer to the supplier to see if the manual that was shipped with your product is the latest edition Ÿ As with all electrical installations you should use a qualified electrician and obey all of the latest laws and regulations Ÿ Be sure to fill out and complete ALL paperwork where instructed as this manual is the equipments...

Page 4: ...he combination of products in the customer s application or use of the products At the customer s request Schneider will provide applicable third party certification documents identifying ratings and limitations of use that apply to the products This information by itself is not sufficient for a complete determination of the suitability of the products in combination with the end product machine syst...

Page 5: ...tion of goods and the hazards this generates It covered the main areas that cause the majority of injuries and ill health to workers including Workplace transport Slips trips and Musculoskeletal disorders MSD The movement of goods presents us as health and safety regulators with the challenge of dealing with a huge variety of issues The commercial organisations involved within the movement of good...

Page 6: ...6000X Barrier Setup Safety Road Loop Traf Traf fic Barrier fic Barrier Loop Detector Input Mains Power Free Exit Road Loop Safety Road Loop Loop Detector Input Mains Power Access Control Pedestal ENTRY EXIT ...

Page 7: ...est Keypad Swipe Card etc 2 Barrier Raised 3 Barrier No Passage timer started 4 Should No Passage Timer elapse before safety loop seen go to 9 5 Car move onto safety loop free exit loop inhibited no passage timer cancelled 6 Car moves o ffsafety loop 7 Car move onto free exit loop 8 Car moves o ffof free exit loop 9 Free exit loop active again 10 Barrier Lowered A2B Sequence Leave Site 1 Car moves o...

Page 8: ...on Rusting Ÿ 3 Phase Motor for Guaranteed Reliability Ÿ Adjustable Speed Acceleration Deceleration Ÿ No Springs Required No Balancing or Adjustment Necessary Ÿ Motor Gearbox No Pulleys or Belts Required Ÿ Plug in Loop Detector Bases for Single Channel Safety Entry Exit Control Ÿ Manual Override in case of Power Failure Ÿ Comes Complete with Anchor Bolts No Cabinet Mounting Plate Required Ÿ Safety ...

Page 9: ...n and that the duct is in the centre of the base plate 3 Using one M12 16 fixing bolt down the main cabinet using one of the holes 4 Now make sure that the barrier is now aligned perfectly continue to bolt down through the other holes using the remaining M12 16 bolts see below Now move on to step 5 The numbers in the text document below relate to the drawings below 3 1 2 4 45 mins 60 5 10 15 20 25 ...

Page 10: ...DAPTOR AT THE SAME TIME 5 6 Now it is time to fit the pole to the barrier you must drill through the pole AFTER you have slid it onto arm using a 6mm HSS drill bit The holes should be drilled at 60mm then 200mm from the knuckle as shown above These measurements have been supplied to maintain the optimum strength of the pole arm adaptor Also please note that the pole is a precise fit so may need a de...

Page 11: ...PF6000X Handing Change Procedure ...

Page 12: ...PF6000X Handing Change Procedure ...

Page 13: ...PF6000X Handing Change Procedure ...

Page 14: ...PF6000X Barrier Manual Release Procedure ...

Page 15: ...PF6000X Straining Wire Assembly ...

Page 16: ...ting guide on page 11 when the screen says RUN LD follow below 3 To make the barrier move upwards or to open press the up arrow 4 To make the barrier move down or to close press the down arrow Please note that the above 2 manoeuvres will not work if there is something in the way of photocells or on the loops 1 2 3 4 Key switch keys This key switch is mounted on the side of the barrier Key switch W...

Page 17: ...adjust Lower limit switch trigger position Set barrier to Open position Loosen limit striker Move striker to desired position Re tighten limit striker Use a rubber mallet to advance the striker in small increments to fine tune the position of the pole arm To adjust Upper limit switch trigger position Set barrier to closed position Loosen limit striker Move striker to desired position Re tighten lim...

Page 18: ...I1 I4 Outputs Q1 Q4 Relay 8A 1 2 4 3 Memory card slot Outputs Inputs Power Inputs Left Right Up Down Menu Ok LCD Screen Green Button Menu Ok SR2 B121BD 1 2 Q1 1 2 Q2 1 2 Q3 1 2 Q4 I1 I2 I3 I4 IB ID IC IE 24VDC 24VDC 24VDC Analog or IB IE Inputs I1 I4 Outputs Q1 Q4 Relay 8A Menu Ok SR2 B121BD 1 2 Q1 1 2 Q2 1 2 Q3 1 2 Q4 I1 I2 I3 I4 IB ID IC IE 24VDC 24VDC 24VDC Analog or IB IE Inputs I1 I4 Outputs ...

Page 19: ...pen Free entry Free exit loop Detecting vehicle on free exit entry loop Barrier opens when vehicle present on loop ID Normally Closed Lower limit Arm has reached fully closed position Lower limit switch active IE Normally Closed Safety Edge Input Photocell Input Photocell Active or Safety Edge Active 2 Outputs Output Polarity Connected to Operation when active Q1 Normally Open Motor controller ope...

Page 20: ...al 7 The current speed is then shown Example 50 8 Now use the scroll dial to set the desired speed you require 9 Note if this is increased decreased considerably then the ACC and the DEC will also need to be adjusted to suit For any advice please contact the service department 10 Press the ESC button un l RDY is shown in the display to exit the menu ACC is set to 2 by default this may be increased...

Page 21: ...be twisted a minimum 10 times per meter can be up to 250m long The loop must be placed at least 5m away from high tension cables and at least 1m away from low tension cables If the loop is placed in an area with reinforcing iron typically a concrete floor the loop must be placed at least 50mm above the reinforcement If the detector is used for detecting high vehicles lorries etc use only one loop f...

Page 22: ...loop is faulty This LED can also be used to determine the loop frequence On reset cunt the number of times the LED flashes Multiply this number by 10KHz For example if the LED flashes 6 times then the loop frequency is between 60KHz and 70KHZ Loop Fault Indicator This LED indicator is illuminated when the loop is either open circuit or short circuit and is used to give a visual indication of a fault...

Page 23: ...PF6000X Loop Detector Guide Relay Functionality Diagnostics ...

Page 24: ... 3 4 5 6 7 8 9 10 11 12 13 14 15 16 17 18 19 20 21 22 23 24 L N E ESC STOP EDIT RUN MODE L0 L0 COM LI1 LI2 LI3 LI4 24V R1A R1B R1C COM A 1 5V A01 W T3 V T2 U T1 R L1 S L2 N EARTH Y G 1 2 Q1 1 2 Q2 1 2 Q3 1 2 Q4 Safety Loop Free Entry Exit Loop Inverter PLC LNE 10 11 6 1 2 A2 31 21 11 A1 34 32 24 22 14 12 9 8 7 5 3 4 ...

Page 25: ... LOWER RAISE LIMIT COM RAISE LIMIT LOWER LIMIT COM COM PHOTOCELL FLASHING LIGHT TRAFFIC LIGHT SAFETY EDGE SWITCH LOWER LIMIT LOOP EARTH MOTOR WIRE MOTOR WIRE MOTOR WIRE LIVE NEUTRAL EARTH 20 21 22 23 24 L N E 24V 24V LOOP LOOP LOOP SAFETY SAFETY FREE EXIT FREE EXIT PF6000X Wiring Diagram ...

Page 26: ...ust requires a link between the PLC inputs 1 Link 24v negative between PLC s DO NOT LINK positive 2 Link I1 between PLC s Stop Command 3 Link I2 between PLC s Open Command 4 Link I3 between PLC s Close Command 5 Link IB between PLC s Safety Loop just needed in master barrier only 6 Link IC between PLC s Free Entry Exit Loop Just needed in master barrier only 7 Link IE between PLC s Photocells If u...

Page 27: ...PF6000X Wiring Diagram LED and Safey edge Wiring When you receive your barrier you need to connect the safety edge and LED lights ...

Page 28: ...PF6000X Safety Edge Setup ...

Page 29: ...PF6000X Safety Edge Setup ...

Page 30: ...se can be provided by your supplier Safety Edge Should be showing 8 2KΩ Barrier not going up Access control may be faulty Remove and check barrier function via the PLC Barrier Staying up Car has driven o ffbefore clearing the loop Complete cycle by going through the ground loop Stop Circuit Broken displaying on screen Circuit Broken Check Link between I1 I2 Barrier staying open and not closing If p...

Page 31: ...g or replace loop MECHANICAL ERRORS CAUSE CORRECTION 1 If the barrier has a permenant raise signal for over 2 minutes the PLC display will show PERMANENT RAISE SIGNAL 2 If the Free Exit Entry Loop Detector has a constant signal the PLC display will show CHECK FREE EXIT LOOP DETECTOR 3 If the barrier has photocells or a safety edge connected and they are faulty the PLC display will show CHECK PHOTO...

Page 32: ...mer Site Address Postcode Contact Contact Number Check safety device and equipment Ensure ground anchor is stable and secure Check all electrical connections Check motor and fixings Check pole arm adaptor and fixings Check pole for damage and signs of stress Check end rest is secure and functional Check reader post is securely fixed and cold holder etc are functioning Check for visual damage Check an...

Page 33: ...mers site This is in no way a health and safety guide just a few key areas for you to be aware of and possibly make future changes to Plan view from above Sketch system layout detailing and numbering potential hazard areas for the client Potential Hazard Areas see diagram 1 2 3 4 5 Additional Comments Descriptions concerning safety on this site Signed ...

Page 34: ...ing instructions undertaken Product works the way site need it to this includes no passage time out etc System has had the completed conformity certificate All items on the delivery note have been handed over to client site this should be signed for on the separate sheet which is titled Delivery Note green or yellow paper if parts missing call supplier The engineer has expressed the importance of r...

Page 35: ...accordance with the guidelines below at any point service repair work is carried out on the product This is to achieve two things 1 To keep a history of the product for yourself and your supplier manufacturer 2 To keep an accurate log of any historical or recent modifications and or problems to help an engineer in the event of any future work required on the product ...

Page 36: ...ordance with the following documents Document Ref Revision Description PF6000Lux O M 4 2 System guides and drawings as defined within O M Manuals Part 4 The following test procedures refer Check Lists pages 15 16 Commissioning Certificate Part 5 Existing Installation Items not covered under warranty This certificate Installers Name On Behalf of Address Signature Date of Signing Position Parts Handed ...

Page 37: ...tibility Directive 2004 108 EC and the CE Marking Directive 93 68 EC The equipment has been designed to meet the following standards Electrical Safety BS EN 60204 1 2006 A1 2009 BS 7671 2008 A1 20011 A2 2013 BS EN 62061 2005 A1 2013 BS EN 61439 1 2011 BS EN 61439 2 2011 BS EN 12978 2003 A1 2009 Mechanical Safety PD5304 2014 BS EN ISO 12100 2010 BS EN 60529 1992 A2 2013 BS EN ISO 13849 1 2008 BS EN...

Page 38: ...PEAN MARK CERTIFYING CONFORMITY TO THE ESSENTIAL REQUIREMENTS OF THE STANDARDS 2006 42 EC Proudly Made in the UK Proudly Made Made using recycled paper The manufacturer reserves the right to make amendments to this manual without prior notice and declines all responsibility for any errors personal injury or damage to property ...

Reviews:

Related manuals for PF6000X