background image

RQTV0311

6


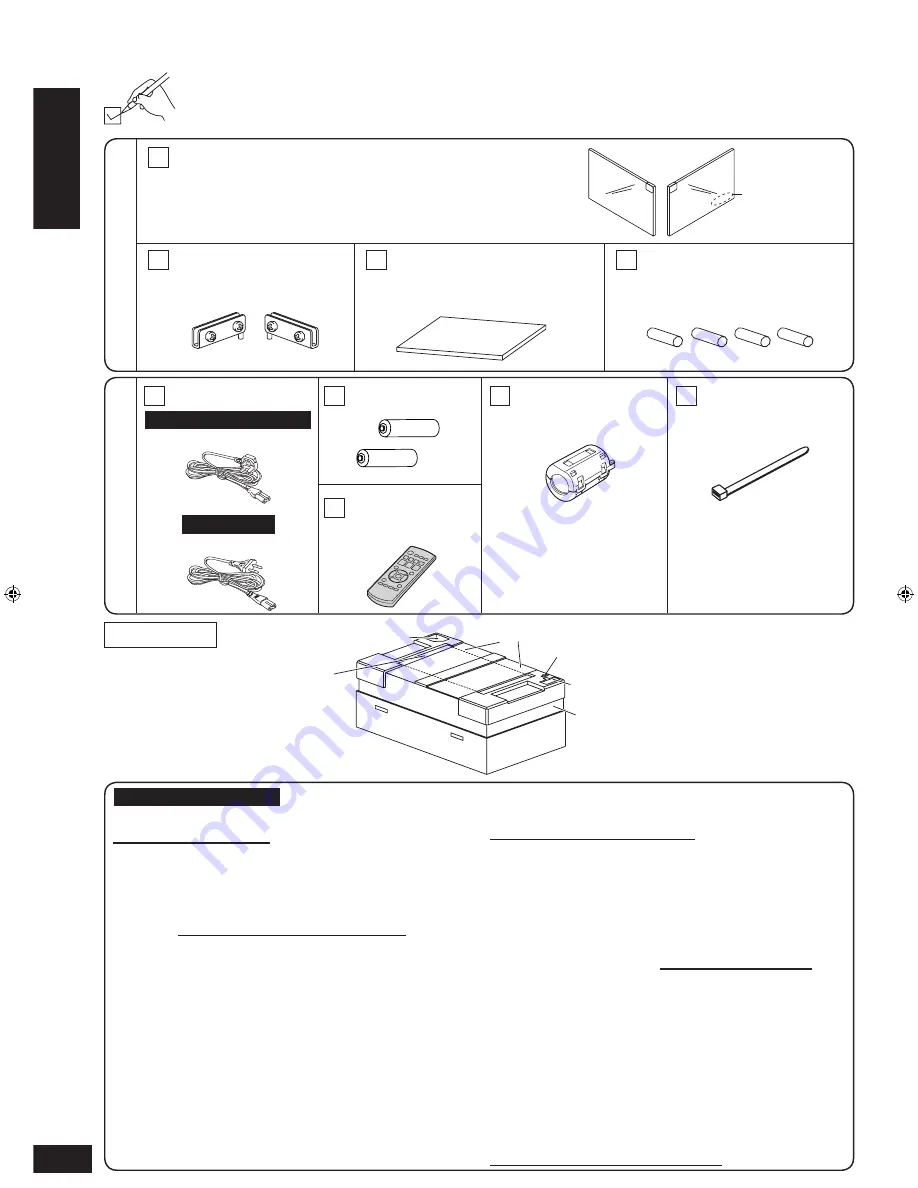
Please check and identify the supplied accessories.
Use numbers when asking for replacement parts.
(Product numbers correct as of November 2007. These may be subject to change.)

2 Glass doors
(The one with the logo is for the right side.)

2 Hinges:
1 x Left (RXC0030)
1 x Right (RXC0030A)

1 AC mains lead

2 Batteries
 

1 Remote control 
(N2QAYB000250)

Supplied accessories for rack

Supplied accessories 

for amplifier

1 Shelf (RKQ1G0003-K)

4 Metal dowels (RMQ1607)

Packing plan

Logo

Left side

Right side

Shelf

Other supplied accessories

Glass doors

Batteries

Remote control

Rack

Supplied accessories

Left side

Right side

1 x Left (RXQ1538)
1 x Right (RXQ1538A)

Before use

Supplied accessories

 Sales and Support Information

Customer Care Centre

For customers within the UK: 0844 844 3852
For customers within the Republic of Ireland:  
01 289 8333
Visit our website for product information
E-mail: [email protected]


Direct Sales at Panasonic UK

Order accessory and consumable items for your 
product with ease and confidence by phoning our 
Customer Care Centre Monday-Thursday  
9:00am-5:30pm, Friday 9:30am-5:30pm 
(Excluding public holidays).
Or go on line through our Internet Accessory 
ordering application at www.panasonic.co.uk.
Most major credit and debit cards accepted.
All enquiries transactions and distribution facilities 
are provided directly by Panasonic UK Ltd.
It couldn’t be simpler!
Also available through our Internet is direct 
shopping for a wide range of finished products, 
take a browse on our website for further details.

Interested in purchasing an extended guarantee?
Please call 0870 240 6284 or visit our website 
www.panasonic.co.uk/guarantee.


1 Ferrite core

(for HDMI cable)

(J0KG00000037)

(

 page 14 for application)

(K2CT3CA00004)

(K2CQ2CA00006)

For Malaysia

For the United Kingdom

For the United Kingdom

1 Cable tie

(for ferrite core)

(

 page 14 for application)

SC-HTR200 (RQTV0311-2B)_En_GMK_with ferrite core.indd   6

2/14/2008   11:55:35 AM

Summary of Contents for SC-HTR200

Page 1: ...and safety please read these instructions carefully Before connecting operating or adjusting this product please read the instructions completely Please keep this manual for future reference Dear customer EB on the packaging indicates the United Kingdom Note EB GM Unless otherwise indicated illustrations show the model for The United Kingdom ...

Page 2: ...This connection requires HDMI terminals on both the television and the DVD recorder Recommended TV size 42 inches or less Enjoy surround sound with DVDs TV and other sources Step by step instructions to enjoy this home theater system After you have installed the rack attach the shelf and glass doors Use an optical fibre cable for TV audio output so that you can enjoy surround effects Setting up yo...

Page 3: ...terminal coaxial 18 AC mains supply connection 19 Checking speaker output 19 Enjoying movies and music 20 Sound field 22 Using the VIERA Link HDAVI ControlTM 24 DVD one touch Home Theater operation 24 VIERA Link operation using TV s remote control 25 Functions and settings 26 Adjusting subwoofer level 26 Adjusting center speaker level 26 Using GAME SOUND 26 Muting 26 Adjusting the balance 26 Adjus...

Page 4: ... please observe the wiring code as stated below If in any doubt please consult a qualified electrician Figure A Figure B Figure A Figure B Fuse cover WARNING DO NOT CONNECT EITHER WIRE TO THE EARTH TERMINAL WHICH IS MARKED WITH THE LETTER E BY THE EARTH SYMBOL OR COLOURED GREEN OR GREEN YELLOW THIS PLUG IS NOT WATERPROOF KEEP DRY Before use Remove the connector cover How to replace the fuse The lo...

Page 5: ...ause electric shock Do not handle the plug with wet hands This can cause electric shock Remove AC mains plug from socket outlet when not using for a long period Do not let metal objects fall inside the unit This can cause electric shock or malfunction Do not let liquids get into the unit This can cause electric shock or malfunction If this occurs immediately disconnect the unit from the power supp...

Page 6: ...33 Visit our website for product information E mail customer care panasonic co uk Direct Sales at Panasonic UK Order accessory and consumable items for your product with ease and confidence by phoning our Customer Care Centre Monday Thursday 9 00am 5 30pm Friday 9 30am 5 30pm Excluding public holidays Or go on line through our Internet Accessory ordering application at www panasonic co uk Most maj...

Page 7: ...guide DTS is a registered trademark of DTS Inc and DTS Virtual is a trademark of DTS Inc Manufactured under license from Dolby Laboratories Dolby Pro Logic and the double D symbol are trademarks of Dolby Laboratories HDMI the HDMI logo and High Definition Multimedia Interface are trademarks or registered trademarks of HDMI Licensing LLC HDAVI Control is a trademark of Matsushita Electric Industria...

Page 8: ...es become disconnected refer to the illustrations below for connection Speaker cable connection How to connect the speaker cables Never short circuit positive and negative speaker wires Incorrect connection can damage the speakers Digital input terminal pages 14 15 17 18 and 24 Speaker terminals AC inlet page 19 Grey Yellow Black White Red Black White Blue line Blue Control guide cont For adjustin...

Page 9: ...adjusting settings pages 25 to 29 For selecting or cancelling Dolby Virtual Speaker and SFC mode pages 22 and 23 7 meters or less actual distance depends on the angle Transmission window Before use Control guide Remote control preparation CAUTION Danger of explosion if battery is incorrectly replaced Replace only with the same or equivalent type recommended by the manufacturer Dispose of used batt...

Page 10: ... back but you will require some space for working during setup and connection Do not place in front of curtains as they may obstruct the unit s vents Avoid pressing on the speaker nets during installation This unit has built in speakers Do not connect other speakers Using other speakers may not produce the correct sound and furthermore can cause damage You cannot add surround speakers to this syst...

Page 11: ...he upper and lower hinges and screw in place to hold the door temporarily The illustration shows how to assemble the left door VIERA Link and other logo marks are on the right door Adjust the height and gap of glass door then tighten the upper and lower screws with a Phillips head screwdriver Assemble the other door in the same way Do not over tighten the screws Use a Phillips head screwdriver tha...

Page 12: ...with care Refer to pages 14 to 18 for connections with other equipment When installing equipment that produces heat remove the cut out to allow ventilation Pass the equipment s cables through the cut out 1 2 Do not put equipment weighing more than 12 kg on the upper shelf or more than 20 kg on the lower shelf Image interference may occur if you put a DVD recorder etc on the upper shelf Put it on t...

Page 13: ... using the holes prepared on the back of the top panel of the shelf Trying to make new holes could damage the panel Use 3 mm diameter screws 30 mm to 35 mm in length Use care when putting things on the shelf Hot items Hot cups may leaves marks on the rack which you may be unable to remove Water filled vessels Water spilled from vessels such as vases may damage the unit Screws Prepared screw hole S...

Page 14: ... turn this unit off the audio video signals from a recorder connected to this unit s BD DVD HDMI input terminal are output through the television even if you have set input on this unit to anything other than BD DVD pages 20 and 21 The selector returns to the previous setting when you turn this unit on again Home Theater connections HDMI input Digital audio out optical TV Amplifier Blu ray Disc pl...

Page 15: ...our television For analogue connection refer to Connecting analogue audio for TV page 16 Stereo phono cable not included Turn off all components before making any connections To connect equipment refer to the appropriate operating instructions TV Digital audio out optical Connect the video directly from the other equipment to the television VIDEO IN AUDIO IN Video cable Audio cable Amplifier DVD p...

Page 16: ...fer to the operating instructions for the equipment you are connecting for the correct type of video cable Home Theater connections cont Audio out TV Amplifier Amplifier Blu ray Disc player DVD recorder R L Use the following connection so that you can play signals that this unit cannot decode when connected through the HDMI or digital terminals Turn off all components before making any connections...

Page 17: ...is unit is in standby mode AUDIO IN TV Audio cable Cable box or satellite receiver etc Connecting a set top box cable or satellite Connecting the optical fibre cable Note the shape and fit it correctly into the terminal Do not bend Connection cable Optical fibre cable not included Stereo phono cable not included Refer to the operating instructions for the equipment you are connecting for the corre...

Page 18: ... standby mode AUDIO IN TV Audio cable Combination DVD recorder VCR Amplifier Digital audio out coaxial CD player etc Connecting a combination DVD recorder VCR Connecting the optical fibre cable Note the shape and fit it correctly into the terminal Do not bend Connection cable Optical fibre cable not included Coaxial cable not included Stereo phono cable not included Refer to the operating instruct...

Page 19: ... AC MAINS LEAD ON PAGE 4 BEFORE CONNECTION Amplifier You can check audio output with a test signal 1 Press to turn on the unit 2 Press to output the test signal Press to adjust the volume to the normal listening level Test signal is output from one speaker at a time for two seconds in the following order L Front left C Center R Front right SUBW Subwoofer If you feel the output of the center speake...

Page 20: ... for example 1 Standby on switch Press TV TV BD DVD Blu ray Disc player DVD recorder factory setting AUX 1 AUX1 terminal AUX 2 AUX2 terminal Operation on the amplifier 2 Select the source Press 3 Start play on the other equipment 4 Adjust the volume Press Enjoying movies and music Play Enjoying movies and music Preparation ...

Page 21: ... displayed if the number of channels is the same after you change the input source DIGITAL VS DIGITAL INPUT To turn on the unit Press the button 1 2 3 4 After playback reduce the volume level and turn off To select the source Press one of these buttons Start play on the other equipment Adjust the volume Press the buttons AUX 1 and AUX 2 switch every time you press AUX 1 2 or or For combination DVD...

Page 22: ...for Dolby Virtual Speaker and SFC differ depending on input source Select the mode you prefer Dolby Virtual Speaker automatically cancels if the input PCM sampling frequency is more than 48 kHz To activate press VIRTUAL SPEAKER again REFERENCE Standard mode Standard sound effect WIDE Wide mode Broadens the effect to the left and right If the input source is digital surround signal e g Dolby Digita...

Page 23: ...e and direction DANCE Enjoy a dance hall like audio effect DRAMA Best suited for dialogues in drama movies ACTION Best suited for action movies with impact SPORTS Enjoy a feeling like being at a live sporting event MUSICAL Enjoy a feeling like being at a live musical performance GAME Enjoy games with greater audio impact MONO Best suited for older monaural audio movies Digital surround signal soun...

Page 24: ... input to HDMI Switch the unit s input to BD DVD and make sure that images from DIGA appear correctly Do this whenever you change connections or settings DVD one touch Home Theater operation Audio output from the DVD recorder DIGA switches from speakers on the TV VIERA to speakers connected to the unit when you turn the unit on Audio output automatically switches to speakers on your TV VIERA when ...

Page 25: ...P for about 2 seconds 2 Press w q to select HDMI press OK to confirm 3 Press w q to select CTRL press OK to confirm 4 Press e r to select OFF press OK to confirm OFF VIERA Link HDAVI Control is OFF ON VIERA Link HDAVI Control is ON factory setting 5 Press BALANCE RETURN a few times and select EXIT press OK to confirm DIGA DVD recorder does not start playback with DVD ONE TOUCH PLAY If DIGA DVD rec...

Page 26: ...nt range 6 to 6 Factory setting 0 Press To cancel Press once again When you cancel Dolby Virtual Speaker and Dolby Pro Logic ΙΙ turn on On the amplifier GAME SOUND indicator lights green when this function is active Indicator also lights when you select GAME using SFC MOVIE page 23 Adjusting subwoofer level Adjust the subwoofer level while listening to a source Adjusting center speaker level Adjus...

Page 27: ...hen audio adjustment can be made Reducing standby power consumption Standby mode HDMI standby page 14 does not work in this mode if you have connected through the HDMI terminal VIERA Link pages 24 and 25 will not function when this unit is off 2 1 Press to select HDMI 3 Press to select STNBY STNBY CTRL 5 Press a few times to select EXIT Press OFF Standby power consumption reduced approximately 0 4...

Page 28: ...s to select ATTENUATOR 3 Press to select ON ON OFF Factory setting OFF 4 Functions and settings cont Press and hold for about 2 seconds Press to confirm Press to confirm Press to confirm Select EXIT and confirm to finish the setup mode Press and hold for about 2 seconds Press to confirm Select EXIT and confirm to finish the setup mode Press to confirm Press to confirm Return to previous menu cance...

Page 29: ...ne 2 1 Press to select INPUT MODE 3 Press to select setting 5 4 Press to select input signal 2 1 Press to select RESET 3 Press to select YES YES NO 1 2 2 1 Press to select REMOTE 3 Press to select 2 Press and hold for about 2 seconds 4 While pressing press and hold about 2 seconds To restore the code to 1 In step 3 select 1 In step 4 while pressing OK press and hold TV for about 2 seconds Factory ...

Page 30: ...not heard when playing DVD audio 22 23 16 29 9 16 29 29 HDMI The equipment connected by the HDMI cable is not compatible with the unit s copyright protection technology U 70 1 1 appears on the display U 70 1 2 appears on the display The unit is receiving video signals that are incompatible with it through HDMI connection Check the settings of the connected equipment U 70 3 appears on the display A...

Page 31: ...ult your dealer Switch the attenuator on 28 Display Check point Cause Countermeasure Pages You cannot use Dolby Virtual Speaker and SFC effect with PCM signals with sampling frequency over 48 kHz You are trying to use an effect unavailable with the current input source 22 23 21 Scrolling Scrolling DSP or HDMI is displayed in place of Error messages Specifications Maintenance To clean this unit wip...

Page 32: ...ia This is the copyright protection technology which prevents file copy of DVD audio Dolby Digital DVD etc Digital surround system developed by Dolby Laboratories Dolby Pro Logic ΙΙ This system can process not only Dolby Surround but also other 2 channel sources to produce a 5 1 channel sound for a more realistic sound field It is also possible to enhance old movies recorded in stereo with this dy...

Page 33: ...KCASE BUILT IN CABINET OR IN ANOTHER CONFINED SPACE ENSURE THE UNIT IS WELL VENTILATED TO PREVENT RISK OF ELECTRIC SHOCK OR FIRE HAZARD DUE TO OVERHEATING ENSURE THAT CURTAINS AND ANY OTHER MATERIALS DO NOT OBSTRUCT THE VENTILATION VENTS DO NOT OBSTRUCT THE UNIT S VENTILATION OPENINGS WITH NEWSPAPERS TABLECLOTHS CURTAINS AND SIMILAR ITEMS DO NOT PLACE SOURCES OF NAKED FLAMES SUCH AS LIGHTED CANDLE...

Page 34: ...RQTV0311 34 ...

Page 35: ...RQTV0311 35 ...

Page 36: ...Matsushita Electric Industrial Co Ltd Web Site http panasonic net En RQTV0311 2B H1107FS2127 ...

Reviews: