background image

11

TQB

J09

97

Turning the timer on

1

Prepare the selected music source and set the 
desired volume.

2

Press [

F

,


PLAY].

F

” is shown.

To cancel, press [

F

,


PLAY] again.

The system must be switched off for the timer to operate.

To check the settings

Press [CLOCK/TIMER] repeatedly to select “TIMER ADJ”.

(During standby, press [CLOCK/TIMER] twice.)

Note:

• The timer starts at a low volume and increases gradually to 

the preset level.

• The timer comes on at the set time every day if the timer is 

on.

• If you switch off the system and switch on again while a 

timer is in operation, the timer will not stop at the end time.

*1: “CD”, “USB”, “DAB+”, and “FM” can be set as the music 

source.

• For timer music source through the port for iPhone/

iPad/iPod and USB devices, select “USB”.

Sound effects

1

Press [SOUND] repeatedly to select a sound 
effect.

2

Press [

2

,

1

] to select the desired setting.

By this unit only

Turn [BASS] or [TREBLE] to adjust the level.

Press [PRESET EQ] repeatedly to select a setting.

This function lets you enjoy a powerful bass effect.

Press [D.BASS] to select “ON D.BASS” or “OFF 

D.BASS”.

Using the auxiliary input

You can connect a VCR, DVD player etc. and listen to 

the audio through this system.

Preparation

Connect the external equipment.

1

Press [RADIO, EXT-IN] repeatedly to select 
“AUX”.

2

Play the external equipment.

Using the PC input

You can play back music on the PC with connected 

speakers by connecting a PC to the PC IN terminal on 

this unit.

About supported format, refer to “Specifications” (

14).

(as of February 2017)

1

Disconnect the AC mains lead.

2

Connect this unit and a PC.

3

Connect the AC mains lead to this unit and turn 
this system on.

4

Press [RADIO, EXT-IN] repeatedly to select “PC”.

5

Operate the PC for playback.

Note:

• When you play back high-resolution audio, it is 

recommended that you use a compatible USB 2.0 High 

Speed Cable.

OS X is a trademark of Apple Inc., registered in the U.S. and other 

countries.

Windows is a trademark or a registered trademark of Microsoft 

Corporation in the United States and other countries.

Changing the sound quality

BASS

-4 to +4

TREBLE
SURROUND

“ON SURROUND” or 

“OFF SURROUND”

Preset EQ

HEAVY

Adds punch to rock

SOFT

For background music

CLEAR

Clarifies higher frequencies

VOCAL

Adds gloss to vocal

FLAT

Cancels the sound effect

D.BASS

Before connecting to a PC

Follow the steps below.

• Refer to the following for the recommended OS 

versions for your PC:

– Windows 7, Windows 8, Windows 8.1, Windows 10

– OS X 10.7, 10.8, 10.9, 10.10, 10.11, 10.12

1

Download and install the dedicated driver to the 
PC. (Only for Windows OS)
Download and install the driver from the website 
below.

http://panasonic.jp/support/global/cs/audio/

(This site is in English only.)

2

Download and install the dedicated app 
“Panasonic Audio Player 2”


(free of charge) on 

your PC. (For Windows OS and OS X)
Download and install the app from the website 
below.

http://panasonic.jp/support/global/cs/audio/

(This site is in English only.)

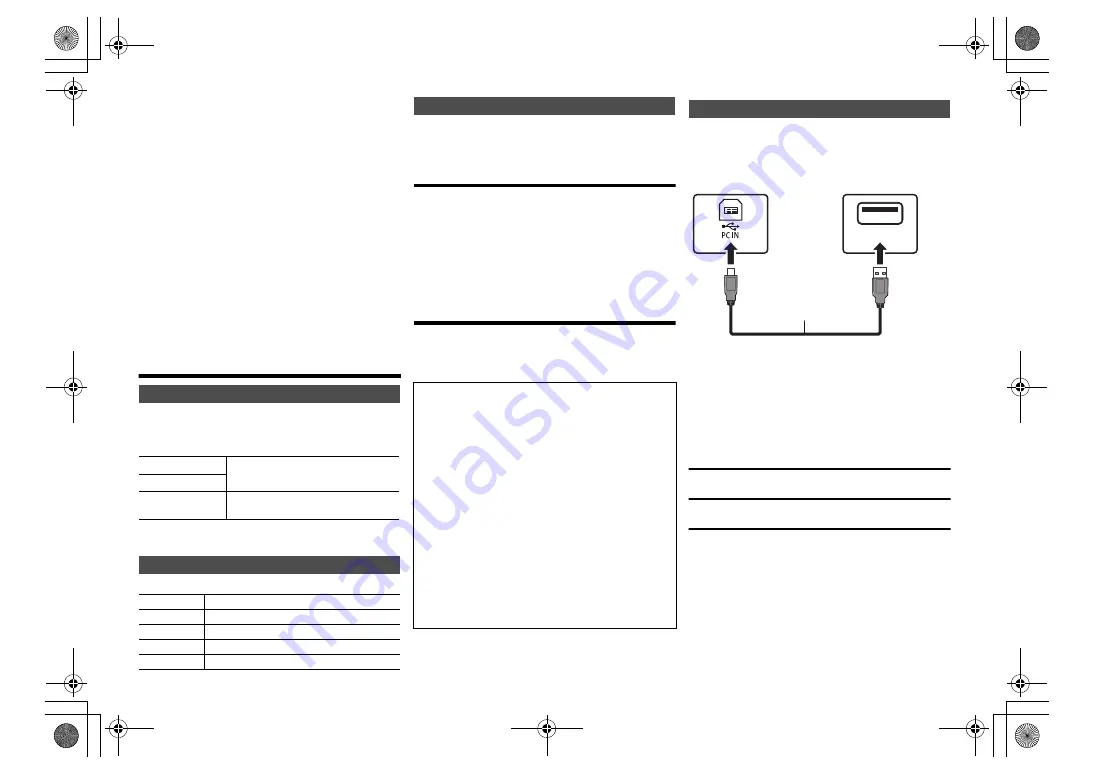
Listening to audio from a PC

USB

USB 2.0 cable

(not supplied)

This unit (rear)
USB-DAC port

Type A

Type B

PC

SA-PMX82-M~TQBJ0997.book  11 ページ  2017年4月14日 金曜日 午前9時58分

Summary of Contents for SA-PMX82M

Page 1: ...ne through our Internet Accessory ordering application at www pas europe com Most major credit and debit cards accepted All enquiries transactions and distribution facilities are provided directly by...

Page 2: ...he mobile telephone This unit utilizes a laser Use of controls or adjustments or performance of procedures other than those specified herein may result in hazardous radiation exposure Battery Do not b...

Page 3: ...use cover with a screwdriver 2 Replace the fuse and close or attach the fuse cover Supplied accessories Check and identify the supplied accessories Product numbers provided in these operating instruct...

Page 4: ...d sound When you adjust the sound quality You can connect a VCR DVD player etc Note Disconnect the AC mains lead before connection Switch off all equipment and read the appropriate operating instructi...

Page 5: ...isplay panel 18 Port for iPhone iPad iPod and USB devices 19 Bluetooth pairing button Press to select BLUETOOTH as the audio source Press and hold to enter pairing mode 6 or disconnect a Bluetooth dev...

Page 6: ...urn on the Bluetooth feature of the device and place the device near this unit 1 Press to select BLUETOOTH If PAIRING is indicated on the display go to step 3 2 Press PLAY MENU to select PAIRING and t...

Page 7: ...T16 and FAT32 file systems are supported This unit supports USB 2 0 High Speed USB devices with storage capacity of more than 32 GB cannot work in some conditions Supported file formats and extensions...

Page 8: ...be shown approximately 32 This system supports ver 1 and 2 ID3 tags Text data that the system does not support can show differently 1 Press PLAY MENU to select PLAYMODE or REPEAT 2 Press 2 1 to select...

Page 9: ...cted as the tune mode 2 To tune automatically press and hold the button until the frequency starts changing quickly 2 Press PROGRAM 3 Press the numeric buttons to select a preset number Do steps 1 thr...

Page 10: ...atedly to select SIGNAL QUALITY 2 Press 2 1 to select frequency The current frequency block is displayed and then the reception quality is indicated Clock and timers This is a 24 hour clock 1 Press CL...

Page 11: ...t About supported format refer to Specifications 14 as of February 2017 1 Disconnect the AC mains lead 2 Connect this unit and a PC 3 Connect the AC mains lead to this unit and turn this system on 4 P...

Page 12: ...vice is connected to both the AUX IN terminals and the USB port noise may be generated depending on the device In this case remove the USB cable from the USB port Display not shown correctly Playback...

Page 13: ...the unit off and then on again NO PRESET There are no preset DAB DAB stations to select Preset some channels NO SIGNAL This station cannot be received Check your antenna DEVICE NO RESPONSE HUB NOT SUP...

Page 14: ...pproximate Total harmonic distortion is measured by the digital spectrum analyzer 1 BLUETOOTH STANDBY is OFF 2 No device is connected to the USB port before turning to standby mode 3 MPEG 1 Layer 3 MP...

Page 15: ...15 TQBJ0997 SA PMX82 M TQBJ0997 book 15...

Page 16: ...orporation Kadoma Osaka Japan Panasonic Marketing Europe GmbH Panasonic Testing Centre Winsbergring 15 22525 Hamburg Germany Panasonic Corporation Web Site http www panasonic com p C Panasonic Corpora...

Reviews: