background image

VQT3C56

22

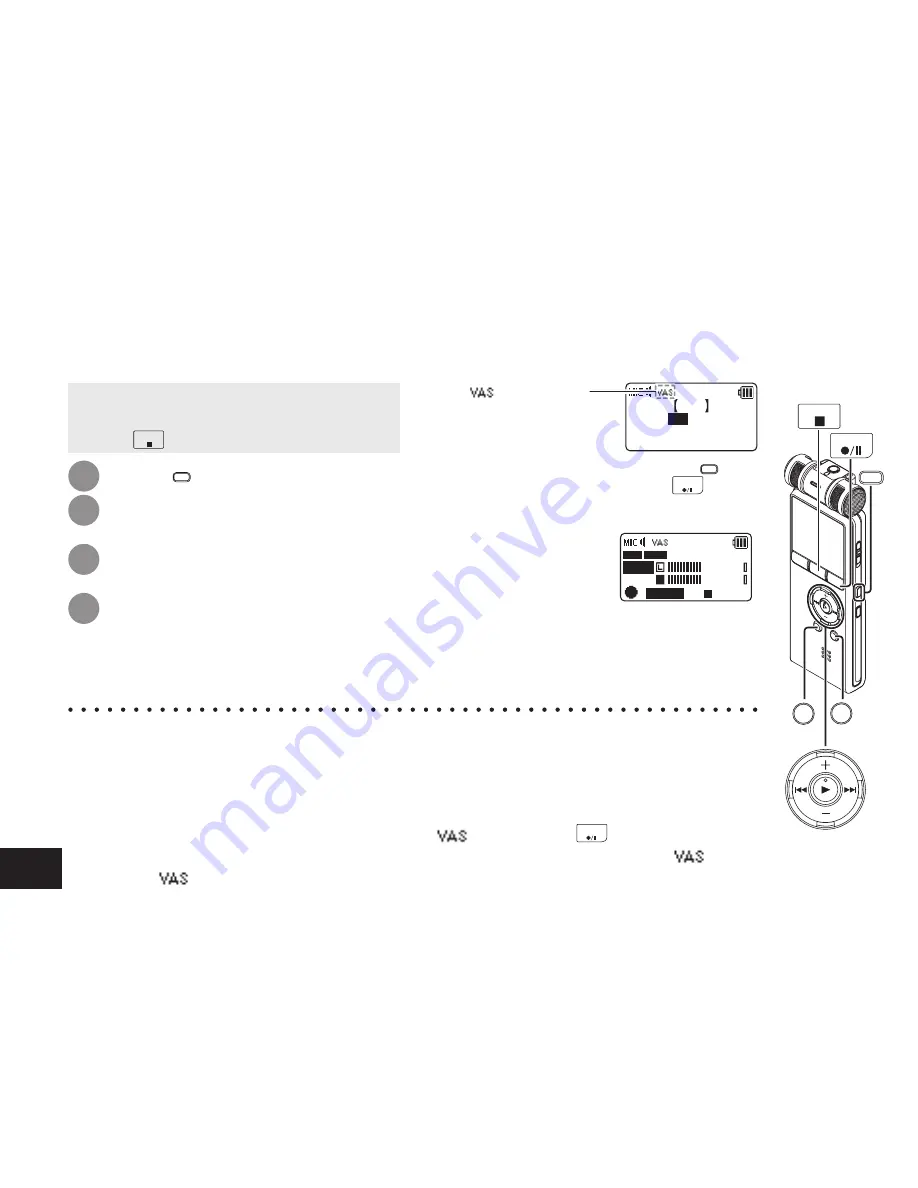
When VAS (Voice Activated System) is set, if silence continues for approx. 2 seconds during microphone 
recording, the recording is paused automatically. If the unit detects sound, the recording resumes.

*

 When the microphone ALC setting is OFF (

 page 18), even if the VAS setting is set 

to ON, the setting does not change to the VAS recording. 

*

 For important recording, set the VAS setting to OFF.

*

 If the “LOW CUT FILTER” setting is “ON”, low frequency sound may be cut out and VAS recording 

may not activate. In this case, change the “LOW CUT FILTER” setting to “OFF”. (

 page 17)

*

 If the recording is paused with no sound state, “

” blinks. When 

REC

 is pressed from this 

recording pause state, the status is changed to normal recording pause state and “

”  lights 

up. While “

” is blinking, the “AUTO POWER OFF” (

 page 33) function does not operate.

Preventing unnecessary recording (VAS)

• Set the microphone ALC setting to ON 

beforehand. (

 page 18)

• Press 

STOP

 to stop the unit.

1

Press 

MENU

.

2

Press +, – to select “REC MENU” 
and press 

q

 to enter.

3

Press +, – to select “VAS” and 
press 

q

 to enter.

4

Press 

u

i

 to select “ON” 

and press 

q

 to enter.

(The factory setting is “OFF”.)

” is displayed.

OFF

ON

VAS

∗ 

OK ONLY WHEN

MIC ALC IS ON

To exit the setting screen, press 

MENU

To start VAS recording, press 

REC

.

Adjusting the VAS operation level:

Press 

u

i

 during 

VAS recording.

(The factory setting is “3”.)

VAS 3

A001

–36

dB

R

MP3 128k

R

68:34:56

*

 You can adjust the sound detection level from 1 to 5.

*

 If the audio to record is low, increase the 

VAS value (sensitivity level). If the sound 
is loud, decrease the VAS value.

STOP

REC

SLOW

FAST

MENU

Summary of Contents for RR-XR800

Page 1: ...optimum performance and safety please read these instructions carefully Before connecting operating or adjusting this product please read the instructions completely Please keep this manual for future reference E Operating Instructions IC Recorder RR XR800 Model No ...

Page 2: ...ww panasonic co uk E mail customer care panasonic co uk Direct Sales at Panasonic UK For customers 0844 844 3856 Order accessory and consumable items for your product with ease and confidence by phoning our Customer Care Centre Monday Thursday 9 00 a m 5 30 p m Friday 9 30 a m 5 30 p m Excluding public holidays Or go on line through our Internet Accessory ordering application at www pas europe com...

Page 3: ...om a specified position TIME SEARCH 24 Repeat play REPEAT 24 Setting the skip interval TIME SKIP 25 Setting the playback EQ SOUND EQ 26 Dividing files 27 Recording by connecting an external microphone 28 Copying to other devices 29 Recording from other devices 30 Common menu 32 Using with a computer System requirements 35 Connecting this unit to a computer 36 Opening folders of this unit 38 Import...

Page 4: ... enables natural and realistic recording You can enjoy recordings of a band practice instrument lesson birds singing etc Features This unit offers various types of recording settings You can switch to your preferred setting according to the recording environment The chart below shows the guideline of recording settings for each recording scene Detailed setting methods etc are described in each pag...

Page 5: ...in speaker OPR HOLD MENU ERASE i Fast forward LIST FAST USB jack Built in microphone Headphone earphone jack W External microphone jack MIC ġBattery cover ġHand strap hole Part names The button notations differ from those of the actual product Actual product INDEX DIVIDE FOLDER SLOW LIST FAST In this manual INDEX or DIVIDE FOLDER or SLOW LIST or FAST Preparation ...

Page 6: ... 7 Recording mode page 16 Folder name page 10 File number PEAK indication pages 11 19 Status indication page 11 Recording elapsed time Screen display during playback MP3 128k A 0 00 05 T 1 199 110720_1720 MP3 0 12 34 FLAT TS A B FAST 120 M Playback speed page 23 Time skip page 25 Total number of files in the folder page 10 File number SOUND EQ page 26 Index page 15 A B Repeat page 23 ONE Repeat pa...

Page 7: ...peration due to the low level of battery Some level of battery is required when recording or performing Deleting files page 14 Dividing files page 27 Deleting index page 15 FORMAT page 34 If the battery indicator shows blinking and these operations are performed the power turns OFF due to the battery exhaustion Make sure to turn the power off before removing the battery If the battery is removed w...

Page 8: ...ON HOLD OFF OPR ON HOLD OPR Operation Set the current date and time when turning this unit on for the first time page 9 Turning the power ON Slide the OPERATION HOLD switch to ON side to turn the power on Then the display lights on Turning the power OFF Slide the OPERATION HOLD switch to OFF side while stopped When sliding the OPERATION HOLD switch to OFF side during recording or playback the unit...

Page 9: ...IME The above illustration is a display example 5 Press to set the month and press i Setting the clock MENU The clock operates with the monthly loss gain of approx 60 seconds at normal temperature The clock setting will be lost if the battery is removed or completely exhausted 6 Press to set the date and press i 7 Press to set the clock indication method and press i 24H and AM PM are displayed for...

Page 10: ...cording mode or microphone sensitivity as necessary pages 16 17 Note if your finger or an object touches this unit during recording the noise will be recorded through the microphone This is where files are stored This unit has folders A B C and D for microphone recording folder L for recording with other devices connected and folder M for music Using each folder according to the purposes of record...

Page 11: ...R volumes are displayed respectively during monaural recording page 16 as well Note that the monaural recording data are synthesized from L and R ӷ Possible remaining recording time Displays the remaining recording time possible recording time in the selected recording mode See page 6 for other screen displays Note when recording This unit is equipped with a large diameter and high sensitivity mic...

Page 12: ...d hold u i To stop Press STOP Playing STOP FOLDER LIST Press FOLDER to display SELECT FOLDER Press u i to select the folder that contains a file to play and press q to enter Selecting M displays the list screen pages 13 43 Select a folder Press u i to select Each time you press the file number changes Select a file Each time STOP is pressed the display content Possible remaining recording time Cur...

Page 13: ...hen earphones are connected Listening to the audio using earphones ӱ Press LIST while the unit is stopped Files in the selected folder are displayed as a list The list screen Ӳ Press to select the file and press q to enter MIC_A 111021_1045 MP3 111020_1200 MP3 111224_0820 MP3 Playback starts Pressing FOLDER after step ӱ can switch the folder The folder is switched each time the button is pressed W...

Page 14: ...ter deleting files page 40 Read only MP3 music files transferred from the computer or subfolders pages 42 44 in the MUSIC folder created on the computer cannot be deleted using this unit Delete them on the computer page 39 For operations on the list screen see page 13 or page 43 as well When deleting by selecting a file from the list Press STOP to stop the unit 1 Press LIST Files in the selected f...

Page 15: ...dded Indexes are deleted when the file is deleted or divided When the battery indicator shows blinking indexes cannot be added Also adding the index may be impossible on the border of and blinking During playback even if you press u at the position within approx 2 seconds after the index point playback does not stop at the point Deleting Index Select a file which has Index to be deleted page 12 Pr...

Page 16: ...g mode is displayed MP3 128k A REC REMAINING TIME 1 2 0 00 00 R68 34 56 FLAT You can change the sound quality for microphone recording or line in recording This allows you to provide the best sound quality for the particular purpose Depending on the recording mode setting the sound quality and remaining recording time page 55 will differ High quality recording Long recording Recording format MP3 M...

Page 17: ... is High or Low or is displayed respectively HIGH LOW MIC SENSITIVITY To exit the setting screen press MENU Switching microphone sensitivity Sound of low frequency range is reduced during microphone recording This is effective when reducing noise of air conditioning equipment etc while recording at a meeting etc Press STOP to stop the unit 1 Press MENU 2 Press to select REC MENU and press q to ent...

Page 18: ...nit 1 Press MENU 2 Press to select REC MENU and press q to enter 3 Press to select MIC ALC and press q to enter 4 Press u i to select OFF and press q to enter The recording level is displayed OFF ON MIC ALC 10 To exit the setting screen press MENU The microphone ALC setting is only effective during microphone input Adjusting the recording level manually Set the microphone ALC setting to OFF before...

Page 19: ...is pressed during recording standby the microphone sensitivity page 17 LOW CUT FILTER page 17 and recording EQ page 20 can be set Setting the recording peak limiter to ON Even if the microphone ALC setting is OFF when the excessive volume is input the recording level is automatically adjusted and the sound distortion is reduced Press STOP to stop the unit 1 Press MENU 2 Press to select REC MENU an...

Page 20: ...ter exiting the setting screen Pressing REC starts recording EQ mode Effect and application FLAT This basic mode does not emphasise a specific sound range SUPER BASS Emphasise the bass range strongly BASS Emphasise the bass range slightly MIDDLE Emphasise the middle range BASS TREBLE Emphasise the bass and treble ranges slightly TREBLE Emphasise the treble range slightly SUPER TREBLE Emphasise the...

Page 21: ... 4 Press u i to select the time and press q to enter SELF TIMER 5sec 30sec OFF 10sec The factory setting is OFF To exit the setting screen press MENU When REC is pressed countdown starts Then recording starts after the set time The recording indicator blinks during countdown page 33 Once the self timer is set the setting is preserved until the self timer setting is set to OFF or the settings of th...

Page 22: ...atus is changed to normal recording pause state and lights up While is blinking the AUTO POWER OFF page 33 function does not operate Preventing unnecessary recording VAS Set the microphone ALC setting to ON beforehand page 18 Press STOP to stop the unit 1 Press MENU 2 Press to select REC MENU and press q to enter 3 Press to select VAS and press q to enter 4 Press u i to select ON and press q to en...

Page 23: ...pectively Pressing and holding FAST SLOW can also adjust the playback speed Changing the playback speed Playback repeats between the start point A and finish point B if those points are set 1 Press q while playing The start point A is set and blinking and are displayed MP3 128k A 0 00 05 T 1 3 111017_1200 MP3 0 12 34 FLAT A B 2 Press q at the finish point B The display changes to lighting and repe...

Page 24: ...ayback applies only to the currently selected file Playback from a specified position TIME SEARCH Press STOP to stop the unit 1 Press MENU 2 Press to select PLAY MENU and press q to enter 3 Press to select REPEAT and press q to enter 4 Press to select ONE or ALL and press q to enter REPEAT OFF ONE ALL The factory setting is OFF OFF Playback is performed in succession from the selected file to the ...

Page 25: ... MENU TS is displayed MP3 128k A 11 16 FLAT TS REC REMAINING TIME 0 00 00 R68 24 46 If the beginning of a file or the index point is present at the position closer than the set skip interval the playback skips to such a position When jumping skipping page 12 to another file while using the time skip function stop the file playback once and press u i Setting the skip interval TIME SKIP Setting the ...

Page 26: ...LAT 128k EQ mode Effect and application FLAT The sound equalizer function is not used You hear the original sound without any change BASS Emphasise the bass range strongly CLEAR Emphasise the treble range strongly HEAVY Emphasise the bass and treble ranges slightly SOFT Emphasise the middle range VOICE Reduce noise to make human voice easily heard USER This mode enables adjustment of frequency ban...

Page 27: ...at the beginning of the second file To exit the division screen press DIVIDE Files in the M folder cannot be divided A file length of approx 2 seconds or more is necessary for dividing a file You cannot divide a file at the beginning of the file Divided files cannot be recovered After the file is divided the number of files in the folder increases by one page 40 If a file containing index marks is...

Page 28: ... 0 00 00 R53 24 46 6 Press REC to start recording See page 10 for recording operations Connecting the external microphone External microphone not supplied Insert securely Plug type ø 3 5 mm stereo mini plug Use this setting when recording by connecting an external microphone to the external microphone jack of this unit Read the operating instructions for the connected device If the recording level...

Page 29: ...ording to copy the audio on the external device Ӳ On this unit play the file you want to copy page 12 Copying to other devices Read the operating instructions for the connected device Use the connection cable that matches monaural stereo of the connected device Wrong connection may cause recording trouble i e Only 1 channel is copied The copied sound quality may differ from the sound quality of th...

Page 30: ...rminal of the external device adjust the volume of the external device Ӳ Stop the external device by cue operation for the sound source Press STOP to stop the unit 1 Press MENU 2 Press to select REC MENU and press q to enter 3 Press to select INPUT and press q to enter 4 Press to select LINE1 or LINE2 and press q to enter MIC LINE1 LINE2 INPUT If the output level of the external device is low such...

Page 31: ...tting Press STOP to stop the unit 1 Press MENU 2 Press to select REC MENU and press q to enter 3 Press to select SYNCHRO REC and press q to enter 4 Press u i to select ON and press q to enter When the device is connected either and or and are displayed OFF ON SYNCHRO REC OK ONLY FOR LINE REC MP3 5 Press u i to select AUTO or MANUAL and press q to enter MANUAL AUTO REC STOP SET AUTO STOP IF NO SOUN...

Page 32: ...mon menu The following are the settings used for both recording and playback STOP MENU Recording from other devices Synchro recording Set the recording mode to MP3 beforehand page 16 Make the synchro recording setting beforehand 1 Perform steps 1 to 8 on pages 30 and 31 If the recording mode is set to PCM the synchro recording is not possible even if the synchro recording setting is ON When connec...

Page 33: ...F Not lighting The factory setting is ON AUTO POWER OFF This function automatically turns the power off if there is no operation for a certain period of time such as when recording is paused or stopped This function helps you save battery when you forget to turn off the power AUTO POWER OFF 15min 0 15 AUTO POWER OFF 0 min OFF to 15 min The factory setting is 15min You can set the time in 1 minute ...

Page 34: ... recording indicator blinks while formatting Cancelling is not possible while formatting Do not remove the battery while formatting Common menu INIT MENU If the settings of this unit are initialised settings except for the DATE TIME setting are restored to the default state Select YES press q to enter and the settings are initialised YES NO INIT MENU Data including recorded files in the internal m...

Page 35: ...ration of the U S and other countries MPEG Layer 3 audio coding technology licensed from Fraunhofer IIS and Thomson IBM and PC AT are registered trademarks of International Business Machines Corporation of the U S Macintosh and Mac OS are trademarks of Apple Inc Other system names and product names appearing in this document are in general the registered trademarks or trademarks of the respective ...

Page 36: ... devices Caution Use only the supplied USB cable with a ferrite core when connecting to computer When the unit is connected to your PC it can operate without the battery because power is supplied by the computer The first time you connect the unit to your PC Because multiple Found New Hardware messages will appear do not disconnect the unit from your PC until all messages disappear Screen display ...

Page 37: ...started Please see the Operating Instructions for the computer g Removing the USB cable Double click the icon Windows 2000 Windows XP Windows Vista Windows 7 on the task tray at the bottom of the computer screen and follow the on screen instructions to remove the USB cable The icon may not be displayed depending on the OS settings After the cable is removed this unit turns off When this unit is tu...

Page 38: ...it may be displayed as a Removable Disk 2 Right click to open the IC RECORDER G this unit 3 Right click to open the folder Recorded files in this unit appear Depending on the computer settings a file with the extension INX may be displayed This file contains index information If this file is deleted from your computer the index information will be deleted Opening folders of this unit When opening ...

Page 39: ...MUSIC of this unit new MIC_A MIC_B MIC_C MIC_D LINE and MUSIC folders are generated when this unit is disconnected from the computer The files in the folders with changed names cannot be played on this unit Do not change the folder names Open the IC RECORDER this unit displayed on the computer screen and open the folders MIC_A to MIC_D and LINE beforehand page 38 Importing recorded files to a comp...

Page 40: ...displayed instead Automatic change of file name by file deletion division Deleting a recorded file on this unit will move subsequent files forward and file numbers are automatically reassigned example When 002A_110725_0905 MP3 is deleted 001A_110720_1720 MP3 002A_110725_0905 MP3 003A_110903_1233 MP3 004A_111231_1915 MP3 001A_110720_1720 MP3 002A_110903_1233 MP3 003A_111231_1915 MP3 File number par...

Page 41: ...yback by transferring those files to the MUSIC folder is recommended pages 44 45 File name in the MUSIC folder and order of playback If numbers are added at the beginning of file names in the MUSIC folder playback is performed from the file with the smallest number in priority Up to 3 digits of number can be identified If additional methods differ such as 1 01 001 then 001 to 999 takes the first p...

Page 42: ...1 MP3 Artist A Artist B Music A MP3 MIC_B MIC_C MIC_D LINE MUSIC 001A_110720_1720 MP3 002A_110725_0905 MP3 003A_110903_1233 MP3 DATA First hierarchy Album A1 Music A1 1 MP3 Music A1 2 MP3 Album A2 Album A2 1 Second hierarchy Third hierarchy The MUSIC folder is used when transferring MP3 music files etc from the computer You can create subfolders in the MUSIC folder The structure example is shown a...

Page 43: ...o move up 1 hierarchy Then screen Ӳ is displayed Screen Ӳ IC RECORDER MIC_B MIC_A MIC_C Press to select the folder on the screen Ӳ and press q to enter When the MUSIC folder is selected MUSIC Artist A Music 01 MP3 Artist B Press to select the file or folder on the screen on the left and press q to enter When the artist A folder is selected Artist A Album A1 Music A MP3 Album A2 Select folder accor...

Page 44: ...f transfer to this unit When transferring multiple files at a time the computer determines the order of transfer However if numbers are added at the beginning of file names the order of playback is determined based on the numbers page 41 You can enjoy music by transferring MP3 music files stored in the computer to this unit Transferring MP3 music files to this unit from the computer Open MUSIC fol...

Page 45: ...n this unit is changed The selected file is changed to the file immediately under the MUSIC folder In MUSIC folder you can play a maximum of 199 files Files over 199 cannot be played on this unit MP3 files and PCM WAV files recorded on this unit can be played Other file formats such as WMA and AAC cannot be played Copyright protected MP3 music files cannot be played MP3 music files with variable b...

Page 46: ...eate MP3 music file Please see the homepage of the Microsoft company for details of download update of Windows Media Player etc http www microsoft com windows windowsmedia player 11 default aspx If you cannot create MP3 music files successfully or do not know how to operate the computer please consult the computer manufacturer See page 44 for transferring MP3 music files to this unit and page 45 f...

Page 47: ...his unit can be played WMA AAC and other files cannot be played Q A Frequently Asked Questions Error message Checkpoints FILE FULL This is displayed when you attempt to record exceeding maximum number 199 of files that can be recorded in 1 folder page 10 CAPACITY FULL This is displayed when you attempt to record to the internal memory with no space page 55 NO PLAYABLE FILES This is displayed when ...

Page 48: ...E ANY MORE FILES IN THIS FOLDER This is displayed when you attempt to divide a file when 199 recorded files maximum recordable number are present in the selected folder page 27 NOT ENOUGH SPACE FOR FILE DIVIDE This is displayed when you attempt to divide a file when there is not enough space in the internal memory required to divide a file page 27 REC TIME TOO SHORT TO DIVIDE This is displayed whe...

Page 49: ...omes slow and writing may not be performed properly Other Before requesting service make the following checks If you are in doubt about some of the check points or if the remedies indicated in the chart do not solve the problem consult your dealer for instructions Symptom Checkpoints Battery Cannot use a battery that can still be used on other equipment This unit considers the battery as empty eve...

Page 50: ...e Recording ended halfway If the unit receives a shock e g it is dropped if the battery comes off or the battery runs out during recording recording data may not be updated There may be no space left in the internal memory Sound skipping on the recorded file You formatted this unit using the computer If the internal memory is formatted using the computer the optimum performance of this unit may no...

Page 51: ...e file naming rules can be played in folder MIC_A through MIC_D Even if file names are not changed if some file numbers overlaps in the folder those files cannot be played page 41 A file in the MIC_A to MIC_D or LINE folder cannot be played Cannot play a file in the MUSIC M folder or the playback is not correct PCM WAV files recorded on this unit and MP3 files can be played on this unit Other file...

Page 52: ...ot delete a file or folder If MP3 music files transferred from the computer are Read only or subfolders are created in the MUSIC folder they cannot be deleted on this unit Delete them on the computer page 39 Cannot divide a file Is there sufficient space in the internal memory 199 recorded files maximum recordable number may be present in the folder If the folder contains 199 recorded files dividi...

Page 53: ... product correctly will help to save valuable resources and prevent any potential negative effects on human health and the environment which could otherwise arise from inappropriate waste handling Please contact your local authority for further details of your nearest designated collection point Penalties may be applicable for incorrect disposal of this waste in accordance with national legislatio...

Page 54: ...30 Hz to 22 000 Hz MP3 320 30 Hz to 20 000 Hz MP3 192 30 Hz to 17 200 Hz MP3 128 30 Hz to 7 500 Hz MP3 64 30 Hz to 6 700 Hz MP3 32 Built in Microphone S N Ratio 45 5 dB PCM Filter JIS A USB USB2 0 Hi Speed DC 5 V 150 mA Audio Output Earphone ø 3 5 mm 16 Ω Max 10 mW Speaker Output ø 15 mm 8 Ω 80 mW RMS Audio Input External Microphone ø 3 5 mm 0 80 mV plug in power Max Dimensions W H D 38 3 mm 106 5...

Page 55: ... battery 2 Without recording monitor Recording indicator OFF Microphone ALC setting ON 3 When audio is output from speaker Volume 13 SOUND EQ FLAT Playback speed control 100 Standard recordable time may be less depending on the operating conditions Recording mode Recording time Bit rate PCM 44 1 Stereo approx 6 h 1411 kbps MP3 320 Stereo approx 27 h 320 kbps MP3 192 Stereo approx 45 h 192 kbps MP3...

Page 56: ... leave the batteries in an automobile exposed to direct sunlight for a long period of time with doors and windows closed Do not attempt to recharge dry cell batteries Battery mishandling can cause electrolyte leakage which can damage items the fluid contacts and may cause a fire If electrolyte leaks from the batteries consult your dealer Wash thoroughly with water if electrolyte comes in contact w...

Page 57: ... becomes too dirty wring a cloth moistened in water wipe the dirt with it and clean with a dry cloth Do not use solvents including benzine thinner alcohol kitchen detergent a chemical wiper etc This might cause the exterior case to be deformed or the coating to come off Maintenance This product may receive radio interference caused by mobile telephones during use If such interference is apparent p...

Page 58: ...VQT3C56 58 ONLY FOR AUSTRALIA ...

Page 59: ...osta Rica 800 PANA737 800 7262737 El Salvador 800 PANA 800 7262 Guatemala 1 801 811 PANA 1 801 811 7262 Chile 800 390 602 From a cell phone 797 5000 Venezuela 800 PANA 800 800 7262 800 Uruguay 0 800 PANA 0 800 7262 Peru 0800 00726 Argentina 0800 333 PANA 0800 333 7262 0810 321 PANA 0810 321 7262 Mexico Service To obtain information in the Republic of Mexico contact us at email atencion clientes mx...

Page 60: ...010AF0 Web Site http panasonic net EU Pursuant to at the directive 2004 108 EC article 9 2 Panasonic Testing Centre Panasonic Marketing Europe GmbH Winsbergring 15 22525 Hamburg Germany Panasonic Corporation 2010 EU ...

Reviews: