13
Initial Setup
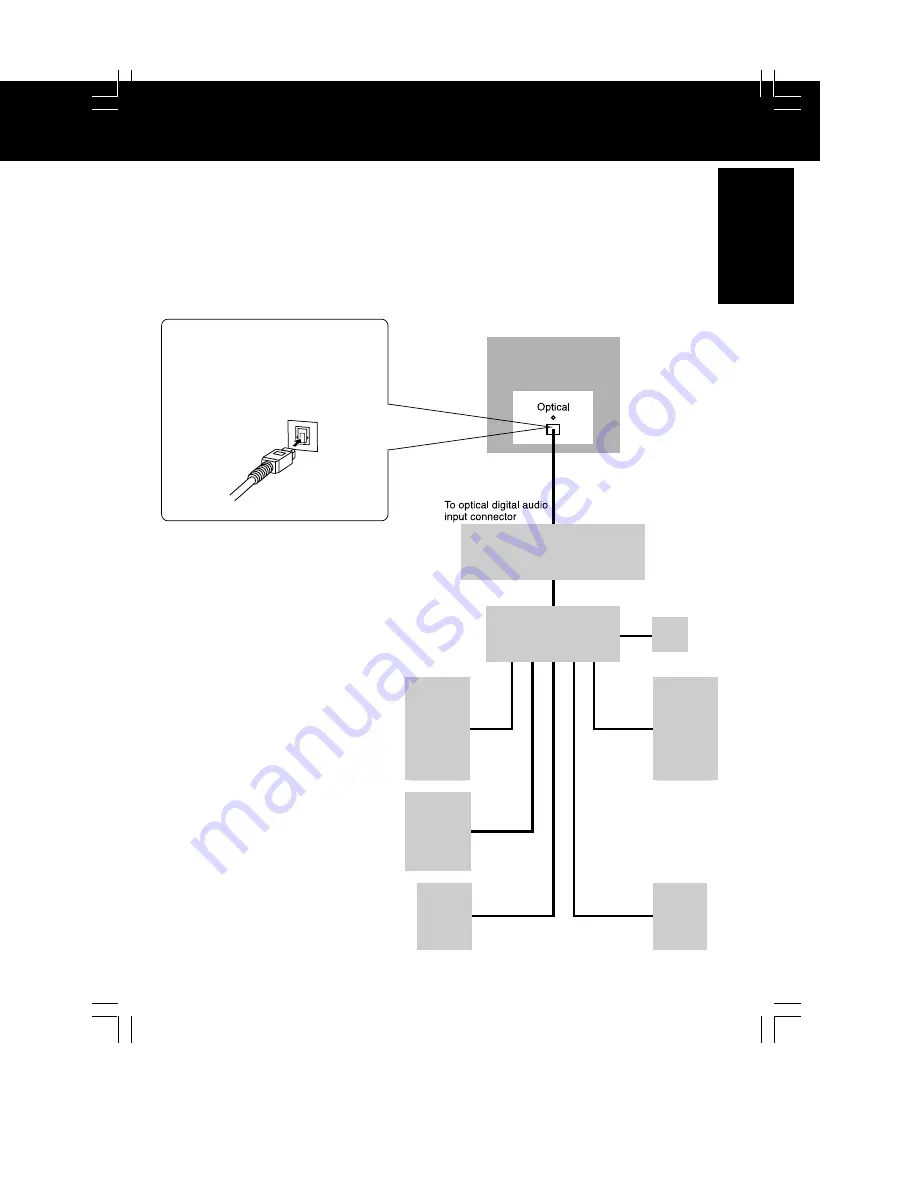
Unit
Optical digital audio
cable (optional)
Dolby Digital Decorder/
dts processing (optional)
Amplifier
Center speaker
Front
Speaker
Front
Speaker
Subwoofer
Surround
speaker
Surround
speaker
■
Unit
➛
➛
➛
➛
➛
Dolby Digital Decoder
➛
➛
➛
➛
➛
Amplifier
➛
➛
➛
➛
➛
Speaker
or
Unit
➛
➛
➛
➛
➛
dts
(digital theater systems)
Decoder
➛
➛
➛
➛
➛
Amplifier
➛
➛
➛
➛
➛
Speaker
When DVDs recorded in Dolby Digital or dts are played, Dolby Digital bitstream or dts
bitstream is output from the unit Optical digital audio output connector. When the unit is
connected to a Dolby Digital decoder or dts decoder, you can enjoy theater-quality audio
in your home. [An optical digital audio cable (optional) is required when an optional Dolby
Digital decoder or dts decoder is used.]
Notes on connecting an Optical
digital audio cable (optional)
• Firmly connect the cable to the
connector.
IMPORTANT NOTE:
Caution for optical digital audio
output connector:
• When connecting an amplifier (with
an Optical digital input connector)
which does not contain the Dolby
Digital or dts decoder, be sure to
select “OFF” at “Dolby Digital” and
“OFF” at “dts” of the Settings for
DVD Operation “AUDIO OUTPUT”
(see page 59). Otherwise, any
attempt to play DVDs may cause
such a high level of noise that it
may be harmful to your ears and
damage your speakers.
• When a dts decoder is connected,
please select “Bitstream” at “dts” of
the Settings for DVD Operation
“AUDIO OUTPUT”. If “OFF” is
selected, there will be no sound.
(See page 59).
• Video CDs and CDs can be played
as normal.
Note:
• Some dts decoders which do not
support DVD-dts Interface may not
work properly with the unit.
DM2092 (P12-13) connect.p65
2002/06/19, 14:52
13
Summary of Contents for PVDM2092 - MONITOR/DVD COMBO
Page 1: ...ORDER NO MKE0207607C1 B22 TV DVD VCR Combination PV DM2092 PV DM2092 K SPECIFICATIONS 1...
Page 10: ...Fig 1 4 Fig 1 5 10...
Page 27: ...CAUTION Disconnect AC plug before disassembly Fig D1 Fig D2 27...
Page 28: ...Fig D3 28...
Page 29: ...6 1 1 1 Notes in chart 1 Removal of VCR DVD Ass y Fig D4 29...
Page 33: ...6 2 3 EJECT Position Confirmation Fig J1 2 33...
Page 34: ...6 2 4 Full Erase Head and Cylinder Unit Fig J2 34...
Page 76: ...76...
Page 79: ...11 2 MECHANISM BOTTOM SECTION 79...
Page 80: ...11 3 CASSETTE UP COMPARTMENT SECTION 80...
Page 81: ...11 4 CHASSIS FRAME SECTION 1 81...
Page 82: ...11 5 CHASSIS FRAME SECTION 2 82...
Page 83: ...11 6 CHASSIS FRAME SECTION 3 83...
Page 84: ...11 7 PACKING PARTS AND ACCESSORIES SECTION 84...


