


Chapter 1
Preparation — About your projector
24 - ENGLISH
About your projector
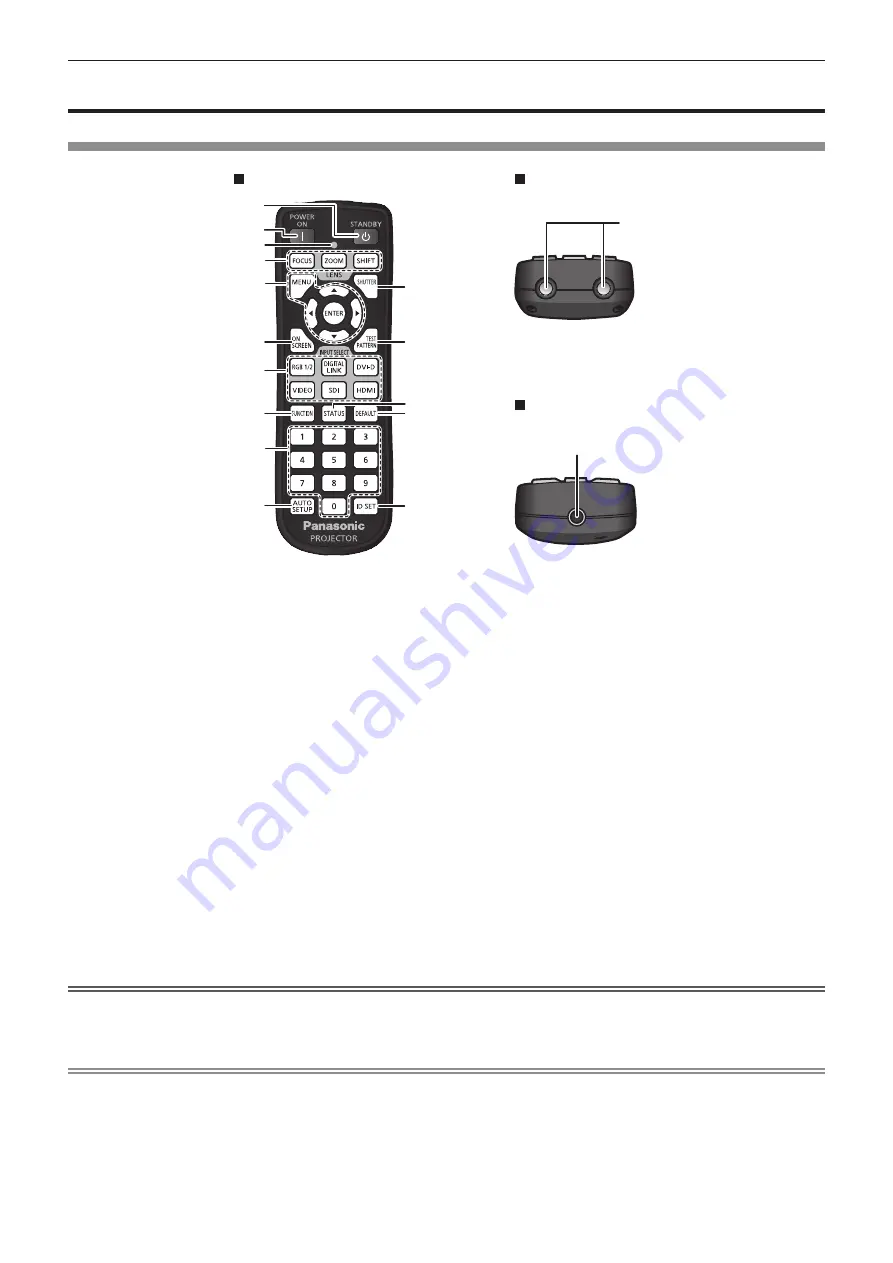
Remote control
1
3
2
4
5
7
6
8
9
10
15
12
11
13
14
16
17
Front
Top
Bottom
1
Power standby <
v
> button
Sets the projector to the state where the projector is switched
off (standby mode) when the <MAIN POWER> switch on the
projector is set to <ON> and in projection mode.
2
Power on <
b
> button
Starts projection when the <MAIN POWER> switch on the
projector is set to <ON> when the power is switched off
(standby mode).
3 Remote control indicator
Blinks if any button in the remote control is pressed.
4
Lens (<FOCUS>, <ZOOM>, <SHIFT>) buttons
Adjusts the projection lens. (
x
page 60)
5 <MENU> button/<ENTER> button/
asqw
buttons
Used to navigate through the menu screen. (
x
page 67)
6
<ON SCREEN> button
Switches the on-screen display function on (display) or off
(hide). (
x
page 62)
7
Input selection (<RGB1/2>, <DIGITAL LINK>, <DVI-D>,
<VIDEO>, <SDI>, <HDMI>) buttons
Switches the input signal to project. (
x
page 63)
(SDI input is supported only for PT-RZ670.)
8
<FUNCTION> button
Assigns a frequently used operation as a shortcut button.
(
x
page 64)
9
Number (<0> - <9>) buttons
Used for entering an ID number or a password in a multiple
projector environment.
10 <AUTO SETUP> button
Automatically adjusts the image display position while projecting
the image.
[PROGRESS] is displayed while in automatic adjustment.
(
x
page 64)
11
<SHUTTER> button
Used to temporarily turn off the image. (
x
page 62)
12 <TEST PATTERN> button
Displays the test pattern. (
x
page 64)
13
<STATUS> button
Displays the projector information.
14
<DEFAULT> button
Resets the content of the sub-menu to the factory default.
(
x
page 68)
15 <ID SET> button
Sets the ID number of the remote control in a multiple projector
environment. (
x
page 27)
16 Remote control signal transmitter
17 Remote control wired terminal
This is the terminal used to connect to the projector via a cable
when used as a wired remote control. (
x
page 28)
Attention
f
Do not drop the remote control.
f
Avoid contact with liquids or moisture.
f
Do not attempt to modify or disassemble the remote control.
Note
f
When operating the remote control by directly pointing at the remote control signal receiver of the projector body, operate the remote
control within a distance approx. 30 m (98'5") from the remote control signal receiver. The remote control can control at angles of up to ±30°
vertically and horizontally, but the effective control range may be reduced.
f
If there are any obstacles between the remote control and the remote control signal receiver, the remote control may not operate properly.
f
The signal will be reflected off the screen. However, the operating range may be limited from light reflection loss due to the screen material.
f
If the remote control signal receiver directly receives strong light, such as fluorescent light, the remote control may not operate properly. Use
it in a place distant from the light source.
f
The power indicator <ON (G)/STANDBY (R)> will blink if the projector receives a remote control signal.


