background image

74

1

4

2

OPEN/
 EJECT

CLOSE

PUSH

2

3

1

3

OF

F O

N MODE

CAMERA

VCR

CARD 
P.B.

2

RECORD

REC

1

CAMERA

VCR

CARD 
P.B.

1

2

OF

F O

N MODE

1

CAMERA

VCR

CARD 
P.B.

OF

F O

N MODE

SEARCH

BACKLIGHT

FADE

MAGICPIX

MULTI/

P-IN-P

TITLE

CAMERA

STILL

SEARCH

2


3


Spanish Quick Use Guide/Guía española para el 
uso rápido

ª

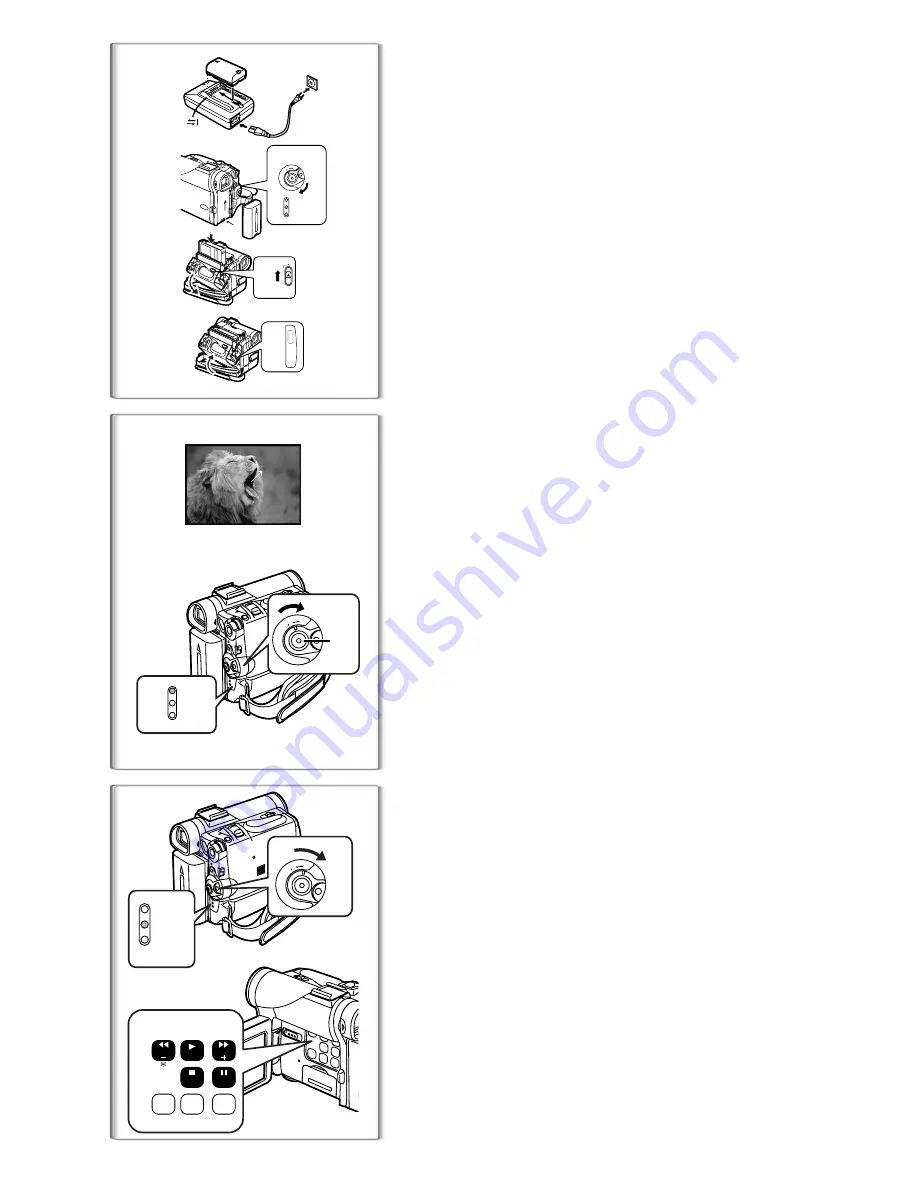
Para iniciar

1

Cargue la batería.

Conecte el cable eléctrico de CA en el adaptador de CA y en la toma de 
corriente de CA.

Coloque la batería con el adaptador de CA. (Eso hará empezar la 
carga).

La batería estará cargada enteramente cuando se apague la luz de 
carga [CHARGE],.

Como la batería no se carga cuando el cable de CC. está conectado 

con el adaptador de CA, desconéctelo.

2

Acople la batería cargada con la videocámara.

3

Active la videocámera.

Desplace el interruptor 

1

 a [ON]. (Se enciende la luz  [CAMERA].)

4

Introduzca la cassette.

Lleve la palanca 

2

 a la derecha y tire hacia abajo para abrir la tapa.

Introduzca la cassette.

Oprima [PUSH CLOSE] 

3

 para cargar la cassette.

Cierre la tapa del asiento inferior.

~~~~~~~~~~~~~~~~~~~~~~~~

ª

Para grabar

1

1

1

1

Ajuste el [OFF/ON/MODE] y ponga a [ON].

Se enciende la luz [CAMERA]. 

1

2

2

2

2

Oprima el pulsador de Inicio/Parada para grabar.

Inicia la grabación.

Después de que esté visualizado [RECORD], cambia a [REC]. 

2

~~~~~~~~~~~~~~~~~~~~~~~~

ª

Para comprobar lo que ha sido grabado

1

Active el modo VCR, rebobine la cinta, ponga la cinta en 
playback.

Desplace el interruptor 

1

. (Se enciende la luz [VCR].)

Oprima el pulsador para rebobinar 

2

.

Oprima el pulsador de actuación 

3

. (Empezará el playback)

2

Desactive la videocámara.

Lleve el interruptor 

1

 a [OFF].

Summary of Contents for Palmcorder PV-DC152

Page 1: ...A 7262 or send e mail to consumerproducts panasonic com For Canadian assistance please call 1 800 561 5505 or visit us at www panasonic ca Digital Video Camcorder Operating Instructions Models No PV D...

Page 2: ...re designed to provide reasonable protection against harmful interference when operated in a residential environment If this equipment does cause interference to radio or television reception which ca...

Page 3: ...a plug having one blade wider than the other or 3 wire grounding type plug a plug having a third grounding pin The 2 wire polarized plug will fit into the power outlet only one way This is a safety f...

Page 4: ...t exposure to water rain sleet snow sand dust or a direct splashing from a pool or even a cup of coffee This action could permanently damage the internal parts of your Palmcorder Do not attempt to dis...

Page 5: ...he End of a Recording 30 Index Search Functions 31 Playback Zoom Function 32 Playback Digital Effect Functions 32 Playing Back on Your TV 33 Audio Dubbing 33 Special Features Using a Memory Card 34 Re...

Page 6: ...r for assistance in selecting an alternate AC plug We recommend using the accessory power plug adaptor VJSS0070 in an area which has special AC outlets 2 Battery Pack l 12 Supplies power to the Palmco...

Page 7: ...r disconnect it 2 Attach the Charged Battery to the Palmcorder l 12 3 Insert the Cassette l 13 Slide the OPEN EJECT 1 Lever toward the front and pull down to open the Cassette Compartment Insert the C...

Page 8: ...DC252 PV DC252 K l 34 14 Card Slot PV DC252 PV DC252 K l 34 15 Card Slot Cover PV DC252 PV DC252 K l 34 16 Eyepiece Corrector Knob l 14 17 Viewfinder l 14 62 Due to limitations in LCD production tech...

Page 9: ...ivates it When plugging the pin plug of the AV cable into the AV output terminal plug it in as far as it goes 47 Microphone Jack MIC Connecting with an external microphone or audio equipment When this...

Page 10: ...m Function l 32 10 Downward Direction Button for Playback Zoom Function l 32 11 Slow Motion Still Advance Button E D E reverse direction D normal direction l 30 12 Index Search Button 9 reverse direct...

Page 11: ...lace battery with Panasonic PART NO VSBW0004 CR2025 only Use of another battery may present a risk of fire or explosion Caution Battery may explode if mistreated Dispose of used battery promptly Keep...

Page 12: ...aptor disconnect it The POWER Lamp and CHARGE Lamp lights up and charging starts When the CHARGE Lamp goes off charging is completed 2 Attach the charged Battery to the Palmcorder Disconnecting the Po...

Page 13: ...tdoors to record so as to avoid dropping the Palmcorder 1 Pass the tip of the Shoulder Strap through the Shoulder Strap Holder on the Palmcorder and pull the Shoulder Strap 2 Fold the tip of the Shoul...

Page 14: ...direction of the arrow to open the LCD Monitor The Viewfinder goes off 3 3 3 3 Adjust the LCD Monitor angle according to the desired recording angle The LCD Monitor can rotate a maximum of 180x 2 fro...

Page 15: ...Menu Screen Press the MENU Button again About the Menu Mode Setting The setting selected on the Menu will be retained even when the Palmcorder is turned off However if the Battery or AC Adaptor is dis...

Page 16: ...Exposure Mode PROG AE l 24 2 Progressive PhotoShot Mode PROGRESSIVE l 21 3 Digital Effect Image Stabilizer EIS l 22 4 Digital Zoom D ZOOM l 22 5 Cinema like Format Recording CINEMA l 23 6 Returning t...

Page 17: ...YES 11 12 10 5 CARD SETUP PUSH MENU TO EXIT PICTURE QUALITY FINE NORMAL ECONOMY RETURN YES YES CREATE TITLE VCR Mode Main Menu VCR FUNCTIONS PLAYBACK FUNCTIONS Sub Menu 1 Blank Search BLANK SEARCH l...

Page 18: ...1 DELETE FILE The DELETE FILE Menu for deleting the file being displayed appears l 40 Use this Menu after the file to be erased appears 12 FILE LOCK The FILE LOCK Menu to prevent the accidental erasur...

Page 19: ...n lithium battery and reset the date and time Internal Lithium Battery Recharge The internal lithium battery sustains the operation of the clock When the 0 Indication 1 is lit the internal lithium bat...

Page 20: ...e Mode To View the recorded scene while the Recording is paused Camera Search The recorded scene can be viewed by holding down the SEARCHj Button 6 or SEARCHi Button 7 in the Recording Pause Mode The...

Page 21: ...again the Digital Still Picture Mode is cancelled We recommend that you press the CAMERA STILL Button first at the position where you want to record the picture and then press the PHOTO SHOT Button F...

Page 22: ...IS ON The EIS Indication 1 appears Canceling Digital Electronic Image Stabilizer Set EIS on the CAMERA SETUP Sub Menu to OFF EIS function may not work when Palmcorder movement is too extreme Recording...

Page 23: ...e used when the Iris is set Magic Pix Function This Palmcorder automatically adjusts the shutter speed in accordance with the amount of available light Objects can be brightly isolated from background...

Page 24: ...recorded unnaturally at the beginning of the recording The zoom magnification differs from when it is in the Recording Pause mode and when the recording starts Wind Noise Reduction Function This funct...

Page 25: ...e PUSH Dial repeatedly until the iris Indication 2 appears 3 Rotate the PUSH Dial to adjust the iris Adjustable Range of the Iris CLOSE Closed F16 F1 7 OP Opened 0dB 18dB When a value closer to CLOSE...

Page 26: ...otate the PUSH Dial until the 1 indication 2 is displayed 4 Point the Palmcorder at a full screen white subject and then keep the PUSH Dial pressed until indication 1 stops flashing When the 1 indicat...

Page 27: ...a desired digital effect Set CAMERA FUNCTIONS DIGITAL EFFECT EFFECT1 or EFFECT2 a desired digital effect Canceling the digital effect Set CAMERA FUNCTIONS DIGITAL EFFECT EFFECT1 or EFFECT2 OFF For ot...

Page 28: ...ti Pictures While 9 multi pictures are displayed press the MULTI Button If MANUAL has been selected press the MULTI Button after 9 pictures are displayed To Display the Multi Pictures again Press the...

Page 29: ...d continuously it remains as Cue Playback or Review Playback until you release it If the Button is pressed briefly Cue Playback or Review Playback continues even when it is released Hyper Check Functi...

Page 30: ...Playback By rotating the Jog Dial PUSH Dial 1 of the Palmcorder in the Still Playback Mode still pictures can be advanced one frame at a time in the forward or reverse direction If the Palmcorder is l...

Page 31: ...ress the 9 Button or the Button on the Remote Controller With each press of the corresponding button still pictures recorded in PhotoShot Mode are searched After Pictures with Sounds are played back f...

Page 32: ...OR The same setting can also be set using the DIGITAL EFFECT on the VCR FUNCTIONS Main Menu Suspending Playback Digital Effect Temporarily Press the OFF ON Button 1 to clear or restart the digital eff...

Page 33: ...ecordings made in LP Mode l 19 1 Press the 1 Button and then press the Button at the point where you want to start dubbing 2 Press the A DUB Button on the Remote Controller A DUB Indication appears 1...

Page 34: ...s accessing the Card reading recording playback erasing moving of images the ACCESS Lamp 1 lights up While the ACCESS Lamp is on never attempt to pull out the Card to turn off the Palmcorder power or...

Page 35: ...proximately 45 pictures NORMAL Normal approximately 95 pictures ECONOMY low image quality approximately 190 pictures The figures vary depending on the subject being photographed Automatically copying...

Page 36: ...sired file The selected file is marked with a red frame When 7 or more files have been recorded turn the PUSH Dial to display the next file The 6 Button or 5 Button can be used instead of the PUSH Dia...

Page 37: ...ayed only the subsequent pictures will be copied 2 2 2 2 Set CARD FUNCTIONS CARD EDITING RECORD TO TAPE YES During the copying the Indication 1 appears It takes approximately 7 11 seconds for each pic...

Page 38: ...he MENU Button 8 Press the 1 Button The M SLIDE Indication is displayed 4 To Play Back All the Pictures Continuously After setting the SLIDE SHOW to ALL press the 1 Button The SLIDE Indication is disp...

Page 39: ...r of the captured image Title in the original color in which the bright portion whitish portion of the captured image is missing 4 Preset colors black blue green cyan red pink yellow and white Title i...

Page 40: ...can Deleting the Files recorded on a Memory Card Using the Palmcorder you can delete the still picture files and titles recorded on a Memory Card After the file is deleted it cannot be restored In PV...

Page 41: ...printed the number of prints and other print related information DPOF setting on a Memory Card DPOF stands for Digital Print Order Format and since printing data can be added to images on the Memory C...

Page 42: ...ed Cassette VCR 2 Insert a blank Cassette with an erasure prevention tab If various settings such as external input tape speed etc are required please refer to the operating instructions of your VCR P...

Page 43: ...DC9 optional 1 high quality image and sounds can be dubbed in the digital mode Playback Unit A 1 Insert the recorded Cassette and set the Palmcorder to the VCR Mode Recording Unit B 2 Insert a Cassett...

Page 44: ...rademarks of the respective holders Please refer to page 46 regarding the system requirements of USB Driver Software Installation Windows 1 Turn on Computer and start up Windows 2 Insert supplied CD R...

Page 45: ...enhance retouch or add special effects to any image Also offers creative solutions for making greeting cards and calendars 3 PhotoBase 3 0 Windows PhotoBase 2 0 Mac Create albums of image video audio...

Page 46: ...No is clicked 4 Click OK when the Restarting Windows Dialog appears Reboot the computer to finish installing USB driver Installation continues after the computer reboots if you selected additional so...

Page 47: ...nnected while computer is on an error message may appear In such a case click OK and close the dialog box By following the steps below you can disconnect the cable safely 1 Double click the icon in ta...

Page 48: ...ager tab we recommend updating the driver by following the steps below Updating driver 1 1 1 1 Select DVC in Other devices of Device Manager and click Properties 2 2 2 2 Select Driver and click Update...

Page 49: ...of Device Manager tab we recommend updating the driver as described below to Panasonic DVC USB Driver Updating driver 1 1 1 1 Click USB Mass Storage Device of Device Manager 2 2 2 2 Select Driver and...

Page 50: ...ng the steps below Updating driver 1 1 1 1 Select USB Mass Storage Device in Universal Serial Bus controllers of Device Manager and click Properties 2 2 2 2 Select Driver and click Update Driver 3 3 3...

Page 51: ...software or driver uninstall Uninstalling Application Software 1 Click Start Settings Control Panel 2 Double Click Add Remove Programs in Control Panel 3 Select the application software you want to re...

Page 52: ...f the equipment in advance About the compatibility of the card files Data files recorded on an SD Memory Card or a MultiMediaCard by this Palmcorder conform with DCF Design Rules for Camera Files Syst...

Page 53: ...ex signals are being recorded the INDEX Indication flashes l 31 Search Number S1 l 31 The figure indicates which number of scenes ahead from the present scene is to be played back 7 Tape Run Indicatio...

Page 54: ...SLIDE Manual Slide Show Playback l 38 M SLIDE Manual Slide Show Playback Pause l 38 22 Card File Indications 2 CARD P B Mode Image size l 34 36 When you playback a scene recorded on a Palmcorder with...

Page 55: ...BATTERY The Battery is low Recharge it l 12 0 The internal lithium battery is low l 19 2 END TAPE END The tape ended during recording REMOTE CHECK REMOTE MODE Wrong Remote Controller Mode has been se...

Page 56: ...ou will hear a click This is the sound of the iris closing and not an indication of malfunction If you record still pictures in Progressive PhotoShotTM Mode when your Palmcorder is set to Program AE t...

Page 57: ...scenes may not be able to be made brighter to a satisfactory degree Spotlight Mode With this Mode recorded images may turn out to be extremely dark If the recording subject is extremely bright its rec...

Page 58: ...You cannot use the Mirror Mode of Digital Effects and the Playback Zoom Functions simultaneously During the Playback Zoom Function the Variable Speed Search Function cannot be used with the Remote Con...

Page 59: ...e set from 5 to 99 seconds Perform the Slide Show Settings with your own Palmcorder Depending on the File size playback may take longer than the set time When performing the Slide Show after the Title...

Page 60: ...taken when inserting and removing the Cassette Do not spray insecticides or volatile chemicals onto the Palmcorder If the Palmcorder is sprayed with such chemicals the Palmcorder body may deform and t...

Page 61: ...t Steps 1 to 3 Do not use the Head Cleaner 3 times or more consecutively Notes Do not rewind every time you use the Head Cleaner Rewind only when the tape reaches the end and then use it again from th...

Page 62: ...wer or subject it to vibration or impact Do not leave the Card in places where there is high temperature or direct sunlight or where electromagnetic waves or static electricity are easily generated Do...

Page 63: ...th bluish or reddish hue To minimize the effect of light on the subject s color White Balance Adjustment becomes necessary White Balance Adjustment White Balance Adjustment recognizes the color of lig...

Page 64: ...nk software and RS 232C cable optional PV DRS2 USB PV DC252 PV DC252 K Card reader writer function USB 2 0 compliant max 12 Mbps No copyright protection support Digital Interface DV Input Output Termi...

Page 65: ...Lithium Ion Battery Pack 2800mAH Rechargeable Lithium Ion Battery Pack 5300mAH Rechargeable Lithium Ion Battery Pack DV Interface Cable i LINK 4 pin to 4 pin IR Remote Control Figure PV DRC9 For USA P...

Page 66: ...0421 84th Avenue South Kent WA 98032 Ship To Mr Mrs Ms First Last Street Address City State Zip Phone Day Night 4 Shipping information UPS delivery requires complete street address Please photocopy th...

Page 67: ...operating time of the Battery becomes shorter Has the Battery worn out If the operating time is still too short even after the Battery is fully charged the Battery has worn out The Battery cannot be c...

Page 68: ...ginal sound and sound that was recorded by audio dubbing are played back together It is possible to reproduce the sounds separately The original sound was erased when audio dubbing was performed If yo...

Page 69: ...or Service Notice USA Only Please photocopy this form when making a request for service notice In the unlikely event this product needs service Please include your proof of purchase Failure to due so...

Page 70: ...pictures on wide screen TV s or onscreen data in a stationary and fixed location The warranty ALSO DOES NOT COVER damages which occurred in shipment or failures which are caused by products not suppli...

Page 71: ...85 Phone 787 750 4300 Fax 787 768 2910 Web Site http www panasonic com You can purchase parts accessories or locate your nearest servicenter by visiting our Web Site Accessory Purchases 1 800 332 5368...

Page 72: ...es so the above limitations and exclusions may not be applicable WARRANTY SERVICE For product operation and information assistance please contact your Dealer or our Customer Care Centre at Telephone 9...

Page 73: ...ion 21 Manual Focus 25 Memory Card 34 Memory Stop Function 63 Menu Screen 15 Microphone 21 58 Mirror Mode Digital Effect 27 32 Mix Mode 27 32 Mosaic Mode 27 32 Multi Picture Mode 28 N Negative Mode 27...

Page 74: ...ctelo 2 Acople la bater a cargada con la videoc mara 3 Active la videoc mera Desplace el interruptor 1 a ON Se enciende la luz CAMERA 4 Introduzca la cassette Lleve la palanca 2 a la derecha y tire h...

Page 75: ...luz ACCESS 1 nunca trate de abrir el asiento de la tarjeta ya que eso podr a da ar la tarjeta y originar un funcionamiento defectuoso a la videoc mara Para grabar en una tarjeta de memoria 1 1 1 1 Lle...

Page 76: ...7094 201 348 7000 Panasonic Company East 6749 Baymeadow Drive Glen Burnie MD 21060 Panasonic Company Central 1707 North Randall Road Elgin IL 60123 Panasonic Company West 6550 Katella Avenue Cypress C...

Reviews: