background image

8.3  Restarting the VPS

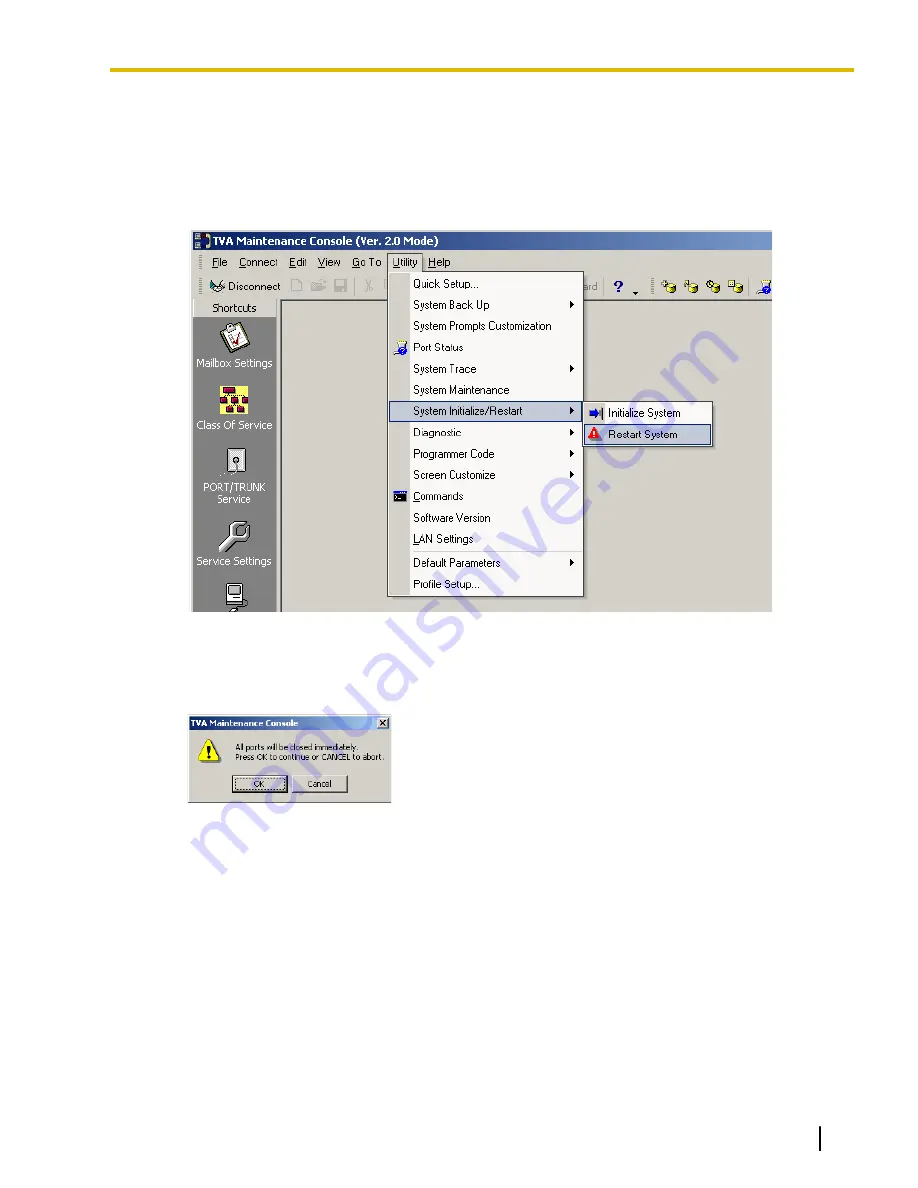
If the VPS is not functioning properly, restarting the VPS may resolve the issue. There are 3 methods for
restarting the VPS, explained below.

1.

If the VPS does not function properly:

a.

Select 

Utility

®

System Initialize/Restart

®

Restart System

.

b.

Click 

OK

 to close all lines and restart the VPS.

c.

Click 

OK

 and wait for the VPS to restart.

2.

If the VPS still does not function properly:

a.

Press the 

SHUTDOWN

 button. The 

RUN

 indicator will begin flashing.

b.

Wait for the 

RUN

 indicator to turn off and for the 

ALARM

 indicator to light.

c.

Press the 

RESET

 button.

Pressing the 

RESET

 button before the 

ALARM

 indicator lights may cause the VPS to take an

exceptionally long time (up to 30 minutes) to start up again.

Document Version  3.0  2010/06

Installation Manual

197

8.3 Restarting the VPS

Summary of Contents for KX-TVA50

Page 1: ...ing System Model No KX TVA50 KX TVA200 Thank you for purchasing a Panasonic Voice Processing System Please read this manual carefully before using this product and save this manual for future use KX T...

Page 2: ...ssing System Optional Cards KX TVA502 2 Port Hybrid Expansion Card KX TVA503 2 Port Digital Expansion Card KX TVA524 Memory Expansion Card KX TVA594 LAN Interface Card KX TVA296 Modem Card KX TVA200 M...

Page 3: ...arate enclosure unless it is properly ventilated Mount the unit on a surface that is flat and free of obstructions so that the openings on the back of the unit will not be blocked Do not block the ven...

Page 4: ...HE POWER FIRST TO PREVENT FIRE OR ELECTRICAL SHOCK DO NOT EXPOSE THIS UNIT TO RAIN OR MOISTURE THIS UNIT IS EQUIPPED WITH A GROUNDING CONTACT PLUG FOR SAFETY REASONS THIS PLUG MUST ONLY BE CONNECTED T...

Page 5: ...aintenance Console or the Voice Mail Assistant feature of the optional Phone Assistant software Log out of the VPS when leaving the computer unattended If features that allow users to access the VPS w...

Page 6: ...password the first time you access the VPS via KX TVA Maintenance Console The default password can be changed by running the Quick Setup utility see 6 1 2 Quick Setup or by selecting System Security A...

Page 7: ...for this product are listed in the Service Center directory Consult your certified Panasonic dealer for detailed instructions Installation note This product is only for connection behind a suitable PB...

Page 8: ...and lgpl txt files in the open source license folder and for information about other Open Source Software refer to the freeware_header txt in the open source freeware header folder in the included CD...

Page 9: ...arty responsible for compliance could void the user s authority to operate this device The following information applies to when an optional modem card is installed in this product Notify The Telephon...

Page 10: ...acilities Equipment Operations and Procedures The telephone company may make changes in its facilities equipment operations or procedures that could affect the operation of the equipment If this happe...

Page 11: ...Console This section explains how to install KX TVA Maintenance Console on a PC Section 4 PBX Programming for APT DPT Integration This section explains how to configure selected Panasonic PBXs to use...

Page 12: ...t this manual for your reference Subscriber s Manual The Voice Processing System Subscriber s Manual describes how subscribers can access commonly used VPS features and functions with their extensions...

Page 13: ...2 50 2 7 2 2 Port Digital Expansion Card KX TVA503 52 2 7 3 Memory Expansion Card KX TVA524 54 2 7 4 LAN Interface Card KX TVA594 55 2 7 5 Modem Card KX TVA296 57 2 8 Installing Optional Cards KX TVA2...

Page 14: ...for Inband Integration 135 5 4 KX TA824 PBX Programming for Inband Integration 144 5 5 KX TD Series PBX Programming for Inband Integration 149 5 5 1 KX TD Series PBX Programming via the Manager s Exte...

Page 15: ...197 9 Revision History 199 9 1 KX TVA50 KX TVA200 Version 3 0 200 9 2 KX TVA50 KX TVA200 Version 2 1 200 9 3 KX TVA50 KX TVA200 Version 2 0 200 Index 201 Document Version 3 0 2010 06 Installation Manu...

Page 16: ...16 Installation Manual Document Version 3 0 2010 06 Table of Contents...

Page 17: ...Overview This section provides a basic introduction to the VPS and its specifications It briefly explains what the VPS can do and how it is connected to and interacts with the PBX Document Version 3...

Page 18: ...nitial configuration and its hard disk drive provides 1000 hours of recording capacity Both systems can be expanded by adding optional service cards KX TVA50 1 3 2 4 1 Main Board 2 Front Cover 3 Facto...

Page 19: ...PC PC PC USB LAN PBX PBX Server PC Internal Modem Internal Modem DPT APT Inband Interface DPT Interface KX TVA50 KX TVA50 KX TVA200 KX TVA200 KX TVA50 KX TVA200 Telephone Company Lines Document Versio...

Page 20: ...Recording Time Initial Configuration 4 hours 1000 hours Maximum 8 hours 1 1 5 Installer Equipment and Software Requirements The installer must use a PC and the KX TVA Maintenance Console software to...

Page 21: ...arts KX TVA50 PBX KX TVA50 No of Trunks CO Lines No of Trunks CO Lines When Using AA Service No of Ports No of Optional Port Cards 1 6 1 4 1 0 1 7 12 5 8 2 13 18 9 12 3 1 19 24 13 16 4 25 30 17 20 5 2...

Page 22: ...79 84 53 56 14 85 90 57 60 15 91 96 61 64 16 97 102 65 68 17 4 103 108 69 72 18 109 114 73 76 19 115 120 77 80 20 121 126 81 84 21 5 127 132 85 88 22 133 138 89 92 23 139 144 93 96 24 1 The factory i...

Page 23: ...n P231U91227A KX TD816 DPT Integration P301O91227A KX TD500 DPT Integration P171AA010312A KX TD308 DPT Integration P871F91227 Third party Manufacturer Inband Integration or No Integration KX TVA200 PB...

Page 24: ...See the DPT connection example s for your VPS model in the following sections 1 2 2 Connection Examples KX TVA50 1 2 3 Connection Examples KX TVA200 Connect the other jacks to the VPS in the same ord...

Page 25: ...nected to the lowest numbered port of the Voice Mail group assigned through PBX programming Connection Example Factory installed Jacks and KX TVA502 2 DPT Integration Mode PBX KX TDA50 Slot 1 Port 2 P...

Page 26: ...n Example Factory installed Jacks and KX TVA502 1 APT Integration Mode KX TVA50 PBX KX TA824 Assigned as VM1 APT ports Jack 7 Jack 8 Port 2 Port 1 Jack 1 Jack 2 Factory installed Jacks Slot 1 Port 4 P...

Page 27: ...and KX TVA502 2 Inband No Integration Mode PBX KX TDA50 Slot 1 Port 2 Port 1 Port 4 Port 5 Port 6 Port 7 Port 8 Port 3 Port 2 Port 1 KX TVA50 Jack 1 Jack 2 Slot 3 Port 6 Port 5 Jack 5 Jack 6 KX TVA50...

Page 28: ...ort 8 Port 7 Port 6 Port 5 Port 12 Port 11 Port 10 Port 9 Port 16 Port 15 Port 14 Port 13 KX TVA200 Assigned as VM DPT ports Jack 1 Jack 2 KX TVA204 Slot 3 Port 10 Port 11 Port 12 Port 9 Jack 5 Jack 6...

Page 29: ...pression Rate 32 Kbps Internal Modem Type V 90 Dialing Method DTMF Flash Time 100 ms 300 ms 600 ms 900 ms programmable CPC Detection None 6 5 ms 150 ms 300 ms 450 ms 600 ms programmable Line Type Loop...

Page 30: ...urly Statistics Report E mail Report Mailbox Information Report Call Account Report Group calls by Port Call Account Report Group calls by Mailbox Port Usage Report HDD Usage Report Mailbox Usage Repo...

Page 31: ...ication KX TVA50 KX TVA200 Weight when all available option cards are installed No more than 1 7 kg 3 75 lb No more than 4 0 kg 8 82 lb Document Version 3 0 2010 06 Installation Manual 31 1 3 Specific...

Page 32: ...32 Installation Manual Document Version 3 0 2010 06 1 3 Specifications...

Page 33: ...Section 2 Installation This section explains how to install the VPS and its optional cards Document Version 3 0 2010 06 Installation Manual 33...

Page 34: ...rce computer etc If cables are run near those wires shield them with metal tubing or use shielded cables and ground the shields Use protectors if running cables on the floor Avoid running cables under...

Page 35: ...ting Humidity See the graph below Shock Under 5 G Vibration 5 Hz to 22 Hz 0 0042 cm 0 020 in displacement double amplitude 1 octave per minute 23 Hz to 350 Hz Under 0 5 G Magnetic Field DC 0 6 mT to 7...

Page 36: ...he PBX For the KX TVA50 twisted pair 2 conductor cables are needed if using Inband or No Integration A USB cable is needed when connecting the VPS to the PC that will used for programming via the KX T...

Page 37: ...s are included with the VPS KX TVA50 KX TVA200 Main Unit 1 1 AC Adaptor 1 1 AC Cord 1 1 Screws Wall Mounting 5 5 Washers Wall Mounting 5 5 Cable strap 1 1 CD ROM 1 1 Document Version 3 0 2010 06 Insta...

Page 38: ...lled Jacks 5 RESET Button 6 SHUTDOWN Button 7 Mode Switch 8 USB Port 9 Dummy Cover Plate for LAN Interface Card 10 Dummy Cover Plate Reserved 11 Dummy Cover Plate for Modem Card 12 Ground Terminal 13...

Page 39: ...SHUTDOWN Button 6 Mode Switch 7 Factory installed Jacks 8 LAN Port 9 USB Port 10 Dummy Cover Plate for Modem Card 11 Ground Terminal 12 DC IN 13 Power Switch 1 2 3 4 5 1 Main Board 2 Front Cover 3 3...

Page 40: ...istance DC IN Used to supply power to the VPS from the AC Adaptor Power Switch Starts the system and begins the self test SAFETY PRECAUTION When making any connections or removing the cover be sure th...

Page 41: ...ult values Recorded messages and customized prompts are erased All System prompts are reset to their defaults CAUTION All user recorded prompts are erased 9 Reserved 10 0 1 1 2 3 4 KX TVA50 only Puts...

Page 42: ...is may take several minutes The ALARM indicator and RUN indicator will first blink intermittently before the RUN indicator blinks to indicate the Mode Switch position 7 Turn the power switch off at th...

Page 43: ...uctor cable as necessary see 2 9 PBX Connections 5 Connect the VPS to the PC to be used for programming see 2 10 PC Connection 6 Connect the VPS to ground see 2 11 Frame Ground Connection 7 Connect th...

Page 44: ...ning the Covers 1 Push the release button in the direction shown below 1 and slide the cable cover in the direction shown below 2 Turn the cable cover away from the unit and remove it 1 Release Button...

Page 45: ...hown Removing Attaching the Front Cover You may also detach the front cover from its hinges Removing the Front Cover While holding the front cover open at a 45 angle lift the cover away from the unit...

Page 46: ...he front cover to the main unit as shown below then close the front cover Closing the Covers 1 Close the front cover then tighten the 3 screws Screw 46 Installation Manual Document Version 3 0 2010 06...

Page 47: ...e cable cover to the main unit then swing the cable cover closed so that the front hooks fit in place 3 Slide the cable cover down until it locks Document Version 3 0 2010 06 Installation Manual 47 2...

Page 48: ...main unit using cutting pliers as shown below The model shown here is the KX TVA200 however this procedure is the same for the KX TVA50 Dummy Cover Plate CAUTION For safety reasons smooth the cut edge...

Page 49: ...alling optional cards it is very important that the power to the unit be turned off Before touching the optional cards or any components within the unit discharge any static electricity from your body...

Page 50: ...n 1 1 2 3 1 per card 1 6 Inband No Integration 2 2 6 6 1 When using DPT Integration only odd numbered jacks 1 3 and 5 can be used Each jack provides 2 VPS ports Included Items Screw 2 Installation 1 P...

Page 51: ...2 Insert and tighten the screws as shown Screw Note The KX TVA502 operates at SELV Document Version 3 0 2010 06 Installation Manual 51 2 7 1 2 Port Hybrid Expansion Card KX TVA502...

Page 52: ...rts DPT Integration 1 2 3 1 per card 6 Included Items Screw 2 Installation 1 Position the front of the card so that the jacks fit in the open slot Holding the card firmly in place lower the other end...

Page 53: ...2 Insert and tighten the screws as shown Screw Note The KX TVA503 operates at SELV Document Version 3 0 2010 06 Installation Manual 53 2 7 2 2 Port Digital Expansion Card KX TVA503...

Page 54: ...d between the guide rails and slide it down as shown 2 Secure the latch by flipping it toward the center of the card and slightly pressing down on it CAUTION When installing optional cards do not put...

Page 55: ...1 Insert the card between the guide rails and slide it down as shown 2 Secure the latch by flipping it toward the center of the card and slightly pressing down on it CAUTION When installing optional...

Page 56: ...3 Insert and tighten the screw as shown Screw 56 Installation Manual Document Version 3 0 2010 06 2 7 4 LAN Interface Card KX TVA594...

Page 57: ...the card between the guide rails and slide it down as shown 2 Secure the latch by flipping it toward the center of the card and slightly pressing down on it CAUTION When installing optional cards do n...

Page 58: ...3 Insert and tighten the screw as shown Screw Note The KX TVA296 operates at TNV 58 Installation Manual Document Version 3 0 2010 06 2 7 5 Modem Card KX TVA296...

Page 59: ...power to the unit be turned off Before touching the optional cards or any components within the unit discharge any static electricity from your body by touching the ground terminal if it is connected...

Page 60: ...ack Included Items Extension Bolt 3 Screw 3 Installation 1 Position the front of the card so that the jacks fit in the open slot Make sure that the tabs on both sides of the card fit into place Holdin...

Page 61: ...extension bolts included with the card into the holes on the card and tighten them to secure the card Extension Bolt Document Version 3 0 2010 06 Installation Manual 61 2 8 1 4 Port Digital Expansion...

Page 62: ...g a card in Slot 5 or 6 secure the card using the screws included with the card instead of the extension bolts Screw Note The KX TVA204 operates at SELV 62 Installation Manual Document Version 3 0 201...

Page 63: ...e it down as shown 2 Secure the latch by flipping it toward the center of the card and slightly pressing down on it CAUTION When installing optional cards do not put pressure on the main board Doing s...

Page 64: ...uctor cable to connect the VPS and PBX For Inband or No Integration KX TVA50 only use a 2 conductor T and R cable Y G R B Y G R B 4 Conductor Cable Modular Connection Outer Pins Inner Pins B BLACK R R...

Page 65: ...and a minimum of 24 gauge cables that comply with the electrical specifications for Category 3 wiring as detailed in the ANSI EIA TIA 570A Building Wiring Standards The maximum length of each VPS PBX...

Page 66: ...us VPS settings 2 10 1 USB Connection An on site PC can be connected to the VPS via USB PC To USB port KX TVA200 KX TVA50 Note We recommend using a USB cable of no more than 5 m 16 ft 5 in in length 6...

Page 67: ...0 3 Modem Connection To connect an off site PC to the VPS remotely via modem an optional Modem Card must be installed in the VPS and the off site PC must also be equipped with a modem To Modem CO Exte...

Page 68: ...connected to the VPS modem Note that the effective data transfer rate of the internal modem maximum 33 600 bps will be subject to the throughput limitations of the PBX 68 Installation Manual Document...

Page 69: ...e Green and yellow insulation is required and the cross sectional area of the conductor must be more than 0 75 mm2 or 18 AWG 3 Tighten the screw 4 Connect the grounding wire to ground KX TVA50 Screw G...

Page 70: ...tor 1 Plug the DC connector of the AC adaptor into DC IN KX TVA50 AC Adaptor DC Connector DC IN 2 1 KX TVA200 AC Adaptor DC Connector DC IN 2 1 70 Installation Manual Document Version 3 0 2010 06 2 12...

Page 71: ...AC outlet AC Adaptor AC Cord To AC outlet IMPORTANT KX TVA50 Use only the included Panasonic AC adaptor part number PSLP1322 KX TVA200 Use only the included Panasonic AC adaptor part number PSLP1244...

Page 72: ...TVA200 however this procedure is the same for the KX TVA50 1 Attach the included strap to either of the 2 rails depending on your preference Rail Rail 2 Bind the cables as shown 72 Installation Manua...

Page 73: ...or safety reasons do not stretch bend or pinch the cables If you prefer you can cut the other side of the cable cover and run the cables through that opening For safety reasons smooth the cut edges Do...

Page 74: ...cations 0 1 1 2 3 4 3 Turn the power switch to the on position 4 Confirm that the RUN indicator blinks 5 times This may take several minutes The ALARM indicator and RUN indicator will first blink inte...

Page 75: ...aced KX TVA50 KX TVA200 232 mm 9 1 8 in 120 mm 4 3 4 in 250 mm 9 13 16 in 130 mm 5 1 8 in 2 Install the screws and washers included in the wall Washer Drive the screw to this position Note Drive the s...

Page 76: ...10 cm 4 in on the sides of the unit Make sure that the wall behind the unit is flat and free of obstructions so that the openings on the back of the unit will not be blocked Be careful not to drop th...

Page 77: ...found on the last 2 pages of this manual on the wall to mark the locations where the 3 screws need to be placed KX TVA50 KX TVA200 232 mm 9 1 8 in 120 mm 4 3 4 in 250 mm 9 13 16 in 130 mm 5 1 8 in 2...

Page 78: ...in above and 10 cm 4 in on the sides of the unit Make sure that the wall behind the unit is flat and free of obstructions so that the openings on the back of the unit will not be blocked Be careful n...

Page 79: ...KX TVA50 KX TVA200 83 mm 3 1 4 in 110 mm 4 5 16 in 2 Install the screws and washers included in the wall Washer Drive the screw to this position Note Drive the screws into the wall until each screw h...

Page 80: ...mounting template found later in this section on the wall to mark the locations where the 2 screws need to be placed KX TVA50 KX TVA200 83 mm 3 1 4 in 110 mm 4 5 16 in 2 Install 2 anchor plugs user s...

Page 81: ...4 Mount the AC adaptor as shown Document Version 3 0 2010 06 Installation Manual 81 2 15 2 Wall Mounting the AC Adaptor...

Page 82: ...stall a screw here Note When you print out this page the dimensions of the wall mounting template may deviate slightly from the measurements indicated in the template Confirm that the markings on the...

Page 83: ...n Note When you print out this page the dimensions of the wall mounting template may deviate slightly from the measurements indicated in the template Confirm that the markings on the printed page refl...

Page 84: ...84 Installation Manual Document Version 3 0 2010 06 2 15 2 Wall Mounting the AC Adaptor...

Page 85: ...Section 3 Installing KX TVA Maintenance Console This section explains how to install KX TVA Maintenance Console on a PC Document Version 3 0 2010 06 Installation Manual 85...

Page 86: ...onnection to the VPS via USB LAN and modem For details on how to connect the PC to the VPS see 2 9 PBX Connections For detailed information on all programming parameters available through KX TVA Maint...

Page 87: ...n system security a password is required to perform system programming We recommend changing the default password the first time you access the VPS via KX TVA Maintenance Console The default password...

Page 88: ...nstall the software on a PC running Windows 2000 Professional or Windows XP Professional you must be logged in as a user that is in either the Administrators or Power Users group To install or uninsta...

Page 89: ...Code dialog box is displayed Enter the installer level programmer code default INSTALLER and click OK Note A programmer code is required to use the KX TVA Maintenance Console The System Administrator...

Page 90: ...aintenance Console Installation 7 Enter the installer level password default 1234 then click Next Note The installer level password also called the administrator password is required to access the VPS...

Page 91: ...tings quickly and easily See 6 1 2 Quick Setup for more information KX TVA Maintenance Console supports versions 1 0 and 1 1 of the KX TVA50 and KX TVA200 The software performs according to the versio...

Page 92: ...t enters Initial mode From here you can choose to enter Batch mode or Interactive mode to program the VPS Batch Mode Batch mode allows you to create new system data files and make modifications to sys...

Page 93: ...tion 4 PBX Programming for APT DPT Integration This section explains how to configure compatible Panasonic PBXs to use APT DPT Integration with the VPS Document Version 3 0 2010 06 Installation Manual...

Page 94: ...at is calling This communication allows features that are only available with APT DPT Integration described below Feature Description Compatible Integration Type APT DPT Auto Configuration The VPS kno...

Page 95: ...s PBXs Personal Greeting for Caller ID 2 Each subscriber can record up to 4 personal greeting messages for special callers Service Mode PBX Control Mode Allows the VPS to change time modes day night l...

Page 96: ...rietary Telephones DPTs 1 DID Call Routing and Toll Saver using DID numbers are only available when the VPS is connected to the following PBXs with DPT Integration KX TD500 software production date co...

Page 97: ...ports 24 channels of the VPS and each VM DPT Group can be connected to a different VPS Maximum Number of VM DPT Groups PBX Model Max No of VM DPT Groups KX TDE100 KX TDE200 2 KX TDA600 8 KX TDA100 KX...

Page 98: ...he VPS The VPS answers all incoming trunk CO line calls promptly See Example Settings 1 later in this section The VPS answers when the operator does not take the call after a specified time See Exampl...

Page 99: ...lick Apply to save the changed data Calls received on the assigned trunks CO lines will be directed to the VPS The VPS will answer those calls using the service AA VM Custom Service etc assigned to ea...

Page 100: ...ach time mode and trunk CO line to a specific extension number operator extension c Click Apply to save the changed data 2 Program the PBX so that unanswered calls to the operator are redirected to th...

Page 101: ...considered to be unanswered and therefore forwarded to the VPS a Go to the System Timers Counters CO Extension screen b Assign the Intercept Timer parameter Document Version 3 0 2010 06 Installation M...

Page 102: ...t it will direct intercepted calls to the VPS a Go to the Groups VM DPT Group System Setting screen b Set Intercept to Mailbox to Disable 102 Installation Manual Document Version 3 0 2010 06 4 2 KX TD...

Page 103: ...c Click Apply to save the changed data Document Version 3 0 2010 06 Installation Manual 103 4 2 KX TDE KX TDA and KX TAW Series PBX Programming for DPT Integration...

Page 104: ...d trunk CO line to a specific extension number floating extension number of the ICD group c Click Apply to save the changed data 2 Program the PBX so that unanswered calls to the ICD group are redirec...

Page 105: ...ll direct overflowed calls to the ICD group s mailbox a Go to the Groups VM DPT Group System Setting screen b Set Intercept to Mailbox to Enable Document Version 3 0 2010 06 Installation Manual 105 4...

Page 106: ...ert the CD ROM included with the VPS into your PC s CD ROM drive 3 Find the following folder CD ROM Drive VM_prompt VM_Menu 4 Copy the desired language file to your desktop 5 Double click the exe file...

Page 107: ...t your dealer for more information 1 Go to the 1 System 1 Date Time screen Set the date and time Click Apply to save the changed data 2 Go to the 1 System 2 Main screen Under Voice Mail select APT Int...

Page 108: ...customer plans to use the VPS a to answer all incoming calls b as an operator backup or c to only answer calls not answered by user extensions a If the VPS is answering all calls Go to the 3 CO 1 Lin...

Page 109: ...s immediately for all time modes To give the operator time to answer the call before the VPS picks up we recommend setting the delay to a few seconds for each extension connected to the VPS Set a diff...

Page 110: ...he call before the VPS picks up we recommend setting the delay to a few seconds for each extension connected to the VPS Set a different delay time for each extension connected to the VPS Finally go to...

Page 111: ...Complete the PBX VPS connection by following from step 1 of 4 7 Completing the PBX VPS Connection Document Version 3 0 2010 06 Installation Manual 111 4 3 KX TA824 PBX Programming for APT Integration...

Page 112: ...amming via the Operating and Maintenance Tool All of the following procedures must be performed through system programming Refer to the KX TD1232 Programming Guide or Installation Manual for instructi...

Page 113: ...SP PHONE Screen output VM NO c Press the NEXT button SP PHONE Screen output VM 01 _ _ 1 165 _ _ the port number you entered in program 117 d Enter the extension number that you want this port to have...

Page 114: ...Integration For more information consult your dealer 2 Go to the Main Menu Select System Data Programming BATCH 1 or INTERACTIVE 2 3 Select System from the System Data Programming Main Menu 4 Select...

Page 115: ...mation 1 Assignment of the VPS card to be connected to the VPS Note If the VPS card to which the VPS will be assigned is already installed in the KX TD500 proceed to step 2 If installing a new VPS car...

Page 116: ...y with DPT Integration For more information call National Parts Center at 1 800 833 9626 In the example below Q171AB represents the software version and 010427A represents the software production date...

Page 117: ...S card and its model a Go to the 1 4 VPS DPT Port Assignment screen b Select the corresponding equipment number in the TVS No menu c Select your VPS model in the Type menu KX TVA50 Select TVS200 1 KX...

Page 118: ...when the attribute of the ports is assigned to VPS DPT in step 2 c Assign DN for the port click DN Refer to check the available directory numbers Note This program allows you to assign an extension n...

Page 119: ...trunk CO line features in 5 6 KX TD500 PBX Programming for Inband Integration 7 Set the PBX to send DID numbers to the VPS a Go to the 2 7 System Option 6 screen b Enable 67 Sending DID Number to VPS...

Page 120: ...mbers e g Toll Saver DID Call Routing you must enable this setting 8 Connect the jack assigned in Step 4 to the VPS 9 Complete the PBX VPS connection by following from step 1 of 4 7 Completing the PBX...

Page 121: ...ogram 998 Example Y581J000421 XX The underlined digits represent the software production date code year month day For APT Integration the production date must be 000421 or later If the software versio...

Page 122: ...nly if the trunks CO lines are DIL to the first port of the hunt group Lines programmed as Normal do not hunt b If the VPS is only answering calls not answered by the operator Operator Backup Flexible...

Page 123: ...t KX TVA Maintenance Console see 3 2 KX TVA Maintenance Console Installation 2 Using KX TVA Maintenance Console initialize the PBX see 8 1 Initializing the VPS 3 Start the Quick Setup utility and proc...

Page 124: ...lete each extension has a mailbox in both VPS 1 and VPS 2 however each extension should have only 1 mailbox 2 Match extension settings with subscriber settings For each subscriber s extension make sur...

Page 125: ...PBX Programming for Inband Integration KX TVA50 only This section explains how to configure selected Panasonic PBXs to use Inband Integration with the VPS Document Version 3 0 2010 06 Installation Ma...

Page 126: ...or the type of extension cards installed in the PBX will determine whether Inband Integration should be used Generally if the VPS is connected to an APT DPT Integration compatible Panasonic PBX APT D...

Page 127: ...ss slows down VPS performance as it dials the beeper or extension number and waits to confirm notification The beeper or user assigned extension notification is meant to be used for necessity usually...

Page 128: ...ds by playing that subscriber s personal greeting This operation is sometimes called Call Forward to Mailbox Without this feature the VPS cannot immediately play the called extension s greeting messag...

Page 129: ...e most PBXs do not provide this signal to single line ports If choosing a setting other than None use an amount equal to or less than the PBX or telephone company provided CPC signal Disconnect Time T...

Page 130: ...n the connected PBX Note Extension numbers of the VPS ports will automatically be assigned when the PBX type has been changed Operator Transfer Sequence Tells the VPS how to transfer a call to the ope...

Page 131: ...on light off process This parameter is enabled only when the integration mode is Inband Integration or No Integration Message Waiting Lamp Interval Time Specifies the time between retries for the Mess...

Page 132: ...o Voice Mail Busy The extension dialed is forwarded to Voice Mail and no other Voice Mail ports are available to accept the call This signals the Voice Mail port usually Auto Attendant to let the call...

Page 133: ...pecifies the sequence the VPS uses to transfer calls to trunks CO lines using EFA External Feature Access EFA Transfer Reconnect Sequence on Busy Specifies the sequence the VPS uses to reconnect the l...

Page 134: ...ect Sequence on Busy F F F F F F F F Reconnect Sequence on No Answer F F F F F F F F Reconnect Sequence on Refuse Call F F F F F F F F Light On Sequence for Message Waiting Lamp N A T701X T 91X T 9X T...

Page 135: ...VM DTMF Group c Select AA as the service type d Assign extension numbers to Extension Number of the SLT Port connected to VM Incoming calls will hunt starting at the lowest VM Port number e Click Appl...

Page 136: ...ck Apply to save the changed data Calls received on the assigned trunks CO lines will be directed to the VPS The VPS will answer those calls using the service AA VM Custom Service etc assigned to each...

Page 137: ...h time mode and trunk CO line to a specific extension number operator extension c Click Apply to save the changed data 2 Program the PBX so that unanswered calls to the operator are redirected to the...

Page 138: ...is considered to be unanswered and therefore forwarded to the VPS a Go to the System Timers Counters CO Extension screen b Assign the Intercept Timer parameter 138 Installation Manual Document Versio...

Page 139: ...er by Mailbox or AA as the parameter for Intercept Routing to the VPS Sequence This parameter determines which DTMF command the PBX will send to the VPS in order to select the desired service AA VM Cu...

Page 140: ...c Click Apply to save the changed data 140 Installation Manual Document Version 3 0 2010 06 5 3 KX TDE KX TDA and KX TAW Series PBX Programming for Inband Integration...

Page 141: ...trunk CO line to a specific extension number floating extension number of the ICD group c Click Apply to save the changed data 2 Program the PBX so that unanswered calls to the ICD group are redirect...

Page 142: ...r by Mailbox or AA as the parameter for Intercept Routing to the VPS Sequence This parameter determines which DTMF command the PBX will send to the VPS in order to select the desired service AA VM Cus...

Page 143: ...c Click Apply to save the changed data Document Version 3 0 2010 06 Installation Manual 143 5 3 KX TDE KX TDA and KX TAW Series PBX Programming for Inband Integration...

Page 144: ...Inband Integration 1 Go to the 1 System 2 Main screen 2 Under Voice Mail select DTMF Integration then select each extension jack that is connected to the VPS Click Apply to save the changed data 3 Go...

Page 145: ...for the VPS extension groups to Circular Click Apply to save the changed data 6 Go to the 2 Extension 2 Feature Settings screen Document Version 3 0 2010 06 Installation Manual 145 5 4 KX TA824 PBX Pr...

Page 146: ...the VPS is answering all calls Go to the 3 CO 1 Line Mode screen Program all lines DIL to the first extension of the Voice Mail hunt group The PBX will allow incoming trunk CO line calls to hunt only...

Page 147: ...go to the 3 CO 1 Line Mode screen and set all trunk CO line types to Normal Click Apply to save the changed data c If the VPS is only answering calls not answered by user extensions Go to the 3 CO 2...

Page 148: ...he VPS Finally go to the 3 CO 1 Line Mode screen and set all trunk CO line types to Normal Click Apply to save the changed data 148 Installation Manual Document Version 3 0 2010 06 5 4 KX TA824 PBX Pr...

Page 149: ...tenance Tool For KX TD500 programming refer to 5 6 KX TD500 PBX Programming for Inband Integration 1 Go to the Main Menu Select System Data Programming BATCH 1 or INTERACTIVE 2 Before choosing BATCH y...

Page 150: ...e KX TD500 proceed to step 2 If installing a new VPS card begin with step 1 a Go to the 1 1 Slot Assignment screen b Assign the slot card type to be installed to DHLC HLC SLC ESLC or SLC M SLT interfa...

Page 151: ...hrough additional programming e Click Apply to save the changed data f Set Status to INS 3 Assignment of the extension line to be connected to the VPS a Go to the 4 2 Extension Line 1 2 screen b Set D...

Page 152: ...VPS The VPS answers all incoming trunk CO line calls promptly See Example Settings 1 later in this section The VPS answers when the operator does not take the call after a specified number of rings S...

Page 153: ...time mode and trunk CO line to a specific extension number VPS port 3 Click Apply to save the changed data Note Specify the FDN for the extension group to which VM or AA has been assigned In order to...

Page 154: ...unk CO line to a specific extension number c Click Apply to save the changed data Note Specify the FDN for the extension group to which Operator has been assigned 2 Program the PBX so that unanswered...

Page 155: ...ings before a call is considered to be unanswered and therefore forwarded to the VPS Intercept Routing No Answer timer a Go to the 2 4 System Timer 1 2 screen b Assign the Intercept Time parameter Doc...

Page 156: ...c Click Apply to save the changed data 156 Installation Manual Document Version 3 0 2010 06 5 6 KX TD500 PBX Programming for Inband Integration...

Page 157: ...reen b Assign the Destination for each time mode and trunk CO line to a specific extension number c Click Apply to save the changed data 2 Program the PBX so that unanswered calls are redirected to th...

Page 158: ...amount of time that passes before unanswered calls are redirected to the VPS Intercept Routing No Answer timer a Go to the 2 4 System Timer 1 2 screen b Assign the Intercept Time parameter 158 Instal...

Page 159: ...c Click Apply to save the changed data Document Version 3 0 2010 06 Installation Manual 159 5 6 KX TD500 PBX Programming for Inband Integration...

Page 160: ...et the hunting type for the VPS extension groups to Circular using System Program 101 6 At every VPS extension temporarily connect an SLT or test set go off hook and dial 7301 to turn on Data Line Sec...

Page 161: ...setting the delay to a few seconds for each extension connected to the VPS Set a different delay time for each extension connected to the VPS Use System Programs 411 Day Mode 412 Night Mode and 413 Lu...

Page 162: ...162 Installation Manual Document Version 3 0 2010 06 5 7 KX TA Series PBX Programming for Inband Integration...

Page 163: ...Section 6 Configuring the System This section explains how to configure the VPS for basic operation Document Version 3 0 2010 06 Installation Manual 163...

Page 164: ...ge Manager how to record system greetings Refer to 3 6 Recording Messages in the Manager s Manual Show the Message Manager how to transfer General Delivery Mailbox messages Refer to 3 2 Managing the G...

Page 165: ...nance Console and connect to the VPS refer to 3 3 Starting KX TVA Maintenance Console 2 Click Utility Quick Setup in the menu bar 3 Click OK when the message is displayed Document Version 3 0 2010 06...

Page 166: ...security related settings For more information refer to 2 8 System Security in the Programming Manual Edit each parameter as needed then click Next IMPORTANT To prevent unauthorized access we strongl...

Page 167: ...l Note The VPS will set the appropriate parameters to match the default settings of the PBX you select as the PBX Type Edit each parameter as needed then click Next You will be asked whether you want...

Page 168: ...skipped later in this section If you start Auto Configuration the following screen will be displayed while data is exchanged between the PBX and VPS Click Next when the button becomes available Creat...

Page 169: ...re used by the PBX the VPS will use 4 digit mailbox numbers by default When creating mailbox numbers for 3 digit extensions a 0 will be added to the end of each mailbox number Example of 3 digit exten...

Page 170: ...rmation refer to 2 1 3 Mailbox Parameters in the Programming Manual Note The Mailbox Edit window allows you to set basic mailbox parameters only Detailed mailbox settings can be made after Quick Setup...

Page 171: ...ed is the Port Trunk window Configure Service Groups for each port trunk CO line then click Next For more information refer to 2 3 1 Service Group in the Programming Manual Document Version 3 0 2010 0...

Page 172: ...Date and Time setting The last window displayed is the date and time setting window Set the date and time then click Finish 172 Installation Manual Document Version 3 0 2010 06 6 1 2 Quick Setup...

Page 173: ...ll return to the previous screen If you clicked Yes the following screen is displayed as your settings are saved When Quick Setup is completed the following screen will be displayed Note If the VPS is...

Page 174: ...ed then click Next For more information refer to 2 1 3 Mailbox Parameters in the Programming Manual Note The Mailbox Edit window allows you to set basic mailbox parameters only Detailed mailbox settin...

Page 175: ...ed is the Port Trunk window Configure Service Groups for each port trunk CO line then click Next For more information refer to 2 3 1 Service Group in the Programming Manual Document Version 3 0 2010 0...

Page 176: ...Date and Time setting The last window displayed is the date and time setting window Set the date and time then click Finish 176 Installation Manual Document Version 3 0 2010 06 6 1 2 Quick Setup...

Page 177: ...ll return to the previous screen If you clicked Yes the following screen is displayed as your settings are saved When Quick Setup is completed the following screen will be displayed Note If the VPS is...

Page 178: ...th Mode to Flexible and allow mailbox numbers of mixed length to be created see 6 2 1 Changing the Mailbox No Length Mode 4 Change the maximum length of mailbox numbers max 8 digits see 6 2 2 Changing...

Page 179: ...The maximum number of digits that can be used for mailbox numbers is set using the Set Default Parameters utility in the KX TVA Maintenance Console or when you initialize the system However it is poss...

Page 180: ...180 Installation Manual Document Version 3 0 2010 06 6 2 2 Changing the Maximum Length of Mailbox Numbers...

Page 181: ...Section 7 Configuring VPS Features via PC Programming This section explains how to configure the PBX via PC Programming to use certain VPS features Document Version 3 0 2010 06 Installation Manual 181...

Page 182: ...via PC programming Follow the procedure below to assign each feature 1 Go to the Extension Wired Extension Extension Settings screen 2 Select the Option 4 tab 3 Set LCS Recording Mode to Keep Record o...

Page 183: ...ed key type to the Key Location you wish to program When Two way Record Two way Transfer or Voice Mail Transfer is selected enter the VM Port floating extension number in Ext No or Floating Ext No Whe...

Page 184: ...to the 2 Extension 2 Feature Settings screen 2 Under LCS Password 1 To set the LCS Password enter a 3 digit number using 0 9 2 To cancel the LCS Password delete the 3 digit number 3 Click Apply to sav...

Page 185: ...to the 2 Extension 3 PT personal settings screen 7 Under LCS Mode select Private or Hands free 8 Click Apply to save the setting Document Version 3 0 2010 06 Installation Manual 185 7 2 1 Live Call S...

Page 186: ...2 Click OK to save the button 4 Select the desired CO button 1 Select 2 way Record from the menu 2 Enter the extension number of the VPS 3 Click OK to save the button 5 Select the desired CO button 1...

Page 187: ...Note To cancel the password erase the 3 digit number 2 To assign LCS Recording Mode set Recording Mode to Keep Rec or Stop Rec 3 To assign LCS Private Hands free Mode set Operation Mode to Private or...

Page 188: ...ne screen 2 Select the Card No and Port No which you are going to program 3 Click CO Key in the upper right corner The Flexible CO Key screen for all CO keys is displayed 4 Click the button correspond...

Page 189: ...r in DN 6 Click OK The Flexible CO Key screen for all CO keys is displayed again 7 Click OK The 4 2 Extension Line screen is displayed again 8 Click OK or Apply 9 Repeat these steps for each extension...

Page 190: ...190 Installation Manual Document Version 3 0 2010 06 7 3 2 Button Assignment via PC Programming...

Page 191: ...Section 8 System Maintenance This section describes how to perform common maintenance procedures Document Version 3 0 2010 06 Installation Manual 191...

Page 192: ...ncluding customized prompts are preserved There are 2 methods to initialize the VPS using KX TVA Maintenance Console and using the Mode Switch Initializing the VPS with KX TVA Maintenance Console 1 Se...

Page 193: ...tializing the VPS with the Mode Switch 1 Disconnect the port cables from the VPS 2 Turn the power switch off at the VPS 3 Set the Mode Switch to position 5 see 2 3 Names and Locations 0 1 1 2 3 4 4 Tu...

Page 194: ...ck on at the VPS Note The execution time for the initialization may differ each time it is performed because of system capacity and system programs Generally initialization will take about 10 min 194...

Page 195: ...8 2 Backing Up the System Select Utility System Back Up Make Backup Document Version 3 0 2010 06 Installation Manual 195 8 2 Backing Up the System...

Page 196: ...unication speed and the amount of data that is being backed up To restore the system from a backup refer to Restoration of Backup Data in 1 9 2 Utility System Back Up in the Programming Manual Note De...

Page 197: ...start the VPS c Click OK and wait for the VPS to restart 2 If the VPS still does not function properly a Press the SHUTDOWN button The RUN indicator will begin flashing b Wait for the RUN indicator to...

Page 198: ...WN Button SHUTDOWN RESET KX TVA200 SHUTDOWN RESET RUN Indicator ALARM Indicator RESET Button SHUTDOWN Button 3 If the VPS still does not function properly press the RESET button only 198 Installation...

Page 199: ...Section 9 Revision History Document Version 3 0 2010 06 Installation Manual 199...

Page 200: ...ersion 2 0 New Content 6 2 1 Changing the Mailbox No Length Mode 6 2 2 Changing the Maximum Length of Mailbox Numbers Revised Content 1 2 2 Connection Examples KX TVA50 4 3 KX TA824 PBX Programming fo...

Page 201: ...Index Document Version 3 0 2010 06 Installation Manual 201...

Page 202: ...Feature 106 K KX TA Series PBX Programming for APT Integration 121 KX TA Series PBX Programming for Inband Integration 160 KX TA824 PBX Programming for APT Integration 107 KX TA824 PBX Programming for...

Page 203: ...27 Securing the Cables 72 Sequences for Voice Mail Integration 134 Single Line Tip Ring Port Circuits 126 Specifications 29 Standard Buttons 92 Starting KX TVA Maintenance Console 89 Starting Quick Se...

Page 204: ...e Install a screw here Note Wall Mounting Template for KX TVA50 When you print out this page the dimensions of the wall mounting template may deviate slightly from the measurements indicated in the te...

Page 205: ...screw here Install a screw here Note Wall Mounting Template for KX TVA200 When you print out this page the dimensions of the wall mounting template may deviate slightly from the measurements indicated...

Page 206: ...206 Installation Manual Document Version 3 0 2010 06 Notes...

Page 207: ...Document Version 3 0 2010 06 Installation Manual 207 Notes...

Page 208: ...material is copyrighted by Panasonic System Networks Co Ltd and may be reproduced for internal use only All other reproduction in whole or in part is prohibited without the written consent of Panasoni...

Reviews: