5. Copier
35
Proof set feature
To make 1 set of collate copy first, set the original and
enter necessary settings for collate copy (step 2 to 3 on
“5.2.2 Collate copy”, page 34). Press
{V}
or
{^}
repeatedly to display
“
PROOF SET
”
(step 4 on
“5.2.2 Collate copy”, page 34). The unit will make 1 set of
collate copy and stop temporarily so you can check
whether the copy is made as you expected. If the copy is
correct, press
{
Start
}
to continue copying.
If the copy is not correct, press
{
Stop
}
and start again
from the beginning.
5.2.3 N in 1 feature
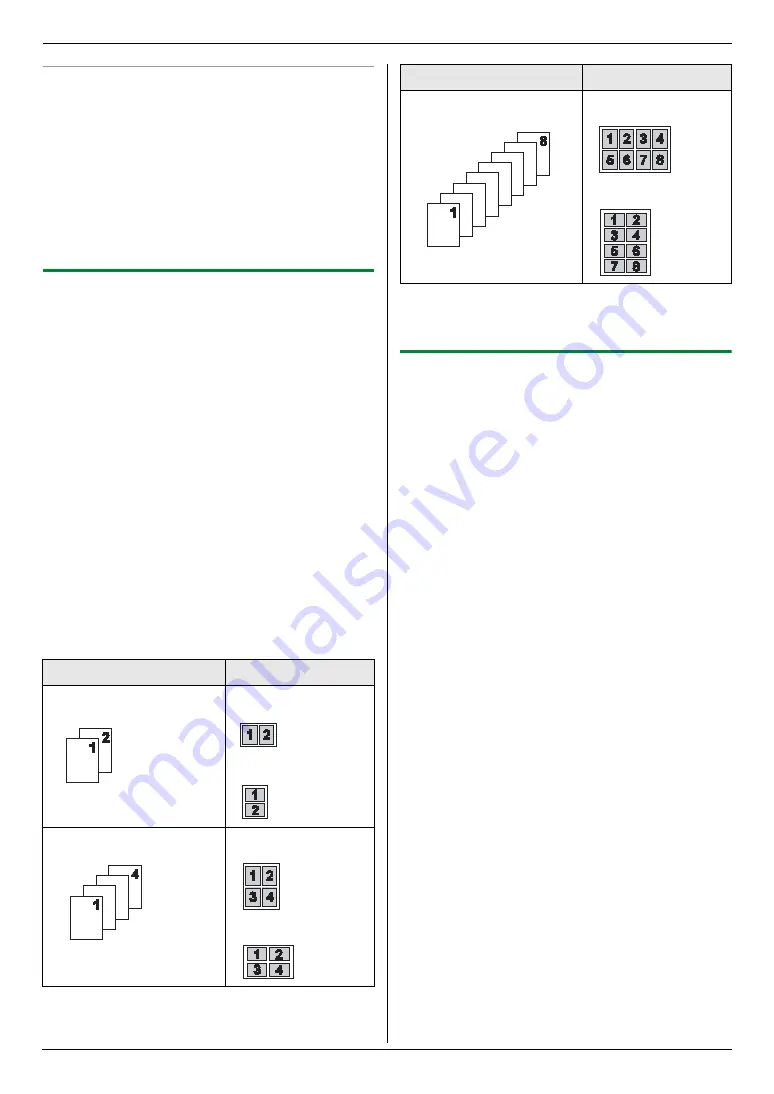
You can save paper by copying 2, 4 or 8 pages onto 1
page. The documents will be reduced to fit the recording
paper.
1
Set the original (page 19).
L
To make a portrait copy, set the original in portrait
direction. To make a landscape copy, set the
original in landscape direction.
2
{
Enhanced Copy
}
3
Press
{
<
}
or
{
>
}
repeatedly to select
“
N in 1
”
.
i
{
Set
}
4
Press
{V}
or
{^}
repeatedly to select the number of
original documents from
“
2 in 1
”
,
“
4 in 1
”
or
“
8
in 1
”
.
i
{
Set
}
5
Press
{V}
or
{^}
repeatedly to select the layout from
“
PORTRAIT
”
or
“
LANDSCAPE
”
.
i
{
Set
}
6
If necessary, enter the number of copies (up to 99).
i
{
Start
}
7
After you finish copying, press
{
Stop
}
to reset this
feature.
Note:
L
You can save the previous N in 1 setting (feature
#467 on page 56).
5.2.4 Copy reservation
You can reserve your copy;
–
while the unit is printing documents from your
computer.
–
while the unit is printing received fax documents.
1
Set the original (page 19).
2
While
“
PC PRINTING
”
or
“
PRINTING
”
is displayed,
press
{
Copy
}
.
3
Make necessary settings such as number of copies,
resolution, zoom features and N in 1 features.
i
{
Start
}
L
“
COPY RESERVED
”
will be displayed. The unit
will start copying after the current printing job.
Original document
Page layout
“
2 in 1
”
“
PORTRAIT
”
“
LANDSCAPE
”
“
4 in 1
”
“
PORTRAIT
”
“
LANDSCAPE
”
“
8 in 1
”
“
PORTRAIT
”
“
LANDSCAPE
”
Original document
Page layout


