- 63 -
≥
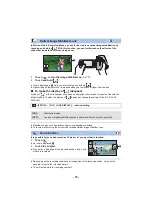
Change the Recording Mode to
. (
1
Press the
button to record the still pictures. (
2
Touch [Enter].
≥
A still picture will be recorded, and it will be displayed in a semi-transparent state on the recording
screen. Look at the picture to estimate how far you should move the subject for the next
recording.
≥
If you have already recorded still pictures in the recording group, the last still picture will be
displayed in a semi-transparent state on the recording screen.
≥
To record again, touch
and record again.
3
Move the subject and determine the composition of the picture.
≥
Repeat Steps 1-3 to continue recording.
≥
You can save still pictures in the same recording group until you use [Create Stop Motion].
Creating a new recording group
≥
If you touch [YES], a new recording group will be created and the recording screen will be
displayed.
≥
Once you create a recording group, you cannot save still pictures in any of the older recording
groups.
≥
[PICTURE SIZE] is set to
(1920
k
1080).
≥
When you want to record still pictures in a separate recording group, use a different SD card.
≥
For details on playback of the Stop Motion Animation Assist Mode, refer to page
.
Stop Motion Animation Assist
Before recording in Stop Motion Animation Assist Mode
You can create a slideshow that appears to be moving by recording the subject while moved a
little at a time.
≥
Each recording group can store up to 999 still pictures recorded in Stop Motion Animation
Assist Mode.
: [PICTURE]
#
[Create Stop Motion]
MENU
2.1M


