background image

97

RQT9131

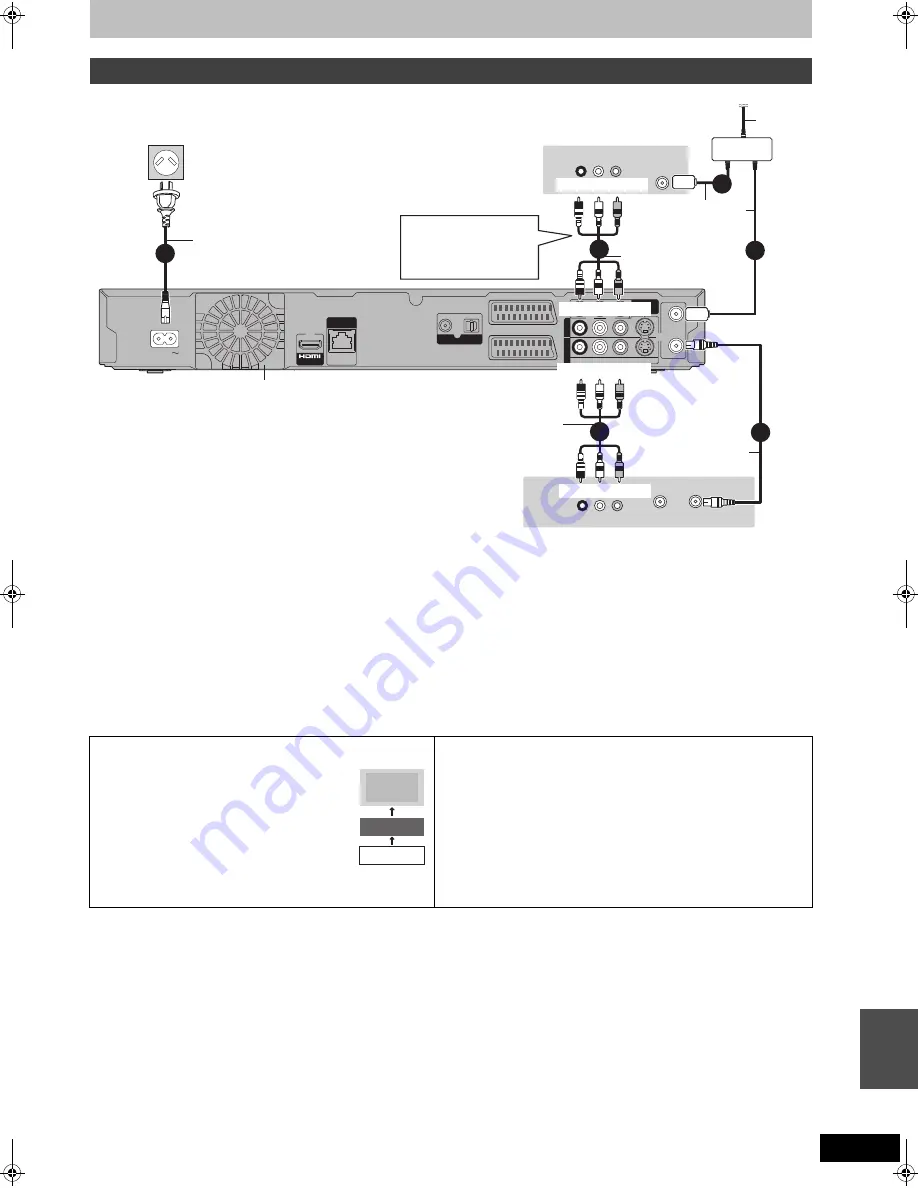
Connecting a Digital television and VCR

Connect the unit directly to the television

If you connect the unit through an AV selector or 
video cassette recorder to the television, video 
signal will be affected by copyright protection 
systems and the picture may not be shown 
correctly.

When connecting to a television with a built-in 
VCR

Connect to the input terminals on the television 
side if there are both television and VCR input 
terminals.

Connecting to a television with 21-pin Scart terminal

You can also connect with the AV1 terminal on this unit using the 21-pin 
Scart cable.
If your television is equipped with RGB input capability, by connecting with 
a fully wired 21-pin Scart cable you can see video using RGB output on 
this unit.

[Required]setting]

“AV1 Output” in the Setup menu (

88)

Connecting to a VCR with 21-pin Scart terminal

You can also connect with the AV2 terminal on this unit using the 21-pin 
Scart cable.

[Required]setting]

“AV2 Input” in the Setup menu (

88)

RF 

RF 
I

N


I

N


RF 

RF 
OUT 

OUT 

V

2   ( EXT )   

V

 1 

( T

V

 )   

OPTICAL 

COAXIAL 

COMPO

N

E

N

COMPO

N

E

N

V

IDEO OUT 

V

IDEO OUT 

OUT O

U

T


A

V

4 I

N


A

V

4

 I

N


V

IDEO 

V

IDEO 

R- A UDIO- L 

P

P

A C I

N


A

V

 OU

V

 OUT

L A

N

L A

N

10BASE-T/ 

100BASE-TX 

DIGITAL  

DIGITAL  

AUDIO OUT 

AUDIO OUT 

(PCM/BITSTREAM) 

(PCM/BITSTREAM) 

V

HF/UHF

RF I

N

RF OUT

V

IDEO OUT

R         L

AUDIO OUT

V

HF/UHF

RF I

N

AUDIO I

N

R         L

V

IDEO I

N

6

5

2

4

3

1

To the aerial

Cooling fan

Aerial cable

This unit’s rear panel

To household mains socket

(AC 220 to 240 V, 50 Hz)

Television’s rear panel

VCR’s

rear panel

AC mains lead

(included)
Connect only after all other 
connections are complete.

Red White Yellow

Audio/Video cable

Red White Yellow

Red White Yellow

Audio/Video cable

(included)

Red White Yellow

Other connections

(

17, 94)

Aerial 
cable

Splitter

RF coaxial cable

(included)

Television

VCR

This unit

DO NOT

A

d

dit

io

n

a

l c

onne

c

tions

DMRBW500GN-RQT9131-L_eng.book  97 ページ  2008年5月12日 月曜日 午前9時37分

Summary of Contents for DMR-BW500

Page 1: ...taining the region number 4 or ALL Example This Blu ray Disc Recorder is for viewing and recording free to view channels only not pay TV or encrypted channels Trademark of the DVB Digital Video Broadcasting Project 1991 to 1996 Declaration of Conformity No 5367 25th January 2008 Notice for DVB functions Any function related to DVB Digital Video Broadcasting will work in areas where DVB T MPEG2 dig...

Page 2: ...ame or equivalent type recommended by the manufacturer Dispose of used batteries according to the manufacturer s instructions THIS UNIT IS INTENDED FOR USE IN MODERATE CLIMATES This product may receive radio interference caused by mobile telephones during use If such interference is apparent please increase separation between the product and the mobile telephone The socket outlet shall be installe...

Page 3: ...RN Select Programme OPTION Portrait Landscape Page Page 24 Hr 24 Hr Prog type Favourites Time Info ABC 1 ABC 2 In today s show we will Emmerdale SUN 10 01 News News News GUIDE CH Record to Blu ray disc It can record in high definition quality in addition to large volume recording 6 2 programmes Simultaneous Recording It is possible to record 2 programmes being broadcasted at the same time 31 VIERA...

Page 4: ...ording 33 Advanced timer recording 34 Manually programming timer recordings 34 To release the unit from recording standby 35 Relief Recording 35 Auto Renewal Recording 35 To cancel recording when recording has already begun 35 Check change or delete a programme 36 Notes on timer recording 36 Operations in the TV Guide system 37 TV Guide data download 37 Advanced playback 38 Operation during play 3...

Page 5: ... Deleting all titles Delete all titles 80 Enabling the unit s recording function Format 80 Selecting the background style Top Menu 81 Selecting whether to show the Top Menu first Auto Play Select 81 Enabling discs to be played on other equipment Finalise 81 Creating Top Menu Create Top Menu 81 Changing the unit s settings 82 Common procedures 82 Tuning 82 HDD Disc 84 Picture 85 Sound 85 Display 86...

Page 6: ...R R R R DL R DL R DL RW RW RW BD RE BD RE BD RE BD R BD R BD R DVD RAM DVD RAM DVD RAM DVD R DVD R DVD R DVD R DL DVD R DL DVD R DL DVD RW DVD RW DVD RW Internal REC HDD Cannot do Can do Discs Landscape TV Guide SUN 10 01 08 19 10 All DVB Services All Types Select Service OK RETURN OPTION Portrait Landscape Page Page 24 Hr 24 Hr Prog type Favourites Time Info ABC 1 ABC 2 In today s show we will Em...

Page 7: ...ends on the disc to copy Speed of copying depends on the disc to copy Regarding DR Direct Recording mode The following can be recorded or copied in DR mode HDD HDD HDD BD RE BD RE BD RE BD R BD R BD R DR XP SP LP EP FR Record as high definition HD quality Record as standard definition SD quality Programmes in high definition HD quality DR XP SP LP EP FR All subtitles and multiple audio are recorde...

Page 8: ...ition HD quality Standard definition SD quality Recording mode that can be recorded All recording mode DR XP SP LP EP FR Rewritable Timer recording Copy once recording Play on other players It can be played on the players compatible to BD RE Ver 2 1 and BD R Playback of LTH type BD R discs may not be possible with players that do not support the LTH type format Single side dual layer 50 GB disc ca...

Page 9: ...d DVD RAM compatible DVD players Finalisation needed for playback on other equipment R DL can be played back only on equipment compatible with this disc Note Take the disc out from the cartridge to use the DVD RAM with a cartridge TYPE1 cannot be used Discs recorded on equipment other than this unit may not be able to be recorded to Disc type R R DL RW Standard symbol R before finalisation DVD V a...

Page 10: ... discs the menu screen may continue to display even if the disc has been ejected Enjoying High Bit rate Audio and Video of BD Video 43 Operation of this unit may become slower when the BD J application 114 is executing This is not malfunction DVD Video DVD V Movie and music discs DVD RW DVD Video Recording format RW VR DVD RW video recorded on another DVD recorder You can play programmes that allo...

Page 11: ...ras which require additional programme installation when connected to a PC are not supported MTP Media Transport Protocol device is not supported A multi port USB card reader is not supported PTP protocol is not supported Format FAT16 and FAT32 file systems are supported UDF NTFS exFAT file system is not supported Depending on the sector size some files may not work Only the first partition on USB...

Page 12: ...tions Playback Recording etc quickly and easily GReturn to previous screen HCreate chapter 46 IShow Timer Recording screen 34 JSkip the specified time 39 KSkip approx 1 minute forward 39 LStart Flexible Recording 32 The remote control information Batteries Insert so the poles i and j match those in the remote control Do not use rechargeable type batteries Do not mix old and new batteries Do not us...

Page 13: ...Connection for VCR camcorder etc 55 56 9Open close disc tray 15 SD card slot 15 USB port 15 Channel select 23 Start recording 23 Specify a time to stop recording 23 Stop 23 38 Start play Rear panel terminals 16 17 94 98 1Copying indicator 2SD card slot indicator 3USB port indicator 4Disc indicator 5Timer recording indicator 6Drive HDD BD or SD indicator 7Main display section indicator 8Playback in...

Page 14: ...where the rear cooling fan and the cooling vents on the side are covered up Place the unit on a surface that is flat and not subject to vibration or impact Do not place on anything that generates heat like a video cassette recorder etc Do not place in an area often subject to temperature changes Place in an area where condensation does not occur Condensation is a phenomenon where moisture forms on...

Page 15: ... disc only with a soft oil based felt pen Do not use ballpoint pens or other hard writing implements Do not use record cleaning sprays benzine thinner static electricity prevention liquids or any other solvent Do not use scratch proof protectors or covers Do not expose the terminals of the card to water garbage or other strange things Do not drop stack or impact discs Do not place objects on them ...

Page 16: ...the 21 pin Scart cable If your television is equipped with RGB input capability by connecting with a fully wired 21 pin Scart cable you can see video using RGB output on this unit Required setting AV1 Output in the Setup menu 88 RF RF IN IN RF RF OUT OUT AV2 EXT AV1 TV OPTICAL COAXIAL COMPONENT COMPONENT VIDEO OUT VIDEO OUT OUT OUT AV4 IN AV4 IN S VIDEO VIDEO R AUDIO L PR PB Y AC IN 10BASE T 100BA...

Page 17: ... unit to DVI devices that are incompatible with HDCP For units compatible with HDCP High Bandwidth Digital Content Protection copyright protection that are equipped with a digital DVI input terminal PC monitors etc Depending on the unit images may not display properly or at all when connecting with a DVI HDMI switching cable Audio cannot be output Connecting to a TV with an HDMI High Definition Mu...

Page 18: ...inutes Auto Tuning is complete when Quick Start setting screen appears The time information for your region can be obtained MANUAL SKIP DISPLAY STATUS AUDIO PROG CHECK TIME SLIP REC MODE REC CREATE CHAPTER F U N C T I O N M E N U D I R E C T N A V I G A T O R GUIDE RETURN PLAY x1 3 PAUSE STOP SLOW SEARCH SKIP TEXT CH PAGE SELECT INPUT 0 9 8 7 6 5 4 3 2 1 CH AV TV DRIVE SELECT BD VOL DELETE STTL EX...

Page 19: ...ned on for the first time Please proceed to the following steps After Download from TV is complete Quick Start setting screen appears Press 3 4 to select On or Off and press OK When television picture appears set up is complete To stop partway Press RETURN Note Acquisition of the setting information is not supported by all Panasonic TVs VIERA The acquisition may take some time depending on the VIE...

Page 20: ... View and press OK To exit the screen Press EXIT Press AUDIO Audio will switch according to the contents of the programme every time it is pressed When STTL appears in digital channel information 21 Press STTL Press again to hide the subtitle Important This unit does not have an analogue broadcast tuner Select the channel e g 5 0 0 5 15 0 1 5 115 1 1 5 MANUAL SKIP DISPLAY STATUS AUDIO PROG CHECK T...

Page 21: ...olour button of the colour to change 2 Enter the new page number with the numbered buttons 3 Press and hold OK To exit the teletext screen Press TEXT Note The teletext function depends on respective stations While stopped Press STATUS 1 Channel and Station Name 2 Programme name and Broadcast time 3 Current favourite list 4 Change the favourite list 5 Software update 93 6 The parental ratings level...

Page 22: ... DL RW RW VR You can quickly find the recorded titles and easily play them You can also sort the titles or edit the Groups of titles 1 Press DRIVE SELECT to select the HDD or BD drive The HDD or BD indicator lights up on the unit s display 2 Press DIRECT NAVIGATOR HDD BD RE RAM When VIDEO is not selected press the Red button to select VIDEO 3 Press 3 4 to select the title and press OK To show othe...

Page 23: ...rding in XP SP LP or EP modes Subtitles cannot be recorded Multiple audio will be recorded with the contents selected when the recording starts and the switching cannot be done after the recording Select the audio to be recorded with Audio Mode for Digital Broadcast in the Setup menu prior to the recording 86 During recording Press REC on the main unit to select the recording time You can specify ...

Page 24: ...en the programme currently broadcasting is selected Press 3 4 to select Timer Rec Set and press OK Confirm the programme start and end time by using a TV magazine etc and make corrections if necessary using 3 4 2 1 34 step 3 3 Press OK The timer programme is stored and the timer icon is displayed F lights on the unit s display to indicate timer recording standby has been activated Press Í BD to tu...

Page 25: ...n is displayed F lights on the unit s display to indicate timer recording standby has been activated Press Í BD to turn the unit off To return to the previous screen Press RETURN To exit the screen Press EXIT To cancel a timer recording on the TV Guide screen 1 Press 3 4 2 1 to select the programme in the TV Guide and press OK 2 Press 2 1 to select Yes and press OK F in the TV Guide disappears To ...

Page 26: ...ble disc space after deleting HDD BD RE RAM The space deleted becomes available for recording RW V RW Available recording space increases only when the last recorded title is deleted This space become available for recording after all the later recorded titles are deleted BD R R R DL R R DL Available space does not increase even after the contents are deleted STATUS PROG CHECK TIME SLIP REC MODE R...

Page 27: ...e was recorded in EP or FR recordings 5 hours or longer mode When the copy destination disc does not have enough space When the title aspect for the copying source and Aspect for Recording do not match When the title aspect for the copying source is 16 9 R R DL RW R R DL RW V copying source was recorded in EP or FR recordings 5 hours or longer mode Note Titles in the grouped titles and other title...

Page 28: ...E BD R Subtitles will be recorded as is It is possible to switch the subtitles after it is recorded When recording in XP SP LP EP or FR modes Subtitles cannot be recorded Recording of 16 9 image such as wide broadcasting When the Rec for High Speed Copy of the Setup menu is On Record in XP SP LP EP or FR modes Copy from the finalised disc DVD Video to the HDD When recording to R R DL RW V It will ...

Page 29: ...om the HDD to a disc They are deleted from the HDD They cannot be copied Even when copying to videotape the title may not be copied correctly because of the copy guard Playing the disc on other players R R DL RW V R R DL The disc must be finalised 81 It is necessary to finalise DVD R etc on this unit after recording or copying titles to them You can then play them as a commercially sold DVD Video ...

Page 30: ...ng area on the disc Broadcasting input that can be recorded Digital broadcasting Digital broadcasting External input DV input Quality that can be recorded Quality same as broadcasted HD quality and SD quality SD quality only The audio of the surround programme Surround audio as the broadcast Stereo audio Multiple audio Record all multiple audio Record only one audio Before recording Select the aud...

Page 31: ...gs The unit automatically selects a recording rate between XP and EP 8 hours that will enable the recordings to fit in the remaining disc space with the best possible recording quality For example with a 90 minute recording to an unused DVD RAM the picture quality is adjusted to between XP and SP When recording to the HDD picture quality is automatically adjusted to precisely fit a copied title on...

Page 32: ...the HDD or timer recording onto the disc However disc cannot be played back while timer recording onto the disc 1 Press DRIVE SELECT to select the HDD or BD drive 2 Press DIRECT NAVIGATOR during recording is displayed on the recording programme 3 Press 3 4 to select a title and press OK To stop play Press To exit the Direct Navigator screen Press DIRECT NAVIGATOR Note Chasing playback and Simultan...

Page 33: ...e on the TV screen above Press Press again to restart recording You can also press REC to restart Title is not split into separate titles When the recording in DR mode is paused that part will show up as still picture instantaneously while playback Switch the input Press INPUT SELECT Switch to other channel Press W X CH Perform 2 programmes simultaneousrecording Record other programme with steps 1...

Page 34: ... drive is BD and there is not enough remaining space recording automatically switches to the HDD 35 Relief Recording Mode Recording modes 30 Renew Auto Renewal Recording 35 Programme Name Press OK 73 Entering text 4 Press OK The timer programme is stored and the timer icon is displayed F lights on the unit s display to indicate timer recording standby has been activated Press Í BD to turn the unit...

Page 35: ...d only when weekly recording or daily recording is selected 1 Press PROG CHECK 2 Press 3 4 to select the programme and press OK 3 Press 3 4 to select Renew column 4 Press 2 1 to select ON and press OK Note If a programme set for Auto Renewal Recording is protected or while playback is taking place from the HDD or while copying the programme will not be overwritten Instead the programme set for rec...

Page 36: ...es simultaneous recording First 1 minute of the following programme is not recorded either if the following programme set to be recorded is also BD If the start of 2 timer recordings overlap with each other when 2 programme simultaneous recording is not possible the programme with the earlier start time will be recorded Starting of the timer recording while executing other operation 99 Check chang...

Page 37: ...ump back 24 hours Press the Red button You can only jump back to the current date Past information cannot be viewed When jumping the selected time period may deviate To browse through the TV Guide list Press W X CH To see programme information Programmes with the symbol Press STATUS Additional information programme name programme duration broadcast time description is available for these programme...

Page 38: ... PLAY to restart play Audio is heard during first level search forward BD V Only primary video is played while performing this operation Skip During play or while paused press or 9 Skip to the title or chapter you want to play It will skip to the beginning of chapters 46 if the title contains chapters HDD It will not skip the title But the title in the grouped titles during the Grouped Playback 40...

Page 39: ...ct Switch the aspect ratio of the screen 77 Create Chapter Chapters are divided at the point pressed 46 5 min This automatically disappears after approximately 5 seconds To show the screen again press TIME SLIP again Changing audio during play PLAY eng Audio LR HDD Soundtrack 1 ENG Digital 3 2 1ch e g English is selected Display the subtitle during play When playing DVD R DL Dual Layer single side...

Page 40: ... used as the group name To change the group name 1 Press 3 4 to select the group and press OPTION 2 Press 3 4 to select Edit and press OK 3 Press 3 4 to select Enter Name and press OK 4 Enter the name 73 Entering text Even if the group name is changed the title names in the group will not be changed Direct Navigator screen icons Currently recording Title protected Title that was not recorded due t...

Page 41: ...ording BD RE BD R RAM RW VR Creation or editing of playlists cannot be done on this unit Preparation Insert a disc Press DRIVE SELECT to select the BD drive 1 While stopped Press FUNCTION MENU 2 Press 3 4 to select To Others and press OK 3 Press 3 4 to select Playlists and press OK 4 Press 3 4 2 1 to select the playlist and press OK Operation during play 38 To return to the previous screen Press R...

Page 42: ...ary video does not display Turn the Video and Soundtrack to On in the Secondary Video in the Signal Type in the Disc menu 76 Playback method set by the disc will take priority so it may not playback in the method set in this unit To output the audio of the secondary video set the BD Video Secondary Audio to On in the Setup menu 85 Note There are functions to enjoy link up with the SD cards in the ...

Page 43: ...ved clarity enhanced perspective etc Required connection Connect to a TV supporting 1080 24p input via an HDMI cable Required setting BD Video 24p Output On 87 Regarding High Bit rate Audio Secondary Audio To enjoy secondary audio Original audio Dolby Digital Plus Dolby TrueHD DTS HD High Resolution Audio DTS HD Master Audio Audio formats are output as PCM BD Video Secondary Audio is set to On and...

Page 44: ... Setting the protection 1 Press DIRECT NAVIGATOR HDD BD RE RAM When VIDEO is not selected press the Red button to select VIDEO 2 Press 3 4 to select the title To show other pages Press 9 Multiple editing Select with 3 4 and press Repeat A check mark appears Press again to cancel 3 Press OPTION 4 Press 3 4 to select the operation and press OK If you select Edit press 3 4 to select the operation and...

Page 45: ...ect Preview and press OK The unit plays 10 seconds before and after the division point To change the division point Restart play and press 3 4 to select Divide then press OK at the point where you want to divide the title Note The divided titles retain the title name and CPRM property 114 of the original title Video and audio just before and after the dividing point may momentarily cut out HDD Div...

Page 46: ...exceeds the maximum chapter numbers R R DL RW V RW VR R R DL RW Only playback is possible During the playback or pause Press CREATE CHAPTER Chapters are divided at the point pressed To delete the Chapter Mark 1 While paused Press 9 and skip to the location you want to delete 2 Press CREATE CHAPTER 3 Press 2 1 to select Yes and press OK Regarding Chapters Programmes are recorded as a single title c...

Page 47: ...lected chapter Selected chapter can be edited via OPTION Press RETURN to go back to previous menu Chapter View Select OPTION Page 001 001 0 00 00 001 0 00 00 Play Time Remaining Chapter View screen Combine Chapters Delete Chapter Refer to Chapter operations Chapter operations Create Chapter Select the point where you want to start a new chapter while viewing the title 1Press CREATE CHAPTER at the ...

Page 48: ...The high speed copy may not be possible depending on the destination disc or the title to copy 50 When is the time high speed copy is not possible BD RE BD R HDD Advanced Copy Normal speed RAM RW VR HDD Advanced Copy High speed RW HDD Advanced Copy Normal speed Before finalise R R DL RW V R R DL Cannot copy DVD V After finalise R R DL RW V R R DL HDD Advanced Copy Normal speed SD Video MPEG2 forma...

Page 49: ...In case that the bit rate of broadcasting is 15 Mbps Note When recording or playing while copying the unit may not use the maximum recording speed Depending on the condition of the disc the unit may not copy using the maximum speed High speed mode Normal speed mode Features Copy with shorter time than the recorded time of the title with same quality recording mode It will take same or longer time ...

Page 50: ... to the disc The titles that were temporarily copied to the HDD are then deleted You cannot copy to the disc in the following cases When there is not enough free space on the HDD When copying to a new blank disc if you intend to fill a new disc when copying to it the equivalent of up to 4 hours of free space in SP mode is needed on the HDD When the number of titles recorded to the HDD and the numb...

Page 51: ...S Note Timer recordings executed while copying are recorded to the HDD regardless of the recording drive settings Only when high speed copying Speed and recording mode when copying For titles in DR mode BD RE BD R High speed recording mode as is RAM R R DL RW V R R DL RW Normal speed FR mode For titles in XP SP LP EP or FR modes BD RE BD R Normal speed Recording mode of playing title RAM High spee...

Page 52: ...s 2 to confirm 7 Set to make it possible to play on other equipment Finalise or Create Top Menu HDD R R DL RW V R R DL RW only Press 4 if it is not to be set step 8 1 Press 3 4 to select Other setting and press 1 2 Press OK 3 Press 3 4 to select On or Off and press OK If On is selected R R DL RW V R R DL After finalising the discs become play only and you can also play them on other DVD equipment ...

Page 53: ...rming steps 1 3 52 1 Press 3 4 2 1 to select Cancel All and press OK 2 Press 2 1 to select Yes and press OK The settings and lists may be cancelled in the following situations When a title still picture etc has been recorded or deleted at the copy source When steps have been taken for instance to turn off the unit open the tray change the copy direction etc COPY Navigator Copying list icons and fu...

Page 54: ...ying The disc top menu is displayed Disc play automatically begins from title 1 when Title 1 is selected from the Auto Play Select menu when finalising the disc 81 4 When the top menu is displayed Press 3 4 2 1 to select the title you want to start copying and press OK While playing in order all the titles after the selected title are recorded until the set time After the last title on the disc ha...

Page 55: ...LECT to select the input channel for the equipment you have connected e g If you have connected to AV3 input terminals select AV3 2 Press REC MODE to select the recording mode DR FR mode cannot be selected 3 Select the channel on the other equipment 4 Press REC Recording starts To skip unwanted parts Press to pause recording Press again to restart recording To stop recording Press See also Importa...

Page 56: ... AV3 input Copy will stop when timer recording starts Chasing playback simultaneous rec and play switching of the broadcast or input cannot be performed HDD Preparation Press DRIVE SELECT to select the HDD drive When recording bilingual programmes 28 Important notes for recording When the output signal from the external equipment is NTSC change the TV System to NTSC in the Setup menu 87 1 While st...

Page 57: ...m equipment connected to the AV3 input terminals Preparation Press DRIVE SELECT to select the BD drive When the output signal from the external equipment is NTSC change the TV System to NTSC in the Setup menu 87 1 While stopped Press FUNCTION MENU 2 Press 3 4 to select To Others and press OK 3 Press 3 4 to select Recording via AV3 input and press OK It may take a while for the next screen to displ...

Page 58: ... the same date become a title 6 Press OK 7 Press 2 1 to select Start and press OK It will automatically format the unformatted disc such as new disc when copying To stop copying Press and hold RETURN for 3 seconds Note Record playback or timer recording cannot be executed while copying Title with more than 256 scenes cannot be copied Copied video will be displayed as AVCHD in the Name column of th...

Page 59: ...Advanced Copy 52 Please set the items in step 4 and 5 as shown below Copy Direction Source USB Copy Mode Format VIDEO SD Video on the camera are automatically registered on the copy list Copying SD Video MPEG 2 format SD HDD RAM All the recordings on the same date become a title You cannot playback SD Video on an SD card with this unit You must copy the files to the HDD or a DVD RAM You cannot pla...

Page 60: ...n to previous screen Press RETURN To exit the screen Press DIRECT NAVIGATOR The display below automatically appears when you insert a SD card USB memory or the CD while stopped Press 3 4 to select Play Pictures JPEG or JPEG and press OK Then go to step 3 right CD It will go to step 3 right automatically if it is only still pictures that is recorded Display contents differs depending on what is rec...

Page 61: ...n copying pictures When changing date If you remove the SD card while the DIRECT NAVIGATOR screen is displayed picture rotation information may not be properly stored Remove the SD card after you exit the DIRECT NAVIGATOR screen Zoom in Zoom out While playing 1 Press OPTION 2 Press 3 4 to select Zoom out and press OK Press 3 4 to select Zoom in in step 2 and press OK to resume the display size of ...

Page 62: ...ATOR Editing still pictures JPEG ᧂ Date 04 02 2007 Total 9 Date 08 09 2006 Total 19 RETURN OK 20 08 DR PICTURE VIDEO MUSIC VIDEO PICTURE MUSIC Slide Show Select OPTION Press OK to display pictures DIRECT NAVIGATOR Pictures by Date Page 01 01 001 002 Time Remaining Pictures by Date screen 20 08 DR 04 02 2007 PICTURE VIDEO MUSIC RETURN OK DIRECT NAVIGATOR Picture JPEG View Page 001 001 OPTION Select...

Page 63: ... Copy to HDD BD RE RAM Press 2 1 to select Start and press OK Change Date HDD BD RE RAM Pictures by Date only 1Press 2 1 to select the item and press 3 4 to change 2Press OK Date of the original is maintained Delete if unrequired If the changed date already exists pictures will be moved to that date Enter Album Name HDD BD RE RAM Album View only You can give names to albums 73 Entering text Album ...

Page 64: ...3 seconds Note This unit saves the information on up to 12 000 still pictures and 30 SD cards If additional still pictures are imported then the older information will be deleted HDD BD RE RAM SD 1 While stopped Press FUNCTION MENU 2 Press 3 4 to select To Others and press OK 3 Press 3 4 to select Advanced Copy and press OK If you are not going to change the registered list press 4 several times s...

Page 65: ...equence in which the still pictures are registered on the copy list may not be the same at the copy destination If still pictures are already contained inside the copy destination folder the new still pictures are recorded following the existing still pictures To edit the copying list Select the item in step 6 3 left 1 Press OPTION 2 Press 3 4 to select the operation and press OK Delete All Delete...

Page 66: ... track will stop Playing MP3 files Using the tree screen to find a group CD OK RETURN Select file type JPEG MP3 USB device OK RETURN USB device is inserted Copy AVCHD Copy Video MPEG2 Play Pictures JPEG Copy Pictures JPEG Play Copy Music MP3 DIRECT NAVIGATOR CD MP3 0 09 March Moon OK RETURN No Track Name Folder Mexican pops Artist 0001 March Moon Do this flower open Go to there from here If easter...

Page 67: ... OK To return to the previous screen Press RETURN To exit the screen Press DIRECT NAVIGATOR Playback of track will stop Note You cannot play music tracks on HDD while copying When this unit is not operated for approximately 10 minutes during music playback the screen saver is displayed only when the Screen Saver in the Setup menu is set to On 86 To return to the previous screen press RETURN Playin...

Page 68: ... when Digital Audio Output is set to PCM However in this case audio is output as 2ch from the DIGITAL AUDIO OUT terminal Display Still Pictures Slide show Sample pictures in this unit or pictures stored on the Album View of the HDD can be played back as slide show during playback of the music While playing the music Press the Red button Change the pictures to display 1 Press OPTION 2 Press 3 4 to ...

Page 69: ...bum and track operation right 70 Enter Artist Name Delete AllTracks Album and track operation right Add to Playlist EditTrack Name Properties Edit Artist Name Delete Album and track operation right 70 68 Album and track operation Delete All Tracks While displaying Music Menu screen Delete all tracks in the HDD 1 Press 2 1 to select Yes and press OK 2 Press 2 1 to select Delete and press OK Once de...

Page 70: ...ress OK 3 Edit the playlist Press 3 4 to select the playlist and press OPTION Edit the track in the playlist 1 Press 3 4 to select the playlist and press OK 2 Press 3 4 to select the track and press OPTION 4 Press 3 4 to select item and press OK e g while selecting playlist e g while selecting the track in playlist To return to the previous screen Press RETURN To exit the screen Press DIRECT NAVIG...

Page 71: ...M USB CD MP3 MP3 The maximum number of tracks on HDD 40000 Depends on the remaining capacity If titles or pictures are recorded then the number of albums that can be recorded will be reduced 1 While stopped Insert a CD or USB memory CD Music CD The unit starts accessing the Gracenote Database and searches for the title information If search results indicate that multiple titles were found Press 3 ...

Page 72: ...te and press OK When MUSIC is not selected press the Yellow button to select MUSIC 3 Deleting an artist album music 1Press 3 4 2 1 to select the item and press OK 2Press 3 4 2 1 to select the item and press DELETE Deleting a track 1Press 3 4 2 1 to select the item which contains the track to delete and press OK 2Press 3 4 2 1 to select the track and press OK Remove the music Only when My Favourite...

Page 73: ... Title BD RE BD R 254 44 Album of still pictures HDD BD RE RAM 36 Album Music HDD 59 Track HDD 59 Artist HDD 39 Playlist Music HDD 59 Disc BD RE BD R 254 Disc RAM 64 R R DL RW V R R DL RW Characters Title 44 Disc 40 Title timer recording Select Programme Name in step 3 on page 34 Title Select Enter Name in step 4 on page 44 Disc Select Disc Name in step 1 of Providing a name for a disc on page 79 ...

Page 74: ... function HDAVI Control 3 is the newest standard current as of December 2007 for Panasonic s HDAVI Control compatible equipment This standard is compatible with Panasonic s conventional HDAVI equipment Please refer to individual manuals for other manufacturers equipment supporting VIERA Link function Download from the TV 1 If this unit is connected to a Panasonic TV VIERA supporting HDAVI Control ...

Page 75: ...programme Turn on the Pause Live TV function using the TV remote control This unit turns on automatically 2 When you want to resume Display the Control Panel below and press OK The TV programme resumes To stop Pause Live TV 1 Press 4 while the Control Panel is displayed 2 Press 2 1 to select Yes and press OK Refer to Note on page 78 To pause the TV programme you are watching Pause Live TV Using th...

Page 76: ...g this unit Multi Audio HDD BD RE BD R only for titles in DR mode Switch in the case of multiple audio Subtitle Style BD V Select the subtitle style recorded on the disc Angle BD V DVD V Change the number to select an angle Audio channel HDD RAM RW VR 39 Changing audio during play Disc Play Picture Sound Soundtrack Subtitle 1 Audio channel Off L R Digital 2 0 ch Menu Item Setting LPCM ÎDigital ÎDi...

Page 77: ...rdings This function is effective for audio from the HDMI terminal or the DIGITAL AUDIO OUT terminal only when Digital Audio Output is set to PCM However in this case audio is output as 2ch from the DIGITAL AUDIO OUT terminal Dialogue Enhancer HDD BD RE BD R BD V RAM R R DL RW V R R DL RW DVD V RW VR AVCHD 3 channel or over only including a centre channel The volume of the centre channel is raised...

Page 78: ...is set to On 86 To return to the previous screen press RETURN FUNCTION MENU window Playback You can select and play recorded programmes 22 change the Play Mode JPEG MP3 etc Recording You can easily find programmes you want to watch and set them for timer recording 24 Delete You can delete items using DELETE Navigator 26 72 Copy You can copy recorded titles using COPY Navigator 27 Timer Recording Y...

Page 79: ...ove Setting the protection After performing steps 1 3 left 1 Press 3 4 to select Disc Name and press OK 73 Entering text The disc name is displayed in the BD DVD Management window R R DL RW V R R DL With a finalised disc the name is displayed on the Top Menu RW The disc name is displayed only if you play the disc on other equipment after creating top menu To return to the previous screen Press RET...

Page 80: ... 3 4 to select Format Disc or Format Card and press OK 2 Press 2 1 to select Yes and press OK 3 Press 2 1 to select Start and press OK A message appears when formatting is finished Note Formatting normally takes a few minutes however it may take up to a maximum of 70 minutes RAM Do not disconnect the AC mains lead while formatting This can render the disc or the card unusable 4 Press OK Note When ...

Page 81: ...t other than this unit the background selected as Top Menu may not be displayed Discs finalised on this unit may not be playable on other players due to the condition of the recording RW RW discs contain no Top Menu data Top Menu is a convenient function We recommend you create the menu before playing a RW disc on other equipment You cannot use the Top Menu for playing on this unit Make selections...

Page 82: ...to move other channels 4 Press OK to save the group To delete channels on a group 1 Press 1 2 Press 3 4 to select the channel in the Fav List column and press the Yellow button Repeat this step to delete other channels Press the Blue button to delete all the channels from the group 3 Press OK to save the group Deleting a channel from a group does not affect the channel itself You can still select ...

Page 83: ...X CH to select the channel Signal Quality Below 2 display red The signal quality is so poor that there may be interference in the pictures and sound 2 5 display orange The signal quality is basically adequate but brief interference in the pictures and sound is possible in isolated case Over 5 display green Optimum picture and sound quality Signal Strength The display for signal strength is grey 0 ...

Page 84: ...hen level 0 to 7 is selected Unlock Recorder Change Password Change Level Temporary Unlock Settings for Recording Press OK to show the following settings Recording time in EP mode Select the maximum number of hours for recording in EP mode 30 Recording modes and approximate recording times 6 hours You can record for 6 hours on an unused 4 7 GB disc 8 hours You can record for 8 hours on an unused 4...

Page 85: ...annot process signals with a sampling frequency of 96 kHz Off Signals are output as 96 kHz Choose when the connected equipment can process signals with a sampling frequency of 96 kHz Priority Setting Select priority items for Dolby D Dolby D Dolby TrueHD DTS DTS HD MPEG and BD Video Secondary Audio See Enjoying High Bit rate Audio and Video of BD Video 43 Secondary Audio BD Video Secondary Audio i...

Page 86: ...quality Display On Screen Messages Choose the approximate time until the digital channel information screen 21 disappears automatically The length of time the control panel 75 is displayed can also be changed but Off does not work Off The digital channel information is not displayed 3 sec 5 sec 7 sec 10 sec FL Display Changes the brightness of the unit s display This setting is fixed with Automati...

Page 87: ...N CLOSE on the main unit at the same time for 5 or more seconds TV type Disc Titles recorded on HDD BD RE or BD R Yes No Multi system TV PAL NTSC PAL TV PAL NTSC 1 PAL60 NTSC TV PAL NTSC 2 HDMI Connection Press OK to show the following settings HDMI Video Mode Select On when video is output from HDMI AV OUT terminal On Off When the equipment such as amplifiers is connected using HDMI cable and TV ...

Page 88: ... RB C RB RS LS LB D E F F LS Approximate room dimensions Circle of constant primary listening distance Actual speaker position Ideal speaker position Primary listening distance 5 1ch speaker connection 7 1ch speaker connection D Centre speaker F Surround Surround back speakers Difference Setting Approx 34 cm 1 0 ms Difference Setting Approx 170 cm 5 0 ms Approx 68 cm 2 0 ms Approx 102 cm 3 0 ms Ap...

Page 89: ...ange as follows Hour Minute Second Day Month Year J 2 Press 3 4 to change the setting 3 Press OK when you have finished the settings The clock starts Clock Time Date Please set clock manually OK store RETURN leave 15 45 39 1 8 2008 Power Save On Power consumption is minimized when the unit is turned to standby 113 Off If Quick Start is set to On Power Save is automatically turned to Off Refer to t...

Page 90: ...s can normally be used without making any changes When setting an assigned DNS server from your internet service provider perform the following settings After performing steps 1 5 left 6 Press 3 4 to select IP Address Auto assignment and press 2 1 to select Off 7 Press 3 4 to select Primary DNS or Secondary DNS and press OK 8 Enter numbers with the numbered buttons and press OK Follow the instruct...

Page 91: ...K 6 Press 3 4 to select Proxy Address and press OK 73 Entering text After the input of Proxy Address is completed 7 Press 3 4 to select Proxy Port Number and press OK 8 Enter numbers with the numbered buttons and press OK 9 Press 2 1 to select Yes and press OK To set back to default setting After performing steps 1 5 above 1 Press 3 4 to select Initialize and press OK 2 Press 2 1 to select Yes and...

Page 92: ...nd operation is impossible To cancel the Child Lock Press and hold OK and RETURN simultaneously until X HOLD disappears Television operation e g 01 0 1 10 1 0 Brand Code Brand Code Panasonic 01 02 03 04 METZ 05 28 AIWA 35 MITSUBISHI 05 19 20 47 AKAI 27 30 MIVAR 24 BEJING 33 NEC 36 BEKO 05 71 72 73 74 NOBLEX 33 BENQ 58 59 NOKIA 25 26 27 60 61 BP 09 NORDMENDE 10 BRANDT 10 15 OLEVIA 45 BUSH 05 ONWA 3...

Page 93: ...date of the software will start when the power is turned off The unit s display during the update SW DL Software is downloading Download will stop when the power is turned on or the timer recording starts START Update of the software will start once the download is completed UPD Software is updating FINISH Updated of the software has completed You cannot operate the unit until the update is comple...

Page 94: ... the Setup menu 87 R RF IN IN AV1 TV COMPONENT COMPONENT VIDEO OUT VIDEO OUT OUT OUT AV4 IN PR PB Y S VIDEO IN AUDIO IN R L VIDEO IN Television s rear panel Red White S Video cable Red White This unit s rear panel Audio Video cable included RF RF IN IN RF RF OUT OUT AV2 EXT AV1 TV OPTICAL COAXIAL COMPONENT COMPONENT VIDEO OUT VIDEO OUT OUT OUT AV4 IN AV4 IN S VIDEO VIDEO R AUDIO L PR PB Y AV OUT N...

Page 95: ...tion copyright protection that are equipped with a digital DVI input terminal PC monitors etc Depending on the unit images may not display properly or at all when connecting with a DVI HDMI switching cable Audio cannot be output Connecting with an HDMI compatible television and receiver Regarding VIERA Link HDAVI ControlTM function When connecting with a Panasonic TV VIERA or a receiver equipped w...

Page 96: ...REAM PCM BITSTREAM VHF UHF RF IN RF OUT VIDEO OUT R L AUDIO OUT VHF UHF RF IN AUDIO IN R L VIDEO IN 6 5 4 2 1 3 To the aerial Cooling fan RF coaxial cable included This unit s rear panel To household mains socket AC 220 to 240 V 50 Hz Television s rear panel VCR s rear panel AC mains lead included Connect only after all other connections are complete RF coaxial cable Red White Yellow Audio Video c...

Page 97: ...nnecting to a VCR with 21 pin Scart terminal You can also connect with the AV2 terminal on this unit using the 21 pin Scart cable Required setting AV2 Input in the Setup menu 88 RF RF IN IN RF RF OUT OUT AV2 EXT AV1 TV OPTICAL COAXIAL COMPONENT COMPONENT VIDEO OUT VIDEO OUT OUT OUT AV4 IN AV4 IN S VIDEO VIDEO R AUDIO L PR PB Y AC IN AV OU V OUT LAN LAN 10BASE T 100BASE TX DIGITAL DIGITAL AUDIO OUT...

Page 98: ... acquire the title of the CD or the information about the artist 71 Update the software of this unit Automatically update the software of this unit 93 Update of the software can be done from the broadcast too Make the necessary settings in Network Settings after connecting 90 RF RF IN IN RF RF OUT OUT AV2 EXT AV1 TV OPTICAL COAXIAL COMPONENT COMPONENT VIDEO OUT VIDEO OUT OUT OUT AV4 IN AV4 IN S VI...

Page 99: ...r recording possible during the following operations Starting of timer recording not possible during the following operations Recording the title 1 Playing the title 2 Editing the title Copying a title in high speed mode without finalising Only 1 programme can be recorded Executing DV Auto Rec 3 Executing Recording via AV3 input 3 Executing Pause Live TV 1 1 Executing operation will terminate when...

Page 100: ... and DVD Video bought in another country Playback of the following discs is not possible BD Video discs that do not include region B DVD Video discs that do not include region 4 or ALL Refer to the disc s jacket for more information Cover Can BD Video DVD Video that does not have a region code number be played The region management information for BD Video DVD Video indicates that the disc conform...

Page 101: ...xisting album Can I transfer the music tracks from HDD to the disc or USB memory No you cannot Abkhazian 6566 Afar 6565 Afrikaans 6570 Albanian 8381 Amharic 6577 Arabic 6582 Armenian 7289 Assamese 6583 Aymara 6589 Azerbaijani 6590 Bashkir 6665 Basque 6985 Bengali Bangla 6678 Bhutani 6890 Bihari 6672 Breton 6682 Bulgarian 6671 Burmese 7789 Byelorussian 6669 Cambodian 7577 Catalan 6765 Chinese 9072 ...

Page 102: ...lete recorded content from the BD R DVD R DVD R DL R or R DL there is no increase in disc space Available space on DVD RW DVD Video format and RW increases only when the last recorded title is deleted Use a new disc 26 45 80 Cannot record Exceeds maximum number limit of titles allowed No Disc The disc may be upside down No folders There is no compatible folder in this unit 115 No SD CARD No valid ...

Page 103: ... compatible USB memory 8 10 11 UPD The software is being updated You cannot operate the unit until the update is complete 93 U59 The unit is hot The unit switches to standby for safety reasons Wait for about 30 minutes until the message disappears Select a position with good ventilation when installing the unit Do not block the cooling fan on the rear of the unit U61 When a disc is not inserted Di...

Page 104: ...time recorded on the disc and the available time shown do not add up The displayed time of this unit is different from the actual recording time Times shown may disagree with actual times Available recording space on DVD RW DVD Video format or RW increases only when the last recorded title is deleted It does not increase if other titles are deleted Even if you delete recorded content from the BD R...

Page 105: ...vertically Adjust by the aspect ratio setting on the TV If you cannot make the adjustment set the Component Resolution in the Setup menu to 576p 480p and HDMI Video Format to 576p 480p 87 87 There is a lot of after image when playing video Set HD optimizer in the Picture menu to Off 76 When playing DVD Video using progressive output one part of the picture momentarily appears to be doubled up Set ...

Page 106: ...ber button at the same time for more than 5 seconds The batteries are depleted Replace them with new ones You are not pointing the remote control at the main unit s remote control signal sensor during operation Coloured glass may obstruct the signal reception transmission Don t place the signal sensor in direct sunlight or in areas that may be subject to sunlight exposure Software is updating when...

Page 107: ...work properly The timer programme is incorrect or different timer programme times overlap is displayed Correct the programme The programme is not in timer recording standby The timer icon F in the timer recording is grey Set the clock The programme information in the TV Guide system may not be correct It is recommended to modify the start and end times to allow a margin of a few minutes 36 35 89 3...

Page 108: ... changed during scenes where different angles are recorded You have forgotten your ratings password You want to cancel the ratings level The ratings level returns to the factory preset While the disc tray is open press DRIVE SELECT to select the BD drive then press and hold REC and 1 PLAY on the main unit at the same time for 5 or more seconds INIT will appear on the unit s display Image for the Q...

Page 109: ...rom CDs that do not conform to CD DA specifications copy control CDs etc cannot be guaranteed Bonus tracks may not be copied Title of the newly released CD cannot be acquired Title cannot be acquired if the title is not registered in the built in GracenoteR database Connection to the network is necessary to acquire title for the newly released CD 98 ID3 tag of a MP3 file is not completely displaye...

Page 110: ...andard AS1417 1 If you live within 5 10 km of DVB transmission towers a combined VHF UHF aerial should be adequate Outside this area separate VHF and UHF aerials provide superior reception performance If you live in a unit or apartment check to ensure the Master Antenna TV MATV system is designed for DVB T reception Please consult your body corporate Picture regularly breaks up on some channels No...

Page 111: ...tings except for the ratings level ratings password and clock settings return to the factory preset The timer recording programmes are also cancelled 89 89 To reset the ratings level settings While the disc tray is open press DRIVE SELECT to select the BD drive then press and hold REC and 1 PLAY on the main unit at the same time for 5 or more seconds To restore the unit if it freezes due to one of...

Page 112: ...1 JPEG 1 Internal HDD capacity 500 GB Optical pick up System with 2 lens 3 integration units 405 nm wavelength for BDs 661 nm wavelength for DVDs 783 nm wavelength for CDs LASER specification Class 1 LASER Product Pickup Wave length Laser power No hazardous radiation is emitted with the safety protection Audio Recording system Dolby Digital 2ch XP SP LP EP mode Linear PCM XP mode Dolby Digital 2ch...

Page 113: ...level 1 or 2 except for extended formats and Joliet This unit is compatible with multi session but reading or play of the disc may take time if there are a lot of sessions Operation may take time to complete when there are many files tracks and or folders and some files tracks may not display or be playable English alphabet and Arabic numerals are displayed correctly Other characters may not be di...

Page 114: ...ipment You can format BD RE DVD RAM DVD RW only as DVD Video format RW SD cards and the HDD or unused BD R R and R DL on this unit Formatting permanently deletes all contents Frames and fields Frames refer to the single images that constitute the video you see on your television Each frame consists of two fields A frame still shows two fields so there may be some blurring but picture quality is ge...

Page 115: ...realistic and rich image 1080p In one high definition image 1080 1125 scan lines pass at the same time every 1 50th of a second to create a progressive image Since progressive video does not alternate scan lines like interlace there is a minimal amount of screen flicker 24p This is a progressive image recorded at a rate of 24 frames per second 720p In one high definition image 720 750 scan lines p...

Page 116: ...t to be used for a long time Placement Voltage AC mains lead protection Foreign matter Service Java and all Java based trademarks and logos are trademarks or registered trademarks of Sun Microsystems Inc in the United States and other countries Manufactured under license from Dolby Laboratories Dolby and the double D symbol are trademarks of Dolby Laboratories DTS is a registered trademark of DTS ...

Page 117: ...s you agree to cease any and all use of the Gracenote Data the Gracenote Software and Gracenote Servers Gracenote reserves all rights in Gracenote Data the Gracenote Software and the Gracenote Servers including all ownership rights Under no circumstances will Gracenote become liable for any payment to you for any information that you provide You agree that Gracenote Inc may enforce its rights unde...

Page 118: ...tor Music 67 Still picture 60 Title 22 Discs Discs you can use for recording and play 8 Play only discs 10 Discs that cannot be played 10 Disc name 79 Format 80 Protection 79 Display Digital channel information 21 Status messages 77 Divide Title 45 DR Direct Recording mode 7 30 DV automatic recording 57 DVB Signal Display 83 Edit Chapter 47 Music on HDD 69 Still picture 62 Title 44 Enabling discs ...

Page 119: ...ture 60 Supported formats 11 SD Video Copy 59 Select channel 20 Setup menu 82 Simultaneous rec and play 32 Slide show 61 Software Update 93 Soundtrack 76 Speaker 88 Specifications 112 Still picture Copy 64 Edit 62 Play 60 Subtitle Digital broadcast 20 Disc 76 Playback 39 Switch the audio subtitles on the disc Disc menu 76 Teletext 21 Time Slip 39 Timer recording Check change or delete a programme ...

Page 120: ...Matsushita Electric Industrial Co Ltd Web Site http panasonic net p RQT9131 L F0508TN0 2000 A ...

Reviews: