- 25 -
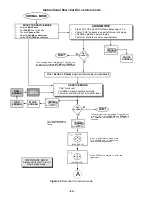
Tint/Color adjustment
Service DAC adjustment (TINT) (COLOR)
Note:
Color,
tint
adjustment
sets
the
reference
settings
for
the
user
controls; It is important to read the
procedures.
(No rainbow pattern)
Make sure that sub-contrast adjustment was finished
prior to perform this adjustment
Preparation:
1.
Normalize the picture settings.
2.
Set picture mode to VIVID
Procedure:
1.
Apply a color bar pattern.
2.
In service mode adjust “TINT” sub-tint data so that
the color does not become greenish or redish.
3.
In service mode adjust “COLOR” sub-color data so
that the color level is not too high (saturated) or too
low (tending to black and white).
4.
confirm that saturation and picture are normal
(normal image).
5.
If image is not satisfactory, repeat adjustment until
the image is normal and natural.
6.
The image can be compared against other set to
see the image quality.
Color temperature adjustment
(B/W Tracking)
Service DAC adjust
(CUT_R) (CUT_G) (CUT_B) (R -DR) (B-DR)
Minor touch-up method
OBSERVE low and high brightness areas of a B/W
picture for proper tracking. Adjust only as required for
good gray scale and warm highlights”.
1.
LOW LIGHT areas – In service mode for making
electronic adjustments, select “CUT_R”, “CUT_G”,
“CUT_B” and adjust the picture for gray.
2.
HIGH LIGHT areas – In service mode for making
electronic adjustments, select “CUT_G”, “CUT_B”
and adjust the picture for warm whites.
Complete adjustment
Preparation:
1.
Turn the receiver “ON” and allow 10 minutes warm
up at high brightness.
2.
Apply a color bar signal with color “OFF”.
3.
Turn the SCREEN control (part of FBT T551) fully
counterclockwise.
Procedure:
Preset the following service DACs for best results:
• CUT_R. . . . . . . . . 02 00
• CUT_G . . . . . . . . 02 00
• CUT_B. . . . . . . . . 02 00
• R-DR . . . . . . . .. . 07 FF
• B-DR . . . . . . . .. . 07 FF
1.
Connect the oscilloscope to TP35 (L-Board).
2.
In service mode for making electronic adjustment,
select the sub-bright DAC “BRIGH”.
3.
Press the R-TUNE key on the remote.
4.
Observe the oscilloscope waveform at horizontal
rate and adjust the service mode sub-bright DAC
“BRIGH” level until 2.0 ± 0.05V above DC ground
is measured, as indicated in Fig. 28.
5.
Press the R-TUNE key on the remote.
6.
Connect the scope to GREEN cathode (KG) on the
CRT-Board.
7.
In
the
service
mode
for
making
electronic
adjustments, select the GREEN CUTOFF DAC
“CUT_G”.
8.
Press the R-TUNE key on the remote.
9.
View scope trace at horizontal rate and adjust the
service mode DAC “CUT_G” level until 170±2V
above DC ground is measured, as indicated in
Fig. 29.
10. Press the R-TUNE key on the remote.
11. Write the same “CUT_G” data to “CUT_R” and
“CUT_B”.
12. Press the R-TUNE key on the remote.
13. Turn the screen control (part of FBT) slowly
clockwise until a slightly color horizontal line
appears.
14. Adjust “CUT_R” and “CUT_B” until the horizontal
line becomes white.
15. Press the R-TUNE key on the remote
16. Apply a normal image and check for a good
picture.
17. Exit the service mode.
0V DC
Figure 28. TP35 Waveform
2.0±0.05V DC
Figure 29. KG Waveform
170±2V DC
0V DC
(Ground)
Summary of Contents for CT-32SC13-1G
Page 63: ... 50 A Board ...
Page 65: ... 52 ERJ6GEYJ183V NP2AH037AC ERENCES A Board ...
Page 66: ... 53 A Board ...
Page 69: ... 56 D Board ...
Page 70: ... 57 D Board ...
Page 71: ... 58 D Board ...
Page 74: ... 61 notes NOTES ...
Page 75: ... 62 G Board ...
Page 76: ... 63 G Board ...
Page 77: ... 64 G Board ...
Page 79: ... 66 L Board ...
Page 80: ... 67 L Board ...
Page 81: ... 68 A PCB ...
Page 82: ... 69 A PCB ...
Page 83: ... 70 D PCB ...
Page 84: ... 71 D PCB ...
Page 85: ... 72 G PCB ...
Page 86: ... 73 G PCB ...
Page 87: ... 74 L PCB ...
Page 88: ... 75 notes NOTES ...

