background image

59 

  The operation mode judging temperature and standard setting temperature can be increased by 2°C 

permanently, by open the circuit of JX03 at indoor unit’s printed circuit board. 


13.5  Indoor Fan Speed Control 

  Indoor fan speed can be set using remote control. 

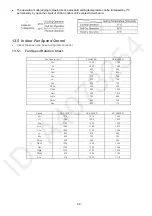
13.5.1  Fan Speed Rotation Chart 


Fan Speed (rpm) 

CS-A9PKD 

CS-A12PKD 

SHi 1060 

1100 

Hi 1020 

1080 

Me 850 

930 

HLo 750 

820 

CLo 710 

780 

Lo- 670 

740 

SLo 650 

720 

SSLo 300 

300 

QSHi 990 

1030 

QHi 950 

1010 

QMe 780 

860 

QHLo 680 

750 

QLo 640 

710 


Speed CS-A18PKD 

CS-A24PKD 

CS-A28PKD 

SHi 1310 1530 1520 

Hi 1240 

1390 

1470 

Me 1100 1220 1320 

HLo 1060 1180 1270 
CLo 1000 1100 1200 

Lo- 820 910 990 

SLo 630  700  780 

SSLo 300  300  300 
QSHi 1220  1440  1430 

QHi 1150 1300 1380 

QMe 1010 1130 1230 

QHLo 970  1090 1180 

QLo 910 1010 1110 


Summary of Contents for CS-A12PKD

Page 1: ...erienced repair technicians only and is not designed for use by the general public It does not contain warnings or cautions to advise non technical individuals of potential dangers in attempting to se...

Page 2: ...69 13 11 Timer Control 71 13 12 Random Auto Restart Control 71 13 13 Remote Control Signal Receiving Sound 71 13 14 nanoe G operation 72 13 15 In filter Deactivation Operation 74 13 16 AUTO COMFORT an...

Page 3: ...CD Otherwise it may cause electrical shock and fire in case equipment breakdown or insulation breakdown 10 Do not use joint cable for indoor outdoor connection cable Use the specified Indoor Outdoor c...

Page 4: ...ncy In some countries permanent connection of this air conditioner to the power supply is prohibited 1 Power supply connection to the receptacle using power plug Use an approved 15 16A 1 0 1 5HP or 16...

Page 5: ...B 54 54 56 56 dB A 48 49 48 49 Heating Outdoor Noise H L Power Level dB 64 65 64 65 Max Current A Max Input Power W 5 1 1 13k 6 3 1 39k Starting Current A 18 0 23 0 Type Hermetic Motor Rotary Hermetic...

Page 6: ...5 49 2 I D O D Height different m ft 5 16 4 5 16 4 Additional Gas Amount g m oz ft 20 0 2 20 0 2 Piping Length for Additional Gas m ft 7 5 24 6 7 5 24 6 Inner Diameter mm 16 7 16 7 Drain Hose Length m...

Page 7: ...55 Heating Outdoor Noise H L Power Level dB 70 71 70 71 Max Current A Max Input Power W 10 2 2 20k 14 6 3 25k Starting Current A 40 0 60 0 Type Hermetic Motor Rotary Hermetic Motor Rotary Motor Type...

Page 8: ...ength range min max m ft 3 9 8 25 82 0 3 9 8 25 82 0 I D O D Height different m ft 20 65 6 20 65 6 Additional Gas Amount g m oz ft 20 0 2 30 0 3 Piping Length for Additional Gas m ft 7 5 24 6 7 5 24 6...

Page 9: ...Factor 99 99 dB A 48 44 Indoor Noise H L Power Level dB 64 dB A 55 Heating Outdoor Noise H L Power Level dB 71 Max Current A Max Input Power W 16 4 3 45k Starting Current A 40 Type Hermetic Motor Rot...

Page 10: ...dditional Gas m ft 7 5 24 6 Inner Diameter mm 16 7 Drain Hose Length mm 650 Fin Material Aluminium Pre coated Fin Type Slit Fin Row Stage FPI 2 15 21 Indoor Heat Exchanger Size W H L mm 810 315 25 4 F...

Page 11: ...o 30 meters Easy to use remote control Quality Improvement o Random auto restart after power failure for safety restart operation o Gas leakage protection o Prevent compressor reverse cycle o Inner pr...

Page 12: ...12 4 Location of Controls and Components 4 1 Indoor Unit 4 2 Outdoor Unit 4 3 Remote Control...

Page 13: ...13 5 Dimensions 5 1 Indoor Unit 5 1 1 CS A9PKD CS A12PKD...

Page 14: ...14 5 1 2 CS A18PKD CS A24PKD CS A28PKD...

Page 15: ...15 5 2 Outdoor Unit 5 2 1 CU A9PKD 5 2 2 CU A12PKD...

Page 16: ...16 5 2 3 CU A18PKD...

Page 17: ...17 5 2 4 CU A24PKD CU A28PKD...

Page 18: ...18 6 Refrigeration Cycle Diagram 6 1 CS A9PKD CU A9PKD CS A12PKD CU A12PKD...

Page 19: ...19 6 2 CS A18PKD CU A18PKD CS A24PKD CU A24PKD CS A28PKD CU A28PKD...

Page 20: ...20 7 Block Diagram 7 1 CS A9PKD CU A9PKD...

Page 21: ...21 7 2 CS A12PKD CU A12PKD...

Page 22: ...22 7 3 CS A18PKD CU A18PKD CS A24PKD CU A24PKD...

Page 23: ...23 7 4 CS A28PKD CU A28PKD...

Page 24: ...A9PKD CONNECTION CWA921447 CONNECTION 2PS156D3DA02 BLUE YELLOW 336 C R 4 228 YELLOW RED 306 C S 3 841 Note Resistance at 25 C of ambient temperature Note Resistance at 20 C of ambient temperature Resi...

Page 25: ...TION CWA921447 CONNECTION 2PS206D3DA06 BLUE YELLOW 336 C R 3 252 YELLOW RED 306 C S 4 313 Note Resistance at 25 C of ambient temperature Note Resistance at 20 C of ambient temperature Resistance of Ou...

Page 26: ...ompressor Windings MODEL CU A18PKD CU A24PKD MODEL CU A18PKD CU A24PKD CONNECTION CWA951385J CONNECTION 2JS318D3AA04 2JS438D3CC04 BLUE YELLOW 93 C R 1 618 1 121 YELLOW ORANGE 124 C S 3 718 2 535 YELLO...

Page 27: ...istance of Compressor Windings MODEL CU A28PKD MODEL CU A28PKD CONNECTION CWA951294J CONNECTION 2JD514E3AA03 BLUE YELLOW 102 C R 1 022 YELLOW ORANGE 81 C S 2 142 YELLOW RED 108 Note Resistance at 20 C...

Page 28: ...28 9 Electronic Circuit Diagram 9 1 CS A9PKD CU A9PKD...

Page 29: ...29 9 2 CS A12PKD CU A12PKD...

Page 30: ...30 9 3 CS A18PKD CU A18PKD CS A24PKD CU A24PKD...

Page 31: ...31 9 4 CS A28PKD CU A28PKD...

Page 32: ...32 10 Printed Circuit Board 10 1 Indoor Unit 10 1 1 Main Printed Circuit Board 10 1 1 1 CS A9PKD CS A12PKD...

Page 33: ...33 10 1 1 2 CS A18PKD CS A24PKD CS A28PKD 10 1 2 Indicator Receiver Printed Circuit Board 10 1 3 High Voltage Power Supply Printed Circuit Board...

Page 34: ...34 10 1 4 Comparator Printed Circuit Board 10 1 5 Human Activity Sensor Printed Circuit Board...

Page 35: ...ded installation height for indoor unit shall be at least 2 5 m 11 1 2 Outdoor Unit If an awning is built over the unit to prevent direct sunlight or rain be careful that heat radiation from the conde...

Page 36: ...5 screws If mounting the unit on the concrete wall consider using anchor bolts o Always mount the installation plate horizontally by aligning the marking off line with the thread and using a level gau...

Page 37: ...2 3 Indoor Unit Installation 11 2 3 1 For the right rear piping 11 2 3 2 For the right and right bottom piping 11 2 3 3 For the embedded piping This can be used for left rear piping and bottom piping...

Page 38: ...o Do not use joint power supply cord Replace the wire if the existing wire from concealed wiring or otherwise is too short o In unavoidable case joining of power supply cord between isolating devices...

Page 39: ...se grille door by tighten with screw and close the front panel Note Isolating Devices Disconnecting means should have minimum 3 0 mm contact gap Ensure the colour of wires of outdoor unit and the term...

Page 40: ...40 11 2 5 Wire Stripping And Connecting Requirement...

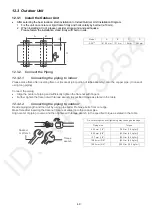
Page 41: ...int portion of tube assembly onto the copper pipe In case of using long piping Connect the piping Align the center of piping and sufficiently tighten the flare nut with fingers Further tighten the fla...

Page 42: ...TO AVOID REFRIGERENT GAS LEAKAGE 5 Disconnect the charging hose from the vacuum pump and from the service port of the 3 way valve 6 Tighten the service port caps of the 3 way valve at a torque of 18...

Page 43: ...r unit WARNING This equipment must be properly earthed Earth wire shall be Yellow Green Y G in colour and longer than the other AC wires for safety reason 11 3 5 Piping Insulation 1 Please carry out i...

Page 44: ...les Recommended installation height for indoor unit shall be at least 2 5 m 12 1 2 Outdoor Unit If an awning is built over the unit to prevent direct sunlight or rain be careful that heat radiation fr...

Page 45: ...nit on the concrete wall consider using anchor bolts o Always mount the installation plate horizontally by aligning the marking off line with the thread and using a level gauge 2 Drill the piping plat...

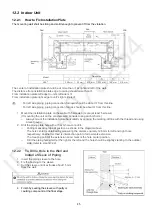
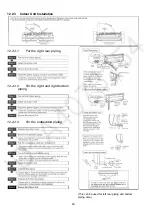
Page 46: ...2 3 Indoor Unit Installation 12 2 3 1 For the right rear piping 12 2 3 2 For the right and right bottom piping 12 2 3 3 For the embedded piping This can be used for left rear piping and bottom piping...

Page 47: ...if the existing wire from concealed wiring or otherwise is too short Secure the connection cable onto the control board with the holder WARNING This equipment must be properly earthed Note Isolating...

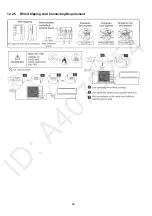
Page 48: ...48 12 2 5 Wire Stripping And Connecting Requirement...

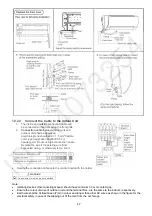
Page 49: ...In case of using long piping Connect the piping Align the center of piping and sufficiently tighten the flare nut with fingers Further tighten the flare nut with torque wrench in specified torque as...

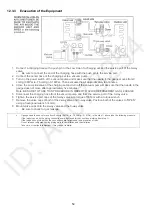
Page 50: ...TO AVOID REFRIGERENT GAS LEAKAGE 5 Disconnect the charging hose from the vacuum pump and from the service port of the 3 way valve 6 Tighten the service port caps of the 3 way valve at a torque of 18...

Page 51: ...nect the power supply cord and connection cable between indoor unit and outdoor unit according to the diagram below 5 Secure the power supply cord and connection cable onto the control board with the...

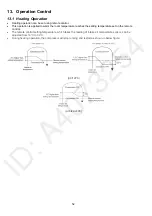
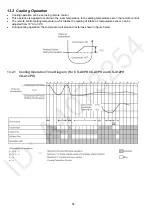
Page 52: ...arm the room temperature reaches the setting temperature set on the remote control The remote control setting temperature which takes the reading of intake air temperature sensor can be adjusted from...

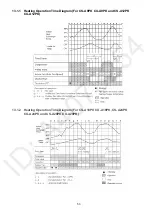
Page 53: ...53 13 1 1 Heating Operation Time Diagram For CS A9PK CU A9PK and CS A12PK CU A12PK 13 1 2 Heating Operation Time Diagram For CS A18PK CU A18PK CS A24PK CU A24PK and CS A28PK CU A28PK...

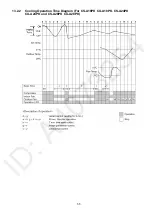
Page 54: ...setting temperature set on the remote control The remote control setting temperature which takes the reading of intake air temperature sensor can be adjusted from 16 C to 30 C During cooling operation...

Page 55: ...55 13 2 2 Cooling Operation Time Diagram For CS A18PK CU A18PK CS A24PK CU A24PK and CS A28PK CU A28PK...

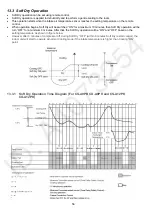
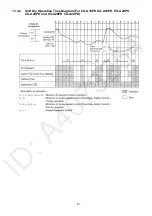
Page 56: ...e switched ON for a maximum 10 minutes then Soft Dry operation will be turn OFF for a minimum 6 minutes After that the Soft Dry operation will be ON and OFF based on the setting temperature as shown i...

Page 57: ...57 13 3 2 Soft Dry Operation Time Diagram For CS A18PK CU A18PK CS A24PK CU A24PK and CS A28PK CU A28PK...

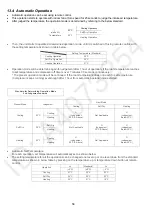
Page 58: ...reach to set temperature Compressor keeps running eventhough after 1 hour from automatic operation mode started Standard for Determining Operation Mode 2nd Judgement onwards Next Mode Present Mode Jud...

Page 59: ...tion Chart Fan Speed rpm CS A9PKD CS A12PKD SHi 1060 1100 Hi 1020 1080 Me 850 930 HLo 750 820 CLo 710 780 Lo 670 740 SLo 650 720 SSLo 300 300 QSHi 990 1030 QHi 950 1010 QMe 780 860 QHLo 680 750 QLo 64...

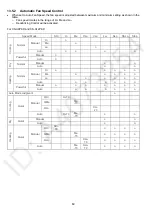
Page 60: ...e HLo CLo Lo SLo SSLo Stop Hi o Me o Manual Lo o Normal Auto o o o o Manual o Cooling Powerful Auto o Manual o o Dry Normal Auto o o Hi o o o o o Me o o o o o Manual Lo o o o o o Normal Auto o o o o o...

Page 61: ...Dry Normal Auto o o Hi o o o o o Me o o o o o Manual Lo o o o o o Normal Auto o o o o o o Manual o o o o o o o Heating Powerful Auto o o o o o o Auto Mode Judgment o QHi Hi 90 QMe Me 90 Manual QLo CLo...

Page 62: ...uid form returning to the compressor 5 After the compressor turned off for 3 minutes indoor fan will start to operate at Lo to circulate the air in the room This is to obtain the actual reading of the...

Page 63: ...stopped and restarted If the fan motor error counter increased to 7 then air conditioner will stop operation 13 6 Outdoor Fan Speed Control There is only one speed for outdoor fan motor Applicable fo...

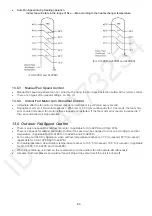
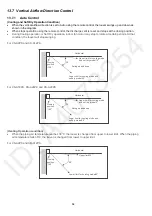
Page 64: ...ing For CS A9PK and CS A12PK For CS A18PK CS A24PK and CS A28PK Heating Operation condition When the piping air temperature reaches 38 C the louver is changed from upper to lower limit When the piping...

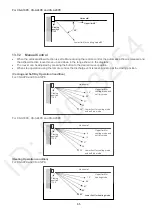
Page 65: ...g position Cooling and Soft Dry Operation Condition For CS A9PK and CS A12PK For CS A18PK CS A24PK and CS A28PK Heating Operation condition For CS A9PK and CS A12PK Closing position 140 Lower limit fo...

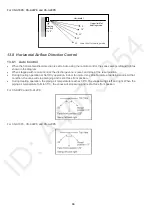
Page 66: ...oling operation or Soft Dry operation indoor fan motor may stop to rotate at certain periods At that condition the vane will stop swinging and rest at face front position During Heating operation the...

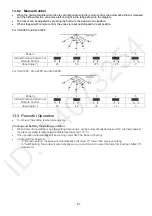
Page 67: ...CS A18PK CS A24PK and CS A28PK Pattern 1 2 3 4 5 Airflow Direction Patterns at Remote Control Vane Angle 20 40 30 10 0 13 9 Powerful Operation To achieve the setting temperature quickly Cooling and S...

Page 68: ...lly shift down 5 lower than previous setting o In Auto setting the vane will automatically shift between upper and lower limit depending on the intake air temperature as Heating Mode Airflow Direction...

Page 69: ...formation become severe at Quite Lo Cool therefore Quiet Lo cool operated only for 1 hour 30 minutes 1 hour QLo 30 minutes QLo 80rpm for A9PK and A12PK and Quiet Lo cool operated only 1 hour 30 minute...

Page 70: ...ill reduce either around 2 dB Lo or 3 dB Hi Me against the present sound level operation Quiet setting of fan speed rpm refer to Indoor Fan Speed Control Manual Fan Speed o Rpm control during Lo Me Hi...

Page 71: ...el the previous timer setting press CANCEL button 3 To activate the previous timer setting press SET button 4 If main power supply is switched off the Timer setting will be cancel 13 12 Random Auto Re...

Page 72: ...ly Auto Fan Speed and no Powerful operation is allowed Even if Fan Speed button is pressed no signal is sent to the unit and no change on remote control display Auto Fan Speed for nanoe G operation ch...

Page 73: ...with dry cotton bud o Abnormal discharge error Judgment method During nanoe G operation the nanoe G system has abnormal discharge due to short circuit caused by water or dust adhesion and so forth wi...

Page 74: ...r accumulated unit operation time achieves 4hrs if unit operation time less than 2hours In filter deactivation stop condition o The unit is turned on o nanoe G generator operation time during in filte...

Page 75: ...OFF by OFF ON button o When unit is OFF when OFF TIMER activates o When unit is OFF by AUTO OFF ON button at indoor unit o When POWERFUL QUIET operation activates o When button is pressed 13 16 1 Hum...

Page 76: ...o Non Living Area near windows wall etc 13 16 1 4 Human Position Analysis According to Area of Living frequency of activity and indoor unit intake temperature the system will analyze the human positi...

Page 77: ...econds Cooling 2 levels Higher Activity level 60 seconds Lower Activity level 8 seconds 1 level Higher Activity level 8 seconds Lower Activity level 30 seconds Heating 2 levels Higher Activity level 8...

Page 78: ...n details Infrared sensor Human Activity Sensor Sensor 1 Sensor 2 Left Center Right Vane position Fan speed 1 0 5 HI 1 1 Auto Swing HI 0 1 1 HI 0 0 Auto Swing LO The target area will maintain for 5 se...

Page 79: ...AC reset o When abnormality counter reached 4 times No TIMER indicator blinking When error code happened the unit is able to operate without AUTO COMFORT ECONAVI 13 16 1 11 Human Activity Sensor Chec...

Page 80: ...ght judgment is as following 13 16 2 1 Sunlight Intensity Reset The sunlight intensity will to reset to zero no sunlight condition when o Each time ECONAVI is activated o Setting temperature is change...

Page 81: ...utes o During check mode the ON and OFF timer will be memorized but it operation be ignored o During check mode if the sunlight sensor check code is retransmitted the 5 minutes counter will be reset o...

Page 82: ...e ECONAVI is OFF the 24 hours timer will be reset but the sunlight sensor disconnection error counter will not be reset Error Code judgment o When sunlight sensor disconnection error counter reached 1...

Page 83: ...temperature has reached the thermo off temperature However force stop by pressing the OFF ON operation button at the remote control is permitted The reason for the compressor to force operate at minim...

Page 84: ...ted if o Cooling mode or Quiet mode o Remote Control setting temperature is less than 25 C o Fan speed is at CLo or QLo o Room temperature is constant 1 C for 30 minutes o Compressor is continuously r...

Page 85: ...eted Indoor fan control during hot start is shown below Indoor Pipe Temperature Indoor Fan 30 C OFF 30 C t 34 C SLo t 34 C Lo When indoor pipe temperature over 34 C or maximum 240 seconds hot start is...

Page 86: ...e to overload protection control is accumulated up to 60 minutes and after compressor starts for 1 minutes deice starts Deice ends when 1 12 minutes after deicing operation starts 2 TRS senses the out...

Page 87: ...87 Normal Deice Time Diagram Overload Deice Time Diagram...

Page 88: ...will not stop within 60 seconds in a normal operation although the intake air temperature has reached the thermo off temperature However force stop by pressing the OFF ON operation button at the remot...

Page 89: ...C for one minute or more o Operation mode change The unit could be ON by pressing OFF ON button at remote control but the TIMER LED will continue blinking TIMER LED blinking will be reset if o Indoor...

Page 90: ...ated before the compressor restart 14 23 4 Way Valve Control 4 way valve always on during Heating operation except deicing operation When the unit is switched off by remote control during Heating oper...

Page 91: ...ring compressor is in operation deice will start There is no detection during Outdoor Fan stops Overload Deice During heating operation if the outdoor Fan OFF duration due to overload protection contr...

Page 92: ...92 a Normal Deice Time Diagram b Overload Deice Time Diagram...

Page 93: ...remote control receiving sound Short beep Turn ON remote control receiving sound Long beep Turn OFF remote control receiving sound After Auto OFF ON button is pressed the 20 seconds counter for Remot...

Page 94: ...Set button until a beep sound is heard as confirmation of transmission code change 15 2 2 RESET RC To clear and restore the remote control setting to factory default o Press once to clear the memory...

Page 95: ...n of a compressor and a fan The normal outlet air temperature and pressure of the refrigeration cycle depends on various conditions the standard values for them are shown in the table on the right Nor...

Page 96: ...a malfunction of a compressor and 4 way Valve Nature of fault Symptom Insufficient compressing of a compressor Electric current during operation becomes approximately 20 lower than the normal value T...

Page 97: ...capacitor has discharged sufficiently before proceeding with repair work Failure to heed this caution may result in electric shocks 17 1 CS A9PKD CS A12PKD 17 1 1 Indoor Electronic Controllers Cross...

Page 98: ...98 Figure 3 Figure 4 17 1 1 3 To remove discharge grille Figure 5...

Page 99: ...99 17 1 1 4 To remove control board Figure 6 17 1 1 5 To remove cross flow fan and indoor fan motor Figure 7 Figure 8...

Page 100: ...100 Figure 9 Figure 10...

Page 101: ...d sufficiently before proceeding with repair work Failure to heed this caution may result in electric shocks 17 2 CS A18PKD CS A24PKD CS A28PKD 17 2 1 Indoor Electronic Controllers Cross Flow Fan and...

Page 102: ...102 17 2 1 3 To remove electronic controller Figure 13 Figure 14 Figure 15 17 2 1 4 To remove discharge grille Figure 16...

Page 103: ...103 17 2 1 5 To remove control board Figure 17 17 2 1 6 To remove cross flow fan and indoor fan motor Figure 18 Figure 19...

Page 104: ...104 Figure 20 Figure 21...

Page 105: ...105 18 Technical Data 18 1 Thermostat Characteristics...

Page 106: ...106 18 2 Operation Characteristics 18 2 1 CS A9PKD CU A9PKD Cooling Characteristic o Room temperature 27 C DBT 19 C WBT o Operation condition High fan speed o Piping length 7 5m...

Page 107: ...107 Piping Length Characteristic o Room temperature 27 C DBT 19 C WBT o Operation condition High fan speed o Outdoor temperature 35 24 C...

Page 108: ...108 Heating Characteristic o Room temperature 20 C o Operation condition High fan speed o Piping length 7 5m...

Page 109: ...109 Piping Length Characteristic o Room temperature 20 C o Operation condition High fan speed o Outdoor temperature 7 6 C...

Page 110: ...110 18 2 2 CS A12PKD CU A12PKD Cooling Characteristic o Room temperature 27 C DBT 19 C WBT o Operation condition High fan speed o Piping length 7 5m...

Page 111: ...111 Piping Length Characteristic o Room temperature 27 C DBT 19 C WBT o Operation condition High fan speed o Outdoor temperature 35 24 C...

Page 112: ...112 Heating Characteristic o Room temperature 20 C o Operation condition High fan speed o Piping length 7 5m...

Page 113: ...113 Piping Length Characteristic o Room temperature 20 C o Operation condition High fan speed o Outdoor temperature 7 6 C...

Page 114: ...114 18 2 3 CS A18PKD CU A18PKD Cooling Characteristic o Room temperature 27 C DBT 19 C WBT o Operation condition High fan speed o Piping length 5 0m...

Page 115: ...115 Piping Length Characteristic o Room temperature 27 C DBT 19 C WBT o Operation condition High fan speed o Outdoor temperature 35 C DBT 24 C WBT o Piping length 5 0m...

Page 116: ...116 Heating Characteristic o Room temperature 20 C DBT o Operation condition High fan speed o Piping length 5 0m...

Page 117: ...117 Piping Length Characteristic o Room temperature 20 C DBT o Operation condition High fan speed o Outdoor temperature 7 C DBT 6 C WBT o Piping length 5 0m...

Page 118: ...118 18 2 4 CS A24PKD CU A24PKD Cooling Characteristic o Room temperature 27 C DBT 19 C WBT o Operation condition High fan speed o Piping length 5 0m...

Page 119: ...119 Piping Length Characteristic o Room temperature 27 C DBT 19 C WBT o Operation condition High fan speed o Outdoor temperature 35 C DBT 24 C WBT o Piping length 5 0m...

Page 120: ...120 Heating Characteristic o Room temperature 20 C DBT o Operation condition High fan speed o Piping length 5 0m...

Page 121: ...121 Piping Length Characteristic o Room temperature 20 C DBT o Operation condition High fan speed o Outdoor temperature 7 C DBT 6 C WBT o Piping length 5 0m...

Page 122: ...122 18 2 5 CS A28PKD CU A28PKD Cooling Characteristic o Room temperature 27 C DBT 19 C WBT o Operation condition High fan speed o Piping length 5 0m...

Page 123: ...123 Piping Length Characteristic o Room temperature 27 C DBT 19 C WBT o Operation condition High fan speed o Outdoor temperature 35 C DBT 24 C WBT o Piping length 5 0m...

Page 124: ...124 Heating Characteristic o Room temperature 20 C DBT o Operation condition High fan speed o Piping length 5 0m...

Page 125: ...125 Piping Length Characteristic o Room temperature 20 C DBT o Operation condition High fan speed o Outdoor temperature 7 C DBT 6 C WBT o Piping length 5 0m...

Page 126: ...w and Replacement Parts List 19 1 Indoor Unit 19 1 1 CS A9PKD CS A12PKD Note The above exploded view is for the purpose of parts disassembly and replacement The non numbered parts are not kept as stan...

Page 127: ...21 LEAD WIRE PCB ECO 1 CWA67C9785 22 CONTROL BOARD CASING FOR PCB ECO 1 CWD933407 23 CONTROL BOARD TOP COVER 1 CWH131467 24 INDICATOR HOLDER 1 CWD933406 25 CONTROL BOARD FRONT COVER 1 CWH13C1247 26 DI...

Page 128: ...1 CWG861497 51 SHOCK ABSORBER LEFT 1 CWG713386 52 SHOCK ABSORBER RIGHT 1 CWG713387 53 C C CASE 1 CWG569049 CWG569050 55 INSTALLATION INSTRUCTION 1 CWF615796 Note All parts are supplied from PAPAMY Mal...

Page 129: ...129 19 1 2 CS A18PKD CS A24PKD CS A28PKD Note The above exploded view is for the purpose of parts disassembly and replacement The non numbered parts are not kept as standard service parts...

Page 130: ...LLER COMPARATOR 1 CWA746653 O 21 LEAD WIRE PCB ECO 1 CWA67C9934 22 CONTROL BOARD CASING FOR PCB ECO 1 CWD933407A 23 CONTROL BOARD TOP COVER 1 CWH131467 24 INDICATOR HOLDER 1 CWD933406 25 CONTROL BOARD...

Page 131: ...WF615794 CWF615807 50 BAG 1 CWG861498 51 SHOCK ABSORBER 1 CWG713402 52 SHOCK ABSORBER 1 CWG713403 53 C C CASE 1 CWG569051 CWG569052 CWG569053 54 INSTALLATION INSTRUCTION 1 CWF615796 CWF615809 Note All...

Page 132: ...132 19 2 Outdoor Unit 19 2 1 CU A9PKD Note The above exploded view is for the purpose of parts disassembly and replacement The non numbered parts are not kept as standard service parts...

Page 133: ...133 19 2 2 CU A12PKD Note The above exploded view is for the purpose of parts disassembly and replacement The non numbered parts are not kept as standard service parts...

Page 134: ...51023 23 TERMINAL BOARD ASSY 1 CWA28C2267 CWA28C2286 O 24 CAPACITOR COMP 1 F0GAH306A004 DS401306CPNE O 25 HOLDER CAPACITOR 1 CWH301035 CWH30060 26 CAPACITOR FM 1 F0GAH205A009 O 27 CABINET SIDE PLATE L...

Page 135: ...SCRIPTION QTY CU A9PKD CU A12PKD REMARK 50 C C CASE 1 CWG568886 CWG568887 51 WIRE NET 1 CWD041057A CWD041111A Note All parts are supplied from PAPAMY Malaysia Vendor Code 00029488 O marked parts are r...

Page 136: ...136 19 2 3 CU A18PKD CU A24PKD Note The above exploded view is for the purpose of parts disassembly and replacement The non numbered parts are not kept as standard service parts...

Page 137: ...9 O 23 HOLDER CAPACITOR 1 CWH30060 24 TERMINAL BOARD ASSY 1 CWA28K1063J CWA28K1070J O 25 CABINET SIDE PLATE L 1 CWE041520A CWE041255A 26 HANDLE 1 CWE161010 27 CABINET SIDE PLATE CO 1 CWE041574A CWE041...

Page 138: ...138 19 2 4 CU A28PKD Note The above exploded view is for the purpose of parts disassembly and replacement The non numbered parts are not kept as standard service parts...

Page 139: ...WH102206 21 CAPACITOR FM 1 DS441355NPQA O 22 CAPACITOR COMP 1 CWA312088 O 23 HOLDER CAPACITOR 1 CWH30071 24 TERMINAL BOARD ASSY 1 CWA28K1058J O 25 CABINET SIDE PLATE L 1 CWE041082A 26 HANDLE 1 CWE1610...

Page 140: ...28PKD REMARK 50 SHOCK ABSORBER LEFT 1 CWG713124 51 C C CASE 1 CWG568890 52 TUBE ASS Y 1 CWT025826 Note All parts are supplied from PAPAMY Malaysia Vendor Code 00029488 O marked parts are recommended t...

Reviews: