background image

16 

-English-

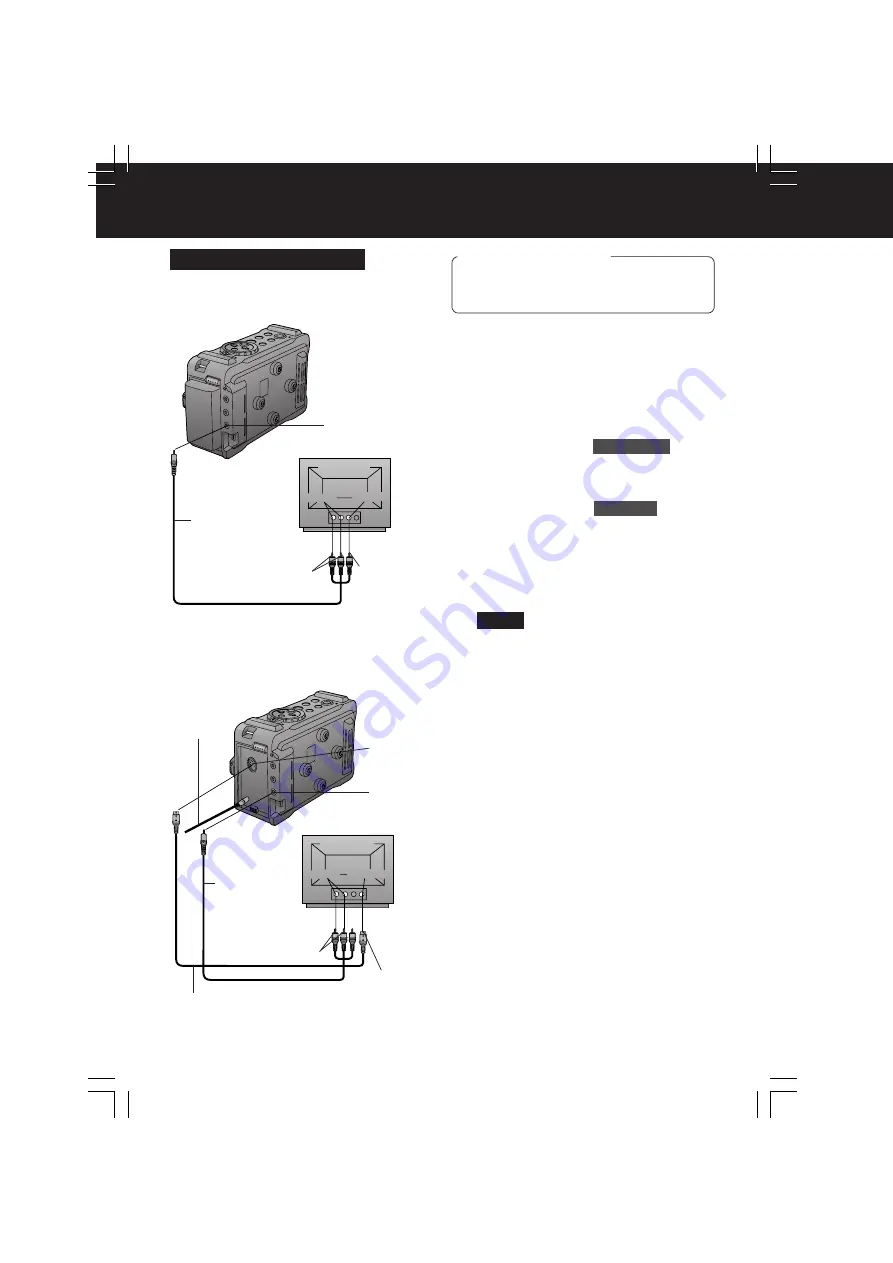
Back of TV

Audio In S-Video In

Back of TV

Audio In

Video In

To S-Video In

To Audio In

S-VIDEO
OUT

A/V Cable
(Supplied)

S-Video Cable
(Not supplied)

To Video In

To Audio In

A/V OUT

For best Chrominance and Luminance, use
the S-Video connection if available on your
TV.

A/V Cable
(Supplied)

[ TV with S-VIDEO IN Jacks ]

1

Set POWER to ON

 while pressing the

white button.

2

Press MENU

 to display the MAIN

MENU screen.

3

Press +/– 

to select 

REC MODE


, then

press SET

 to display the REC MODE

menu screen.

4

Press +/–

 to select 

AV JACK


in the

REC MODE menu. (Menu OSD: p. 29)

5

Press SET 

to select OUT/PHONES.

• Press MENU twice to exit.
• “DV IN” will appear on the screen.

(p. 32)

• Set LINE OUT: ON in the DISPLAY

menu to display the OSD screen on
your TV monitor.

6

Turn your TV ON and set it to LINE
INPUT or S-VIDEO.

Check your TV operating instructions
for further information.

7

Start playback.

• Make sure this unit and TV are turned off

while connecting.

• Please connect the A/V Cable securely.

A/V OUT

[ TV with AUDIO/VIDEO IN Jacks ]

Playback on your TV

Before you begin

• When using S-VIDEO Connector,

insert the DC Cable into the DC IN
Terminal. (p. 10)

DC Cable
(Supplied)

Note

Playback Your  Recordings

DV1DC.Eng13-18.p65

2003/02/28, 17:02

16

Summary of Contents for AG-DV1DC E

Page 1: ...odel No AG DC E Digital Video Cassette Recorder Operating Instructions Mini Before attempting to connect operate or adjust this product please read these instructions thoroughly DV1DC Eng1 5 p65 2003 02 28 17 02 1 ...

Page 2: ...d CAUTION Danger of explosion if battery is incorrectly replaced Replace only with the same or equivalent type recommended by the manufacturer Dispose of used batteries according to the manufacturer s instructions THE SOCKET OUTLET SHOULD BE INSTALLED NEAR THE EQUIPMENT AND SHOULD BE EASILY ACCESSIBLE As this equipment gets hot during use operate it in well ventilated place do not install this equ...

Page 3: ...d from your local Panasonic Dealer IF THE FITTED MOULDED PLUG IS UNSUITABLE FOR THE SOCKET OUTLET IN YOUR HOME THEN THE FUSE SHOULD BE REMOVED AND THE PLUG CUT OFF AND DISPOSED OF SAFELY THERE IS A DANGER OF SEVERE ELECTRICAL SHOCK IF THE CUT OFF PLUG IS INSERTED INTO ANY 13 AMP SOCKET If a new plug is to be fitted please observe the wiring code as shown below If in any doubt please consult a qual...

Page 4: ...ove the Battery Pack 9 Battery Care 10 Use AC Adaptor 10 Setting the Clock 11 Using the Menu 12 Playback Your Recordings Basic Playback 13 Connecting Earphone not supplied 13 Adjusting the Volume 14 To adjust the LCD BRIGHTNESS or COLOUR 14 COLOUR Mode 15 Playback on your TV 16 Special Effect Features Rapid Visual Search 17 STILL Picture 17 Blank Search 17 Fast Forward Rewind Check 18 Variable Spe...

Page 5: ...C MODE 29 PLAYBACK MODE 29 REMOTE 30 DISPLAY 30 LCD 30 DATE TIME SETTING 30 LCD Monitor Indications 31 Index of Controls 33 Index 35 Recording Features Basic Recording Basic Recording 19 Recording Features Audio Dubbing using the External Microphone or External Recording Source 20 Copying your Tapes to S VHS or VHS Cassette 22 Copying S VHS or VHS Cassette to your Tapes 23 Copying from Digital Equ...

Page 6: ...DE 811D with AC Cable and DC Cable 1 pc Battery Pack CGR D08 CGR D08R 1 pc A V Cable Accessories Before you begin Connect this unit to a power source pp 9 10 record tab 60 minutes 45 minutes SP LP 90 minutes 30 minutes Record Speed Playback time 80 minutes 120 minutes Use only those tapes having the Mini logo indicating the 6 35 mm digital standard Record Speed Playback Time Cassettes have a slidi...

Page 7: ...ssing the white button The POWER Lamp lights red 1 2 4 Insert a cassette record tab up window side facing out Make sure the record tab is closed p 6 5 Press PUSH CLOSE mark to close the Cassette Compartment Cover WARNING Do not lift or carry this unit by the LCD Monitor CAUTION To protect the VTR and tapes avoid use in dusty and dirty locations It is also recommended that the unit be used with the...

Page 8: ...OP to stop playback 180 90 1 Set POWER to ON while pressing the white button The POWER Lamp lights red Before you begin Charge the Battery p 9 4 Press PLAY to start playback Make a Recording 1 Set POWER to ON while pressing the white button The POWER Lamp lights red 2 Press REC to start recording 3 Press STOP to stop recording DV1DC Eng6 8 p65 2003 02 28 17 02 8 ...

Page 9: ...g of the CHARGE Lamp Charge the Battery within an ambient temperature range of 10 C and 30 C If charging is done in extreme low or high temperatures Battery charge time increases CHARGE Lamp flashes when The Battery is being charged but charging is taking longer than normal Charging is not possible Remove the Battery once wait a short time then re attach it for charging Note 1 Insert the Battery P...

Page 10: ...ses Safety precautions Do not place the Battery near or dispose of in fire Do not directly connect short circuit the positive and negative terminals Never attempt to disassemble or reassemble the Battery To avoid damage to the Battery Do not drop or jar the Battery Use the Battery with specified models only If the Battery is used in extremely high temperatures a safety device will automatically pr...

Page 11: ...to an item and correct A built in Battery maintains clock operation If this unit is not connected to a power source for a few months the built in battery may discharge and CLOCK BATTERY indication appears p 28 EXAMPLE When DATE TIME setting is completed press MENU twice to start the clock and exit 1MENU The date and time is calculated including leap year up to 31 12 2089 Note Set the Date and Time...

Page 12: ... screen 2 Press to select a menu item Displaying the MENU Before you begin Connect this unit to a power source pp 9 10 Set POWER to ON while pressing the white button 1 REC MODE To select REC SPEED AUDIO DUB AUDIO REC AV JACK or AUDIO SEL 2 PLAYBACK MODE To select COLOUR MODE AUDIO or B SEARCH 3 REMOTE To select CONTROL MODE or REMOTE MODE 4 DISPLAY To select DISPLAY LINE OUT C RESET DATE TIME or ...

Page 13: ...asic Playback You can playback your recording Note PHONE Jack Before you begin Connect this unit to a power source pp 9 10 Insert a recorded cassette When a tape recorded in LP mode on another digital video camera is played back on this unit the picture may appear mosaic Using the LCD monitor reduces battery operating time You can place this unit on a table etc for viewing Rotate the LCD Monitor 1...

Page 14: ...o increase the volume or press to decrease the volume LCD Monitor Built in Speaker 2 B SELECT 1 CMENU 2 ASET LCD Monitor APress SET to select LCD BRIGHTNESS or LCD COLOUR Menu OSD p 30 BHold down for more than 0 5 second to adjust CPress MENU twice to exit the menu 1 Press MENU to display the MAIN MENU screen 2 Press to select LCD then press SET to display the LCD screen Displaying the MENU Settin...

Page 15: ...BACK MODE menu Menu OSD p 29 BPress SET to select ON or OFF CPress MENU twice to exit the menu MONO will appear on the screen when selecting OFF 1 Press MENU to display the MAIN MENU screen 2 Press to select PLAYBACK MODE then press SET to display the PLAYBACK MODE menu screen Displaying the MENU Setting the COLOUR mode Playback Your Recordings DV1DC Eng13 18 p65 2003 02 28 17 02 15 ...

Page 16: ...s to select AV JACK in the REC MODE menu Menu OSD p 29 5 Press SET to select OUT PHONES Press MENU twice to exit DV IN will appear on the screen p 32 Set LINE OUT ON in the DISPLAY menu to display the OSD screen on your TV monitor 6 Turn your TV ON and set it to LINE INPUT or S VIDEO Check your TV operating instructions for further information 7 Start playback Make sure this unit and TV are turned...

Page 17: ...ert as follows STILL STOP after 3 minutes Note Rapid Visual Search STILL Picture 2PLAY 1 2PAUSE 1 Set POWER to ON while pressing the white button 2 Press MENU to display the MAIN MENU screen 3 Press to select PLAYBACK MODE then press SET to display the PLAYBACK MODE menu screen 4 Press to select B SEARCH in the PLAYBACK MODE menu Menu OSD p 29 5 Press SET to select ON BLANK will appear on the scre...

Page 18: ...ring the Variable Speed Search except 1X speed in forward direction mosaic like patterns will appear in the picture During the Variable Speed Search sound is muted Variable Speed Search Note Sound is muted during all special effects Note Frame Search 1 During Still mode press to advance or reverse the picture one frame at a time 1PLAY 1 AHold down FAST FORWARD SEARCH during fast forward BHold down...

Page 19: ... operating instructions for further information 8 Press REC to start recording The REC Lamp lights red 9 Press PAUSE to pause 10Press STOP to stop recording Basic Recording Before you begin Connect this unit to a power source pp 9 10 Insert a cassette with the record tab closed p 6 10STOP 8REC 1POWER 9PAUSE REC Lamp If left in Record Pause for 5 minutes this unit will automatically go into Stop mo...

Page 20: ...atically set to MIC 6 Press to select AUDIO SEL and then press SET to select MIC Go to step 7 on page 21 Before you begin Connect the external Microphone if used Connect this unit and the external recording source using the A V Cable if used Turn this unit on Insert a pre recorded tape to be dubbed Select 12 bit if you do not want the original sound to be completely replaced during an audio dub Wi...

Page 21: ...ack may occur In this case either move the mic farther away or turn the volume down p 14 If the tape position is in or was started in a blank section you cannot use the A DUB feature When a 16 bit recording is dubbed over the original audio of the recording will be erased When a 12 bit recording is dubbed over and played back and MIX is selected as the AUDIO both the original audio and the dubbed ...

Page 22: ... MENU screen 3 Press to select REC MODE then press SET to display the REC MODE menu screen 4 Press to select AV JACK then press SET to select OUT PHONES Press MENU twice to exit DV IN will appear on the screen 5 Press PLAY on this unit When the tape reaches the point from which you want to start dubbing press PAUSE 6 Place the VCR into REC PAUSE mode See VCR manual 7 Simultaneously press PAUSE on ...

Page 23: ...rces Connect this unit to a VCR as illustrated left Turn both units on Before using S VIDEO Connector insert the DC Cable into the DC IN Terminal p 10 CAUTION Unauthorised exchanging and or copying of copyrighted recordings may be copyright infringement Video Out S Video Out VHF Connecting Cable not supplied TV To View A V Cable Supplied To Audio Out To Video Out Source Playing VCR Rear To S Video...

Page 24: ...aying unit When the tape reaches the point from which you want to start dubbing press PAUSE 7 First place the target recording unit to play pause mode and then press REC to pause the tape at the starting point of the dub 8 Simultaneously press PAUSE on both units to begin dubbing 9 Press STOP on the recording unit and then press STOP on the playing unit to end dubbing CAUTION Unauthorised exchangi...

Page 25: ...Unit 4 screws Supplied Attachment Panel etc The REC LED lights up during REC Mode The REC LED flashes during REC PAUSE Mode The REC LED lights out during other modes When REC PAUSE switch is closed from open mode is changed Refer to Menu OSD p 30 Please consult your local dealer Note To Remote Terminal Wire Remote Controller ø2 5 Wire Remote Controller DV1DC Eng25 28 p65 2003 02 28 17 02 25 ...

Page 26: ...m Video Input Level 1 0 Vp p 75 ohm S Video Input Level Y Input 1 0 Vp p 75 ohm C Input 0 3 Vp p 75 ohm Audio 12 bit 32 kHz 4 tracks 16 bit 48 kHz 2 tracks Audio Output Level Line 10 dBV Output Impedance 1 kohm Load Impedance 10 kohm Audio Input Level Line 10 dBV Input Impedance 47 kohm Audio Input Level Mic 70 dBV Input Impedance 5600 ohm Mic sensitivity 50 dB LCD Monitor 88 9 mm 3 5 inch Liquid ...

Page 27: ...n and all function buttons PLAY FF REW etc are only operational after the tape has been completely loaded Tape Operations Caution Cleaning Care for Video Heads Clogged Video Head If you have a problem with your unit it may be something you can correct yourself Check the list below for symptoms and corrections No picture in the LCD Monitor Video cassette cannot be inserted Video cassette cannot be ...

Page 28: ...n When an AUDIO DUB is attempted on a pre recorded LP tape CANNOT REC LP MODE will appear for 5 seconds If excessive moisture condenses in the unit WARNING will flash DEW DETECTED will appear and this unit will automatically turn OFF in 15 seconds In this case wait until the indicator no longer flashes when your unit is turned ON again When a battery recharge is necessary WARNING will flash LOW BA...

Page 29: ...the 16 bit 48 kHz high quality mode AV JACK pp 16 19 24 To designate the A V terminal as IN or OUT AUDIO SEL pp 19 21 23 To select LINE or MIC as the sound input when recording AV JACK should be IN to select COLOUR MODE p 15 Select OFF to playback in black and white AUDIO p 21 To select the desired audio playback mode after performing audio dubbing in the 12 bit mode SP mode only ST1 The original ...

Page 30: ...D Monitor LINE OUT p 16 Set to ON to display the OSD screen on your TV monitor etc C RESET p 32 Setting to ON resets the counter to zero COUNTER should be LINEAR or MEMORY to select DATE TIME p 31 To select the desired type of display on the screen COUNTER p 32 To select LINEAR MEMORY or TC Time Code as the Counter indication LCD p 14 To display the menu for adjusting the LCD brightness and colour...

Page 31: ...bar appears when the volume of the built in speaker is being adjusted Date and Time Indication Menu OSD p 30 As shown right the date and time indication changes each time DATE TIME is selected from the unit s MENU Menu OSD p 30 30 minutes 60 minutes FULL EMPTY R0 30 R0 00 R1 00 R0 00 a b c d e LCD Monitor Indications a b c d f g f g e DATE TIME DATE OFF Tape Speed Indication Menu OSD p 29 Indicate...

Page 32: ...erms of hours minutes seconds and frames 25 frames 1 second This display cannot be reset IMPORTANT NOTE C RESET does not work when COUNTER is set to TC ON AUTO OFF Tape Mode Indications REC Recording REC Paused during recording Playback Still STOP STOP Frame Advance forward Frame Advance reverse FF Fast forward REW Rewind FF Search REW Search BLANK Blank Search A DUB Audio Dubbing A DUB Audio Dubb...

Page 33: ...LAY pp 8 13 pp 11 12 VOLUME p 14 SET pp 11 12 POWER ON OFF pp 7 8 Front View LCD Liquid Crystal Display Monitor pp 7 8 13 LCD OPEN pp 7 8 13 DC IN Terminal p 10 External Microphone Jack p 20 Cassette Compartment Cover p 6 DV Input Output Connector p 24 S VIDEO Output Input Connector pp 16 19 22 23 TAPE EJECT pp 6 7 Remote Terminal p 25 REC Lamp p 19 BATT RELEASE pp 9 10 DV1DC Eng33 36 p65 2003 02 ...

Page 34: ...ex of Controls Tripod Receptacle Underside View Built in Speaker p 14 Side View VCR DC Output Connector p 10 CHARGE Lamp p 9 POWER Lamp pp 9 10 AC Power Cord pp 9 10 AC Adaptor DV1DC Eng33 36 p65 2003 02 28 17 03 34 ...

Page 35: ...Cassette Tape 6 DV Interface Cable 24 E Easy Cassette Eject 6 Erase Protection Tab 6 F Fast Forward Rewind Check 18 Frame Search 18 I Index of Controls 33 34 Information For Your Safety 2 3 L LCD Monitor Indications 31 32 M Memory Counter 32 MENU OSD 29 30 O On Screen Display OSD 28 P Playback on your TV 16 Q Quick Guide 7 8 R Rapid Visual Search 17 S SCREW Unit 6 25 Setting the Clock 11 Specifica...

Page 36: ...36 English Note DV1DC Eng33 36 p65 2003 02 28 17 03 36 ...

Reviews: