Chapter 2 Description of Parts
—
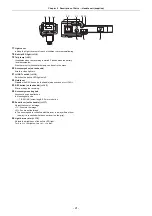
Handle unit (supplied)
- 21 -
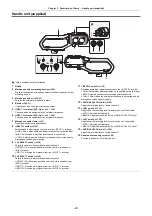
17
Light cover
≥
Keep the Light cover out of reach of children to prevent swallowing.
18
Built-in LED light (
19
Tally lamp (
51)
Illuminates when the recording is started. Flashes when the battery
level becomes low.
Whether or not to illuminate the lamp can be set in the menu.
20
Accessory shoe (on the handle)
Attach a video light, etc.
21
<LIGHT> switch (
Switches the built-in LED light on/off.
22
Hold lever
Disables the REC button (on the handle) when switched to <HOLD>.
23
REC button (on the handle) (
Starts or stops the recording.
24
Accessory mounting hole
Accessories can be attached.
≥
Mounting hole size
j
1/4-20 UNC (screw length 5.5 mm or shorter)
25
Zoom lever (on the handle) (
Adjust the zoom of an image.
<T>: Zooms in the image.
<W>: Zooms out the image.
≥
The zoom speed is controlled with this lever in a way different from
the way it is controlled with the zoom lever (on the grip).
26
Light dimmer dial (
Adjusts the brightness of the built-in LED light.
Turn to <
i
> to brighten, turn to <
j
> to dim.
26
25
24
21
20
22 23
17 18 19
Summary of Contents for AG-CX7
Page 8: ...Chapter 1 Overview Before using the unit read this chapter ...
Page 188: ...Chapter 10 Notes Maintenance of the unit or frequently asked questions are described ...
Page 199: ...Chapter 11 Specification This chapter describes the specifications of this product ...
Page 208: ... Panasonic Corporation 2020 Panasonic Corporation Web site http www panasonic com ...

