background image

Chapter 1   Overview 

 Before using the unit

- 10 -

Do not apply insecticide or volatile material to the camera.

The main unit may deform or the paint may peel off when insecticide or volatile material is applied.

Do not allow the camera to remain in contact with a rubber or vinyl object for a long period of time.

Disconnect the battery or disconnect the AC cable from the power outlet after the use.

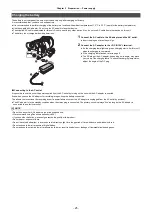
Battery characteristics

The battery is a rechargeable lithium-ion battery. It produces electrical energy via an internal chemical reaction. This chemical reaction is effected by the 
ambient temperature and humidity. The usable time of the battery becomes shorter when the temperature gets higher or lower. When used in an 
environment with extremely low temperature, it can only be used for approximately 5 minutes.
When the battery is in an extremely hot environment, its protective function will operate and the unit cannot be used temporarily.

After using the unit, be sure to remove the battery.

Securely remove the battery from the camera.
(Minute current is consumed even if the camera is turned off when the battery is left attached)
The battery will become over discharge and may become unusable even if it is recharged when the battery is left attached for long period of time.
Do not remove the battery when the power is turned on.
Turn off the power and remove the battery after the operation lamp goes completely out.

Take proper care of the battery terminal.

Do not allow dust or foreign objects on the battery terminal.
Confirm that the battery and its terminal section is not deformed when the battery is dropped by mistake.
Do not mount a deformed battery to the camera. This may damage the camera.

Cautions when throwing memory cards away or transferring them to others

Formatting memory cards or deleting data using the functions of the unit or a computer will merely change the file management information: it will not 
completely erase the data on the cards.
It is recommended to completely erase the data in following method when discarding/conveying.

Physically destroy the memory card itself

Completely erase the data in the memory card using a commercially available data erasing software for PC, etc.

Users are responsible for managing the data stored in their memory card.

LCD monitor and viewfinder

Condensation sometimes forms on the LCD panel of the LCD monitor in locations subject to extreme temperature differences. If this happens, wipe 
with a soft, dry cloth.

Do not touch the LCD monitor with your finger nails, or rub or press with strong force.

The LCD monitor will be slightly darker than normal immediately after the power is turned on when the camera is very cold. It will return to its regular 
brightness when the internal temperature increases.

The LCD monitor and viewfinder are managed with high precision so that at least 99.99% of the dots are effective pixels and 0.01% or less are invalid 
pixels and always lit. This is not a malfunction and it has no effect whatsoever on the recorded images.

It may become difficult to see or difficult to recognize the touch when a LCD protection sheet is affixed.

About Condensation (When the lens, the viewfinder or LCD Monitor is fogged up)

Condensation occurs when there is a change in temperature or humidity, such as when the unit is taken from outside or a cold room to a warm room. 
Please be careful, as it may cause the lens, the viewfinder or LCD monitor to become soiled, moldy, or damaged.
When taking the unit to a place which has a different temperature, if the unit is accustomed to the room temperature of the destination for about 1 hour, 
condensation can be prevented. (When the difference in temperature is severe, place the unit in a plastic bag or the like, remove air from the bag, and 
seal the bag.)
When condensation has occurred, remove the battery and/or the AC adaptor and leave the unit like that for about 1 hour. When the unit becomes 
accustomed to the surrounding temperature, fogginess will disappear naturally.

Caution regarding laser beams

The MOS sensor may be damaged if the MOS sensor is subjected to light from a laser beam.
Take sufficient care to prevent laser beams from striking the lens when shooting in an environment where laser devices are used.

Regarding system frequencies

You can change the system frequency (59.94 Hz/50.00 Hz) for this unit by using the menu. ([FREQUENCY]: 

l

 87)

When AVCHD clips are recorded, it is not possible to use the same memory card with different system frequencies. When the system frequency is 
changed, use a different memory card.

Note the following points.

If you prepare to record important images, always shoot some advance test footage to verify that both pictures and sound are being recorded normally.

Panasonic will not assume liability when video or audio recording fails due to a malfunction of the unit or the memory card during the use.

Set the calendar (datetime of the internal clock) and the time zone, or check the setting before recording. This will have an effect on the management of 
the recorded contents.

Summary of Contents for AG-CX7

Page 1: ...g Instructions Memory Card Camera Recorder Model No AG CX7 AG CX8 AG CX10 Please read these instructions carefully before using this product and save this manual for future use EN W0220SQ0 FJ DVQP2245ZA ENGLISH ...

Page 2: ...connecting device Install this unit so that the mains plug can be unplugged from the socket outlet immediately This unit is intended for use in moderate and tropical climates Warning Risk of fire explosion and burns Do not disassemble heat above 60 oC or incinerate CAUTION Danger of explosion if battery is incorrectly replaced Replace only with the type recommended by the manufacturer When disposi...

Page 3: ...njury When this unit is turned on do not use it in direct contact with the skin for a long period of time When using this unit for a long period of time use a support such as a tripod Low temperature burns may result if any high temperature part of this unit or hot air from the ventilation openings on the front side of the hand strap of this unit is in direct contact with the skin for a long perio...

Page 4: ...d with this product and to distribute that card to end users for a profit The end user mentioned here indicates a person or organization that handles contents for a personal use Software information about this product This product incorporates the following software 1 the software developed independently by or for Panasonic Corporation 2 the software owned by third party and licensed to Panasonic ...

Page 5: ...nce pages in this document are indicated by l 00 Terminology The battery pack is described as battery SDHC memory card and SDXC memory card are referred to as SD card unless distinguished otherwise A memory card with the microP2 logo is referred to as a microP2 card SD card and microP2 card are referred to as a memory card unless distinguished otherwise Images created with one recording operation ...

Page 6: ...en 55 Camera image screen 55 Thumbnail screen 55 Operation icon screen 55 Basic operation of the menu 56 Configuration of the menu 56 Displaying the menu 57 Operating the menu 58 Initializing the menu 59 Menu settings 60 THUMBNAIL menu 60 CAMERA menu 61 SCENE FILE menu 64 AUDIO menu 69 VIDEO OUT LCD VF menu 71 RECORDING menu 79 NETWORK menu 81 SYSTEM menu 87 OTHERS menu 88 Factory setting value of...

Page 7: ...ration by iPhone iPad or Android terminal 171 Chapter 9 Network Connection 172 Network connection 173 Available functions 173 About the wireless LAN function on this unit 173 Preparing for connection wired LAN CX10 174 Network settings 175 Wireless LAN settings 175 Wired LAN settings CX10 177 Specifying the network settings using the settings tool CX10 178 Confirming the network status 179 Connect...

Page 8: ...Chapter 1 Overview Before using the unit read this chapter ...

Page 9: ...h or low It can be charged but it may take a few hours to complete the charging normally Once normal charging starts the charging lamp lights up green However depending on the conditions of use even when normal charging is taking place the charging lamp may keep flashing in approx 4 second intervals until charging is completed Flashing with approx 0 5 second period on for approx 0 25 second off fo...

Page 10: ...re differences If this happens wipe with a soft dry cloth Do not touch the LCD monitor with your finger nails or rub or press with strong force The LCD monitor will be slightly darker than normal immediately after the power is turned on when the camera is very cold It will return to its regular brightness when the internal temperature increases The LCD monitor and viewfinder are managed with high ...

Page 11: ...tem where a PC is connected make sure that checking and cleaning of infection by computer virus and malicious program is performed periodically In order to prevent malicious attacks use the authentication system and change the default setting values by using 8 characters or more including 3 or more character types for the authentication information such as user name and password so that a third pa...

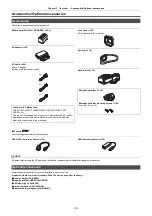
Page 12: ...d and packing materials after taking the product out Optional accessories Some optional accessories may not be available in some countries Product numbers correct as of January 2020 These may be subject to change Battery charger AG BRD50 Battery pack AG VBR59 VW VBD58 LED video light VW LED1E Stereo microphone VW VMS10E Unidirectional microphone AG MC200G Caution for AC Mains Lead FOR YOUR SAFETY ...

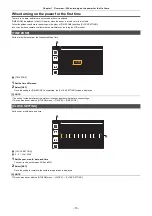
Page 13: ...the time difference from the Greenwich Mean Time A TIME ZONE 1 Set the time difference 2 Select SET Once the setting for TIME ZONE is completed the CLOCK SETTING screen is displayed NOTE 0 The setting for the date time of the main unit changes together with the time zone settings 0 This can also be set with the OTHERS menu CLOCK TIME ZONE CLOCK SETTING Set the year month date and time A CLOCK SETT...

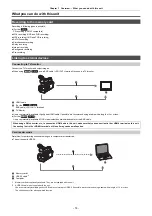
Page 14: ...e Use a commercially available 5C FB or equivalent double shielded cable for the BNC cable Card reader mode Data files for performing nonlinear editing on a computer are transferred The unit supports USB2 0 1 Memory cards are optionally available They are not supplied with the unit 2 A USB2 0 cable is not supplied with the unit Use a commercially available generic USB cable conforming to USB2 0 If...

Page 15: ...lable Connecting to HC ROP app You can remotely control this unit with the HC ROP app by connecting this unit with an iPhone iPad or Android terminal via wireless LAN Checking camera status Camera remote control focus zoom image quality settings recording control such as start end recording and time code user bits settings Menu Operations Starting and stopping streaming when the function is assign...

Page 16: ...Chapter 2 Description of Parts This chapter describes the names functions and operations of parts on the unit ...

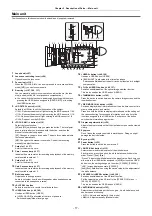
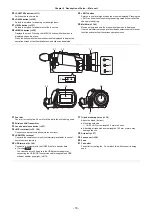
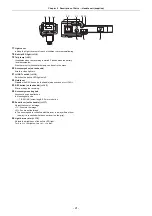
Page 17: ...AUGE is allocated at the time of purchase Switches display hide of level gauge 14 USER2 button l 46 108 Used as a USER button USER2 BACKLIGHT is allocated at the time of purchase Switches enable disable of the auto iris control function for backlight compensation 15 O I S USER3 button l 46 137 Switches enable disable of the optical image stabilizer function This is also used as the USER button USE...

Page 18: ...i manual function and select set the various operation icons 31 Fan inlet Fan inlet for cooling fan Do not block this while the unit is being used 32 Wireless LAN Transmitter 33 Lens hood release button l 27 34 MIC terminal l 32 124 Connect an external microphone stereo mini jack 35 REMOTE terminal Connects the remote control unit commercially available to control some functions remotely 36 USB te...

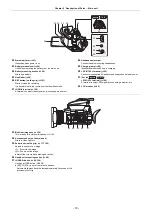
Page 19: ...ging 50 DC IN 12V terminal l 25 Connects the supplied AC adaptor and supplies an external power 51 For the SDI OUT terminal l 168 A terminal to output SDI signal by connecting a monitor etc 52 LCD monitor l 49 53 Built in microphone l 124 This is the built in stereo microphone L R 54 Accessory shoe on the main unit Attach a video light etc 55 Zoom lever on the grip l 117 152 Adjusts the zoom of an...

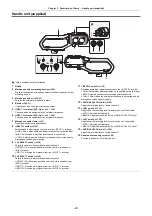
Page 20: ...T1 Records input signals from the INPUT 1 terminal 10 CH2 SELECT switch l 124 Selects the audio to be recorded on audio channel 2 INT MIC R Records right audio from the built in microphone or MIC terminal INPUT1 Records input signals from the INPUT 1 terminal INPUT2 Records input signals from the INPUT 2 terminal 11 INPUT2 switch l 125 Switches audio input signals connected to the INPUT 2 terminal...

Page 21: ...ht on off 22 Hold lever Disables the REC button on the handle when switched to HOLD 23 REC button on the handle l 103 Starts or stops the recording 24 Accessory mounting hole Accessories can be attached Mounting hole size j 1 4 20 UNC screw length 5 5 mm or shorter 25 Zoom lever on the handle l 117 Adjust the zoom of an image T Zooms in the image W Zooms out the image The zoom speed is controlled ...

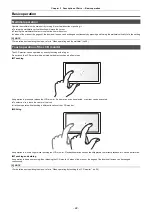
Page 22: ...tor can be operated by directly touching with a finger Do not touch the LCD monitor with a pointed hard object such as a ball point pen Touching An operation to press and release the LCD monitor An item or icon can be selected or an item can be executed To select an icon touch the center of the icon It will not operate while touching a different location of the LCD monitor Sliding An operation to ...

Page 23: ...Chapter 3 Preparation Before you use the unit attach the battery following the procedures in this chapter The attaching of accessories is also described in this chapter ...

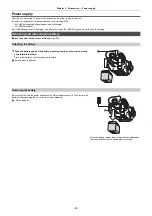
Page 24: ...g and removing the battery Press the power button to turn off the unit l 33 Attaching the battery 1 Push the battery against the battery mounting section on the main unit and slide forward to attach Press in the battery until it clicks and gets locked A Battery mounting section Removing the battery Be sure to hold down the power button until the status indicator goes off Then remove the battery wh...

Page 25: ...your view of the charging lamp To check the charging lamp status adjust the angle of the DC plug Connecting to the AC outlet It is possible to use this unit with power supplied from the AC outlet by turning on the unit with the AC adaptor connected Even when you use the AC adaptor for recording images keep the battery connected This allows you to continue the recording even if a power failure occu...

Page 26: ...us display may not be displayed depending on the setting in the menu 0 Repair or copy of the clip or update of the firmware is not possible when it is flashing in red Checking the remaining battery level with the battery The remaining battery level can be checked with the indicator display by pressing the CHECK button on the battery when it is not charging jThe remaining battery level is a rough i...

Page 27: ... the buckle section 3 Pull the end of the belt 4 Do up the button of the grip belt Attaching the lens hood Removing 1 While pressing the lens hood release button turn the lens hood in the direction of the arrow to remove it Attaching 1 Insert the lens hood into the unit Align the mounting marks on the lens hood and unit 2 Turn the lens hood clockwise Turn until the lens clicks and locks into place...

Page 28: ...e lens and lens cover 0 The lens cover may not open and close or the lens hood may not attach depending on the various filters and MC protectors mounted to the front lens of the unit Attaching the eye cup 1 Attach the eye cup by aligning the groove on the mounting part of the eye cup with the inner ridge of the eye cup The illustration below is an example of attaching the eye cup to use it with yo...

Page 29: ...mercially available screwdriver There will be some rubbing noises with the rubber when screwing in the microphone holder mounting screws but please ensure they are done up tightly 1 Microphone holder 2 Microphone holder mounting screws 3 Push the handle unit into the handle unit mounting section on the camera Match the positions of mounting mark A on the handle unit and mounting mark B on the came...

Page 30: ...ing the handle unit mounting screw down turn it in the direction indicated by arrow 2 until it stops How to remove Remove by doing the steps for attaching in reverse NOTE 0 Keep the microphone holder mounting screws out of reach of children to prevent swallowing ...

Page 31: ...s to the handle 1 Open the microphone holder 2 Attach the external microphone to the microphone holder then close the buckle to secure the external microphone Attach the fitting to the hook and close the buckle in the direction indicated by the arrow 3 Connect the microphone cable to the INPUT 1 terminal A 4 Attach the microphone cable to the microphone cable clamp B 5 Switch the INPUT1 switch to ...

Page 32: ...hoe A For details about how to attach the external microphone refer to the operating instructions for the external microphone 2 Connect the microphone cable to the MIC terminal Attaching a tripod The tripod mounting holes accept 1 4 20 UNC screws NOTE 0 Use a tripod in safe locations 0 The depth of the tripod mounting holes is 5 5 mm Do not over tighten the tripod screw when attaching the unit to ...

Page 33: ...ing the viewfinder does not turn on the unit Press the power button to turn on the unit jWhen the unit is originally purchased jWhen you have turned off the unit using the power button Charging the built in battery The date time set in the unit is maintained by the built in battery If this unit is left without turning the power on and then when you turn the power on and BACKUP BATT EMPTY is displa...

Page 34: ...uired 0 Due to the format specifications with AVCHD format the following time difference conversions are made for recording with the clip Time difference Region Time difference Region i0 00 Greenwich i0 30 j0 30 i1 00 Central Europe j1 00 Azores i1 30 j1 30 i2 00 Eastern Europe j2 00 Mid Atlantic i2 30 j2 30 i3 00 Moscow j3 00 Buenos Aires i3 30 Tehran j3 30 Newfoundland i4 00 Abu Dhabi j4 00 Hali...

Page 35: ...with the required Speed Class is used Speed Class and UHS Speed Class are the speed specification regarding continuous writing Check the display on the label and other information on the memory card Available for setting when using For the microP2 cards can be used with all of the recording formats Type of the memory card Recording capacity SDHC memory card 4 GB to 32 GB SDXC memory card 48 GB to ...

Page 36: ...an error has occurred Green slowly flashing No remaining recording capacity No recording capacity left on the memory card Only loading is possible Write protected The write protection switch of the memory card is set to the LOCK side Recording not possible It cannot record with the recording format that is currently set Change the recording format or use a memory card compatible with the recording...

Page 37: ...Do not touch the connecting terminal section at the rear of the memory card Avoid high temperature and humidity Avoid water droplets Avoid charging with electricity Use or store the memory card with the card inserted into the unit and with the slot cover closed Formatting the memory card Before recording with a memory card that is to be used for the first time in this unit format it All data will ...

Page 38: ...n the length of a clip reaches 10 hours and recording is automatically resumed after few seconds When the file format is MOV h is an abbreviation for hour and min for minute NOTE 0 With super slow recording the recording time changes depending on the frame rate of the REC FORMAT 0 File is split approximately every 3 hours for the data in MOV format These are displayed as separate clips in the thum...

Page 39: ...ever the clips recorded across 2 memory cards using the relay recording are displayed as separate clips 0 The recording is stopped once when the recording time reaches 10 hours and recording is automatically resumed after few seconds Image and audio during the pause will not be recorded This includes the case of special recording such as relay recording 0 Protection is automatically released on me...

Page 40: ... information of the final clip was recorded 6 Video data in MOV format UHD 3840 2160 29 97p MOV audio LPCM 7 Video data in MOV format FHD 1920 1080 59 94i MOV audio LPCM 8 Video data in MP4 format UHD 3840 2160 29 97p MP4 audio AAC 9 Video data in MP4 format FHD 1920 1080 59 94p MP4 audio AAC 10 Management file 1 11 Management file 2 12 Thumbnail of video data 13 Video data in AVCHD standard 00000...

Page 41: ...memory card j Be sure to format the memory card with a P2 device or P2 Viewer Plus Volume label of the memory card When the file format is MOV or MP4 The value set in the RECORDING menu CLIP NAME is stored in the volume label in the CAM INDEX i NEXT CARD COUNT format when the memory card is formatted Once it is stored NEXT CARD COUNT will increase by one The CARD COUNT that is stored is also used ...

Page 42: ...rded to a memory card Available for setting when using When multiple file formats are recorded to a single memory card the number will be less than that shown above About MOV MP4 folders The maximum number of folder and the folder number is 999 The recording is prohibited when it reaches 999 even if number in between is open The upper limit for the number of clips that can be recorded in a single ...

Page 43: ...le the counter value is being displayed you can reset the counter value by either pressing the USER button assigned to RESET or touching the USER button icon Either of the following settings can be set in the RECORDING menu REC COUNTER TOTAL Counting continues cumulatively until the counter value is reset The counter value will be maintained even if the memory card is replaced or the power is turn...

Page 44: ...RMAT The SYSTEM menu SUPER SLOW Setting the time code 1 Select the SYSTEM menu FREQUENCY 59 94Hz 50 00Hz 2 From the SYSTEM menu FILE FORMAT REC FORMAT select the recording format 3 Select the RECORDING menu TC UB DF NDF DF NDF 4 Select the RECORDING menu TC UB TC PRESET The TC PRESET screen is displayed 5 Set the time code You can reset the time code to 0 by either pressing the USER button assigne...

Page 45: ...eration of the time code generator will continue by the backup mechanism functioning even when replacing the battery The time code of the free run may shift when any item in the SYSTEM menu FREQUENCY FILE FORMAT or REC FORMAT is changed After turning on the power again with the power button check the time code and set again if necessary Time code in super slow recording The time code is fixed to R...

Page 46: ...tons A USER1 button B USER2 button C USER3 button D USER4 button E USER5 button F USER6 button icon G USER7 button icon H USER8 button icon I USER9 button icon J USER10 button icon K USER11 button icon L USER12 button icon USER button USER button icon Function USER button icon display USER1 button LEVEL GAUGE USER2 button BACKLIGHT USER3 button O I S USER4 button AE LEVEL USER5 button REC CHECK US...

Page 47: ...n that stops the background recording of card slot 2 Press and hold the USER button to which BACKGR PAUSE is assigned for approximately 5 seconds or touch and hold the USER button icon for approximately 5 seconds and release to stop background recording REC CHECK REC CHECK Automatically plays back the last approximately 3 seconds of the previously shot clip DEL LAST CLIP DEL LAST CLIP Deletes the ...

Page 48: ...splay l 164 SUPER SLOW SYSTEM menu SUPER SLOW LEVEL GAUGE VIDEO OUT LCD VF menu LEVEL GAUGE LEVEL GAUGE LCD VF DETAIL VIDEO OUT LCD VF menu FOCUS ASSIST DETAIL LOAD SETUP FILE OTHERS menu FILE SETUP FILE SD CARD LOAD LCD BACKLIGHT VIDEO OUT LCD VF menu LCD BACK LIGHT CARD READER MODE OTHERS menu USB DEVICE CARD READER MODE STREAMING START NETWORK menu STREAMING START REAR RING CAMERA menu SW MODE ...

Page 49: ...tting the following items in the VIDEO OUT LCD VF menu LCD you can adjust items such as brightness and contrast for the LCD monitor j BRIGHTNESS Adjusts the brightness j COLOR LEVEL Adjusts the density of the colors j CONTRAST Adjusts the contrast j RED TINT Adjusts the strength of red j BLUE TINT Adjusts the strength of blue The adjustments of the LCD monitor do not affect the images output or re...

Page 50: ...ng the diopter adjustment dial A NOTE 0 The image brightness and color hue seen on the viewfinder and LCD monitor may be different from that seen on a TV monitor The final check of the image should be done on a TV monitor Adjusting the viewfinder Adjusting brightness contrast color level redness and blueness By setting the following items in the VIDEO OUT LCD VF menu VF you can adjust items such a...

Page 51: ...hen the unit is in the following status j When the remaining recording capacity of the memory card or the remaining battery level is low one time per second j When the memory card has no more space to record 4 times per second j When a warning such as a system error or a recording abnormality has occurred 4 times per second NOTE 0 The tally lamp will not illuminate or flash when the OTHERS menu HA...

Page 52: ...Chapter 4 Operation This chapter describes how to operate the screen of this unit how to operate the menu the structure of the menu and details of the menu ...

Page 53: ...med For details about the thumbnail screen refer to Thumbnail operation l 145 DISP MODE CHK button Press while the camera image screen is displayed to switch display hide of most of the items Press the DISP MODE CHK button for 1 second or more while displaying the camera image screen to display the STATUS screen of the mode check Each setting and the status of the unit can be confirmed For details...

Page 54: ... operation of the DISP MODE CHK button in each screen of the mode check The screen will not switch to the camera image screen while the DISP MODE CHK button is pressed 0 The camera image is displayed in the operation icon screen and each screen for the mode check A Playback screen B Thumbnail screen C Clip information D Operation icon screen E Camera image screen F Mode check NETWORK screen G Mode...

Page 55: ...en status display l 158 Thumbnail screen Playback copy delete or protect of a clip can be performed For details about the thumbnail screen refer to Thumbnail operation l 145 Operation icon screen You can select the scene file or operate the functions assigned to USER6 through USER12 For details about the operation icon screen refer to Operation icon screen display l 141 ...

Page 56: ... setting regarding scene file This menu sets the detailed image quality adjustment of the camera video Also selection of the scene file writing the scene file data to the main unit memory and loading from the main unit memory can be performed This menu cannot be set when the thumbnail screen is displayed AUDIO menu Sets the input output function of audio VIDEO OUT LCD VF menu Configures the settin...

Page 57: ...ted These button icons are not available if they cannot be changed 2 Returns to one level higher from the current menu when selected 3 Menu Moves to one level lower from the current menu or to the setting screen when selected 4 Level display Displays the path of the menu to the currently displayed screen 5 SET Confirms the set value when selected NOTE 0 The menu displayed in gray characters cannot...

Page 58: ...is next level In some menus a screen to set the numeric value is displayed in the camera image screen Fig 2 In some menus a message is displayed if a menu cannot be executed Press the EXIT button to return to one level higher 3 Select the item to set 1 Turn the multidial to move the cursor to the item to set 2 Press the multidial A check mark is displayed at the left of the set item Fig 1 Press th...

Page 59: ...a message is displayed if a menu cannot be executed Touch to switch the pages The button icons cannot be touched if there are no more pages To return to one level higher touch 3 Select the item to set Touch the item to set A check mark is displayed at the left of the set item Fig 1 To return to one level higher touch 4 Exit from the menu by touching or pressing the MENU button Depending on the ope...

Page 60: ...LOT1 Displays only the clips recorded on the memory card in card slot 1 SLOT2 Displays only the clips recorded on the memory card in card slot 2 SAME FORMAT Displays only the clips recorded in the same format as the system format Clips recorded in the same format means that each item of FREQUENCY FILE FORMAT and REC FORMAT in the SYSTEM menu matches the current setting status ON Plays back from th...

Page 61: ...ssing the USER button switches ON OFF For details about optical image stabilizer refer to Optical image stabilizer function l 137 Factory setting ON HYBRID O I S Switches enable disable of the hybrid optical image stabilizer function For details about optical image stabilizer refer to Optical image stabilizer function l 137 Factory setting ON O I S MODE Switches the operation mode of the optical i...

Page 62: ...SET is set to VAR and you press the WHITE BAL button to switch to Preset The items that can be set are as follows 2000K 15000K Factory setting 3200K H ZOOM SPEED Sets the zoom speed of the handle zoom The items that can be set are as follows 1 7 Factory setting 4 i ZOOM When i ZOOM is set to ON you can zoom to a maximum of approximately 48 32 when recording with UHD while maintaining the beauty of...

Page 63: ...Factory setting FACE DETECT TRACKING AE AF USER SW Sets the function to assign to the USER1 to USER5 buttons or the USER6 to USER12 button icons For details refer to Assigning function to the USER buttons l 46 Following functions can be assigned to USER1 to USER12 INHIBIT AWB DRS FBC ONE PUSH AF S GAIN AREA ATW ATW LOCK SPOTLIGHT BACKLIGHT AE LEVEL Y GET O I S i ZOOM D ZOOM IR REC FAST ZOOM PRE RE...

Page 64: ...R6 Sets the function to assign to the USER6 button icon Factory setting AWB USER7 Sets the function to assign to the USER7 button icon Factory setting AREA USER8 Sets the function to assign to the USER8 button icon Factory setting FACE DETECT USER9 Sets the function to assign to the USER9 button icon Factory setting ZEBRA USER10 Sets the function to assign to the USER10 button icon Factory setting...

Page 65: ... gain strength of red for white balance Ach The items that can be set are as follows j30 i30 B GAIN AWB A Set the Bch gain strength of blue for white balance Ach The items that can be set are as follows j30 i30 R GAIN AWB B Set the Rch gain strength of red for white balance Bch The items that can be set are as follows j30 i30 B GAIN AWB B Set the Bch gain strength of blue for white balance Bch The...

Page 66: ...rs or under a halogen lamp NORMAL2 Displays more vivid color than NORMAL1 FLUO Displays the color suitable for shooting indoors under fluorescent light CINELIKE Displays the color suitable for shooting cinematic video STILL LIKE Expresses colors in a picture tone similar to that produced with a digital still camera SAT Corrects red color saturation PHASE Corrects the red hue SAT Corrects the color...

Page 67: ...ntermediate between blue and cyan SAT Corrects cyan color saturation PHASE Corrects the cyan hue SAT Corrects the color saturation between cyan and green PHASE Corrects the hue between cyan and green SAT Corrects green color saturation PHASE Corrects the green hue SAT Corrects the color saturation between green and the color which is intermediate between green and yellow PHASE Corrects the hue bet...

Page 68: ...amic range stretcher function By compressing the video signal levels of the high luminosity areas that are blown out in normal shooting the dynamic range can be expanded The items that can be set are as follows 1 3 NOTE 0 As the number increases the compression level of high luminosity areas increases and there will be more noise in dark areas HD Sets the gamma characteristics for HD High Definiti...

Page 69: ...ts the input level of the external microphone connected to the INPUT 1 terminal Enabled when the external microphone is connected and the INPUT1 switch is set to MIC or i48V The items that can be set are as follows j40dB j50dB j60dB Factory setting j50dB INPUT2 MIC LEVEL Sets the input level of the external microphone connected to the INPUT 2 terminal Enabled when the external microphone is connec...

Page 70: ...filter for audio channel 1 The items that can be set are as follows ON OFF Factory setting OFF CH2 MIC LOWCUT Switches enable disable of the lowcut filter for audio channel 2 The items that can be set are as follows ON OFF Factory setting OFF CH1 LIMITER Switches enable disable of the limiter when the method to adjust the audio input level for audio channel 1 is manual The items that can be set ar...

Page 71: ...t VIDEO OUT SEL Switches the output destination for images and audio Factory setting HDMI SDI OUT Set the VIDEO OUT LCD VF menu VIDEO OUT SEL to SDI OUT FORMAT Selects the signal to output from the SDI OUT terminal The items that can be selected differ depending on the SYSTEM menu FREQUENCY FILE FORMAT REC FORMAT setting Factory setting 1920 1080i NOTE 0 For the combinations that can be set refer ...

Page 72: ...he HDMI terminal l 157 HDMI TC OUT Sets if the time code information is output or not in the output from the HDMI terminal The items that can be set are as follows ON OFF Factory setting OFF HDMI REC REMOTE Sets if the recording operation against the external equipment connected to the HDMI terminal such as recorder is to be controlled or not This can be set when HDMI TC OUT in HDMI OUT is enabled...

Page 73: ...the LCD monitor backlight 0 is the standard brightness The items that can be set are as follows j1 0 1 2 Factory setting 0 RED TINT Finely adjusts the strength of red on the LCD monitor The items that can be set are as follows j10 i10 Factory setting 0 BLUE TINT Finely adjusts the strength of blue on the LCD monitor The items that can be set are as follows j10 i10 Factory setting 0 SELF SHOOT Sets...

Page 74: ...y hide of the status of the card slot and remaining recording capacity The items that can be set are as follows ON OFF Factory setting ON 2 SLOTS FUNC Switches display hide of the setting in the RECORDING menu 2 SLOTS FUNC The items that can be set are as follows ON OFF Factory setting ON STREAMING Switches display hide of the streaming status The items that can be set are as follows ON OFF Factor...

Page 75: ... The items that can be set are as follows ON OFF Factory setting ON DRS Switches whether to display when the dynamic range stretcher function is operating The items that can be set are as follows ON OFF Factory setting ON O I S Switches whether to display when the optical image stabilizer function is operating The items that can be set are as follows ON OFF Factory setting ON SCENE FILE Switches d...

Page 76: ...AT setting The date and time are not displayed when the time stamp function is enabled Factory setting OFF MULTI MANUAL Switches display hide of the multi manual function The items that can be set are as follows ON OFF Factory setting ON D ZOOM Switches display hide of digital zoom ratio The items that can be set are as follows ON OFF Factory setting ON IR REC Switches display hide of the settings...

Page 77: ...EXPAND VALUE Adjusts the enlargement factor of the enlarged display function The items that can be set are as follows 2 3 4 Factory setting 2 PEAKING LEVEL Sets the intensity of the peaking display The items that can be set are as follows LOW MID HIGH Factory setting MID PEAKING COLOR Sets the color of the peaking display The items that can be set are as follows RED GREEN WHITE Factory setting RED...

Page 78: ... items that can be set are as follows ON OFF Factory setting OFF WFM MODE Sets the display of the waveform monitor Displaying of the waveform and the vector can be switched Factory setting WAVE WFM TRANSPARENCE Sets the transmittance of the waveform monitor The items that can be set are as follows 0 25 50 Factory setting 25 MOMENT Press the USER button to which ZEBRA is assigned or touch the USER ...

Page 79: ...le names In the following cases the setting value in NEXT CARD COUNT is stored in the volume label of the memory card together with the CAM INDEX setting value as CARD COUNT Also the setting value will increase one after storing 001 returns after 999 When formatted the memory card When recorded to the memory card where CARD COUNT is not stored in the volume label The items that can be set are as f...

Page 80: ... SLOW ON is set 0 The setting is fixed to FREE RUN when the RECORDING menu PRE REC ON is set 0 The setting is fixed to FREE RUN when the RECORDING menu 2 SLOTS FUNC BACKGR REC is set 0 The setting is fixed to REC RUN when the RECORDING menu REC FUNCTION REC MODE INTERVAL is set DF NDF Sets the count method for the time code generator Enabled only when the frame rate of the SYSTEM menu REC FORMAT i...

Page 81: ...mote are not possible FRAME RATE Selects the image information such as frame rate of the camera USER Selects the user bits set in UB PRESET TIME Selects the local time hh mm ss DATE Selects the local date and time YY MM DD hh TC Records the time code value as user bits CLIP NAME Records the value that CAM INDEX one character and CARD COUNT 3 digit number both converted to ASCII character code Only...

Page 82: ...0 7M 1080 50 00p 1920 1080 50fps 24M 1920 1080 50fps 20M 1920 1080 50fps 16M 1280 720 50fps 14M 1280 720 50fps 8M 1280 720 50fps 3M 640 360 25fps 4M 640 360 25fps 1 5M 640 360 25fps 0 7M 320 180 25fps 4M 320 180 25fps 1 5M 320 180 25fps 0 5M Factory setting 640 360 25fps 0 7M P2 MOV AVCHD P2 AVCHD 1080 59 94i MOV 1080 59 94i or 1080 29 97p 1920 1080 30fps 14M 1920 1080 30fps 6M 1920 1080 30fps 1M ...

Page 83: ... 443 995 10669 10670 59000 to 61000 0 This unit is generally compatible with the RTSP protocol The URL for RTSP requests is as follows rtsp IP address stream 0 RTSP PORT settings are not possible in the following case j When the setting is other than the NETWORK menu STREAMING START TRIGGER RECEIVER MULTICAST ADDRESS Sets the address when using the streaming with the multicast Factory setting 239 ...

Page 84: ...ERTY TYPE DIRECT The items that can be set are as follows AUTO CH1 CH6 CH11 Factory setting AUTO FILE FORMAT REC FORMAT Items that can be set P2 MOV MP4 AVCHD 1080 59 94p 1920 1080 60fps 24M 1920 1080 60fps 16M 1920 1080 60fps 10M 1920 1080 60fps 8M 1280 720 60fps 14M 1280 720 60fps 10M 1280 720 60fps 6M Factory setting 1920 1080 60fps 10M 1080 50 00p 1920 1080 50fps 24M 1920 1080 50fps 16M 1920 1...

Page 85: ... If you do not use default gateway set to 0 0 0 0 0 Cannot be set when WLAN IPv4 SETTING DHCP CLIENT is selected 0 Disables the setting for the default gateway when WLAN PROPERTY TYPE DIRECT is selected PRIMARY DNS Sets the primary DNS server Factory setting 0 0 0 0 NOTE 0 Disables the setting for the primary DNS server when WLAN PROPERTY TYPE DIRECT is selected SECONDARY DNS Sets the secondary DN...

Page 86: ... 0 SECONDARY DNS Sets the secondary DNS server Factory setting 0 0 0 0 USB LAN IPv6 SETTING ENABLE DISABLE Sets whether to use IPv6 Factory setting DISABLE DHCP Sets whether to use automatic acquisition via DHCP Factory setting OFF IP ADDRESS Sets the IP address Factory setting PREFIX LENGTH Sets the prefix length of the subnet Factory setting 64 DEFAULT GATEWAY Sets the default gateway Factory se...

Page 87: ...itle set here is also displayed as the individual device name in the NDI HX compatible switcher SYSTEM menu Configure the settings regarding the recording format of video and audio FREQUENCY Sets the system frequency The items that can be set are as follows 59 94Hz 50 00Hz Factory setting 50 00Hz NOTE 0 The unit will restart when the setting is changed 0 When AVCHD clips are recorded it is not pos...

Page 88: ...080 59 94i 422ALL I 100M 1080 29 97p 422LongGOP 50M 1080 29 97p 422ALL I 100M 1080 23 98p 422LongGOP 50M 1080 23 98p 422ALL I 100M Factory setting 2160 59 94p HEVC LongGOP 200M MP4 2160 59 94p HEVC LongGOP 100M 2160 29 97p 420LongGOP 72M 2160 29 97p HEVC LongGOP 72M 2160 23 98p 420LongGOP 72M 2160 23 98p HEVC LongGOP 72M 1080 59 94p 420LongGOP 50M 1080 23 98p 420LongGOP 50M Factory setting 2160 59...

Page 89: ...card reader mode A computer or other device can be connected via USB to use as a card reader of the memory card The items that can be selected are as follows YES NO NOTE 0 When switched to card reader mode while using a battery the LCD monitor turns off after approximately 5 seconds The LCD monitor turns on when you perform the following operations j Turn the multidial up or down j Touch the LCD m...

Page 90: ...ERY AC or NETWORK is set to ON the power will not automatically turn off j While a memory card is being accessed during recording during playback while formatting the media etc j During pre recording j In card reader mode 0 In the following case even if BATTERY is set to ON the power will not automatically turn off j When using the AC adaptor 0 In the following cases the power will not automatical...

Page 91: ...ets the display language The items that can be selected are as follows Factory setting English MENU INITIALIZE Returns the setting value of the menu to the factory setting The unit is restarted after executing English English 中 文 Simplified Chinese ...

Page 92: ...IN OFFSET OFF OFF OFF OFF OFF OFF CHROMA LEVEL 0 0 i4 0 j10 j10 CHROMA PHASE 0 0 i5 0 0 0 MATRIX NORMAL1 FLUO NORMAL2 STILL LIKE CINELIKE CINELIKE COLOR CORRECTION R 0 0 0 0 0 0 R Mg 0 0 0 0 0 0 Mg 0 0 0 0 0 0 Mg Mg B 0 0 0 0 0 0 Mg B B 0 0 0 0 0 0 B 0 0 0 0 0 0 B B Cy 0 0 0 0 0 0 B Cy Cy 0 0 0 0 0 0 Cy 0 0 0 0 0 0 Cy G 0 0 0 0 0 0 G 0 0 0 0 0 0 G G Yl 0 0 0 0 0 0 G YI Yl 0 0 0 0 0 0 Yl 0 0 0 0 0 ...

Page 93: ...ERA menu Item SCENE SETUP INITIALIZE PLAYBACK CLIP SEL l RESUME PLAY l l CLIP PROTECT DELETE COPY REPAIR 1 INFORMATION DISPLAY DATA l l Item SCENE SETUP INITIALIZE SW MODE ZOOM RING l l IRIS RING l l SUPER GAIN l l AGC LIMIT l l O I S l l HYBRID O I S l l O I S MODE l l ATW l l ATW SPEED l l ATW TARGET R l l ATW TARGET B l l W BAL PRESET l l W BAL VAR l l H ZOOM SPEED l l i ZOOM l l REAR RING l l ...

Page 94: ... A l l R GAIN AWB B l l B GAIN AWB B l l AWB A GAIN OFFSET l l AWB B GAIN OFFSET l l CHROMA LEVEL l l CHROMA PHASE l l MATRIX l l COLOR CORRECTION R l l R Mg l l Mg l l Mg Mg B l l Mg B B l l B l l B B Cy l l B Cy Cy l l Cy l l Cy G l l G l l G G Yl l l G YI Yl l l Yl l l Yl Yl R l l Yl R R l l SKIN TONE DTL l l MASTER PED l l GAMMA MODE SEL l l BLACK GAMMA l l KNEE MODE l l DRS l l DRS EFFECT DEP...

Page 95: ...OWCUT l l CH1 LIMITER l l CH2 LIMITER l l MIC LIMITER LINK l l OUTPUT SETTINGS AUDIO OUT l l ALARM BATTERY END l l MEDIA END l l WARNING l l Item SCENE SETUP INITIALIZE VIDEO OUT SEL 2 l l SDI OUT 2 OUT FORMAT l l SDI AUDIO GAIN CHG l l SDI REC REMOTE l l SDI OUT CHAR l l SDI OUT ZEBRA l l HDMI OUT OUT FORMAT l l HDMI TC OUT l l HDMI REC REMOTE l l HDMI OUT CHAR l l HDMI OUT ZEBRA l l LCD BRIGHTNE...

Page 96: ...TER l l SHUTTER l l IRIS l l AE LEVEL l l ZOOM FOCUS l l WHITE BALANCE l l FACE DETECTION l l DATE TIME l l MULTI MANUAL l l D ZOOM l l IR REC l l PLAYBACK STATUS l l MARKER CENTER MARKER l l SAFETY MARKER l l FRAME MARKER l l FOCUS ASSIST FOCUS ASSIST SW l l EXPAND MODE l l EXPAND VALUE l l PEAKING LEVEL l l PEAKING COLOR l l DETAIL l l DETAIL LEVEL l l DETAIL FREQ l l EI ASSIST ZEBRA l l ZEBRA1 ...

Page 97: ...ENE SETUP INITIALIZE DEVICE SEL l l NETWORK FUNC l l IP REMOTE ENABLE DISABLE l l USER ACCOUNT l ACCOUNT LIST l STREAMING STREAMING FORMAT l l START TRIGGER l l CONNECTION INFO l l RECEIVER URL l l RTSP PORT l l MULTICAST ADDRESS l l MULTICAST PORT l l LOAD SD CARD SAVE SD CARD START l NDI HX 1 ACTIVATION STREAMING FORMAT l l MULTICAST l l MULTICAST ADDRESS l l MULTICAST PORT l l CLEAR ACTIVATION ...

Page 98: ... DNS l l INFORMATION STATUS UTILITY NETWORK INITIALIZE EASY IP SETTING 1 l EASY IP CAMERA TITLE 1 l l Item SCENE SETUP INITIALIZE FREQUENCY l l FILE FORMAT l l REC FORMAT l l SUPER SLOW l l Item SCENE SETUP INITIALIZE FILE SCENE FILE SD CARD SETUP FILE SD CARD SETUP FILE MEMORY SLOT FOR LOAD SAVE l l HANDLE TALLY LED l l CLOCK CLOCK SETTING TIME ZONE DATE FORMAT l l USB DEVICE CARD READER MODE SER...

Page 99: ...d to the memory card in card slot 1 Also the scene files saved in the memory card can be loaded Saving the scene file Saving the scene file into the main unit memory Saves the current setting value of the unit into the main unit memory 1 Select the SCENE FILE menu LOAD SAVE INITIALIZE SAVE 2 Select SET The file is saved Saving the scene file to the memory card The scene file can be overwritten to ...

Page 100: ... stored in the specified folder of the memory card in card slot 1 is displayed 2 Select the file name for the file to load 3 Selects if all of the scene files F1 to F6 are loaded or individually loaded To load all select ALL To load individually select the scene number to load 4 Select SET The file is loaded An error message may be displayed For details about the error message refer to Cases indic...

Page 101: ... 2 Select the file to overwrite from the list of setup files The file name entry screen and the keyboard are displayed Leave it as is when overwriting 3 Select Enter A confirmation screen is displayed 4 Select SET The file is saved Saving the setup file to the main unit memory Saves the current setting value of the unit into the main unit memory 1 Select the OTHERS menu FILE SETUP FILE MEMORY SAVE...

Page 102: ...Chapter 5 Shooting This chapter describes the basic procedure for recording This chapter also describes the special recording method ...

Page 103: ...t the brightness make adjustments to the iris the AE level and the ND filter l 107 To focus manually use the focus operation l 110 To adjust the white balance adjust the white balance and black balance l 113 To adjust the setting of the audio input and the recording level switch audio input l 124 NOTE 0 The settings made in manual mode are not maintained for the following settings when you switch ...

Page 104: ...ecording settings How to read a REC FORMAT setting The item names for recording formats indicate the resolution the frame rate the codec mode and the bit rate However bit rate is not included with some file formats For example When the recording format for file format MOV is 2160 59 94p HEVC LongGOP 200M The resolutions that can be set with this unit are as follows j2160 UHD 3840 2610 1080 FHD 192...

Page 105: ...29 97p 422LongGOP 150M 4 2 2 10 bit 2160 23 98p 420LongGOP 100M 4 2 0 8 bit 100 Mbps VBR 2160 23 98p HEVC LongGOP 150M 4 2 0 10 bit 150 Mbps VBR 2160 23 98p 422LongGOP 150M 4 2 2 10 bit 50 00Hz 2160 50 00p 420LongGOP 150M 4 2 0 8 bit 150 Mbps VBR 2160 50 00p HEVC LongGOP 200M 4 2 0 10 bit 200 Mbps VBR 2160 25 00p 420LongGOP 100M 4 2 0 8 bit 100 Mbps VBR 2160 25 00p HEVC LongGOP 150M 4 2 0 10 bit 1...

Page 106: ...OP 72M 4 2 0 8 bit 2160 23 98p HEVC LongGOP 72M 4 2 0 10 bit 50 00Hz 2160 50 00p HEVC LongGOP 100M 4 2 0 10 bit 100 Mbps VBR 2160 25 00p 420LongGOP 72M 4 2 0 8 bit 72 Mbps VBR 2160 25 00p HEVC LongGOP 72M 4 2 0 10 bit FHD 1920 1080 59 94Hz 1080 59 94p 420LongGOP 50M 4 2 0 8 bit 50 Mbps VBR 1080 23 98p 420LongGOP 50M 50 00Hz 1080 50 00p 420LongGOP 50M Codec Number of channels Number of quantizing b...

Page 107: ...sappears 4 Rotate the rear ring Iris value CLOSE F11 to F1 9 OPEN Value closer to CLOSE darken the image Value closer to OPEN brighten the image Setting with the multi manual function 1 Select the CAMERA menu SW MODE REAR RING ZOOM 2 Press the IRIS button to switch to manual iris mode The iris display is highlighted in orange 3 Turn the multidial to adjust then press the multidial The setting chan...

Page 108: ...e the gain value 0 When auto iris mode or auto shutter mode is enabled the brightness of the screen may not change even when you adjust the gain l 107 111 Super gain You can set super gain when recording in dark places 1 In CAMERA menu SW MODE SUPER GAIN select one of SUPER GAIN SUPER GAINi or ALL 2 Either press the USER button assigned to S GAIN or touch the USER button icon l 46 Gain switches to...

Page 109: ...ar ring is turned Setting with the multi manual function 1 Select the SCENE FILE menu AE LEVEL ON 2 Select the CAMERA menu SW MODE REAR RING ZOOM or IRIS 3 Switch one of iris gain or shutter speed to auto 4 Turn the multidial to display AE LEVEL 5 Press the multidial The AE level display is highlighted in orange 6 Turn the multidial to adjust then press the multidial The setting changes to the val...

Page 110: ...ely 10 cm and MF99 focal distance infinity The higher the number the further away the object is to be focused on Focal distance is the distance to the subject to be focused on NOTE 0 Since the auto focus control may not operate properly if there is a flicker select a shutter speed that is appropriate to the light 0 If you set the unit to auto focus mode at times other than 59 94i 50 00i and 59 94p...

Page 111: ...en when you adjust the shutter speed l 107 108 0 When the shutter speed has been set to slow shutter it may not be possible for the camera to keep up with changes in the images If this occurs set the iris focus and white balance manually Area mode function Touch the subject to apply various effects tailored to the subject that is touched Area auto focus function Adjusts the focus automatically tai...

Page 112: ...splayed in the area that is touched to apply the effects set in the menu 3 Press the USER button or the USER button icon again The area frame disappears and the unit exits the area mode function To display the USER button icon touch and hold the screen Adjusting the area size 1 Turn the multidial to display the AREA 2 Press the multidial 3 Turn the multidial to change the size of the area frame It...

Page 113: ...2 Set the gain value l 108 Normally set this to 0 dB If it is too dark set the gain to an appropriate value 3 Press the WHITE BAL button to switch to Ach Each time you press the button the white balance switches in the order Preset Ach Bch 4 Change the ND FILTER switch settings according to the light conditions For setting examples for the ND FILTER switch refer to Brightness adjustment l 110 5 Pl...

Page 114: ...in W BAL PRESET is displayed l 62 2 Either press the USER button assigned to AWB or touch the USER button icon to switch the white balance P 3200K P 5600K and VAR the value set in the CAMERA menu SW MODE W BAL VAR change in order When VAR is selected turning the multidial can set any white balance value between V 2000K and V 15000K A 1 2 or more of the screen width B 1 2 or more of the screen heig...

Page 115: ...ing conditions The auto tracking white balance function can be assigned to each of Ach Bch and Preset in white balance Set the function with the CAMERA menu SW MODE ATW Applications for the USER button Refer to page 46 for USER button settings NOTE 0 ATW is displayed on the camera image screen when the ATW function is enabled 0 LOCK is displayed on the camera image screen when the ATW LOCK functio...

Page 116: ...nds After adjustment of the black balance white balance is then adjusted and the black balance white balance adjustment values are memorized If white balance has been set elsewhere other than in Ach and Bch then only the black balance is adjusted Messages displayed in the viewfinder and LCD monitor NOTE 0 The content previously set is maintained in Ach or Bch Make the settings again if the lightin...

Page 117: ...uietly 0 When the zoom magnification is at its maximum the subjects are focused at about 1 2 m or more 0 When the zoom ratio is 1 the subjects are focused at about 10 cm or more 0 The units for the zoom ratio can be changed in the ZOOM FOCUS menu l 76 Using i ZOOM When i ZOOM is set to ON you can zoom to a maximum of approximately 48 32 when recording with UHD while maintaining the beauty of high ...

Page 118: ...l the end to zoom The zoom ratio display changes during fast zoom For example 99 NOTE 0 When the CAMERA menu SW MODE H ZOOM SPEED is set to 7 fast zoom can also be used by operating the zoom lever on the handle 0 As the operating noise of fast zoom will be louder than normal the operating noise may be recorded during recording If the operating noise is a problem disable FAST ZOOM 0 Auto focus may ...

Page 119: ...built in LED light is turned on do not look directly into the lighting part or get it near people s eyes 0 Using the built in LED light shortens the time for recording with the battery 0 When the built in LED light is turned on or the brightness of the built in LED light is changed with the light dimmer dial depending on the shooting conditions the auto tracking white balance function may not work...

Page 120: ...e factory settings Advanced settings Set with the SCENE FILE menu RB GAIN CONTROL SETTING When the white balance setting is Ach R GAIN AWB A Sets to add or reduce the intensity of the red color B GAIN AWB A Sets to add or reduce the intensity of the blue color When the white balance setting is Bch R GAIN AWB B Sets to add or reduce the intensity of the red color B GAIN AWB B Sets to add or reduce ...

Page 121: ... settings MASTER PED Sets the reference black level RGB also changes by changing this setting j makes the black color darker and i makes it less dark Advanced settings There are no setting items Gamma function This function optimizes the tone of images General settings GAMMA MODE SEL Selects a gamma mode from 8 types Advanced settings BLACK GAMMA Sets the gamma curve compression and expansion of d...

Page 122: ...es For example the flash band compensation function may operate under some recording environments such as when zooming in or out on a bright window It is recommended to use the function in recording environments where flashes are anticipated Note that due to the recording environment even when there are flashes you may not get sufficient results from the flash band compensation function NOTE 0 The...

Page 123: ...to 59 94Hz There is a slight gap between the displayed frame rate for Super Slow Recording and the actual frame rate at which Super Slow Recording is performed Although S SLOW120 is displayed on the screen the actual recording is performed at 119 88 fps 0 It is not possible to adjust the shutter speed to a value slower than the limit imposed by the frame rate used for Super Slow Recording Example ...

Page 124: ...r external microphone stereo mini jack 1 Set the CH1 SELECT switch to the INT MIC L position The audio signals from L of the built in microphone or the Lch of the external microphone connected to the MIC terminal are recorded to audio channel 1 2 Set the CH2 SELECT switch to the INT MIC R position The audio signals from R of the built in microphone or the Rch of the external microphone connected t...

Page 125: ... that does not support i48 V power supply set the INPUT1 INPUT2 switch to LINE or MIC If set to i48V this unit or the connected equipment may malfunction 0 If an abnormality occurs with the i48 V power supply the power of this unit will turn off 0 Using a phantom microphone shortens the battery time 0 When noise from unconnected terminals is bothersome set the INPUT1 INPUT2 switch to LINE Adjustin...

Page 126: ...d to this unit 1 Select the AUDIO menu MIC SETTING CH1 LEVEL CH2 LEVEL MANUAL 2 Adjust the recording level with AUDIO menu MIC SETTING CH1 LEVEL CONTROL CH2 LEVEL CONTROL The level increases as the number increases Audio is not recorded when set to MUTE NOTE 0 When the input level of audio exceeds 0 dB the level display exceeding 0 dB is displayed in red in the camera image screen and the audio le...

Page 127: ...the signal for audio channel 2 as monaural CH1 2 STEREO Outputs the signals of the audio channel 1 and the audio channel 2 as stereo CH1 2 MIX Mixes the signals of the audio channel 1 and the audio channel 2 and outputs as monaural NOTE 0 Adjust the volume of the headphones and built in speaker as follows j During recording volume is adjusted with the AUDIO MON multi manual function l 143 j During...

Page 128: ... The pre recording is canceled once when 3 hours has past without starting the recording 0 Pre recording cannot be performed if the remaining recording capacity of the memory card is less than 1 minute 0 Pre recording cannot be used in the following cases j When super slow recording is enabled j When background recording is enabled j When interval recording is enabled 0 For information about recor...

Page 129: ...mory cards is exhausted A slanted line is displayed in the SIMUL display when simultaneous recording is not possible To start the simultaneous recording again replace the memory card that has run out of the recording capacity with another memory card and then press the REC button When the REC button is pressed without replacing the memory card standard recording is performed to the memory card wit...

Page 130: ...han MOV j When SYSTEM menu REC FORMAT is UHD 0 The lighting status of the tally lamp 1 changes according to start or stop of recording on card slot 1 0 Time code is fixed to free run 0 Control of recording operation of the external equipment such as recorder connected to the SDI OUT terminal 2 and the HDMI terminal is linked to the start stop recording of the card slot 1 0 In the background record...

Page 131: ...repeat the operation of one frame recording at set time interval To stop recording press the REC button Set NORMAL in the RECORDING menu REC FUNCTION REC MODE to clear the setting NOTE 0 In the following cases REC MODE is fixed to NORMAL j When SYSTEM menu FILE FORMAT is set to MP4 or AVCHD j When SYSTEM menu SUPER SLOW is set to ON 0 The setting is cleared when the power is turned off 0 Audio is ...

Page 132: ...in the IR recording mode j IR is displayed on the camera image screen j Iris is automatically adjusted 2 Press the REC button IR recording is started NOTE 0 In the following case this cannot be set j When using the face detection tracking AE AF function 0 This can also be set with the CAMERA menu SW MODE IR REC 0 It is recommended to use a tripod 0 It takes longer to focus with Auto Focus in dark ...

Page 133: ...a pattern cannot be recorded 0 To record video with less overexposure manually adjust the shutter speed and brightness iris gain so that the zebra pattern is no longer displayed l 107 108 111 Displaying the marker Displaying the center marker A center marker can be displayed 1 Select the type of the center marker in the VIDEO OUT LCD VF menu MARKER CENTER MARKER The center marker is not displayed ...

Page 134: ... enabled Focus assist function The focus assist function enables you to focus the target easily The recording image on the LCD monitor and the viewfinder can be displayed enlarged or the focused area can be visually enhanced Enlarged display function Center of the recording image is displayed enlarged to make it easier to focus Using the enlarged display function Set so enable disable of the enlar...

Page 135: ...display part Peaking display The peaking display will outline the contour of the focused image in red green or white A Peaking display Displaying the peaking display Set so enable disable of peaking display can be switched with a USER button 1 Switch to manual mode with the AUTO MANU switch l 103 2 Press the FOCUS A M button to switch to manual focus mode l 110 3 Select VIDEO OUT LCD VF menu FOCUS...

Page 136: ... NOTE 0 In the following cases the focus assist function is canceled j Power is turned off j Switch to auto mode with the AUTO MANU switch j Press the FOCUS A M button to switch to auto focus mode j Settings in the VIDEO OUT LCD VF menu FOCUS ASSIST FOCUS ASSIST SW are changed 0 In the following cases the enlarged display function is canceled j When using the area mode function j When using the fa...

Page 137: ...n jPress the EXIT button jWhen it is no longer possible to track the touched subject The tracking frame flashes red then goes out after approximately 3 seconds The tracking mode continues if the subject is detected before the tracking frame goes out or if a different subject is touched NOTE 0 In the following cases it cannot be used j When set to manual mode j When set to digital zoom j When using...

Page 138: ...ing for a good balance of correction for large and small camera shake PAN TILT Specifies a setting appropriate for shooting that uses a lot of panning and tilting of the camera STABLE Specifies a setting appropriate for fixing a composition to shoot a subject NOTE 0 Stabilization may not be possible when the unit has a large amount of shake 0 When using a tripod disabling the optical image stabili...

Page 139: ...superimposed to the subject Therefore the peaking display of the focus assist function and zebra pattern detection are enabled also to the time stamp display The time stamp is also displayed horizontally inverted when set to the VIDEO OUT LCD VF menu LCD SELF SHOOT MIRROR When using the SDI OUT terminal can be used Waveform monitor function Waveform of the image can be displayed Assigning WFM to t...

Page 140: ...nge to light blue and then to white when the inclination of the unit is corrected It will indicate up to approximately 30 in horizontal direction and 30 in vertical direction 1 Select the VIDEO OUT LCD VF menu LEVEL GAUGE LEVEL GAUGE ON NOTE 0 The display of level gauge cannot be recorded 0 The level gauge is not displayed when the enlarged display function of the focus assist function is enabled ...

Page 141: ... cases j When the EXIT button is pressed j When anything other than the icon is touched j When the touch operation of the LCD monitor is not performed for approximately 5 seconds 1 Scene file 1 to 6 icon Either press the multidial with the cursor in position or touch the icon to select each of the scene files The name of each scene file is displayed on the second line of the icon 2 USER6 to USER12...

Page 142: ...orange 3 Press the multidial to end the settings A Multidial B EXIT button C Multi manual function Display of the camera image screen Function ICONS Displays the operation icon screen GAIN Sets the gain value l 108 SHUTTER Sets the shutter speed l 111 WB Sets the variable value for the white balance l 115 IRIS Sets the iris value l 107 AE LEVEL Sets the exposure compensation value l 109 AREA Adjus...

Page 143: ...ume during recording 1 Connect the headphones to the headphone terminal 2 Turn the multidial to display AUDIO MON 3 Press the multidial 4 Turn the multidial to adjust the volume There is no change to the sound that is actually recorded 5 Press the multidial The setting changes to the value displayed and exits Press the EXIT button to exit without changing the setting NOTE 0 If no operations are pe...

Page 144: ...apter 6 Playback Data including additional information such as image audio and meta data that are recorded by single shooting is saved as a clip Playback copy etc of the clip can be performed on the unit ...

Page 145: ...the recording file format and when even one MP4 clip is on any of the memory cards Displayed when P2 MOV or MP4 is selected as the recording file format and when even one AVCHD clip is on any of the memory cards CX7 CX8 CX10 CX10 CX10 フビパ ヒブパ フビパ ヒブパ ヶラュ ブペハペフ ヶラュ ブペハペフ ラユヷヤ ビパパ ラユヷヤ ビパパ ヶラュ ブペハペフ ヶラュ ブペハペフ フビパ ヒパパ フビパ ヒパパ ヶラュ ビペハペヘ ヶラュ ビペハペヘ ラユヷヤ ヒブパ ラユヷヤ ヒブパ ヶラュ ビペハペヘ ヶラュ ビペハペヘ フビビ ヒブパ フビビ ヒブパ ヶ...

Page 146: ...e unit such as standard violation 10 Page switching button Switches the page of the thumbnail screen Moves to previous page Moves to next page 11 Scroll bar Indicates which part of the whole thumbnail is currently being viewed NOTE 0 For the When P2 is selected as the recording file format a clip recorded over multiple memory cards is displayed as one clip Display of the clips in the thumbnail scr...

Page 147: ...ip cannot be played back with the unit because the system frequency is different etc 2 Thumbnail number 3 Protect status of the clip defective clip unknown clip incomplete clip This is displayed when the clip is protected This is displayed for a defective P2 clip that may be repaired This is displayed for a defective P2 clip that cannot be repaired This is displayed for a P2 clip with a different ...

Page 148: ...ber of clips it may take longer to copy the clips 0 The clip whose recording file format is MOV MP4 cannot be copied 0 The copy is not possible when the volume of the selected clip is larger than the available card capacity of the destination 0 It cannot copy when the copy destination card is write protected 0 The copy is not possible when the maximum number of the clips will exceed 0 The copy is ...

Page 149: ...if all clips were selected for deletion in Step 3 Protecting clips The clip recorded in MOV MP4 or AVCHD can be protected 1 Press the THUMBNAIL button The thumbnail screen is displayed 2 Press the MENU button while the thumbnail screen is displayed The menu is displayed 3 Select the THUMBNAIL menu CLIP PROTECT SELECT The thumbnail screen is displayed 4 Select the clip to protect in the thumbnail s...

Page 150: ...the THUMBNAIL button The thumbnail screen is displayed 2 Press the MENU button while the thumbnail screen is displayed The menu is displayed 3 Select the THUMBNAIL menu CLIP REPAIR 4 Select YES All the defective P2 clips that may be repaired in the thumbnail screen are repaired NOTE 0 Do not remove the memory card in the card slot that is flashing or do not remove the battery or the AC adaptor whe...

Page 151: ...stem format Clips recorded in the same format match the current settings for each item of the SYSTEM menu FREQUENCY FILE FORMAT REC FORMAT 7 Select the clip to play back is displayed on the clip that cannot be played back To play back the clip with displayed check the information of the clip with the clip information and try operating from the beginning again Playback from touch operations and ope...

Page 152: ...rrent playback position of the clip is at less than 3 seconds from the beginning The clip skips to the beginning of the current clip if the current playback position of the clip is at 3 seconds or more from the beginning Slow playback Touch and hold while paused is reverse slow playback When is touched slow playback is performed with continuous frame by frame playback When is touched playback retu...

Page 153: ...yed back the next time 1 Select the THUMBNAIL menu PLAYBACK RESUME PLAY ON When the playback of a clip is stopped midway L is displayed on the clip in the thumbnail screen NOTE 0 Resume playback is canceled in following cases The RESUME PLAY setting cannot be set to OFF j When the power is turned off j When the thumbnail screen is canceled by pressing the THUMBNAIL button j When the SYSTEM menu RE...

Page 154: ... scene to be recorded as a still image while playing back The still image is recorded in the memory card being played back It is convenient to use Pause Slow motion Playback and Frame by frame Playback NOTE 0 The playback will pause when a still image is recorded 0 Recorded still image cannot be displayed in thumbnail played back copied or deleted in the unit 0 INVALID is displayed when the still ...

Page 155: ...Chapter 7 Output and Screen Display This chapter describes the screen displayed on the output video and LCD monitor ...

Page 156: ...clips are changing over etc Item OUT FORMAT Output Format FREQUENCY REC FORMAT Resolution Frame rate 59 94Hz 3840 2160 59 94p 1920 1080p 1920 1080i 1920 1080 59 94p 4 2 2 10 bit 1920 1080 59 94i 4 2 2 10 bit 29 97p 1920 1080p 1920 1080PsF 1920 1080 29 97p 4 2 2 10 bit 1920 1080 29 97PsF 4 2 2 10 bit 23 98p 1920 1080p 1920 1080PsF 1920 1080 23 98p 4 2 2 10 bit 1920 1080 23 98PsF 4 2 2 10 bit 1920 1...

Page 157: ...0p 1 1920 1080i 3840 2160 59 94p 4 2 2 10 bit 3840 2160 59 94p 4 2 0 8 bit 1920 1080 59 94p 4 2 2 10 bit 1920 1080 59 94i 4 2 2 10 bit 29 97p 3840 2160p 1920 1080p 1 3840 2160 29 97p 4 2 2 10 bit 1920 1080 29 97p 4 2 2 10 bit 23 98p 3840 2160p 1920 1080p 1 3840 2160 23 98p 4 2 2 10 bit 1920 1080 23 98p 4 2 2 10 bit 1920 1080 59 94p 1920 1080p 1 1920 1080i 720 480p 2 1920 1080 59 94p 4 2 2 10 bit 1...

Page 158: ...as stopped 5 Recording status Displays the recording status of the memory card in card slot 1 or card slot 2 Not target for recording flashing flashing Recognizing the memory card The recording is stopped while the recording target memory card is inserted Recording Flashing red dot Flashing red dot Processing to stop the recording P P Recording is stopped with pre recording is enabled and the reco...

Page 159: ...ing even if each function is enabled RELAY When the relay recording is enabled SIMUL When the simultaneous recording is enabled BACKGR When the background recording is enabled No display During standard recording j For the When set to the NETWORK menu NETWORK FUNC NDI HX NDI HX is displayed 10 Flash band compensation function FBC Displayed when the flash band compensation function is operating 11 ...

Page 160: ...s in millimeter unit when set to mm feet or mm m Displays i when i ZOOM is enabled i is displayed with black and white inverted when i ZOOM is operating Z is displayed with black and white inverted when FAST ZOOM is enabled 25 System resolution system frequency Displays the system resolution and the system frequency set in the SYSTEM menu REC FORMAT 2160 59 94p 2160 50 00p 2160 29 97p 2160 25 00p ...

Page 161: ...me of the selected scene file 40 Area mode function face detection tracking AE AF function AREA Displayed when the area mode function is operating FACE Displayed when the face detection AE AF function is working TRACK Displayed when the tracking AE AF function is working 41 Waveform monitor Displays the video status in waveform or vector This is not output externally to the TV monitor View it on t...

Page 162: ...uring playback Stop Playback Pause Frame by frame rewind Frame by frame Fast forward playback 10 speed Fast forward playback 20 speed Fast reverse playback 10 speed Fast reverse playback 20 speed Slow playback Reverse slow playback 4 Still picture recording icon Touching the icon while playing back or while paused records the scene as a still picture 5 Direct playback bar Displays the general posi...

Page 163: ...amera image screen When the DISP MODE CHK button is pressed STATUS Playback screen 1 Time code l l l l 2 Frame rate l l 3 AUTO MANU switch l l 4 Message display area for stop of cooling fan l l l l 5 Recording status l l 1 l 6 Remaining recording capacity and status of the memory card l 2 l 7 External equipment recording operation control status SDI OUT HDMI terminal l l 8 Special recording functi...

Page 164: ...720p the signals output through the SDI OUT terminal VIDEO OUT CHAR Displays with ON OFF whether the characters output through the SDI OUT terminal are superimposed HDMI OUT VIDEO OUT FORMAT Displays with 3840 2160p 3840 2160p 420 8bit 1920 1080p 1920 1080i 1280 720p 720 480p 720 576p the signals output through the HDMI terminal VIDEO OUT CHAR Displays with ON OFF whether the characters output thr...

Page 165: ...ormat output from the headphone jack and the built in speaker Item Description USER SW 1 to 5 Displays the function assigned to USER1 through USER5 buttons OTHER ASSIGN S GAIN Displays the list of gain values assigned as a super gain WHITE BAL A Displays the setting status of the Ach of the white balance as either OK or NG Displays ATW when the auto tracking white balance function is assigned WHIT...

Page 166: ...Chapter 8 Connecting to External Devices This chapter describes the external devices that can be connected to the unit ...

Page 167: ...connected to the headphone terminal 3 5 mm diameter stereo mini jack NOTE 0 Audio is not output from the built in speaker when headphones are connected to the headphone terminal Remote control Connect the remote control unit commercially available to the REMOTE terminal 2 5 mm diameter super mini jack to operate some of the functions remotely A Headphone terminal A REMOTE terminal ...

Page 168: ...lly available 0 The SD resolution signal output from the HDMI terminal is output as a progressive signal 480P 576P 0 For the Use a commercially available 5C FB or equivalent double shielded cable for the BNC cable 0 Use a commercially available High Speed HDMI cable If possible we recommend using a cable with a length of 3 m or less 0 When this unit is connected to a TV monitor while displaying th...

Page 169: ...s not supplied with this unit Use a commercially available generic USB cable conforming to USB2 0 If possible we recommend using a cable with a length of 1 5 m or less 0 You cannot write data to the memory cards of this unit from a computer 0 When connecting the unit to a computer via USB ensure that no other device is connected to the computer via USB 0 Do not remove the memory card when connecti...

Page 170: ...reen indication of the unit The card 1 access lamp or card 2 access lamp flashes while this unit is being accessed Do not disconnect the USB cable battery or AC adaptor while the unit is being accessed If the screen does not change when the unit is operated while connected to a computer disconnect the battery and or AC adaptor wait approximately 1 minute reconnect the battery and or AC adaptor wai...

Page 171: ... Android terminal 171 Remote operation by iPhone iPad or Android terminal This unit can connect to wireless LAN devices via a network Some of the functions can be remotely operated by connecting the unit with iPhone iPad or Android terminal with the HC ROP app installed l 180 ...

Page 172: ...Chapter 9 Network Connection This chapter describes how to use the unit by connecting to a network ...

Page 173: ...r any purpose other than as a wireless LAN device Use of the wireless LAN function of this unit is presumed to be in countries where this unit is sold There is the risk that this unit violates the radiowave regulations if used in countries other than those where this unit is sold and Panasonic takes no responsibility for any violations There is the risk that data sent and received via radio waves ...

Page 174: ...802 11b IEEE802 11g or IEEE802 11n 0 This unit uses the 2 4 GHz frequency band You cannot establish a wireless LAN connection using the 5 GHz frequency band 0 When using a wireless access point we strongly recommend that you set a encryption to maintain information security 0 Depending on the signal status it may not be possible to connect to wireless LAN devices via a network 0 If the wireless LA...

Page 175: ...ating instruction of the iPhone iPad or Android terminal Factory setting 01234567890123456789abcdef 6 Close the menu or return to the level of the NETWORK menu 7 Check the network connection Once connected is displayed on the screen of the unit Setting items for WLAN PROPERTY and WLAN IPv4 SETTING when set to DIRECT When DIRECT is set the following menu settings are automatically set and cannot be...

Page 176: ...PERTY and WLAN IPv4 SETTING SSID enter the SSID of the wireless access point being connected to Setting is completed when the ENCRYPT KEY encryption key password is not set 5 If the ENCRYPT KEY is set enter the password and select Enter 6 Close the menu or return to the level of the NETWORK menu 7 Check the network connection Once connected is displayed on the screen of the unit Setting items for ...

Page 177: ... termination may take some time due to the restart of the network service after the setting is changed 0 All of the IP address subnet mask and default gateway must be correctly set For details contact the network administrator 0 Set 0 0 0 0 or when not using the default gateway or DNS However DNS cannot be disabled when DHCP is set to CLIENT 0 Depending on the network environment even if DHCP is s...

Page 178: ... When multiple units of this product are to be set up each unit needs to be configured If the settings cannot be specified using EASY IP Setup Software specify the settings of the unit in the NETWORK menu NOTE 0 EASY IP Setup Software can be used only when all of the following conditions are satisfied j The NETWORK menu DEVICE SEL USB LAN is set j The NETWORK menu UTILITY EASY IP SETTING is set to...

Page 179: ...s are complete Specify the settings again NOTE 0 The IP address assigned to the unit can be checked by clicking Search of EASY IP Setup Software when using the DHCP server 0 The unit does not support the IPv6 setting due to EASY IP Setup Software 0 Allow access to all of the ports for UDP when implementing a firewall including software 0 Some of the items cannot be set on this unit 0 View Camera S...

Page 180: ...tering with a keyboard Enabling the IP remote function 1 Select the NETWORK menu IP REMOTE ENABLE DISABLE ENABLE Checking deleting user accounts 1 Select the NETWORK menu IP REMOTE ACCOUNT LIST The list of registered user accounts is displayed Proceed to Step 3 to only check user accounts 2 Select the user account to be deleted 3 When the confirmation message is displayed select SET 4 Select and e...

Page 181: ...ge Connecting to the HC ROP app Connect to the unit following the HC ROP app guide NOTE 0 The unit cannot connect with the HC ROP app while the menu or thumbnail screen is displayed 0 For details about operation of the HC ROP app refer to the help for the HC ROP app Operation while the HC ROP app is connected Operation of the unit that is connected The THUMBNAIL button cannot be used Recording and...

Page 182: ...UHD j Interval recording and background recording are disabled Settings when using the streaming function Available for setting when using SYSTEM menu NETWORK menu STREAMING FREQUENCY FILE FORMAT REC FORMAT STREAMING FORMAT 59 94Hz P2 1080 59 94p AVC G25 1920 1080 60fps 24M 1920 1080 60fps 20M 1920 1080 60fps 16M 1280 720 60fps 14M 1280 720 60fps 8M 1280 720 60fps 3M 640 360 30fps 4M 640 360 30fps...

Page 183: ... 50000 3 Specify the address of the unit and start streaming with the application software NOTE 0 Multicast cannot start streaming with the operation on the unit 0 For the Disable the LAN card not to be used when receiving the multicast image to be displayed on a computer with multiple LAN cards installed 50 00Hz P2 1080 50 00p AVC G25 1920 1080 50fps 24M 1920 1080 50fps 20M 1920 1080 50fps 16M 12...

Page 184: ... streaming Setting the destination for streaming in the menu of the unit 1 Select the NETWORK menu STREAMING CONNECTION INFO MEMORY 2 Enter the destination URL in the NETWORK menu STREAMING RECEIVER URL Enter the destination URL in following format j rtmp server URL port number path stream key j rtmps server URL port number path stream key NOTE 0 In general a parameter for the stream key is requir...

Page 185: ...C memory card for setting using the P2 Network Setting software The SDXC memory card created with this software can be used as the reference destination when loading into the unit s menu or when the NETWORK menu STREAMING CONNECTION INFO SD CARD is selected Setting procedure 1 Start the P2 Network Setting software 2 Select the Streaming tab RTMP tab 3 Enter the destination URL in STREAM DESTINATIO...

Page 186: ...menu UTILITY EASY IP SETTING is switched to UNLIMITED when the NDI HX function is enabled Settings when using the NDI HX function SYSTEM menu NETWORK menu NDI HX FREQUENCY FILE FORMAT REC FORMAT STREAMING FORMAT 59 94Hz P2 1080 59 94p AVC G25 1920 1080 60fps 24M 1920 1080 60fps 16M 1920 1080 60fps 10M Factory setting 1920 1080 60fps 8M 1280 720 60fps 14M 1280 720 60fps 10M 1280 720 60fps 6M MOV 10...

Page 187: ...TICAST PORT Set MULTICAST ADDRESS within following range IPv4 224 0 1 0 to 239 255 255 254 IPv6 Multicast address starting with FF Set MULTICAST PORT within the range of 1024 to 50000 NOTE 0 One that has added 1 to the end of the specified multicast address is also used for NDI HX 0 Disable the LAN card not to be used when receiving the multicast video to be displayed on a computer with multiple L...

Page 188: ...Chapter 10 Notes Maintenance of the unit or frequently asked questions are described ...

Page 189: ...sed this unit from Do not attempt to repair the unit by yourself Battery The battery gets exhausted quickly so is there any way to improve Charge the battery sufficiently The operating time becomes shorter in low temperature If the time is short after sufficient charging the battery life has expired Can the battery that was used in the previous models used VW VBD58 optional can be used It is recom...

Page 190: ...be played back is displayed on following clips jA clip shot with other device a clip edited by an editing software jCorrupted clip is displayed on the clip in the thumbnail screen for the clips with different system frequency Change the system frequency The clip with different recording file format P2 MOV MP4 AVCHD is not displayed in the thumbnail screen Change the recording file format The clip ...

Page 191: ...ack on another device In the following cases when multiple clips are played back in succession images may pause for a few seconds when changing between clips The smoothness of playback of successive clips depends on the device used for playback Depending on the device used for playback images may pause for a moment even when the following conditions do not apply When clips recorded successively th...

Page 192: ...d temperature of the unit will rise Therefore do not use the unit for a long period of time REC WARNING An error of the recording data has occurred during recording and the recording has stopped The tally lamp and all of the card access lamps orange flash 4 times each second and an alarm sounds Recording is stopped It has tried to record exceeding the maximum number of clips during recording The t...

Page 193: ... memory card FORMAT ERROR CARD SLOT 1 FORMAT ERROR CARD SLOT 2 A memory card with management information out of specifications has been inserted Include when the system frequency 59 94 Hz system or 50 00 Hz system for the AVCHD format of the memory card is different from the setting in the SYSTEM menu FREQUENCY Insert a memory card that can record The system frequency information for the AVCHD for...

Page 194: ...ANNOT BE COPIED The clip cannot be copied Copy the clips other than the corresponding clip CONTROL DATA ERROR HAS BEEN DETECTED SD CARD An error occurred in the management information of the memory card Restoring of the management information is performed automatically after this COPY FAILED PLEASE CHECK THE CARD The clip has failed to copy due to an error in the memory card Check the memory card ...

Page 195: ...d without inserting a memory card into card slot 1 Insert a memory card into card slot 1 Insert a card in slot 2 Copying was tried to be executed without inserting a memory card into card slot 2 Insert a memory card into card slot 2 REINSERT OR CHECK CARD SLOT 1 REINSERT OR CHECK CARD SLOT 2 It has tried to copy to an error card Check the memory card CANNOT COPY Copying was attempted while the sys...

Page 196: ...neously Meaning of the symbols used in the table are as follows jl Can be used simultaneously j Cannot be used simultaneously Recording function to additionally set Recording function that is set Pre recording Relay recording Simultaneous recording Interval recording Background recording Super slow recording Pre recording l l Relay recording l Simultaneous recording l l Interval recording l Backgr...

Page 197: ...ed by loading the downloaded file to the unit via the memory card Insert the memory card that stores the update file into card slot 1 and select the OTHERS menu INFORMATION UPDATE For update method refer to the support desk at the following website https pro av panasonic net en products ag cx10 index html 0 When updating the firmware use the AC adaptor or sufficiently charged battery 0 Do not turn...

Page 198: ...emperature is extremely high or low Storing in a place where there is heavy oil smoke or dust may lead to malfunctions due to rust on terminal connectors etc Do not let the battery terminal contact a metal object such as a necklace or hairpin Short circuit may occur between terminals and it may lead to heat generation Touching on a heated part may cause severe burns Store the battery with electric...

Page 199: ...Chapter 11 Specification This chapter describes the specifications of this product ...

Page 200: ...Chapter 11 Specification Dimensions 200 Dimensions Main unit When the handle unit is attached supplied 129 mm 257 mm 93 mm 129 mm 257 mm 159 mm ...

Page 201: ...GAIN is assigned to a USER button SUPER GAIN SUPER GAINi can be set Color temperature setting ATW ATW LOCK Ach Bch preset 3200 K preset 5600 K VAR 2000 K to 15000 K Shutter speed When the SYSTEM menu FREQUENCY 59 94Hz is set 59 94i 59 94p mode 1 60 sec 1 100 sec 1 120 sec 1 180 sec 1 250 sec 1 350 sec 1 500 sec 1 750 sec 1 1000 sec 1 1500 sec 1 2000 sec 1 3000 sec 1 4000 sec 1 8000 sec 29 97p mode...

Page 202: ...OV MP4 HEVC MP4 AVCHD P2 Recording format MOV 4 2 0 10bit UHD 3840 2160 HEVC LongGOP 200M Average approx 200 Mbps HEVC LongGOP 150M Average approx 150 Mbps MOV 4 2 0 8bit UHD 3840 2160 420LongGOP 150M Average approx 150 Mbps 420LongGOP 100M Average approx 100 Mbps MOV 4 2 2 10bit UHD 3840 2160 422LongGOP 150M Average approx 150 Mbps FHD 1920 1080 422LongGOP 100M Average approx 100 Mbps 422LongGOP ...

Page 203: ...Relay recording simultaneous recording background recording Still image recording Recording format JPEG DCF Exif2 2 Refer to page 154 for recording formats and the number of recording pixels Item Number of quantizing bits MOV 4 2 2 10bit 4 2 0 8bit 4 2 0 10bit HEVC MP4 4 2 0 8bit 4 2 0 10bit HEVC AVCHD 4 2 0 8bit P2 4 2 2 10bit Video compression format MOV MP4 H 264 MPEG 4 AVC High Profile H 265 M...

Page 204: ...n microphone Supports stereo microphone MIC terminal 3 5 mm diameter stereo mini jack 1 INPUT 1 INPUT 2 terminal When using the handle unit XLR 2 3 pin Input high impedance LINE MIC i48V Switched with INPUT1 INPUT2 switch LINE 4 dBu 0 dBu switched with menu MIC j40 dBu j50 dBu j60 dBu switched with menu Item SDI OUT terminal LPCM 2ch Gain switching 0 dB j6 dB j8 dB switched with menu HDMI terminal...

Page 205: ...onforms to IEEE802 3u 100BASE TX conforms to IEEE802 3 10BASE T Transfer speeds 1000 Mbps 100 Mbps 10 Mbps Connector shape RJ 45 8 plug connector Mass Approx 30 External dimensions W H D Approx 24 mm 14 5 mm 64 mm main unit only excluding cable parts Cable length Approx 140 mm Ambient operating temperature 0 C to 50 C Ambient operating humidity 5 to 90 relative humidity no condensation Power sourc...

Page 206: ...ion 137 Focus assist function 134 Frame marker 134 G Gain 108 Gamma function 121 H Handle unit Attachment 29 HC ROP app 181 Headphones 167 High speed shooting 123 I Interval recording 131 IR recording 132 Iris 107 K Knee function 121 L LCD monitor 49 Status display 158 Lens cover 28 Lens hood 27 Level gauge 140 M Manual focus 110 Matrix function 120 Memory card 35 Folder structure 40 Format 37 Ins...

Page 207: ... gain 108 Super slow 123 Switching screen 54 T Tally lamp 51 Thumbnail 145 Thumbnail screen 145 Time code 44 Time data 43 Time stamp function 139 Tripod 32 TV 168 U Update 197 Usage restriction 196 USB 169 User bits 43 USER buttons Assignment 46 Check 48 V Viewfinder 50 W Warning system 192 Waveform monitor function 139 White balance 113 Wireless LAN Direct connection 175 Wireless access point 176...

Page 208: ... Panasonic Corporation 2020 Panasonic Corporation Web site http www panasonic com ...

Reviews: