79
Troubleshooting (Basic)
Follow the instructions below when a problem has occurred. There is also an advanced
troubleshooting guide in the “Reference Manual”. For a software problem, refer to the software’s
instruction manual. If the problem persists, contact Panasonic Technical Support. You can also
check the computer’s status in the PC Information Viewer (
è
Reference Manual
“Checking
the Computer’s Usage Status”).
■
Starting Up
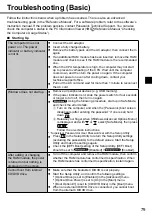
The computer does not
power on / The power
indicator or battery indicator
is not lit.
●
Connect the AC adaptor.
●
Insert a fully charged battery.
●
Remove the battery pack and the AC adaptor, then connect them
again.
●
If an additional RAM module has been inserted, remove the RAM
module and check to see if the RAM module is the recommended
one.
●
When the CPU temperature is high, the computer may not start
up to prevent overheating of the CPU. Wait until the computer
cools down, and then turn the power on again. If the computer
does not power on even after cooling down, contact your
technical support office.
●
Pull out the AC cord and wait for more than 1 minute to reconnect
the AC cord.
Windows does not start up.
●
Remove all peripheral devices (e.g. USB memory).
●
If the power indicator is lit, slide the power switch for four seconds
or longer to turn off, then turn on again.
●
Using the following procedure, start up in Safe Mode,
and check the error details.
A
Turn on the computer, and when the [Panasonic] boot screen
disappears (after entering the password
*1
if one is set) hold
down
F8
.
B
Release your finger when [Windows Advanced Options Menu]
is displayed, and with
or
, select [Safe Mode], then press
Enter
.
Follow the on-screen instructions.
*
1
Supervisor Password or User Password set with the Setup Utility
●
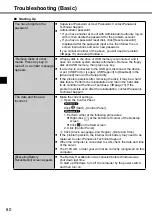
Press
F9
in the Setup Utility to return the Setup Utility settings
(excluding the passwords) to the default values. Start the Setup
Utility and make the settings again.
●
Check the [UEFI Boot] setting of the Setup Utility. [UEFI Boot]
should be set to
[Disabled] /
[Enabled].
After adding or changing
the RAM module, the power
is turned on but nothing is
displayed on the screen.
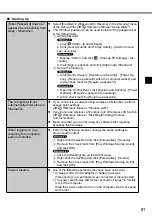
●
Turn off the computer and remove the RAM module, then confirm
whether the RAM module has conformed to specification. When
the RAM module has conformed to specification, install it again.
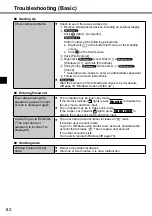
Cannot boot from internal
CD/DVD drive.
●
Make sure that the bootable CD/DVD is set properly.
●
Start the Setup Utility, and confirm the following settings.
•
[Optical Drive] is set to [Enabled] in the [Advanced] menu.
•
[Optical Drive Power] is set to [On] in the [Main] menu.
•
[Boot Option #1] is set to [CD/DVD Drive] in the [Boot] menu.
●
When an external CD/DVD drive is connected, you cannot boot
from the internal CD/DVD drive.
Summary of Contents for CF-NX4E/G
Page 2: ...2...
Page 3: ...3 1 AC 1...
Page 4: ...4 AC 100 V...
Page 5: ...5 2 2 CCU 3 15 cm 2 3 CCU...
Page 6: ...6 LAN 1000BASE T 100BASE TX 10BASE T IP AC AC AC AC AC...
Page 7: ...7 CD DVD 1 10 15...
Page 8: ...8 14 J 1 1 B VCCI B 2 J 2 3 J 1 1 53 J 1...
Page 14: ...14 K L Reference Manual CD DVD Drive M Reference Manual RAM Module N 15 O 22 N O K L M...
Page 16: ...16 21 AC AC 2 A 180 3 AC 6 AC AC LAN AC AC 4 A 12 12 4 10 AC A 2 3...
Page 23: ...23 A A A Bottom AC AC 1 WiDi LCD CPU RAM RAM 1 24...
Page 24: ...24 Reference Manual LAN Bluetooth LAN Bluetooth Windows S 3 L 1 5 S 4 L 1 8 Windows 1 L...
Page 31: ...31 17 32 64 OK OK CANCEL 30 45 Windows 18 40 19 17 20 21 Windows Update 22 TPM TPM 26...
Page 38: ...38 Q A Ctrl Shift Esc Alt Tab 4 A 1 2 B CD DVD CD DVD 20...
Page 39: ...39 1 2 3 1 4 1 5 6 7 6 8 9 10 11 1 2 3 3...
Page 47: ...47 22 J 1...
Page 96: ...96...
Page 97: ...97...
Page 98: ...LAN 1000BASE T 100BASE TX 10BASE T IP CD DVD 10 15 98...
Page 100: ...GB4943 1 2011 Pb Hg Cd CrVI PBB PBDE HDD ODD SJ T11364 GB T 26572 GB T 26572 42 Cs 1 100...
Page 102: ...15 Cs 1 35 Cs 1 CD DVD CD DVD 12 Cs 1 12 1 1 53 Cs 1 102...
Page 103: ...LAN CCU 1 1 CCU 22 103...
Page 106: ...106 N O K L M K L Reference Manual CD DVD Drive M RAM Reference Manual RAM Module N 107 O 113...
Page 108: ...108 2 A 180 3 LAN UPS 4 A 104 104 10 CD DVD A 2 3...
Page 113: ...113 5 C 35 C 20 C 60 C 30 80 30 90 CD DVD Correct Incorrect Incorrect A A A Bottom...
Page 115: ...115 A B C D B C E B C...
Page 116: ...116 A B Windows SD 1 Windows A B Windows C D 20 Windows 140 Windows 2 109 3 Windows...
Page 118: ...118 11 32bit 64bit OK OK CANCEL 12 YES Windows 13 OK 14 15 109 16 Setup Utility 17 Windows...
Page 121: ...121 21 Windows...
Page 127: ...127 PANASONIC A B C D E F 1 2 G H 8 C 19 100026 800 810 0781...
Page 132: ...132 ENERGY STAR ENERGY STAR Panasonic ENERGY STAR ENERGY STAR 22 Cs 1 1006 5 C 3 6 2015 5...
Page 135: ...135...
Page 136: ...AC AC AC AC AC AC AC AC DC AC AC AC AC AC AC AC AC AC AC AC 136...
Page 137: ...AC AC AC LAN 1000BASE T 100BASE TX 10BASE T IP AC AC AC AC AC CD DVD 10 15 137...
Page 140: ...LAN Bluetooth l l 26 Ct 1 58 Ct 1 15 Ct 1 56 Ct 1 140...
Page 144: ...144 N O K L M K L Reference Manual CD DVD Drive M RAM Reference Manual RAM Module N 145 O 152...
Page 146: ...146 2 A 180 LCD LCD 3 AC AC LAN AC AC AC AC UPS 4 A 142 142 AC CD DVD A 2 3...
Page 154: ...154 LCD LCD LCD A AC B C D B C E B C...
Page 165: ...165 CD DVD CD DVD 150...
Page 171: ...171 ENERGY STAR Panasonic Corporation ENERGY STAR Panasonic ENERGY STAR ENERGY STAR 22 Ct 1...
Page 174: ...174...
Page 175: ...AC AC AC AC AC AC AC AC DC AC AC AC AC AC AC AC AC AC 175...
Page 177: ...AC AC AC CD DVD 10 15 Panasonic 1 30 40 95 AC 177...
Page 184: ...184 N O K L M K L Reference Manual CD DVD Drive M RAM Reference Manual RAM Module N 185 O 191...
Page 186: ...186 2 A 180 LCD LCD 3 AC AC LAN AC AC AC AC UPS 4 A 182 182 4 10 AC CD DVD A 2 3...
Page 191: ...191 5 C 35 C 20 C 60 C 30 80 RH 30 90 RH LCD CD DVD Correct Incorrect Incorrect AC AC AC AC...
Page 194: ...194 A AC B C D B C E B C...
Page 209: ...209...
Page 215: ...215 ENERGY STAR Panasonic Corporation ENERGY STAR Panasonic ENERGY STAR ENERGY STAR 22 Th 1...


