


60
D. Go to Room A
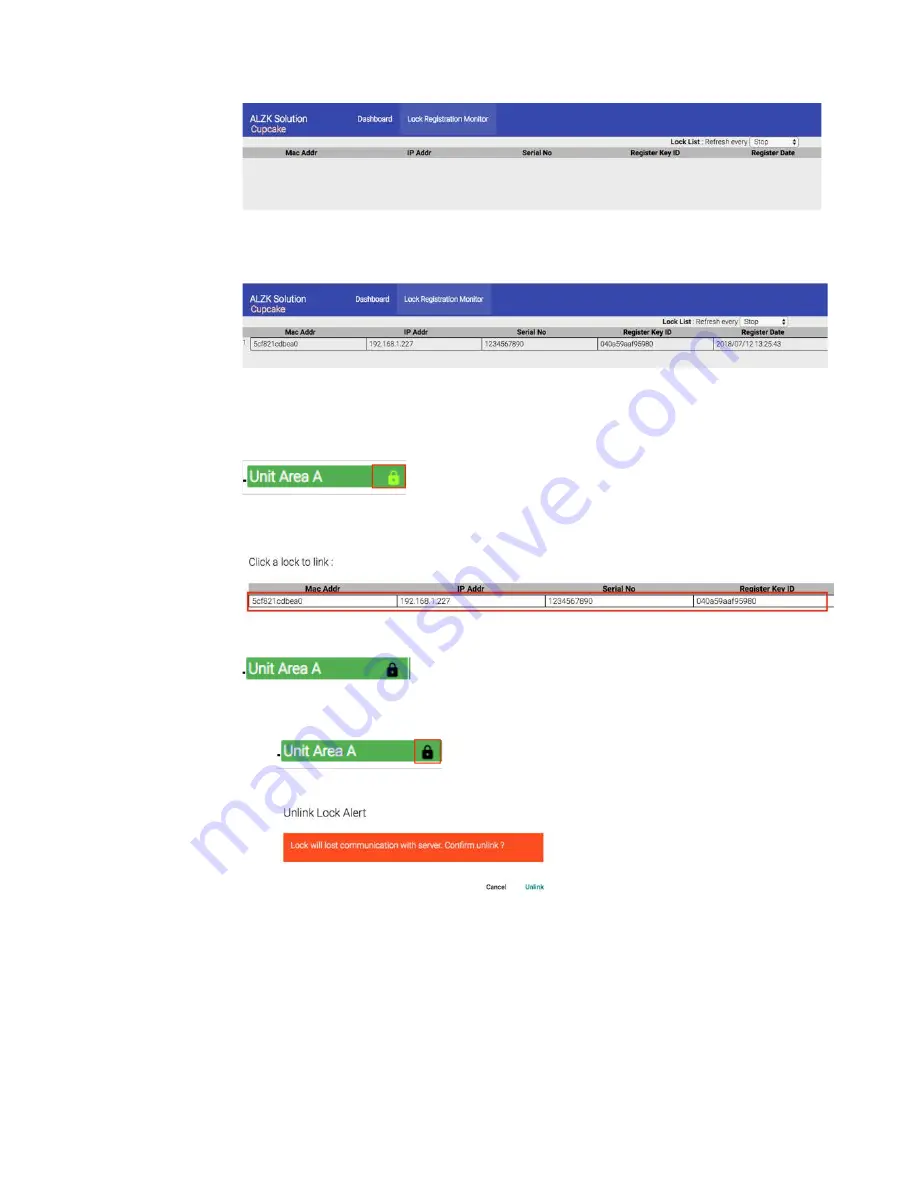
E. Scan programming card to the lock Lockplace A.
You will see the physical new lock connect to MF-Admin server.
F. Link physical lock on Room A to lockplace.
Click lock icon near Unit Area A.
A pop-up window will show up listing all the locks not linked yet. Click the one
you like to link.
G. Link the lock to
Room A
lockplace.
G.1. If you link to the wrong lockplace, Unlink and link again.
Click lockplace which you link to the wrong lockplace.
Click
Unlink
to unlink lock.
H. Repeat the steps D to G for Lockplace B,C,D,P and M
I. All set and all locks are ready for go-live phase.
Summary of Contents for Kapture KA-WR1S
Page 10: ...9 Front View Figure 3 Kapture KA WR1S Front Kapture KA WR1N Front...
Page 11: ...10 Back View Figure 4 Kapture KA WR1S Back Kapture KA WR1N Back...
Page 13: ...12 Basic Door Installation Figure 6 Kapture KA WR1S N Basic Door Installation...
Page 14: ...13 Basic Door Installation Wiring Figure 7 Kapture KA WR1S N Basic Door Installation Wiring...
Page 15: ...14 Solid State Output Figure 8 Kapture KA WR1S N Solid State Output...
Page 16: ...15 Surface Mounting Figure 9 Kapture KA WR1S N Surface Mounting...
Page 18: ...17 Dimensions Figure 11 Kapture KA WR1S Front Figure 12 Kapture KA WR1N Front...
Page 19: ...18 Back Figure 13 Kapture KA WR1S Back...
Page 20: ...19 Figure 14 Kapture KA WR1N Back...
Page 27: ...26 Product Photo Mark...
Page 28: ...27 Dimensions Mark...
Page 29: ...28 Installation Guide...
Page 32: ...31 Product Photo Mark...
Page 33: ...32 Dimensions Mark...
Page 34: ...33 Installation Guide D1 Installation Guide...
Page 37: ...36 Product Photo Mark...
Page 38: ...37 Dimensions Mark...
Page 39: ...38 Installation Guide...
Page 42: ...41 Product Photo Mark...
Page 43: ...42 Installation Guide...
Page 46: ...45 Product Photo Mark...
Page 47: ...46 Installation Guide...
Page 63: ...62 Place key card on reader first Click Read Key From Reader to get Key s UID...
Page 81: ...80 Place key card on reader first Click Read Key From Reader to get Key s UID...
Page 91: ...90 Check the box on Group Area M and click time control button to edit...
Page 93: ...92 Click Issue Write Key to issue the vendor key Place key card on reader first...
Page 99: ...98 Place key card on reader first Click Read Key From Reader to get Key s UID...
Page 118: ...117 Factory default settings Deadbolt Same as Wall Reader...
Page 119: ...118 Factory default settings Leverset Same as Wall Reader...
Page 120: ...119 Factory default settings Interconnect Same as Wall Reader...
Page 129: ...128 NCC Statement NCC Statement Taiwan Regulatory Information NCC...


