Pacific hydrostar 95156 Assembly And Operating Instructions Manual Download Page 15

Page 15

SKU 95156

For technical questions, please call 1-800-444-3353.
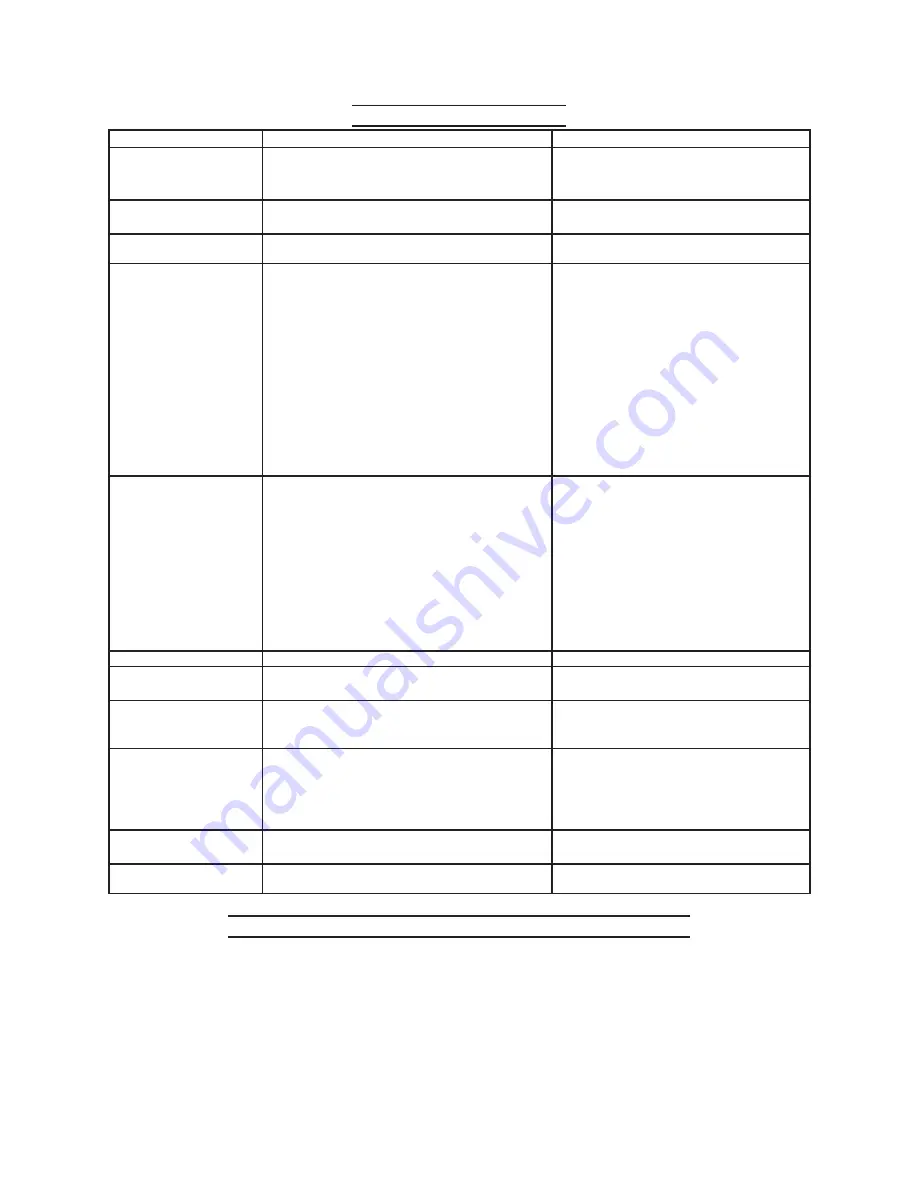
tROUblESHOOtInG

Problem

Possible cause

Possible Solution

Engine will not stop or 

start while operating.

Low oil shutdown.

1. 

Engine switch not in the “ON” position.

2. 

Pressure build-up in hose.

3. 

Fill engine with oil.

1. 

Turn switch “ON”.

2. 

Squeeze trigger.

3. 

Engine is overloaded.

Nozzle partially blocked.

1. 

Excessive pressure.

2. 

Clean nozzle.

1. 

Shorten the spring coil of the reflux valve.

2. 

Pressure increases when 

gun is closed.

Bypass valve blocked.

Clean the bypass valve.

Engine running but pump 

not building maximum 

pressure or has irregular 

pressure.

Faucet closed.

1. 

Unit has been stored in freezing temperatures.

2. 

Inadequate water supply.

3. 

Water inlet screen clogged.

4. 

Kink in garden hose.

5. 

Nozzle worn or damaged.

6. 

Air in pump.

7. 

Adjustable pressure knob not set to maximum 

8. 

position.
Suction or discharge valves clogged or worn 

9. 

out.
Bypass valve not operating effectively.

10. 

Open faucet.

1. 

Thaw out unit completely, including hose 

2. 

gun and wand.
Provide a minimum 4 GPM @ 20 PSI.

3. 

Clean screen.

4. 

Straighten hose.

5. 

Replace nozzle.

6. 

Let run with gun open and wand removed 

7. 

until steady stream of water is released.
Set to maximum position.

8. 

Clean the suction and discharge valves.

9. 

Clean the bypass valve.

10. 

No intake of chemicals.

Chemical hose not properly inserted into unit.

1. 

Tube cracked or split.

2. 

Wrong nozzle.

3. 

Injector turned off.

4. 

Axle of the inner aperture of the three-way cock 

5. 

is different.
Injection tube strainer clogged.

6. 

Nozzle blocked.

7. 

Dried chemicals injector.

8. 

Push firmly into injector.

1. 

Replace tube.

2. 

Switch to low pressure nozzle.

3. 

Turn collar counterclockwise.

4. 

Use a three-way cock with the imbibition 

5. 

system.
Clean strainer.

6. 

Clean nozzle.

7. 

Dissolve by running warm water through 

8. 

the injection tube.  

Trigger will not move.

Gun safety lock engaged.

Disengage safety lock.

Water in crankcase.

High humidity.

1. 

Worn seals.

2. 

Change oil more frequently.

1. 

Change the oil seal.

2. 

Noisy operation.

Worn bearings.

1. 

Air mixed with water.

2. 

Change the bearings.

1. 

Check inlet lines for restriction and/or 

2. 

proper size.

Rough/pulsating 

operation with pressure 

drop.

Inlet restriction.

1. 

Unloader faulty.

2. 

Air mixed in water.

3. 

Check system for stoppage, air leaks, 

1. 

properly sized inlet plumbing to pump.
Check unloader for proper operation.

2. 

Check inlet lines for restriction and/or 

3. 

proper size.

High crankcase 

temperatures.

Wrong grade of oil.

1. 

Improper amount of oil in crankcase.

2. 

Use recommended oil.

1. 

Adjust oil to proper amount.

2. 

Engine runs erratically.

Bad fuel.

Drain fuel tank.  Drain carburetor bowl.  Refill 

fuel tank with fresh fuel.

PlEASE REAd tHE FOllOWInG cAREFUlly

THE MANUFACTURER AND/OR DISTRIBUTOR HAS PROVIDED THE PARTS LIST AND ASSEMBLY DIAGRAM IN 

THIS MANUAL AS A REFERENCE TOOL ONLY.  NEITHER THE MANUFACTURER OR DISTRIBUTOR MAKES ANY 

REPRESENTATION OR WARRANTY OF ANY KIND TO THE BUYER THAT HE OR SHE IS QUALIFIED TO REPLACE 

ANY PARTS OF THE PRODUCT.  IN FACT, THE MANUFACTURER AND/OR DISTRIBUTOR EXPRESSLY STATES 

THAT ALL REPAIRS AND PARTS REPLACEMENTS SHOULD BE UNDERTAKEN BY CERTIFIED AND LICENSED 

TECHNICIANS, AND NOT BY THE BUYER.  THE BUYER ASSUMES ALL RISKS AND LIABILITY ARISING OUT OF 

HIS OR HER REPAIRS TO THE ORIGINAL PRODUCT OR REPLACEMENT PARTS THERETO, OR ARISING OUT 

OF HIS OR HER INSTALLATION OF REPLACEMENT PARTS THERETO.

Summary of Contents for 95156

Page 1: ...ovements actual product may differ slightly from the product described herein Distributed exclusively by Harbor Freight Tools 3491 Mission Oaks Blvd Camarillo CA 93011 Visit our website at http www ha...

Page 2: ...5W 40 SAE Oil Change Frequency Replace oil after first 20 hours of use then replace after every 6 months or 100 hours of use Automatic Low Oil Shutdown Yes Continuous Operating Time 1 5 Hours On Full...

Page 3: ...er Switch is in its OFF position before moving the Pressure Washer and before performing any service maintenance or cleaning procedures on the unit Remove adjusting keys or wrenches before turning the...

Page 4: ...nd Cleaning section of this manual Use of unauthorized parts or failure to follow maintenance instructions may create a risk of electric shock or injury SPECIFIC SAFETY RULES AND PRECAUTIONS Your warr...

Page 5: ...spills of fuel or oil occur they must be cleaned up immediately 3 Dis pose of fluids and cleaning materials as per any local state or federal codes and regulations Store oil rags in a covered metal co...

Page 6: ...not touch the Nozzle or water spray when operating the Spray Gun 2 Never point the Spray Gun at other people or animals Never tie knots in or kink the High Pressure Hose 3 To prevent accidental disch...

Page 7: ...e Frame using two Bolts 190 and two Nuts 191 See Assy Diagram Add Engine Oil IMPORTANT Prior to first using the Pressure Washer the Engine MUST be filled with a high quality 15W 40 SAE grade engine oi...

Page 8: ...UM indicator on the Oil Dipstick Do not exceed the MAXIMUM indicator mark on the Oil Dipstick See Figure A When finished adding engine oil carefully screw the Oil Dipstick 30 back into 4 the Dipstick...

Page 9: ...nly use chemicals compatible with the aluminum and brass parts of the Pres sure Washer Powdered detergents may clog the injection system Always use chemicals according the their manufacturer s directi...

Page 10: ...ped with four Spray Nozzles 200 each designed 1 for a specific use See Figure D 0 High pressure RED 2 The water stream discharged from this Nozzle 200 is very aggressive Use with extreme caution to pr...

Page 11: ...which may ignite the dust or fumes Make sure the Pressure Washer is located on a flat level sturdy surface ca pable of supporting the weight of the Pressure Washer and any additional tools and equipme...

Page 12: ...until the En 6 gine is turned off Note For optimal performance at high altitudes the carburetor can be adjusted by a qualified service technician Cleaning Techniques When cleaning with the Pressure Wa...

Page 13: ...wax by inserting the 7 Chemical Hose 204 into a container of liquid wax See Figure C Apply the wax sparingly in an even layer Apply to wet surfaces from the bottom 8 up for even distribution and to av...

Page 14: ...amount and type of oil Before each use 4 check the Air Cleaner Foam 116 for accumulated debris rocks and other objects that may clog the Air Inlet See Assy Diagram In cold weather 5 when if the Pressu...

Page 15: ...injector 1 Replace tube 2 Switch to low pressure nozzle 3 Turn collar counterclockwise 4 Use a three way cock with the imbibition 5 system Clean strainer 6 Clean nozzle 7 Dissolve by running warm wate...

Page 16: ...54 Float Chamber Gasket 1 55 Float Sub Assy 1 56 Needle Valve 1 57 Main Jet 1 58 Main Nozzle 2 59 Mixture Chamber Body 1 60 Choke Unit 2 Part Description Q ty 61 Choke Lever 1 62 Throttle Unit 1 63 Ai...

Page 17: ...Valve 3 155 Pump Cover 1 156 Screw M6 x 70 4 157 O Ring 12 4 x 1 8 x 1 1 158 Screw ZG 1 159 Support Sheet 1 160 Single Direction Valve Crest Pole 3 161 Spring 1 162 Single Direction Valve 3 Part Descr...

Page 18: ...18 SKU 95156 For technical questions please call 1 800 444 3353 ASSEMBLY DIAGRAM Note Some parts are listed and shown for illustration purposes only and are not available individually as replacement p...

Page 19: ...Page 19 SKU 95156 For technical questions please call 1 800 444 3353 ASSEMBLY DIAGRAM CONTINUED...

Page 20: ...Page 20 SKU 95156 For technical questions please call 1 800 444 3353 ASSEMBLY DIAGRAM CONTINUED 201 202...

Page 21: ...part has failed due to abuse neglect improper maintenance or unapproved modifications You are responsible for shipping your engine to a HFT warranty station as soon as a problem exists Contact the HFT...

Page 22: ...owner is responsible for commissioning a qualified technician mechanic to perform all required maintenance as outlined in the Inspection Cleaning and Maintenance section on page 17 of this manual 6 W...

Page 23: ...ntial damages so the above limitation of exclu sion may not apply to you This warranty is expressly in lieu of all other warranties express or implied including the warranties of mer chantability and...

Reviews: